DROPS Sky
DROPS Sky
74% Alpaca, 18% Polyamide, 8% Wool
from 5.40 € /50g
Get the yarn to make this pattern from 21.60€.

The yarn cost is calculated from the pattern’s smallest size and the yarn’s cheapest product type. Looking for an even better price? You might find it on the DROPS Deals!

DROPS SS24

Spring Renaissance Top

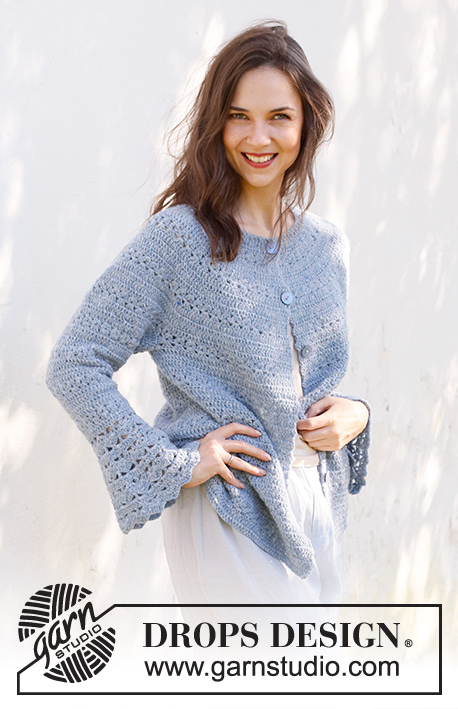
Crocheted jumper with short sleeves / t-shirt in DROPS Sky. Piece is crocheted top down with round yoke and lace pattern. Size: S - XXXL

DROPS 230-40
DROPS design: Pattern sk-166
Yarn group B
----------------------------------------------------------

SIZE:
S - M - L - XL - XXL – XXXL

MATERIALS:
DROPS SKY from Garnstudio (belongs to yarn group B)
200-250-250-300-300-350 g colour 13, light jeans blue

CROCHET HOOK:
DROPS CROCHET HOOK SIZE 4 mm.

CROCHET TENSION:
18 treble crochets in width and 9 rows vertically = 10 x 10 cm.
NOTE! Remember that hook size is only a suggestion. If you have too many stitches on 10 cm switch to larger hook. If you have too few stitches on 10 cm switch to smaller hook.

-------------------------------------------------------

Alternative Yarn – See how to change yarns here
Yarn Groups A to F – Use the same pattern and change the yarn here
Yarn usage using an alternative yarn – Use our yarn converter here

-------------------------------------------------------

DROPS Sky
DROPS Sky
74% Alpaca, 18% Polyamide, 8% Wool
from 5.40 € /50g
Get the yarn to make this pattern from 21.60€.

The yarn cost is calculated from the pattern’s smallest size and the yarn’s cheapest product type. Looking for an even better price? You might find it on the DROPS Deals!

Pattern instructions

----------------------------------------------------------

EXPLANATION FOR THE PATTERN:

----------------------------------------------------------

PATTERN:
See diagram A.1.

CHAIN STITCHES:
If you work at the end of crochet hook the chain stitch will often be too tight.
1 chain stitch should be just as long as 1 double crochet/treble crochet is wide.

CROCHET INFORMATION:
At beginning of every round with treble crochet work 3 chain stitches, these chain stitches do not replace first treble crochet. Finish round with 1 slip stitch in 3rd chain stitch at beginning of round.
At beginning of every round with double crochet work 1 chain stitch, this chain stitch does not replace first double crochet. Finish round with 1 slip stitch in first chain stitch at beginning of round.

INCREASE TIP:
Increase 1 treble crochet by working 2 treble crochets in same stitch.
To calculate how to increase evenly, use the total number of stitches on round (for example 108 stitches) and divide by number of increases to be done (e.g. 15 stitches) = 7.2.
In this example increase by working 2 treble crochets in approx. every 7th stitch.

DECREASE TIP:
Work 2 treble crochets together into 1 treble crochet as follows: *Make 1 yarn over, insert hook in next stitch, get yarn, make 1 yarn over and pull yarn through the 2 first loops on hook *, repeat from *-* 2 times in total, make 1 yarn over and pull yarn through all 3 loops on hook (= 1 stitch decreased).

CROCHET TIP:
Turn piece for every round worked. I.e. work every other round from right side and wrong side as follows:
Work first round from right side. Finish round with 1 slip stitch in 3rd chain stitch from beginning of round. Turn piece and work from wrong side of piece. Finish round with 1 slip stitch in 3rd chain stitch from beginning of round. Turn piece and work next round from right side of piece.
Continue back and forth like this.

----------------------------------------------------------

START THE PIECE HERE:

----------------------------------------------------------

JUMPER - SHORT OVERVIEW OF THE PIECE:
Work the neck edge and yoke in the round, top down. Now divide yoke for body and sleeves. Continue body and sleeves in the round separately.

YOKE:
Work 104-108-112-116-118-122 CHAIN STITCHES - read explanation above, on hook size 4 mm with DROPS Sky and form a ring with 1 slip stitch in first chain stitch worked.
Turn - read CROCHET TIPS and CROCHET INFORMATION and work first round as follows:
Work 1 treble crochet in every chain stitch = 104-108-112-116-118-122 treble crochets.
Work 1 row with 1 treble crochet in every treble crochet and increase 13-15-11-7-17-19 treble crochets evenly – read INCREASE TIP = 117-123-123-123-135-141 stitches.
Work A.1 in the round over all stitches.

Continue pattern and increase like this:
On every 3rd and 5th round in A.1 increase 24-27-33-33-30-33 treble crochet evenly on every round (i.e. Increase 48-54-66-66-60-66 treble crochets in total on 1 repetition vertically). Repeat A.1 vertically. REMEMBER THE CROCHET TENSION!
Increase like this 5-5-5-6-7-7 times in total = 237-258-288-321-345-372 stitches.

Repeat A.1 vertically until piece measures 20-22-23-25-27-29 cm, adjust so that next round is a row with only treble crochets. Now divide piece for body and sleeves as follows:
Work A.1 over 64-72-81-91-97-108 stitches, skip the next 54-57-63-69-75-78 stitches for sleeve and work 9 chain stitches under sleeve, work A.1 over 65-72-81-92-98-108 stitches, skip the next 54-57-63-69-75-78 stitches for sleeve and work 9 chain stitches under sleeve.

BODY:
= 147-162-180-201-213-234 stitches.
Continue pattern as before. Work A.1 over all stitches (i.e. work A.1 49-54-60-67-71-78 times in width).

When piece measures approx. 3 cm from division, decrease 3-6-6-9-6-6 treble crochets evenly on next row with treble crochets – read DECREASE TIP = 144-156-174-192-207-228 stitches.
When piece measures approx. 6 cm from division, decrease 3-6-6-9-6-6 treble crochets on next row with treble crochets = 141-150-168-183-201-222 stitches.
When piece measures approx. 8 cm from division, increase 6-9-9-9-9-9 treble crochets evenly on next row with treble crochets. Increase like this approx. every 5-6-7-7-5-5 cm 4-3-3-3-4-4 times in total = 165-177-195-210-237-258 stitches.
When piece measures 25-25-26-26-26-26 cm from division, adjust to finish with 1 row with treble crochets, fasten off. Jumper measures approx. 50-52-54-56-58-60 cm, measured from shoulder and down.

SLEEVES:
Work sleeve in the round back and round.
Now work over 54-57-63-69-75-78 stitches skipped for sleeve in one side as follows:
Work 1 double crochet in 5th chain stitch worked under sleeve. Work 3 chain stitches, then work A.1 over all stitches = 63-66-72-78-84-87 stitches.
When piece measures approx. 2 cm, adjust so that next round is a round with treble crochets, decrease 3 treble crochets evenly.
Decrease like this approx. every 3-3-3-2-2-2 cm 4-4-3-4-4-3 times in total = 51-54-63-66-72-78 stitches.
When sleeve measures 15-14-13-12-10-9 cm from division, fasten off.
Work the other sleeve the same way.

NECK EDGE:
Crochet an edge around the neck as follows:
Work 1 double crochet in every stitch at the top in the neck. Cut and fasten the yarn.

This pattern has been corrected.

Updated online: 09.05.2022
BODY:... When piece measures 25-25-26-26-26-26 cm from division, adjust to finish with 1 row with treble crochets, fasten off. Jumper measures approx. 50-52-54-56-58-60 cm, measured from shoulder and down.

Diagram

symbols = chain stitch - if you work at the end of crochet hook the chain stitch will often be too tight 1 chain stitch should be just as long as 1 double crochet/treble crochet is wide.
symbols = work 2 treble crochets together as follows: * Make 1 yarn over, insert hook in next stitch, get yarn, make 1 yarn over and pull yarn through the 2 first loops on hook *, repeat from *-* 2 times in total, make 1 yarn over and pull yarn through all 3 loops on hook
symbols = treble crochet in stitch below
symbols = treble crochet around chain stitch/chain space below
symbols = this round should not be worked, it has already been worked, it only shows how next row should be worked in stitch
diagram
Do you have a question? See a list of frequently asked questions (FAQ)

Knitting tension is what determines the final measurements of your work, and is usually measured per 10 x 10 cm. It is provided like so: number of stitches in width x number of rows in height - eg: 19 stitches x 26 rows = 10 x 10 cm.

The knitting tension is very individual; some people knit/crochet loosely while others work tightly. You adjust the knitting tension with the needle size, which is why the suggested needle size is only meant as a guide! You need to adjust this (up or down) to ensure that YOUR knitting tension matches the knitting tension provided in the pattern. If you work with a different knitting tension than provided you will have a different yarn consumption, and your work will have different measurements than what the pattern suggests.

The knitting tension also determines which yarns can replace each other. As long as you achieve the same knitting tension you can replace one yarn with another.

See DROPS lesson: How to measure your tension/gauge

See DROPS video: How to make a gauge tension swatch

The required amount of yarn is provided in grams, eg: 450 g. To calculate how many balls you’ll need you first need to know how many grams are in 1 ball (25g, 50g or 100g). This information is available if you click on the individual yarn quality on our pages. Divide the amount required with the amount of each ball. For example, if each ball is 50g (the most common amount), the calculation will be as follows: 450 / 50 = 9 balls.

The important thing when changing from one yarn to another is that the knitting/crochet tension remains the same. This is so that the measurements of the finished piece will be the same as on the sketch provided. It is easier to achieve the same knitting tension using yarns from the same yarn group. It is also possible to work with multiple strands of a thinner yarn to achieve the knitting tension of a thicker one. Please try our yarn converter. We recommend you to always work a test swatch.

Please NOTE: when changing yarn the garment might have a different look and feel to the garment in the photo, due to individual properties and qualities of each yarn.

See DROPS lesson: Can I use a different yarn than the one mentioned in the pattern?

All our yarns are categorised into yarn groups (from A to F) according to thickness and knitting tension – group A contains the thinnest yarns and group F the thickest. This makes it easier for you to find alternative yarns to our patterns, should you wish to switch yarn. All yarns within the same group have a similar knitting tension and can easily replace each other. However, different yarn qualities have different structures and properties which will give the finished work a unique look and feel.

Click here for an overview of the yarns in each yarn group

At the top of all our patterns you’ll find a link to our yarn calculator, which is a helpful tool should you wish to use a different yarn than suggested. By filling in the yarn quality you wish to replace, the amount (in your size) and number of strands, the calculator will present good alternative yarns with the same knitting tension. Additionally it will tell you how much you’ll require in the new qualities and whether you’ll need to work with multiple strands. Most skeins are 50g (some are 25g or 100g).

If the pattern is worked with multiple colours, every colour will have to be calculated separately. Similarly, if the pattern is worked with several strands of different yarns (for example 1 strand Alpaca and 1 strand Kid-Silk) you will have to find alternatives for each, individually.

Click here to see our yarn calculator

Since different yarns have different qualities and textures we have chosen to keep the original yarn in our patterns. However, you can easily find options among our available qualities by using our yarn calculator, or simply pick a yarn from the same yarn group.

It is possible that some retailers still have discontinued yarns in stock, or that someone has a few skeins at home that they would like to find patterns for.

The yarn calculator will provide both alternative yarn as well as required amount in the new quality.

If you think it's hard to decide what size to make, it can be a good idea to measure a garment you own already and like the size of. Then you can pick the size by comparing those measures with the ones available in the pattern's size chart.

You'll find the size chart at the bottom of the pattern.

See DROPS lesson: How to read size chart

The needle size provided in the pattern serves only as a guide, the important thing is to follow the knitting tension. And since knitting tension is very individual, you will have to adjust the needle size to ensure that YOUR tension is the same as in the pattern – maybe you’ll have to adjust 1, or even 2 needle sizes, up or down to achieve the correct tension. For this, we recommend that you work test swatches.

Should you work with a different knitting tension than the one provided, the measurements of the finished garment might deviate from the measurement sketch.

See DROPS lesson: How to measure your tension/gauge

See DROPS video: How to make a tension/gauge swatch

Working a garment top-down provides more flexibility and room for personal adjustment. For example it is easier to try the garment on while working, as well as making adjustments to length of yoke and shoulder caps.

The instructions are carefully explaining every step, in the correct order. Diagrams are adjusted to the knitting direction and are worked as usual.

The diagram depicts all rows/rounds, and every stitch seen from the right side. It is read from bottom to top, from right to left. 1 square = 1 stitch.

When working back and forth, every other row is worked from the right side and every other row is worked from the wrong side. When working from the wrong side, the diagram will have to be worked reversed: from left to right, knit stitches are purled, purl stitches are knit etc.

When working in the round every round is worked from the right side and the diagram are worked from right to left on all rounds.

See DROPS lesson: How to read knitting diagrams

The diagram depicts all rows/rounds, and every stitch seen from the right side. It is worked from bottom to top, from right to left.

When working back and forth every other row is worked from the right side: from right to left and every other row is worked from the wrong side: from left to right.

When working in the round, every row in the diagram are worked from the right side, from right to left.

When working a circular diagram you start in the middle and work your way outwards, counter clockwise, row by row.

The rows usually start with a given number of chain stitches (equivalent to the height of the following stitch), this will either be depicted in the diagram or explained in the pattern.

See DROPS lesson: How to read crochet diagrams

Instructions for working several diagrams after each other on the same row/round, will often be written like so: “work A.1, A.2, A.3 a total of 0-0-2-3-4 times". This means you work A.1 once, then A.2 is worked once, and A.3 is repeated (in width) the number of times provided for your size – in this case like so: S = 0 times, M = 0 times, L=2 times, XL= 3 times and XXL = 4 times.

The diagrams are worked as usual: begin with the first row in A.1, then work the first row in A.2 etc.

See DROPS lesson: How to read knitting diagrams

See DROPS lesson: How to read crochet diagrams

The total width of the garment (from wrist-to-wrist) will be larger in the larger sizes, despite the actual sleeves being shorter. The larger sizes have longer sleeve caps and wider shoulders, so there will be a good fit in all sizes.

The measurement sketch/schematic drawing provides information regarding the full length of the garment. If it’s a jumper or a jacket the length is measured from the highest point on the shoulder closest to the neckline, and straight down to the bottom of the garment. It is NOT measured from the tip of shoulder. Similarly, the length of yoke is measured from the highest point on the shoulder and down to where yoke is split into body and sleeves.

On a jacket measures are never taken along bands, unless specifically stated. Always measure inside band stitches when measuring the length.

See DROPS lesson: How to read a schematic drawing

Diagrams are often repeated on the round or in height. 1 repeat is the diagram the way it appears in the pattern. If it says to work 5 repeats of A.1 in the round, then you work A.1 a total of 5 times after/next to each other in the round. If it says to work 2 repeats of A.1 vertically/in height you work the entire diagram once, then begin again at the start and work the entire diagram one more time.

Chain stitches are slightly narrower than other stitches and to avoid working the cast-on edge too tight, we simply chain more stitches to begin with. The stitch count will be adjusted on the following row to fit the pattern and measurement sketch.

The rib edge is more elastic and will contract slightly compared to, for example, stocking stitch. By increasing before the rib edge, you avoid a visible difference in width between the rib edge and the rest of the body.

It’s very easy to cast off too tightly, and by making yarn overs while casting off (and simultaneously casting these off) you avoid a too tight cast off edge.

See DROPS video: How to bind off with yarn overs (yo)

To achieve an even increase (or decrease) you can increase on, for example: every 3rd and 4th row alternately, like so: work 2 rows and increase on the 3rd row, work 3 rows and increase on the 4th. Repeat this until the increase is complete.

See DROPS lesson: Increase or decrease 1 st on every 3rd and 4th row alternately

Should you prefer to work in the round instead of back and forth, you may of course adjust the pattern. You’ll need to add steeks mid-front (usually 5 stitches), and follow the instructions. When you would normally turn and work from the wrong side, simply work across the steek and continue in the round. At the end you’ll cut the piece open, pick up stitches to work bands, and cover the cut edges.

See DROPS video: How to knit steeks and cut open

Should you prefer to work back and forth instead of in the round, you may of course adjust the pattern so you work the pieces separately and then assemble them at the end. Divide the stitches for the body in 2, add 1 edge stitch in each side (for sewing) and work the front and back pieces separately.

See DROPS lesson: Can I adapt a pattern for circular needles into straight needles?

Pattern repeats can vary slightly in the different sizes, in order to get the correct proportions. If you’re not working the exact same size as the garment in the photo, yours might deviate slightly. This has been carefully developed and adjusted so that the complete impression of the garment is the same in all sizes.

Make sure to follow instructions and diagrams for your size!

If you have found a pattern you like which is available in women’s size it’s not very difficult to convert it to men’s size. The biggest difference will be the length of sleeves and body. Start working on the women size that you think would fit across the chest. The additional length will be worked right before you cast off for the armhole/sleeve cap. If the pattern is worked top-down you can add the length right after the armhole or before the first decrease on sleeve.

Regarding additional yarn amount, this will depend on how much length you add, but it is better with a skein too many than too few.

All yarns will have excess fibres (from production) that might come off as lint or shedding. Brushed yarns (ie hairier yarns) have more of these loose, excess fibres, causing more shedding.

Shedding also depends on what is worn under or over the garment, and whether this pulls at the yarn fibres. It’s therefore not possible to guarantee that there will be no shedding

Below are some tips on how to get the best result when working with hairier yarns:

1. When the garment is finished (before you wash it) shake it vigorously so the looser hairs come off. NOTE: do NOT use a lint roller, brush or any method that pulls at the yarn.

2. Place the garment in a plastic bag and put it in your freezer - the temperature will cause the fibres to become less attached to each other, and excess fibres will come off easier.

3. Leave in the freezer for a few hours before taking it out and shaking it again.

4. Wash the garment according to the instructions on the yarn label.

Pilling is a natural process that happens to even the most exclusive of fibers. It's a natural sign of wear and tear that is hard to avoid, and that is most visible in high friction areas of your garment like a sweater's arms and cuffs.

You can make your garment look as new by removing the pilling, using a fabric comb or a pill/lint remover.

Still can't find the answer you need? Then scroll down and leave your question so one of our experts can try to help you. This will be done normally within 5 to 10 working days.
In the meantime, you can read the questions and answers that others have left to this pattern or join the DROPS Workshop on Facebook to get help from fellow knitters/crocheters!

You might also like...

Post a comment to pattern DROPS 230-40

We would love to hear what you have to say about this pattern!

If you want to leave a question, please make sure you select the correct category in the form below, to speed up the answering process. Required fields are marked *.

Comments / Questions (31)

country flag Elena wrote:

Hi! As I understand from the description, the first A1 in the round we go without increases, right? And then start adding from 2nd A2?

14.04.2024 - 15:51

DROPS Design answered:

Dear Elena, you start working A.1 in the round. The first 2 rounds don't have increases. In the 3rd round of A.1 increase 24-27-33-33-30-33 treble crochet evenly. Work 1 more round of A.1 without increases. In the 5th round of A.1 increase 24-27-33-33-30-33 treble crochet evenly. Continue working A.1 until finishing the chart. In 1 repeat in vertical of the chart, you should have increased 48-54-66-66-60-66 treble crochets in total. Now, start repeating A.1 and continue increasing as in the first A.1 repeat. Happy crochetting!

14.04.2024 - 18:32

country flag Andrea wrote:

I’m also very confused with the diagram. In line 1, from what I read I understand there is a decrease yet the diagram seems to show an increase. I read the explanations but it is not clearer to me.

08.04.2024 - 12:59

DROPS Design answered:

Dear Andrea, on the very first row in diagram, there is no increase neither decrease of the number of stitches, work as follows: *skip 1 stitch, crochet 2 treble crochets (UK-English) together, 1 chain 2 treble crochets together, skip 1 stitch*, repeat from *-*. Happy crocheting!

08.04.2024 - 15:40

country flag Denise Loup wrote:

Wieso sind die 3 steigeluftmaschen kein Ersatz für das erste Stäbchen. Ich mache kunsthäckel decken und da sind es immer auch Ersatz dafür, und warum wendet man die Arbeit beim rundhäckeln?

03.04.2024 - 18:15

DROPS Design answered:

Liebe Frau Loup, das ist eine Wahl der Designerin, so passiert es oft in unserem Modell, aber gerne können Sie die 3 ersten Lm als Ersatz für das erste Stäbchen häkeln, wenn Sie das so lieber haben. Viel Spaß beim Häkeln!

04.04.2024 - 08:04

country flag Sarah wrote:

I’m really confused how to do A1. A video tutorial of this specific pattern (not just the general stitches) would be incredibly helpful. If you are able, I would appreciate the pattern written out rather than a diagram. For example, “Chain 3, double crochet 2 together, chain 1, double crochet 2 together”… I don’t understand how the decreases are increasing the stitch count.

19.03.2024 - 02:41

DROPS Design answered:

Dear Sarah, we only have diagram for this pattern, but this lesson will help you understanding how to read crochet diagrams. Happy crocheting!

19.03.2024 - 11:18

country flag Virginia wrote:

Hi🙂 Can you let me know how much yarn do I need to crochet the sweater? I know it's in different sizes. But will be very helpful to have it written (maybe) in the pattern explanation. Thank you🙂

02.03.2024 - 14:03

DROPS Design answered:

Dear Virginia, the materials are indicated at the very top of the pattern, in the Materials section. You need 200-250-250-300-300-350 g of DROPS Sky. DROPS Sky is a 50g per ball yarn, so depending on the size you are working you may need 4, 5,6 or 7 balls of DROPS Sky. Happy crochetting!

03.03.2024 - 18:44

country flag Catherine Soltysiak wrote:

Bonjour, Comment faites vous pour obtenir 321 mailles en ayant déjà 123 mailles avant de commencer la grille A1 et en augmentant 6 x 66 mailles ( 396 mailles) ? Je me retrouve avec 519 mailles soit une circonférence de + de 300 cm........pour la justesse on repassera. Dommage.

05.01.2024 - 18:37

DROPS Design answered:

Bonjour Mme Soltysiak , vous devez répéter 5 fois le diagramme A.1 en hauteur, et, en même temps, vous allez augmenter 33 brides à intervalles réguliers 5 fois au total à chaque rang 3 et 5 de A.1, autrement dit: après le 1er A.1 en hauteur, vous avez augmenté 33 brides au 3ème rang et 33 brides au 5ème rang (soit 2 fois et + 66 brides) = 189, après le 2ème A.1, vous aurez ainsi augmenté encore 2 autres fois et 255 brides (189+33+33), après le 3ème rang du 3ème A1.: vous augmentez la 5ème fois = 321 brides. Bon crochet!

08.01.2024 - 09:38

country flag Astrid Sunkler wrote:

Guten Tag, gibt es zu Spring Renaissance Top ein Diagramm? Erwähnt ist A1, aber es fehlt. Gruß Astrid Sunkler

31.12.2023 - 16:05

DROPS Design answered:

Liebe Frau Sunkler, Diagram A.1 finden Sie neben der Maßskizze, unter dem Arm, es wird über 3 Maschen und 6 Reihen gehäkelt. Viel Spaß beim stricken!

02.01.2024 - 11:09

country flag Sofia wrote:

Jag virkar storlek M. När man virkar oket och har 123 maskor och det står virka A1, ska man öka på första A1 eller ska man virka A1 en gång först och sedan börja öka maskor?

20.12.2023 - 07:23

DROPS Design answered:

Hej Sofia, første omgang hækler du uden at øke, næste omgang øker du ifølge mønsteret :)

20.12.2023 - 10:51

country flag Trish wrote:

How do I maintain my 117 stitch count when doing first row of pattern which is treble 2 together, chain 1, treble 2 together then repeat or that is how I read the chart. I have done it 3 times and end up with far too few stitches. Obviously doing something quite incorrect.

01.12.2023 - 05:45

DROPS Design answered:

Dear Trish, A.1 is worked over 3 stitches, so that you will repeat A.1 a total of 39 times on the round, this means you will have 39 times (1 treble group, 1 chain, 1 treble group) on the first round. Happy crocheting!

01.12.2023 - 08:38

country flag Monica Berta wrote:

Hola, quiero alargar tanto las mangas como el cuerpo del jersey: ¿bastará con añadir un rapport a cada parte antes de cortar el hilo? Gracias por la respuesta!

22.11.2023 - 10:38

DROPS Design answered:

Hola Mónica, puedes alargar el cuerpo repitiendo en vertical las últimas filas de A.1 hasta el largo deseado. Para las mangas, puedes alargar como el cuerpo o, si quieres disminuir (para que la manga tenga más forma y no sea tan ancha abajo) tienes que poner un marcapuntos en el centro bajo la manga, donde irás disminuyendo. Así, si la disminución interrumpe el patrón, esta interrupción queda oculta bajo la manga.

26.11.2023 - 23:33