DROPS Nord
DROPS Nord
45% Alpaca, 30% Polyamide, 25% Wool
from 2.95 € /50g
Get the yarn to make this pattern from 5.90€.

The yarn cost is calculated from the pattern’s smallest size and the yarn’s cheapest product type. Looking for an even better price? You might find it on the DROPS Deals!

DROPS SS24

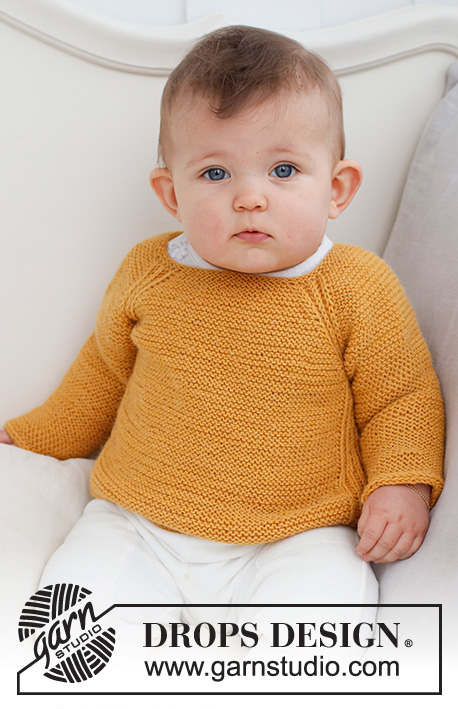
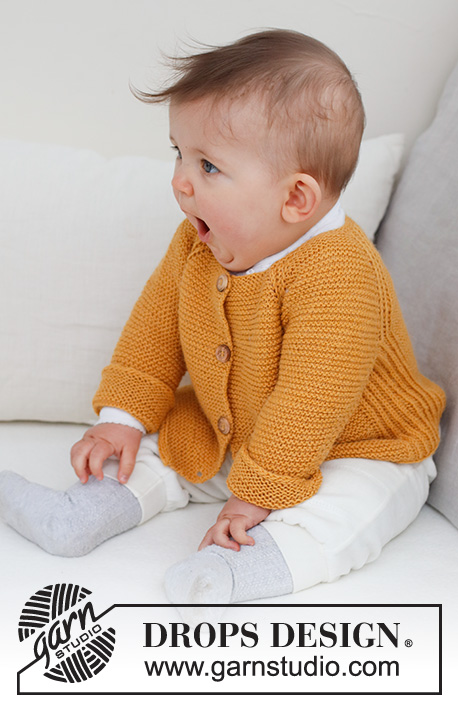
Happy Sunflower Cardigan

Knitted jacket for babies and children in DROPS Nord. The piece is worked top down with raglan, English rib and garter stitch. Sizes 0 - 4 years.

DROPS Baby 43-10
DROPS Design: no-003-by
Yarn group A
-----------------------------------------------------------

SIZES:
0/1 - 1/3 - 6/9 - 12/18 months (2 - 3/4) years
Child’s height in cm:
48/52 - 56/62 - 68/74 - 80/86 (92 - 98/104)

MATERIALS:
DROPS NORD from Garnstudio (belongs to yarn group A)
100-150-150-150 (150-200) g colour 18, goldenrod

DROPS BUTTONS NO 513: 4-4-5-5-6-6 items.

NEEDLES
DROPS CIRCULAR NEEDLE SIZE 3 MM: Length 80 cm.

KNITTING TENSION:
24 stitches in width and 48 rows in height with garter stitch = 10 x 10 cm.
NOTE: Needle size is only a guide. If you get too many stitches on 10 cm, change to a larger needle size. If you get too few stitches on 10 cm, change to a smaller needle size.

-------------------------------------------------------

Alternative Yarn – See how to change yarns here
Yarn Groups A to F – Use the same pattern and change the yarn here
Yarn usage using an alternative yarn – Use our yarn converter here

-------------------------------------------------------

DROPS Nord
DROPS Nord
45% Alpaca, 30% Polyamide, 25% Wool
from 2.95 € /50g
Get the yarn to make this pattern from 5.90€.

The yarn cost is calculated from the pattern’s smallest size and the yarn’s cheapest product type. Looking for an even better price? You might find it on the DROPS Deals!

Pattern instructions

-------------------------------------------------------

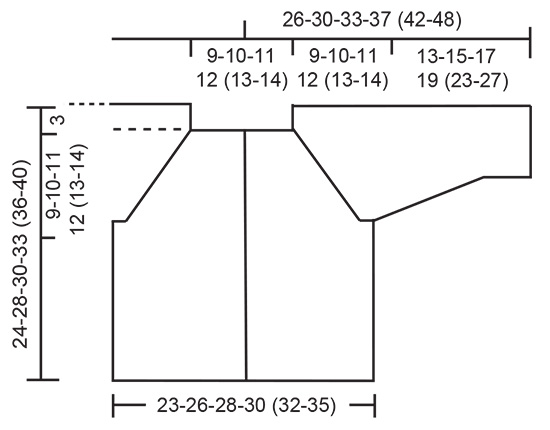
EXPLANATIONS FOR THE PATTERN:

-------------------------------------------------------

RIDGE/GARTER STITCH (worked back and forth):
Knit all rows.
1 ridge = knit 2 rows.

-------------------------------------------------------

ENGLISH RIB:
ROW 1 (right side): * Knit 1, 1 yarn over, slip 1 stitch as if to purl *, work from *-* 1 more time, knit 1.
ROW 2 (wrong side): * 1 yarn over, slip 1 stitch as if to purl, knit the yarn over and slipped stitch together *, work from *-* 1 more time and finish with 1 yarn over, slip 1 stitch as if to purl.
ROW 3 (right side): * Knit together the yarn over and slipped stitch, 1 yarn over, slip 1 stitch as if to purl *, work from *-* 1 more time, knit the yarn over and slipped stitch together.
Repeat rows 2 and 3 onwards.

RAGLAN:
All increases are worked from the right side. Increase 8 stitches as follows:
Work garter stitch to the marker before the English rib, make 1 yarn over, move the marker to the right needle, work English rib over 5 stitches, move the marker to the right needle, 1 yarn over. Repeat at all markers (= 1 stitch increased on each side of the English rib sections = 8 stitches increased). On the next row knit the yarn overs twisted to avoid holes and then work the new stitches in garter stitch.

DECREASE TIP (sleeves):
All decreases are worked from the right side!
Decrease 1 stitch on each side as follows: Work 1 garter stitch, slip 1 stitch as if to knit, knit 1 and pass the slipped stitch over (= 1 stitch decreased), work garter stitch until there are 3 stitches left, knit 2 together (= 1 stitch decreased) and 1 garter stitch (= 2 stitches decreased on the row).

BUTTONHOLES:
The first buttonhole is worked when the piece measures 1 cm, then the next 3-3-4-4 (5-5) buttonholes with approx. 5-6-5-6 (5-6) cm between each one.
Work the buttonholes on the right band (when the garment is worn) from the right side as follows: Work until there are 4 stitches left on the row, knit 2 together, 1 yarn over and knit 2. On the next row knit the yarn over to leave a hole.

I-CORD CAST-OFF:
* Knit 2, knit the next 2 stitches twisted together, place the 3 stitches from the right needle onto the left needle (in the same order) *. Work from *-* until there are 3 stitches left on the left needle, knit these 3 stitches together. Cut the strand and pull it through the last stitch. Fasten well.

-------------------------------------------------------

START THE PIECE HERE:

-------------------------------------------------------

JACKET – SHORT OVERVIEW OF THE PIECE:
The jacket is worked top down, back and forth with circular needle. The sleeves are worked back and forth with circular needle and sewn together to finish.

YOKE:
Cast on 72-76-80-84 (90-94) stitches (including 4 band stitches on each side) with circular needle size 3 mm and DROPS Nord. Work 2 RIDGES – see description above, and increase 8-8-8-8 (6-6) stitches evenly spaced on the last row = 80-84-88-92 (96-100) stitches. On the next row from the right side insert markers, which will follow your work onwards, as follows:

Work 11-12-13-14 (15-16) stitches in garter stitch (left front piece), insert 1 marker, work 5 stitches in ENGLISH RIB – read description above, insert 1 marker, work 12 stitches in garter stitch (sleeve), insert 1 marker, work 5 stitches in English rib, insert 1 marker, work 14-16-18-20 (22-24) stitches in garter stitch (back piece), insert 1 marker, work 5 stitches in English rib, insert 1 marker, work 12 stitches in garter stitch (sleeve), insert 1 marker, work 5 stitches in English rib, insert 1 marker, work 11-12-13-14 (15-16) stitches in garter stitch and work the BUTTONHOLE – read description above (right front piece). You have 8 markers, which show where you will work English rib and increase to raglan. Knit 1 row from the wrong side, apart from the sections in English rib.
REMEMBER THE KNITTING TENSION!
Now start to increase to RAGLAN on each side of all the sections of English rib: Increase every 2nd row 4-6-7-10 (11-14) times, then every 4th row 8-9-9-8 (8-8) times = 176-204-216-236 (248-276) stitches.
Continue the pattern without further increases until the piece measures 9-10-11-12 (13-14) cm from the cast-on edge.
On the next row from the right side, divide for the body and sleeves as follows: Work 23-27-29-32 (34-38) stitches in garter stitch and 5 stitches in English rib, place the next 36-42-44-48 (50-56) stitches on a thread for the sleeve, cast on 7 stitches under the sleeve, work 5 stitches in English rib, 38-46-50-56 (60-68) stitches in garter stitch, 5 stitches in English rib, place the next 36-42-44-48 (50-56) stitches on a thread for the sleeve, cast on 7 stitches under the sleeve, work 5 stitches in English rib and 23-27-29-32 (34-38) stitches in garter stitch.

BODY:
= 118-134-142-154 (162-178) stitches. Continue with garter stitch and English rib as before, working the new stitches under each sleeve in English rib (on the first row these stitches do not have yarn overs).
Work until the body measures 12-15-16-18 (20-23) cm, from the division. Read I-CORD CAST-OFF and cast off from the right side. The jacket measures approx. 24-28-30-33 (36-40) cm from the shoulder down.

SLEEVES:
Place the 36-42-44-48 (50-56) stitches from the thread on one side on circular needle size 3 mm.
Work garter stitch back and forth, on the first 2 rows cast on 4 stitches at the end of each row = 44-50-52-56 (58-64) stitches.
When the sleeve measures 2 cm decrease 1 stitch on each side - read DECREASE TIP. Decrease like this every 8th-8th-6th-6th (8th-8th) row a total of 4-7-8-9 (8-10) times = 36-36-36-38 (42-44) stitches. Work until the sleeve measures 13-15-17-19 (23-27) cm. Cast off with I-CORD CAST-OFF from the right side. Work the other sleeve in the same way.

ASSEMBLY:
Sew the sleeve seams in the outermost loop of the outermost stitch, so the seam is flat. Sew the openings under the sleeves.
Sew the buttons onto the left band.

This pattern has been corrected.

Updated online: 29.06.2022
BODY:
= 118-134-142-154 (162-178) stitches.

Diagram

diagram measurements

Each of our patterns has specific tutorial videos to help you.

Do you have a question? See a list of frequently asked questions (FAQ)

Knitting tension is what determines the final measurements of your work, and is usually measured per 10 x 10 cm. It is provided like so: number of stitches in width x number of rows in height - eg: 19 stitches x 26 rows = 10 x 10 cm.

The knitting tension is very individual; some people knit/crochet loosely while others work tightly. You adjust the knitting tension with the needle size, which is why the suggested needle size is only meant as a guide! You need to adjust this (up or down) to ensure that YOUR knitting tension matches the knitting tension provided in the pattern. If you work with a different knitting tension than provided you will have a different yarn consumption, and your work will have different measurements than what the pattern suggests.

The knitting tension also determines which yarns can replace each other. As long as you achieve the same knitting tension you can replace one yarn with another.

See DROPS lesson: How to measure your tension/gauge

See DROPS video: How to make a gauge tension swatch

The required amount of yarn is provided in grams, eg: 450 g. To calculate how many balls you’ll need you first need to know how many grams are in 1 ball (25g, 50g or 100g). This information is available if you click on the individual yarn quality on our pages. Divide the amount required with the amount of each ball. For example, if each ball is 50g (the most common amount), the calculation will be as follows: 450 / 50 = 9 balls.

The important thing when changing from one yarn to another is that the knitting/crochet tension remains the same. This is so that the measurements of the finished piece will be the same as on the sketch provided. It is easier to achieve the same knitting tension using yarns from the same yarn group. It is also possible to work with multiple strands of a thinner yarn to achieve the knitting tension of a thicker one. Please try our yarn converter. We recommend you to always work a test swatch.

Please NOTE: when changing yarn the garment might have a different look and feel to the garment in the photo, due to individual properties and qualities of each yarn.

See DROPS lesson: Can I use a different yarn than the one mentioned in the pattern?

All our yarns are categorised into yarn groups (from A to F) according to thickness and knitting tension – group A contains the thinnest yarns and group F the thickest. This makes it easier for you to find alternative yarns to our patterns, should you wish to switch yarn. All yarns within the same group have a similar knitting tension and can easily replace each other. However, different yarn qualities have different structures and properties which will give the finished work a unique look and feel.

Click here for an overview of the yarns in each yarn group

At the top of all our patterns you’ll find a link to our yarn calculator, which is a helpful tool should you wish to use a different yarn than suggested. By filling in the yarn quality you wish to replace, the amount (in your size) and number of strands, the calculator will present good alternative yarns with the same knitting tension. Additionally it will tell you how much you’ll require in the new qualities and whether you’ll need to work with multiple strands. Most skeins are 50g (some are 25g or 100g).

If the pattern is worked with multiple colours, every colour will have to be calculated separately. Similarly, if the pattern is worked with several strands of different yarns (for example 1 strand Alpaca and 1 strand Kid-Silk) you will have to find alternatives for each, individually.

Click here to see our yarn calculator

Since different yarns have different qualities and textures we have chosen to keep the original yarn in our patterns. However, you can easily find options among our available qualities by using our yarn calculator, or simply pick a yarn from the same yarn group.

It is possible that some retailers still have discontinued yarns in stock, or that someone has a few skeins at home that they would like to find patterns for.

The yarn calculator will provide both alternative yarn as well as required amount in the new quality.

If you think it's hard to decide what size to make, it can be a good idea to measure a garment you own already and like the size of. Then you can pick the size by comparing those measures with the ones available in the pattern's size chart.

You'll find the size chart at the bottom of the pattern.

See DROPS lesson: How to read size chart

The needle size provided in the pattern serves only as a guide, the important thing is to follow the knitting tension. And since knitting tension is very individual, you will have to adjust the needle size to ensure that YOUR tension is the same as in the pattern – maybe you’ll have to adjust 1, or even 2 needle sizes, up or down to achieve the correct tension. For this, we recommend that you work test swatches.

Should you work with a different knitting tension than the one provided, the measurements of the finished garment might deviate from the measurement sketch.

See DROPS lesson: How to measure your tension/gauge

See DROPS video: How to make a tension/gauge swatch

Working a garment top-down provides more flexibility and room for personal adjustment. For example it is easier to try the garment on while working, as well as making adjustments to length of yoke and shoulder caps.

The instructions are carefully explaining every step, in the correct order. Diagrams are adjusted to the knitting direction and are worked as usual.

The diagram depicts all rows/rounds, and every stitch seen from the right side. It is read from bottom to top, from right to left. 1 square = 1 stitch.

When working back and forth, every other row is worked from the right side and every other row is worked from the wrong side. When working from the wrong side, the diagram will have to be worked reversed: from left to right, knit stitches are purled, purl stitches are knit etc.

When working in the round every round is worked from the right side and the diagram are worked from right to left on all rounds.

See DROPS lesson: How to read knitting diagrams

The diagram depicts all rows/rounds, and every stitch seen from the right side. It is worked from bottom to top, from right to left.

When working back and forth every other row is worked from the right side: from right to left and every other row is worked from the wrong side: from left to right.

When working in the round, every row in the diagram are worked from the right side, from right to left.

When working a circular diagram you start in the middle and work your way outwards, counter clockwise, row by row.

The rows usually start with a given number of chain stitches (equivalent to the height of the following stitch), this will either be depicted in the diagram or explained in the pattern.

See DROPS lesson: How to read crochet diagrams

Instructions for working several diagrams after each other on the same row/round, will often be written like so: “work A.1, A.2, A.3 a total of 0-0-2-3-4 times". This means you work A.1 once, then A.2 is worked once, and A.3 is repeated (in width) the number of times provided for your size – in this case like so: S = 0 times, M = 0 times, L=2 times, XL= 3 times and XXL = 4 times.

The diagrams are worked as usual: begin with the first row in A.1, then work the first row in A.2 etc.

See DROPS lesson: How to read knitting diagrams

See DROPS lesson: How to read crochet diagrams

The total width of the garment (from wrist-to-wrist) will be larger in the larger sizes, despite the actual sleeves being shorter. The larger sizes have longer sleeve caps and wider shoulders, so there will be a good fit in all sizes.

The measurement sketch/schematic drawing provides information regarding the full length of the garment. If it’s a jumper or a jacket the length is measured from the highest point on the shoulder closest to the neckline, and straight down to the bottom of the garment. It is NOT measured from the tip of shoulder. Similarly, the length of yoke is measured from the highest point on the shoulder and down to where yoke is split into body and sleeves.

On a jacket measures are never taken along bands, unless specifically stated. Always measure inside band stitches when measuring the length.

See DROPS lesson: How to read a schematic drawing

Diagrams are often repeated on the round or in height. 1 repeat is the diagram the way it appears in the pattern. If it says to work 5 repeats of A.1 in the round, then you work A.1 a total of 5 times after/next to each other in the round. If it says to work 2 repeats of A.1 vertically/in height you work the entire diagram once, then begin again at the start and work the entire diagram one more time.

Chain stitches are slightly narrower than other stitches and to avoid working the cast-on edge too tight, we simply chain more stitches to begin with. The stitch count will be adjusted on the following row to fit the pattern and measurement sketch.

The rib edge is more elastic and will contract slightly compared to, for example, stocking stitch. By increasing before the rib edge, you avoid a visible difference in width between the rib edge and the rest of the body.

It’s very easy to cast off too tightly, and by making yarn overs while casting off (and simultaneously casting these off) you avoid a too tight cast off edge.

See DROPS video: How to bind off with yarn overs (yo)

To achieve an even increase (or decrease) you can increase on, for example: every 3rd and 4th row alternately, like so: work 2 rows and increase on the 3rd row, work 3 rows and increase on the 4th. Repeat this until the increase is complete.

See DROPS lesson: Increase or decrease 1 st on every 3rd and 4th row alternately

Should you prefer to work in the round instead of back and forth, you may of course adjust the pattern. You’ll need to add steeks mid-front (usually 5 stitches), and follow the instructions. When you would normally turn and work from the wrong side, simply work across the steek and continue in the round. At the end you’ll cut the piece open, pick up stitches to work bands, and cover the cut edges.

See DROPS video: How to knit steeks and cut open

Should you prefer to work back and forth instead of in the round, you may of course adjust the pattern so you work the pieces separately and then assemble them at the end. Divide the stitches for the body in 2, add 1 edge stitch in each side (for sewing) and work the front and back pieces separately.

See DROPS lesson: Can I adapt a pattern for circular needles into straight needles?

Pattern repeats can vary slightly in the different sizes, in order to get the correct proportions. If you’re not working the exact same size as the garment in the photo, yours might deviate slightly. This has been carefully developed and adjusted so that the complete impression of the garment is the same in all sizes.

Make sure to follow instructions and diagrams for your size!

If you have found a pattern you like which is available in women’s size it’s not very difficult to convert it to men’s size. The biggest difference will be the length of sleeves and body. Start working on the women size that you think would fit across the chest. The additional length will be worked right before you cast off for the armhole/sleeve cap. If the pattern is worked top-down you can add the length right after the armhole or before the first decrease on sleeve.

Regarding additional yarn amount, this will depend on how much length you add, but it is better with a skein too many than too few.

All yarns will have excess fibres (from production) that might come off as lint or shedding. Brushed yarns (ie hairier yarns) have more of these loose, excess fibres, causing more shedding.

Shedding also depends on what is worn under or over the garment, and whether this pulls at the yarn fibres. It’s therefore not possible to guarantee that there will be no shedding

Below are some tips on how to get the best result when working with hairier yarns:

1. When the garment is finished (before you wash it) shake it vigorously so the looser hairs come off. NOTE: do NOT use a lint roller, brush or any method that pulls at the yarn.

2. Place the garment in a plastic bag and put it in your freezer - the temperature will cause the fibres to become less attached to each other, and excess fibres will come off easier.

3. Leave in the freezer for a few hours before taking it out and shaking it again.

4. Wash the garment according to the instructions on the yarn label.

Pilling is a natural process that happens to even the most exclusive of fibers. It's a natural sign of wear and tear that is hard to avoid, and that is most visible in high friction areas of your garment like a sweater's arms and cuffs.

You can make your garment look as new by removing the pilling, using a fabric comb or a pill/lint remover.

Still can't find the answer you need? Then scroll down and leave your question so one of our experts can try to help you. This will be done normally within 5 to 10 working days.
In the meantime, you can read the questions and answers that others have left to this pattern or join the DROPS Workshop on Facebook to get help from fellow knitters/crocheters!

You might also like...

Post a comment to pattern DROPS Baby 43-10

We would love to hear what you have to say about this pattern!

If you want to leave a question, please make sure you select the correct category in the form below, to speed up the answering process. Required fields are marked *.

Comments / Questions (13)

country flag Eliška wrote:

Dobrý den, chtěla jsem se zeptat na rukávy. Pletu je v řadách nebo na kruhové jehlici dokola? A v podpaží nahazuji oka navíc, či nabírám oka z podpaží trupu, abych se vyhla zašívání na konci? Předem mnohokrát děkuji za pomoc.

15.10.2023 - 10:23

DROPS Design answered:

Dobrý den, Eliško, u tohoto svetříku pleteme rukávy sice na kruhové jehlici, ale v řadách (tj. střídáme lícovou a rubovou řadu). Nakonec dolní stranu rukávu vč. podpaží sešijeme. Hodně zdaru! Hana

18.10.2023 - 11:26

country flag Carine wrote:

Bonjour, Quel diamètre font les boutons ? Merci

23.05.2023 - 21:49

DROPS Design answered:

Bonjour Carine, vous retrouverez tous nos boutons ici avec leur descriptif respectif; ceux-ci font 15 mm de diamètre. Bon tricot!

24.05.2023 - 08:18

country flag Geeta Fry wrote:

BODY: = 118-134-142-154 (162-178) stitches. Continue with garter stitch and English rib as before, working the new stitches under each sleeve in English rib (on the first row these stitches do not have yarn overs). With reference to the above instruction, for the Enlish rib section, I would now knit row 2 of the English Rib pattern. However, as you state, there are no yarn overs for the new stitches - how do I knit these with the correct pattern? Help!

20.03.2023 - 15:27

DROPS Design answered:

Dear Mrs Fry, on row 2 in English rib you repeat (YO, slip 1 as if to P, K tog YO and next stitch) - when working the new stitches mid under sleeve, you will just have to knit the stitches since they don't have been slipped with a YO on previous row, this means you just knit them. Happy knitting!

20.03.2023 - 15:39

country flag Christaclemens wrote:

Die Zunahmen an der Raglanlinie sollen ja als Umschlag gemacht werden, das werden bei mir aber Löcher, sieht nicht gut aus. gibt es eine andere Möglichkeit der Zunahme ?

03.01.2023 - 17:00

country flag Christiane wrote:

M.E. sollten deutlich weniger Knopflöcher eingestrickt werden. Der Abstand ist doch recht klein. Ich habe z.B. bei 68/104 alle 9,5 cm ein Knopfloch gearbeitet. 5 Knöpfe sind völlig ausreichend.

04.12.2022 - 19:47

country flag Chantal Prud'homme wrote:

Où puis-je acheter vos produits au Québec ou au Canada?

27.09.2022 - 22:20

DROPS Design answered:

Bonjour Mme Prud'homme, retrouvez ici la liste des magasins DROPS au Canada (contactez Nordic Yarn pour connaître la liste des magasins) ou expédiant au Canada. Bon tricot!

28.09.2022 - 08:50

country flag Piera wrote:

Buongiorno, riguardo alla domanda posta in precedenza vorrei per favore una delucidazione: dopo le 29 maglie a legaccio (taglia 6/9 mesi) le 5 maglie successive a costa inglese si lavorano dal ferro nr 1 o 2 o 3 della costa inglese? Grazie

26.07.2022 - 09:22

DROPS Design answered:

Buonasera Piera, deve proseguire la lavorazione precedente. Buon lavoro!

26.07.2022 - 16:21

country flag Elisabeth ROULEAU wrote:

Je réalise régulièrement des modèles de votre site, ils sont originaux et je prends plaisir à les réaliser. Sur ce modèle j'ai appris que l'on pouvait rabattre en faisant une i-cord ce que je ne savais pas (je tricote depuis plus de 60 ans pourtant!!!). Je suis contente du résultat et je pourrai refaire cette fermeture de mailles sur un autre modèle.

20.07.2022 - 15:23

country flag Piera wrote:

Buongiorno, Sto dividendo il lavoro per il corpo e le maniche per taglia 6/9 mesi. Lavorando le 29 maglie a legaccio dello sprone, l'ultima maglia è il gettato della costa inglese. Come faccio a lavrorare la costa inglese senza questo gettato? Grazie Cordiali saluti

18.07.2022 - 16:12

DROPS Design answered:

Buonasera Piera, deve lavorare 29 maglie a maglia legaccio e le 5 maglie successive a coste inglesi. Buon lavoro!

20.07.2022 - 21:28

country flag Natascha Sander wrote:

Hallo liebes Drops Team, ich stricke die Jacke in Größe 80/86. Nach allen Zunahmen (7 Maschen) unter dem Arm und Ärmel (48 Maschen) stilllegen komme ich nach allen Berechnungen immer wieder nur auf 154 Maschen statt auf 158 Maschen für den Rumpfteil. Fehlen mir jetzt 4 Maschen oder ist da ein Fehler in der Anleitung. Vielen Dank

26.06.2022 - 22:41

DROPS Design answered:

Liebe Frau Sander, danke für Ihren Geduld, Sie sind ja recht, 154 Maschen soll man haben; eine Korrektur erfolgt. Danke für den Hinweis, viel Spaß beim stricken!

29.06.2022 - 16:07