DROPS Nord
DROPS Nord
45% Alpaca, 30% Polyamide, 25% Wool
from 3.85 $ /50g
Get the yarn to make this pattern from 7.70$.

The yarn cost is calculated from the pattern’s smallest size and the yarn’s cheapest product type. Looking for an even better price? You might find it on the DROPS Deals!

DROPS SS24

Happy Sunflower

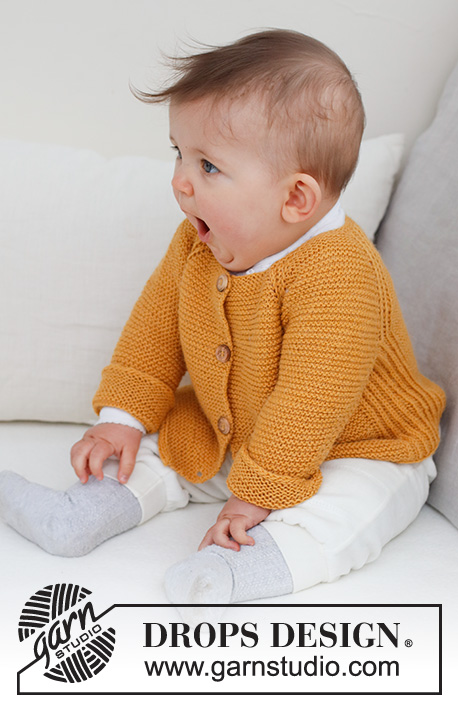
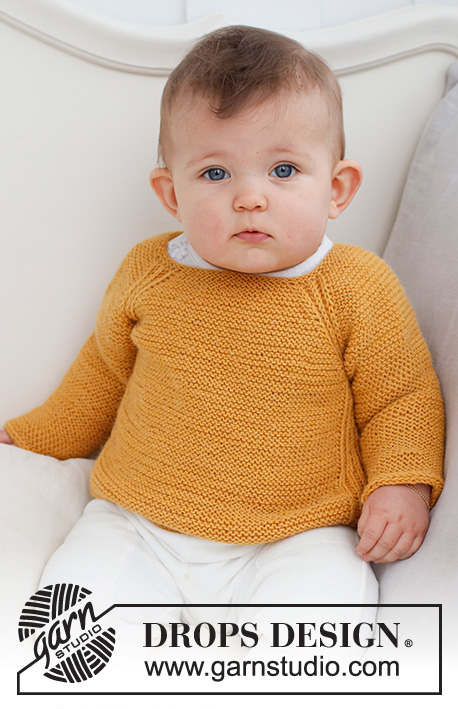
Knitted sweater for babies and children in DROPS Nord. The piece is worked top down, with raglan, English rib and garter stitch. Sizes 0 - 4 years.

DROPS Baby 43-9
DROPS Design: no-002-by
Yarn group A
-----------------------------------------------------------

SIZES:
0/1 - 1/3 - 6/9 - 12/18 months (2 - 3/4) years
Child’s height in cm:
48/52 - 56/62 - 68/74 - 80/86 (92 - 98/104)
Child’s height in feet:
1ft/1ft8 - 1ft 10/2ft - 2ft3/2ft5 - 2ft7/2ft9 (3ft – 3ft3/3ft5)

Finished measurements:
Chest measurements: 46-52-56-60 (64-70) cm = 18"-20½"-22"-23⅝" (25¼"-27½")
Full length: 24-28-30-33 (36-40) cm = 9½"-11"-11¾"-13" (14¼"-15¾")
All measurements in charts are in cm.

MATERIALS:
DROPS NORD from Garnstudio (belongs to yarn group A)
100-150-150-150 (150-200) g color 18, goldenrod

NEEDLES FOR SIZES 0/1 - 1/3 - 6/9 months:
DROPS CIRCULAR NEEDLE SIZE 3 MM = US 2.5: Length 40 cm = 16".
DROPS DOUBLE POINTED NEEDLES SIZE 3 MM = US 2.5.
The technique MAGIC LOOP can be used – you then only need circular needle of 80 cm = 32".

NEEDLES FOR SIZES 12/18 months- (2 - 3/4) years:
DROPS CIRCULAR NEEDLE SIZE 3 MM = US 2.5: Length 60 cm = 24".
DROPS DOUBLE POINTED NEEDLES SIZE 3 MM = US 2.5.
The technique MAGIC LOOP can be used – you then only need circular needle of 80 cm = 32".

KNITTING GAUGE:
24 stitches in width and 48 rows in height with garter stitch = 10 x 10 cm = 4" x 4".
NOTE: Needle size is only a guide. If you get too many stitches on 10 cm = 4", change to a larger needle size. If you get too few stitches on 10 cm = 4", change to a smaller needle size.

-------------------------------------------------------

Alternative Yarn – See how to change yarns here
Yarn Groups A to F – Use the same pattern and change the yarn here
Yarn usage using an alternative yarn – Use our yarn converter here

-------------------------------------------------------

DROPS Nord
DROPS Nord
45% Alpaca, 30% Polyamide, 25% Wool
from 3.85 $ /50g
Get the yarn to make this pattern from 7.70$.

The yarn cost is calculated from the pattern’s smallest size and the yarn’s cheapest product type. Looking for an even better price? You might find it on the DROPS Deals!

Pattern instructions

NOTE: This pattern is written in American English. All measurements in charts are in cm. For conversion from inches to cm - click here. There are different terms for crocheting in American and British English. If this pattern includes crochet, click for "crochet terms" here. For this pattern in British English, please click here.
-------------------------------------------------------

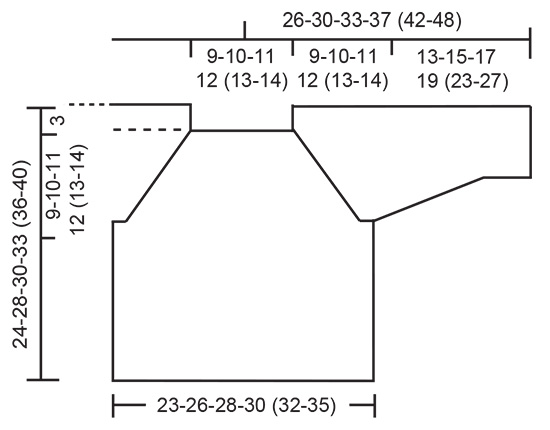
EXPLANATIONS FOR THE PATTERN:

-------------------------------------------------------

RIDGE/GARTER STITCH (worked in the round):
1 ridge in height = 2 rounds; Knit 1 round and purl 1 round.

RIDGE/GARTER STITCH (worked back and forth):
Knit all rows.
1 ridge = knit 2 rows.

ENGLISH RIB:
ROUND 1: * Knit 1, make 1 yarn over, slip 1 stitch as if to purl*, work from *-* 1 more time, knit 1.
ROUND 2: * Make 1 yarn over, slip 1 stitch as if to purl, purl together the next yarn over and stitch *, work from *-* 1 more time, 1 yarn over, slip 1 stitch as if to purl.
ROUND 3: * Knit together the yarn over and stitch, make 1 yarn over, slip 1 stitch as if to purl *, work from *-* 1 more time and knit together the next yarn over and stitch.
Repeat rounds 2 and 3 onwards.

RAGLAN:
Increase as follows:
Work garter stitch to the marker before the English rib, make 1 yarn over, move the marker to the right needle, work English rib over 5 stitches, move the marker to the right needle, 1 yarn over. Repeat at all markers (= 1 stitch increased on each side of the English rib sections = 8 stitches increased). On the next round purl the yarn overs twisted to avoid holes.

DECREASE TIP (sleeves):
All decreases are worked from the right side!
Decrease 1 stitch on each side as follows: Work 1 garter stitch, slip 1 stitch as if to knit, knit 1 and pass the slipped stitch over (= 1 stitch decreased), work garter stitch until there are 3 stitches left, knit 2 together (= 1 stitch decreased) and 1 garter stitch (= 2 stitches decreased on the row).

I-CORD BIND-OFF:
* Knit 2, knit the next 2 stitches twisted together, place the 3 stitches from the right needle onto the left needle (in the same order) *. Work from *-* until there are 3 stitches left on the left needle, knit these 3 stitches together. Cut the strand and pull it through the last stitch. Fasten well.

-------------------------------------------------------

START THE PIECE HERE:

-------------------------------------------------------

SWEATER:
The yoke and body are worked in the round, top down, with double pointed needles then circular needle when you have enough stitches. The sleeves are worked back and forth with circular needle and sewn together to finish.

YOKE:
Cast on 72-76-80-84 (88-92) stitches with double pointed needles size 3 MM = US 2.5 and DROPS Nord.
Work 2 RIDGES in the round – read explanation above.
Insert 8 markers as you work the next round, placing the markers on the needle so they follow your work onwards. Work 14-16-18-20 (22-24) stitches in garter stitch (back piece), insert a marker, work 5 stitches in ENGLISH RIB – read description above, insert a marker, work 12 stitches in garter stitch (sleeve), insert a marker, work 5 stitches in English rib, insert a marker, work 14-16-18-20 (22-24) stitches in garter stitch (front piece), insert a marker, work 5 stitches in English rib, insert a marker, work 12 stitches in garter stitch (sleeve), insert a marker, work 5 stitches in English rib, insert a marker. You have 8 markers, which show where you will work English rib and increase to raglan. Purl the next round, apart from the 4 sections of English rib.
REMEMBER THE KNITTING GAUGE!
On the next round begin to increase to RAGLAN – read description above, on each side of the sections of English rib: Increase every 2nd round 4-6-7-10 (11-14) times, then every 4th round 8-9-9-8 (8-8) times = 168-196-208-228 (240-268) stitches.
Continue the pattern without further increases until the piece measures 9-10-11-12 (13-14) cm = 3½"-4"-4⅜"-4¾" (5⅛"-5½") from the cast-on edge.
On the next round divide for the body and sleeves as follows: Work 38-46-50-56 (60-68) stitches in garter stitch (back piece), 5 stitches in English rib, place the next 36-42-44-48 (50-56) stitches on a thread for the sleeve, cast on 7 stitches under the sleeve, 5 stitches in English rib, work 38-46-50-56 (60-68) stitches in garter stitch (front piece), 5 stitches in English rib, place the next 36-42-44-48 (50-56) stitches on a thread for the sleeve, cast on 7 stitches under the sleeve, 5 stitches in English rib. The body and sleeves are finished separately.

BODY:
= 110-126-134-146 (154-170) stitches. THE BODY IS MEASURED FROM HERE! Continue with garter stitch and English rib as before, working the new stitches under each sleeve in English rib.
Work until the body measures 12-15-16-18 (20-23) cm = 4¾"-6"-6¼"-7" (8"-9"). Read I-CORD BIND-OFF and bind off from the right side. The sweater measures approx. 24-28-30-33 (36-40) cm = 9½"-11"-11¾"-13" (14¼"-15¾") from the shoulder down.

SLEEVE:
Place the 36-42-44-48 (50-56) stitches from the thread on one side on circular needle size 3 MM = US 2.5. THE SLEEVE IS MEASURED FROM HERE!
Work GARTER STITCH back and forth – read description above, on the first 2 rows cast on 4 stitches at the end of each row = 44-50-52-56 (58-64) stitches.
When the sleeve measures 2 cm = ¾" decrease 1 stitch on each side - read DECREASE TIP. Decrease like this every 8th-8th-6th-6th (8th-8th) row a total of 4-7-8-9 (8-10) times = 36-36-36-38 (42-44) stitches. Work until the sleeve measures 13-15-17-19 (23-27) cm = 5⅛"-6"-6¾"-7½" (9"-10⅝"). Bind off with I-CORD BIND-OFF from the right side. Work the other sleeve in the same way.

ASSEMBLY:
Sew the sleeve seams in the outermost loop of the outermost stitch, so the seam is flat. Sew the openings under the sleeves.

This pattern has been corrected.

Updated online: 09.09.2022
ENGLISH RIB: ROUND 1: * Knit 1, make 1 yarn over, slip 1 stitch as if to purl*, work from *-* 1 more time, knit 1.

Diagram

All measurements in charts are in cm.

diagram measurements

Each of our patterns has specific tutorial videos to help you.

Do you have a question? See a list of frequently asked questions (FAQ)

Knitting tension is what determines the final measurements of your work, and is usually measured per 10 x 10 cm. It is provided like so: number of stitches in width x number of rows in height - eg: 19 stitches x 26 rows = 10 x 10 cm.

The knitting tension is very individual; some people knit/crochet loosely while others work tightly. You adjust the knitting tension with the needle size, which is why the suggested needle size only serve as a guide! You need to adjust this (up or down) to ensure that YOUR knitting tension matches the knitting tension provided in the pattern. If you work with a different knitting tension than provided you will have a different yarn consumption, and your work will have different measurements than what the pattern suggests.

The knitting tension also determines which yarns can replace each other. As long as you achieve the same knitting tension you can replace one yarn with another.

See DROPS lesson: How to measure your tension/gauge

See DROPS video: How to make a gauge tension swatch

The required amount of yarn is provided in grams, eg: 450 g. To calculate how many balls you’ll need you first need to know how many grams are in 1 ball (25g, 50g or 100g). This information is available if you click on the individual yarn quality on our pages. Divide the amount required with the amount of each ball. For example, if each ball is 50g (the most common amount), the calculation will be as follows: 450 / 50 = 9 balls.

The important thing when changing from one yarn to another is that the knitting/crochet tension remains the same. This is so that the measurements of the finished piece will be the same as on the sketch provided. It is easier to achieve the same knitting tension using yarns from the same yarn group. It is also possible to work with multiple strands of a thinner yarn to achieve the knitting tension of a thicker one. Please try our yarn converter. We recommend you to always work a test swatch.

Please NOTE: when changing yarn the garment might have a different look and feel to the garment in the photo, due to individual properties and qualities of each yarn.

See DROPS lesson: Can I use a different yarn than the one mentioned in the pattern?

All our yarns are categorised into yarn groups (from A to F) according to thickness and knitting tension – group A contains the thinnest yarns and group F the thickest. This makes it easier for you to find alternative yarns to our patterns, should you wish to switch yarn. All yarns within the same group have a similar knitting tension and can easily replace each other. However, different yarn qualities have different structures and properties which will give the finished work a unique look and feel.

Click here for an overview of the yarns in each yarn group

At the top of all our patterns you’ll find a link to our yarn converter, which is a helpful tool should you wish to use a different yarn than suggested. By filling in the yarn quality you wish to replace, the amount (in your size) and number of strands, the converter will present good alternative yarns with the same knitting tension. Additionally it will tell you how much you’ll require in the new qualities and whether you’ll need to work with multiple strands. Most skeins are 50g (some are 25g or 100g).

If the pattern is worked with multiple colours, every colour will have to be converted separately. Similarly, if the pattern is worked with several strands of different yarns (for example 1 strand Alpaca and 1 strand Kid-Silk) you will have to find alternatives for each, individually.

Click here to see our yarn converter

Since different yarns have different qualities and textures we have chosen to keep the original yarn in our patterns. However, you can easily find options among our available qualities by using our yarn converter, or simply pick a yarn from the same yarn group.

It is possible that some retailers still have discontinued yarns in stock, or that someone has a few skeins at home that they would like to find patterns for.

The yarn converter will provide both alternative yarn as well as required amount in the new quality.

If you think it's hard to decide what size to make, it can be a good idea to measure a garment you own already and like the size of. Then you can pick the size by comparing those measures with the ones available in the pattern's size chart.

You'll find the size chart at the bottom of the pattern.

See DROPS lesson: How to read size chart

The needle size provided in the pattern serves only as a guide, the important thing is to follow the knitting tension. And since knitting tension is very individual, you will have to adjust the needle size to ensure that YOUR tension is the same as in the pattern – maybe you’ll have to adjust 1, or even 2 needle sizes, up or down to achieve the correct tension. For this, we recommend that you work test swatches.

Should you work with a different knitting tension than the one provided, the measurements of the finished garment might deviate from the measurement sketch.

See DROPS lesson: How to measure your tension/gauge

See DROPS video: How to make a gauge tension swatch

Working a garment top-down provides more flexibility and room for personal adjustment. For example it is easier to try the garment on while working, as well as making adjustments to length of yoke and shoulder caps.

The instructions are carefully explaining every step, in the correct order. Diagrams are adjusted to the knitting direction and are worked as usual.

The diagram depicts all rows/rounds, and every stitch seen from the right side. It is read from bottom to top, from right to left. 1 square = 1 stitch.

When working back and forth, every other row is worked from the right side and every other row is worked from the wrong side. When working from the wrong side, the diagram will have to be worked reversed: from left to right, knit stitches are purled, purl stitches are knit etc.

When working in the round every round is worked from the right side and the diagram are worked from right to left on all rounds.

See DROPS lesson: How to read knitting diagrams

The diagram depicts all rows/rounds, and every stitch seen from the right side. It is worked from bottom to top, from right to left.

When working back and forth every other row is worked from the right side: from right to left and every other row is worked from the wrong side: from left to right.

When working in the round, every row in the diagram are worked from the right side, from right to left.

When working a circular diagram you start in the middle and work your way outwards, counter clockwise, row by row.

The rows usually start with a given number of chain stitches (equivalent to the height of the following stitch), this will either be depicted in the diagram or explained in the pattern.

See DROPS lesson: How to read crochet diagrams

Instructions for working several diagrams after each other on the same row/round, will often be written like so: “work A.1, A.2, A.3 a total of 0-0-2-3-4 times". This means you work A.1 once, then A.2 is worked once, and A.3 is repeated (in width) the number of times provided for your size – in this case like so: S = 0 times, M = 0 times, L=2 times, XL= 3 times and XXL = 4 times.

The diagrams are worked as usual: begin with the first row in A.1, then work the first row in A.2 etc.

See DROPS lesson: How to read knitting diagrams

See DROPS lesson: How to read crochet diagrams

The total width of the garment (from wrist-to-wrist) will be larger in the larger sizes, despite the actual sleeves being shorter. The larger sizes have longer sleeve caps and wider shoulders, so there will be a good fit in all sizes.

The measurement sketch/schematic drawing provides information regarding the full length of the garment. If it’s a jumper or a jacket the length is measured from the highest point on the shoulder (usually closest to the neckline), and straight down to the bottom of the garment. It is NOT measured from the tip of shoulder. Similarly, the length of yoke is measured from the highest point on the shoulder and down to where yoke is split into body and sleeves.

See DROPS lesson: How to read a schematic drawing

Diagrams are often repeated on the round or in height. 1 repeat is the diagram the way it appears in the pattern. If it says to work 5 repeats of A.1 in the round, then you work A.1 a total of 5 times after/next to each other in the round. If it says to work 2 repeats of A.1 vertically/in height you work the entire diagram once, then begin again at the start and work the entire diagram one more time.

Chain stitches are slightly narrower than other stitches and to avoid working the cast-on edge too tight, we simply chain more stitches to begin with. The stitch count will be adjusted on the following row to fit the pattern and measurement sketch.

The rib edge is more elastic and will contract slightly compared to, for example, stocking stitch. By increasing before the rib edge, you avoid a visible difference in width between the rib edge and the rest of the body.

It’s very easy to cast off too tightly, and by making yarn overs while casting off (and simultaneously casting these off) you avoid a too tight cast off edge.

See DROPS video: How to bind off with yarn overs (yo)

To achieve an even increase (or decrease) you can increase on, for example: every 3rd and 4th row alternately, like so: work 2 rows and increase on the 3rd row, work 3 rows and increase on the 4th. Repeat this until the increase is complete.

See DROPS lesson: Increase or decrease 1 st on every 3rd and 4th row alternately

Should you prefer to work in the round instead of back and forth, you may of course adjust the pattern. You’ll need to add steeks mid-front (usually 5 stitches), and follow the instructions. When you would normally turn and work from the wrong side, simply work across the steek and continue in the round. At the end you’ll cut the piece open, pick up stitches to work bands, and cover the cut edges.

See DROPS video: How to knit steeks and cut open

Should you prefer to work back and forth instead of in the round, you may of course adjust the pattern so you work the pieces separately and then assemble them at the end. Divide the stitches for the body in 2, add 1 edge stitch in each side (for sewing) and work the front and back pieces separately.

See DROPS lesson: Can I adapt a pattern for circular needles into straight needles?

Pattern repeats can vary slightly in the different sizes, in order to get the correct proportions. If you’re not working the exact same size as the garment in the photo, yours might deviate slightly. This has been carefully developed and adjusted so that the complete impression of the garment is the same in all sizes.

Make sure to follow instructions and diagrams for your size!

If you have found a pattern you like which is available in women’s size it’s not very difficult to convert it to men’s size. The biggest difference will be the length of sleeves and body. Start working on the women size that you think would fit across the chest. The additional length will be worked right before you cast off for the armhole/sleeve cap. If the pattern is worked top-down you can add the length right after the armhole or before the first decrease on sleeve.

Regarding additional yarn amount, this will depend on how much length you add, but it is better with a skein too many than too few.

All yarns will have excess fibres (from production) that might come off as lint or shedding. Brushed yarns (ie hairier yarns) have more of these loose, excess fibres, causing more shedding.

Shedding also depends on what is worn under or over the garment, and whether this pulls at the yarn fibres. It’s therefore not possible to guarantee that there will be no shedding

Below are some tips on how to get the best result when working with hairier yarns:

1. When the garment is finished (before you wash it) shake it vigorously so the looser hairs come off. NOTE: do NOT use a lint roller, brush or any method that pulls at the yarn.

2. Place the garment in a plastic bag and put it in your freezer - the temperature will cause the fibres to become less attached to each other, and excess fibres will come off easier.

3. Leave in the freezer for a few hours before taking it out and shaking it again.

4. Wash the garment according to the instructions on the yarn label.

Pilling is a natural process that happens to even the most exclusive of fibers. It's a natural sign of wear and tear that is hard to avoid, and that is most visible in high friction areas of your garment like a sweater's arms and cuffs.

You can make your garment look as new by removing the pilling, using a fabric comb or a pill/lint remover.

Still can't find the answer you need? Then scroll down and leave your question so one of our experts can try to help you. This will be done normally within 5 to 10 working days.
In the meantime, you can read the questions and answers that others have left to this pattern or join the DROPS Workshop on Facebook to get help from fellow knitters/crocheters!

You might also like...

Post a comment to pattern DROPS Baby 43-9

We would love to hear what you have to say about this pattern!

If you want to leave a question, please make sure you select the correct category in the form below, to speed up the answering process. Required fields are marked *.

Comments / Questions (8)

country flag Amanda wrote:

Hej. I opskriften når man strikker den vrang omgang efter inddelingen til helpatent maskerne, står der at omgang skal strikkes vrang “bortset fra de 4 partier med helpatent.” Men der står ikke om de så skal strikkes ret, eller fra 2.omgang helpatent.. håber i kan hjælpe med noget afklaring. Vh Amanda :)

09.01.2023 - 15:03

DROPS Design answered:

Hej Amanda, patentmaskerne strikker du i patent på hver omgang :)

10.01.2023 - 11:40

country flag Katharina wrote:

Ich kämpfe leider etwas mit den Zunahmen: egal auf welche Weise ich sie mache (Umschlag, aus dem Querfaden, etc) die neue Masche rechts des Vollpatenteils zieht sich immer sehr zusammen und die links des Vollpatenteils wird immer größer und es entsteht ein Loch. Auch die ganz linke Masche des Vollpatenteils ist sehr sehr locker. Haben Sie einen Tipp für mich, wie ich das besser machen kann? Normalerweise stricke ich sehr regelmäßig. Danke!

21.12.2022 - 23:03

DROPS Design answered:

Liebe Katharina, versuchen Sie, die Umschläge genau so fest/locker zu stricken, damit die Maschenprobe immer stimmt und regelmäßig wird - trainieren Sie vielleicht über eine Maschenprobe, dann waschen Sie sie, es kann helfen, die Maschen regelmäßiger zu bilden. Gerne zeigen Sie aber Ihr Strickstück Ihren Händler oder bei unserer DROPS Worshop - dort kann man Ihnen sicher besser helfen. Viel Spaß beim stricken!

22.12.2022 - 08:58

country flag Flumet-Baillif Anne-Joëlle wrote:

Bonjour, il n'est pas indiqué qu'il faut mettre un marqueur au milieu du dos. Donc où se fait le changement de tour ? 1. Juste après le dernier point de raglan 2. 2 mailles après le raglan 3. Au milieu du dos Merci pour votre réponse. Anne-Joëlle

29.11.2022 - 13:12

DROPS Design answered:

Bonjour Anne-Joëlle, les tours commencent juste avant le dos (et pas au milieu dos), on n'indique effectivement pas de placer un marqueur ici, au changement de tour, mais vous pouvez tout à fait le faire. Bon tricot!

29.11.2022 - 13:57

country flag Beatrice wrote:

Buongiorno, ho riscontrato un'altra irregolarità. Le maglie di avvio per la taglia 3/4 anni non sono 94 bensì 92.

25.09.2022 - 09:08

DROPS Design answered:

Buonasera Beatrice, abbiamo corretto il testo, grazie per la segnalazione. Buon lavoro!

26.09.2022 - 18:54

country flag Beatrice wrote:

Lì, il numero di maglie per le coste inglesi è corretto, pertanto nelle spiegazioni in Italiano c\'è un errore dato che viene richiesto di lavorare, all\'interno della ripetizione *...* un\'ulteriore maglia dritta dopo la maglia passata a rovescio.

11.08.2022 - 10:26

DROPS Design answered:

Buongiorno Beatrice, c'è stata un'incomprensione nell'interpretazione della sua domanda: abbiamo inoltrato la sua segnalazione al settore design. Se ci dovesse essere una correzione la troverà direttamente online nei prossimi giorni. Buon lavoro!

11.08.2022 - 16:35

country flag Beatrice wrote:

Buongiorno, sì, ho capito che devo lavorare la maglia a coste come indicato nella spiegazione ma il numero di maglie non torna. Dato che non è stata capita la mia domanda ho provato a cambiare lingua e ho provato a leggere le istruzioni in tedesco.

11.08.2022 - 10:26

country flag Beatrice wrote:

Buonasera, non mi è molto chiaro come devo lavorare la parte delle coste inglesi dopo il bordo iniziale. Nella suddivisione delle maglie sono assegnate 5 maglie alla costa inglese ma, seguendo la spiegazione delle tecniche utilizzate, i conti non mi tornano e mi restano maglie in eccesso dato che vengono lavorate solo 3 maglie ( più un gettato) e poi una maglia a dritto a conclusione dello schema. Mi potete aiutare? Grazie mille in anticipo! Cordialmente Beatrice

09.08.2022 - 22:51

DROPS Design answered:

Buonasera Beatrice, deve lavorare 5 maglie a coste inglesi come spiegato all'inizio delle istruzioni. Buon lavoro!

10.08.2022 - 22:20

country flag Piera wrote:

Buongiorno, Sto dividendo il lavoro per il corpo e le maniche per taglia 6/9 mesi. Lavorando le 29 maglie a legaccio dello sprone, l'ultima maglia è il gettato della costa inglese. Come faccio a lavrorare la costa inglese senza questo gettato? Grazie Cordiali saluti

18.07.2022 - 16:07

DROPS Design answered:

Buonasera Piera, sta facendo riferimento al modello 43-10? Buon lavoro!

20.07.2022 - 21:27