
Popular categories
Looking for a yarn?


|
|||||||||||||||||||
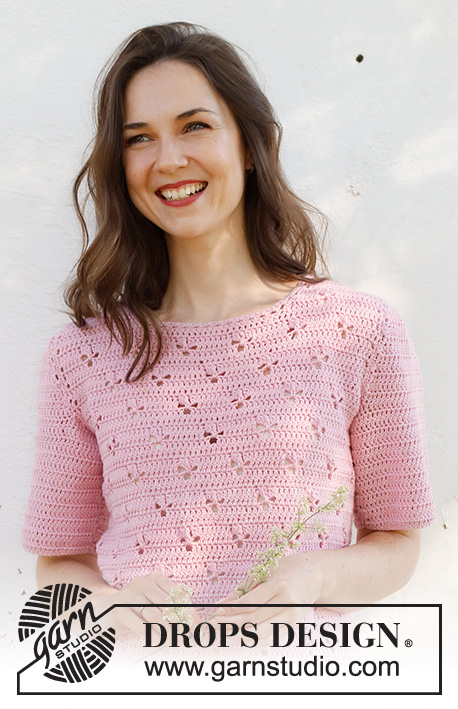
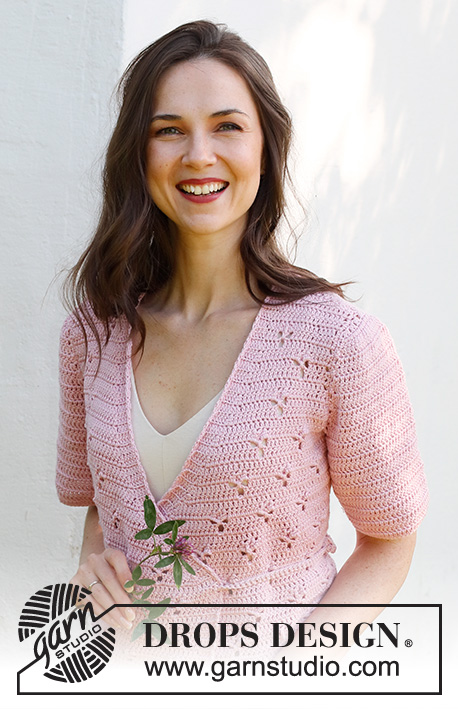
Hortense Wrap Cardigan |
|||||||||||||||||||
 |
 |
||||||||||||||||||
Crocheted wrap-around jacket in DROPS Cotton Merino. The piece is worked bottom up with lace pattern. Sizes S - XXXL.
DROPS 232-35 |
|||||||||||||||||||
|
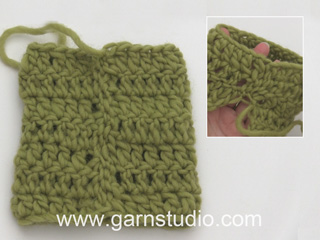
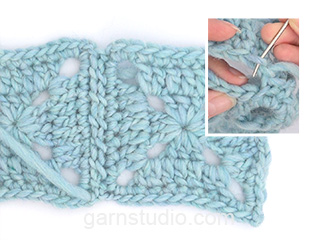
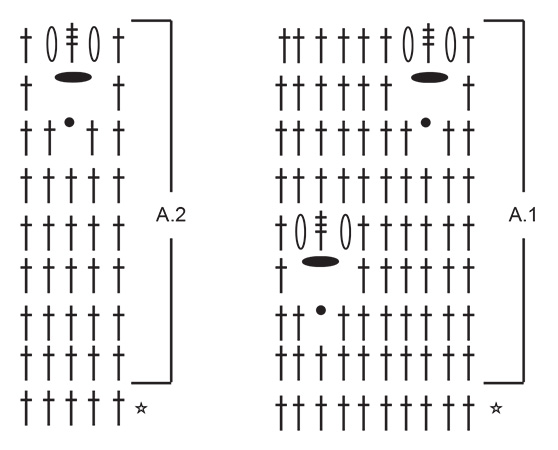
------------------------------------------------------- EXPLANATIONS FOR THE PATTERN: ------------------------------------------------------- CHAIN STITCH: If you work outermost on the hook the chain stitch will often be too tight; 1 chain stitch should be as long as 1 single/double crochet is wide. PATTERN: See diagrams A.1 to A.3. CROCHET INFORMATION: At the beginning of each row of double crochets work 3 chain stitches (replaces the first double crochet), i.e. skip the last stitch on the previous row. Work the last double crochet of the row in the 3rd chain stitch at the beginning of the previous row. At the beginning of each row of treble crochets work 4 chain stitches (replaces the first treble crochet), i.e. skip the last stitch on the previous row. Work the last treble crochet of the row in the 4th chain stitch at the beginning of the previous row. DECREASE TIP: Decrease 1 double crochet by working 2 double crochets together: * Make 1 yarn over, insert the hook through the next stitch, pick up the strand, make 1 yarn over and pull it through the first 2 loops on the hook *, work from *-* 1 more time, make 1 yarn over and pull it through all 3 loops on the hook. Decrease 2 double crochets by working 3 double crochets together: * Make 1 yarn over, insert the hook through the next stitch, pick up the strand, make 1 yarn over and pull it through the first 2 loops on the hook *, work from *-* 2 more times, make 1 yarn over and pull it through all 4 loops on the hook. INCREASE TIP (for sides): Increase by working 2 double crochets in the outermost double crochet on each side. ------------------------------------------------------- START THE PIECE HERE: ------------------------------------------------------- JACKET – SHORT OVERVIEW OF THE PIECE: The front and back pieces are worked separately, back and forth, then sewn together. Stitches are worked around the armholes, then the sleeves worked back and forth, top down. BACK PIECE: Work 75-83-89-99-107-119 CHAIN STITCHES – read description above, with hook size 4 MM = US 6 and DROPS Cotton Merino. Work 1 double crochet in the 4th chain stitch from the hook (2 double crochets) – read CROCHET INFORMATION, 1 double crochet in each of the next 71-79-85-95-103-115 chain stitches = 73-81-87-97-105-117 stitches. Work back with 1 double crochet in each double crochet. Then work pattern as follows: 1 double crochet in each of the first 4-3-6-6-5-6 double crochets, A.1 a total of 6-7-7-8-9-10 times, A.2 and 1 double crochet in each of the last 4-3-6-6-5-6 double crochets. Continue this pattern. REMEMBER THE CROCHET GAUGE! When the piece measures 8 cm = 3⅛", decrease 1 double crochet on each side – read DECREASE TIP = 71-79-85-95-103-115 stitches. Repeat the decrease when the piece measures 12 cm = 4¾" = 69-77-83-93-101-113 stitches. When the piece measures 15 cm = 6", increase 1 double crochet on each side – read INCREASE TIP! Increase like this every 6-6½-4½-7½-5-5 cm = 2⅜"-2½"-1⅝"-2⅞"-2"-2" a total of 3-3-4-3-4-4 times = 75-83-91-99-109-121 stitches. When the piece measures 28-29-30-31-32-33 cm = 11"-11⅜"-11¾"-12¼"-12½"-13", bind off for the armholes as described below, cutting the strand and making sure the next row is a row of double crochets: Skip the first 4-5-5-6-7-9 stitches for the armhole, fasten the strand with 1 slip stitch in the next double crochet, work 3 chain stitches (first double crochet), work 2-2-3-3-3-3 double crochets together, 1 double crochet in each of the next 8-6-9-7-16-15 double crochets, A.1 a total of 4-5-5-6-5-6 times, work A.2, 1 double crochet in each of the next 8-6-9-7-16-15 double crochets, work 2-2-3-3-3-3 double crochets together and 1 double crochet in the last stitch, turn (do not work the last 4-5-5-6-7-9 stitches) = 65-71-77-83-91-99 stitches. Continue the pattern back and forth, working 2-2-3-3-3-3 double crochets together on each side every row a total of 2-4-2-3-5-7 times (including the first decrease when you skipped stitches for the armholes), then work 0-0-2-2-2-2 double crochets together on each side of each row a total of 0-0-3-3-2-1 times = 63-65-67-69-71-73 stitches. Continue the pattern over the middle stitches and 1 double crochet in each of the outermost double crochets on each side. When the piece measures 42-44-46-48-50-52 cm = 16½"-17¼"-18"-19"-19¾"-20½", continue with double crochets; finish the lace pattern if necessary. When the piece measures 45-47-49-51-53-55 cm = 17¾"-18½"-19¼"-20"-21"-21⅝", work the neck as follows: 1 double crochet in each of the first 21-22-22-23-23-23 double crochets, work 2 double crochets together, turn = 22-23-23-24-24-24 stitches on the shoulder. Work 1 double crochet in each double crochet until the piece measures 47-49-51-53-55-57 cm = 18½"-19¼"-20"-21"-21⅝"-22½". Cut and fasten the strand. Work the other shoulder as follows: Skip the middle 17-17-19-19-21-23 stitches for the neck, work 2 double crochets together, 1 double crochet in each of the last 21-22-22-23-23-23 double crochets. Work 1 double crochet in each stitch until the piece measures 47-49-51-53-55-57 cm = 18½"-19¼"-20"-21"-21⅝"-22½". Cut and fasten the strand. RIGHT FRONT PIECE: Work 61-67-71-77-81-89 chain stitches (including 3 chain stitches to turn and 5 band stitches towards mid-front), with hook size 4 MM = US 6 and DROPS Cotton Merino. Work 1 double crochet in the 4th chain stitch from the hook (2 double crochets) – remember CROCHET INFORMATION, 1 double crochet in each of the next 57-63-67-73-77-85 chain stitches = 59-65-69-75-79-87 double crochets. Work 1 double crochet in each double crochet until there are 5 double crochets left, 1 double crochet in the front loop of each of the 5 last double crochets (band). Continue with pattern as follows from the right side: 1 double crochet in the back loop of each of the first 5 double crochets (band), 1 double crochet in each of the next 3 double crochets, A.1 a total of 4-5-5-6-6-7 times, A.2 a total of 1-0-1-0-1-1 times and 1 double crochet in each of the last 6-7-6-7-6-4 double crochets. Continue this pattern; the band is worked in the front loops when working from the wrong side and the back loops when working from the right side. When the piece measures 8 cm = 3⅛", decrease 1 double crochet at the end of the next row from the right side = 58-64-68-74-78-86 stitches. Repeat the decrease when the piece measures 12 cm = 4¾" = 57-63-67-73-77-85 stitches. Continue the pattern. Read the next 2 sections before continuing. INCREASING IN THE SIDE: When the piece measures 15 cm = 6", increase 1 double crochet at the end of the next row from the right side. Increase like this every 6-6½-4½-7½-5-5 cm = 2⅜"-2½"-1⅝"-2⅞"-2"-2" a total of 3-3-4-3-4-4 times. When the piece measures 28-29-30-31-32-33 cm = 11"-11⅜"-11¾"-12¼"-12½"-13", work as follows from the right side: Work as before until there are 15-14-18-17-27-28 stitches left, work 1 double crochet in each of the next 8-6-9-7-16-15 double crochets, work 2-2-3-3-3-3 double crochets together and 1 double crochet in the last stitch, turn (do not work the last 4-5-5-6-7-9 double crochets = armhole) Continue the pattern and work 2-2-3-3-3-3 double crochets together inside 1 stitch by the armhole on each row a total of 2-4-2-3-5-7 times (including the first decrease when you skipped stitches for the armhole), then work 0-0-2-2-2-2 double crochets together on each row a total of 0-0-3-3-2-1 times. DECREASING MID-FRONT: When the work measures 16 cm = 6¼", start only a lace pattern over the first A.1 from the right side (ie the lace pattern closest to the front band stitches) if there are 10 double crochets (including the front band stitches) before the first hole towards the middle front (ie the 2 chain stitches), if there are less than 10 stitches (including the front band stitches) before the first row of holes in the lace pattern, crochet 1 double crochet in each double crochet over these stitches instead. Over the band work the outermost 3 stitches with treble crochets, the other stitches are worked as before; continue to work in the front and back loops. This avoids the band being tight when you start to decrease for the neck. Work the band like this for 3 cm = 1⅛" (measured in double crochets). Then go back to working the bands in double crochets as before. When the piece measures 18 cm = 7", decrease 2 stitches inside the band by working 3 double crochets together. Decrease like this on each row a total of 10 times, then work 2 double crochets together inside the band on each row a total of 12-14-16-17-18-21 times. When all the decreases are finished there are 22-23-23-24-24-24 stitches. When the piece measures 42-44-46-48-50-52 cm = 16½"-17¼"-18"-19"-19¾"-20½", continue with double crochets (band worked as before), finish any lace pattern you have begun. When the piece measures 47-49-51-53-55-57 cm = 18½"-19¼"-20"-21"-21⅝"-22½", continue working over the 5 band stitches for a further 6½-6½-7-7-7½-8 cm = 2½"-2½"-2¾"-2¾"-2⅞"-3⅛". Cut and fasten the strand. LEFT FRONT PIECE: Work 61-67-71-77-81-89 chain stitches with hook size 4 MM = US 6 and DROPS Cotton Merino. Work 1 double crochet in the 4th chain stitch from the hook (2 double crochets), 1 double crochet in each of the next 57-63-67-73-77-85 chain stitches = 59-65-69-75-79-87 stitches. Work 1 double crochet in the front loop of each of the first 5 double crochets (band) and 1 double crochet in each of the remaining double crochets. Continue with pattern as follows from the right side: Work 1 double crochet in each of the first 6-7-6-7-6-4 double crochets, A.2 a total of 1-0-1-0-1-1 times, A.3 a total of 4-5-5-6-6-7 times, 1 double crochet in each of the next 3 double crochets and 1 double crochet in the back loop of each of the 5 last double crochets (= band). Continue this pattern; the band is worked in the front loops when working from the wrong side and the back loops when working from the right side. When the piece measures 8 cm = 3⅛", decrease 1 double crochet at the beginning of the next row from the right side = 58-64-68-74-78-86 stitches. Repeat the decrease when the piece measures 12 cm = 4¾" = 57-63-67-73-77-85 stitches. Continue the pattern. Read the next 2 sections before continuing. INCREASING IN THE SIDE: When the piece measures 15 cm = 6", increase 1 double crochet at the beginning of the next row from the right side. Increase like this every 6-6½-4½-7½-5-5 cm = 2⅜"-2½"-1⅝"-2⅞"-2"-2" a total of 3-3-4-3-4-4 times. When the piece measures 28-29-30-31-32-33 cm = 11"-11⅜"-11¾"-12¼"-12½"-13", work as follows from the right side: Cut the strand. Skip the first 4-5-5-6-7-9 double crochets for the armhole, work 1 single crochet around the next stitch, 3 chain stitches, work 2-2-3-3-3-3 double crochets together, 1 double crochet in each of the next 8-6-9-7-16-15 stitches, then pattern as before in the remaining stitches. Continue the pattern and work 2-2-3-3-3-3 double crochets together inside 1 stitch by the armhole on each row a total of 2-4-2-3-5-7 times (including the first decrease when you skipped stitches for the armhole), then work 0-0-2-2-2-2 double crochets together on each row a total of 0-0-3-3-2-1 times. DECREASING MID-FRONT: When the work measures 16 cm = 6¼", start only a lace pattern over the last A.3 from the right side (ie the lace pattern closest to the front band stitches) if there are 10 double crochets (including the front band stitches) before the last hole towards the middle front (i.e. the 2 chain stitches), if there are less than 10 stitches (including the front band stitches) before the last row of holes in the lace pattern, crochet 1 double crochet in each double crochet over these stitches instead. Over the band work the outermost 3 stitches with treble crochets, the other stitches are worked as before. Continue to work in the front and back loops. This avoids the band being tight when you start to decrease for the neck. Work the band like this for 3 cm = 1⅛" (measured in double crochets). Then go back to working the bands in double crochets as before. When the piece measures 18 cm = 7", decrease 2 stitches inside the band by working 3 double crochets together. Decrease like this on each row a total of 10 times, then work 2 double crochets together inside the band on each row a total of 12-14-16-17-18-21 times. When all the decreases are finished there are 22-23-23-24-24-24 stitches. When the piece measures 42-44-46-48-50-52 cm = 16½"-17¼"-18"-19"-19¾"-20½", continue with double crochets (band worked as before), finish any lace pattern you have begun. When the piece measures 47-49-51-53-55-57 cm = 18½"-19¼"-20"-21"-21⅝"-22½", continue working over the 5 band stitches for a further 6½-6½-7-7-7½-8 cm = 2½"-2½"-2¾"-2¾"-2⅞"-3⅛". Cut and fasten the strand. ASSEMBLY: Sew the shoulder and side seams. SLEEVES: Work an edge around each armhole as follows: Fasten the strand with 1 single crochet in the stitch by the side seam, * work 1 chain stitch, skip 1 stitch, 1 single crochet in the next stitch *, work from *-* over the stitches under the sleeve, then work up the armhole as follows: * 1 chain stitch, 1 single crochet around the next row *, work from *-* around the armhole and down to the bottom of the armhole, work the final stitches under the sleeve in the same way as the first stitches. Finish with 1 single crochet in the last stitch. Make sure your work does not tighten the armhole; work extra chain stitches between each single crochet if necessary = approx. 38-41-43-46-49-53 chain-spaces. Cut the strand. The sleeve cap is worked back and forth over more and more chain-spaces until you have worked all the chain-spaces. Work as follows from the right side: Start in the 5th chain stitch from the shoulder seam on the right side, work 1 single crochet around the chain-space, 2 double crochets around the next chain stitch (up towards the shoulder seam), work 2 double crochets around each of the next 7 chain stitches and finish with 1 slip stitch around the next chain-space = 16 stitches. Turn and work as follows from the wrong side: 3 chain stitches, 1 slip stitch around the next chain-space, 2 double crochets in each double crochet and finish with 1 slip stitch around the next chain-space on the other side of the sleeve = 32 stitches. Turn. Work 3 chain stitches, 1 slip stitch around the next chain-space, 2 double crochets in the first double crochet, 1 double crochet in each stitch until there is 1 double crochet left, 2 double crochets in the next double crochet and finish with 1 slip stitch around the next chain-space = 34 double crochets. Continue like this and increase 1 double crochet on each side a total of 5-6-8-9-10-12 times = 42-44-48-50-52-56 stitches. Approx. 16-17-15-16-17-17 chain-spaces remain. On the next row work alternately 1 and 2 double crochets around the last chain-spaces down to the side seam. Turn and work 1 double crochet in each double crochet and alternately 1 and 2 double crochets around the remaining chain-spaces on the other side of the sleeve = 66-69-70-74-77-81 stitches. On the next row adjust the number of stitches to 62-65-68-74-77-81 stitches. Continue back and forth with 1 double crochet in each double crochet. When the sleeve measures 3 cm = 1⅛" at the shortest point, decrease 1-1-1-1-0-0 double crochets on each side. Decrease like this every 3-4-7-0-0-0 cm = 1⅛"-1½"-2¾"-0"-0"-0" a total of 4-3-2-1-0-0 times = 54-59-64-72-77-81 stitches. Continue back and forth with 1 double crochet in each double crochet until the sleeve measures 15-15-14-14-13-12 cm = 6"-6"-5½"-5½"-5⅛"-4¾" at the shortest point. Cut and fasten the strand. Work the other sleeve in the same way. Sew the sleeve seams. CORDS: Work chain stitches for 40 to 50 cm = 15¾" to 19¾". Work back with 1 single crochet in each chain stitch. Cut the strand. Sew the cord to the right front piece (where decreases for the neck begin). Work chain stitches for 80 to 100 cm = 31½" to 39⅜". Work back with 1 single crochet in each chain stitch. Cut the strand. Sew the cord to the left front piece (where decreases for the neck begin). |
|||||||||||||||||||
Diagram explanations |
|||||||||||||||||||
|
|||||||||||||||||||
|
|||||||||||||||||||

|
|||||||||||||||||||

|
|||||||||||||||||||
|
Have you made this or any other of our designs? Tag your pictures in social media with #dropsdesign so we can see them! Do you need help with this pattern?You'll find tutorial videos, a Comments/Questions area and more by visiting the pattern on garnstudio.com. © 1982-2024 DROPS Design A/S. We reserve all rights. This document, including all its sub-sections, has copyrights. Read more about what you can do with our patterns at the bottom of each pattern on our site. |
|||||||||||||||||||


With over 40 years in knitting and crochet design, DROPS Design offers one of the most extensive collections of free patterns on the internet - translated to 17 languages. As of today we count 304 catalogs and 11422 patterns - 11417 of which are translated into English (US/in).
We work hard to bring you the best knitting and crochet have to offer, inspiration and advice as well as great quality yarns at incredible prices! Would you like to use our patterns for other than personal use? You can read what you are allowed to do in the Copyright text at the bottom of all our patterns. Happy crafting!
Comments / Questions (23)
Bonjour je ne comprend pas bien se passage es ce possible de me le détailler 6-7-7-8-9-10 fois A.1 au total, A.2 et 1 bride dans chacune des 4-3-6-6-5-6 dernières brides.\r\nContinuer ainsi.
04.04.2024 - 23:04DROPS Design answered:
Bonjour Mme Schipani, chaque chiffre se réfère à la taille dans le même ordre des tailles indiquées pour ce modèle, autrement dit, le 1er pour la taille S, le 2ème pour la taille M etc. Ainsi, en taille S par exemple, vous crochetez vos 73 mailles ainsi: 4 brides, 6 x A.1 (soit 6 x 10 mailles = 60 mailles), A.2 (= 5 mailles) et 4 brides = 4+60+5+4=73 brides. Bon crochet!
05.04.2024 - 08:20Hallo! Ich verstehe nicht ganz wie ich das rechte Vorderteil, den Absatz 'Abnahmen am vorderen Rand' häkeln soll. Ab wann sollen die Abnahmen passieren und wie kann ich das Muster erfolgreich weiterführen? Finde es sehr schwer zu verstehen. Vielleicht ist es möglich, ein Foto vom fertigen Cardigan zu sehen, bei dem man diesen Part auch gut erkennen kann um sich daran zu orientieren? Vielen Dank!
27.02.2024 - 20:17DROPS Design answered:
Liebe Anni, um nur komplette Rapporte von dem Muster zu haben wird man nur Stäbchen anstatt Muster häkeln wenn man nicht genügende Maschen für ein ganzes Rapport wegen Abnahmen am vorderen Rand hat. Die anderen Muster häkelt man aber wie zuvor weiter, dh wenn man weniger als 10 Maschen zwischen 2 Lochmuster hat, dann häkelt man nur Stäbchen, siehe auch Fotos, wo die Lochmuster eine schöne Diagonale bilden (nur komplette Rapporte). Viel Spaß beim Häkeln!
28.02.2024 - 09:20Hi! Just to confirm, in the US-English pattern, when it talks about "single-double" crochet stitches, is that meant to be an ordinary treble crochet? After glancing at the UK-English pattern that is what I expect. Thanks!
24.02.2024 - 17:10DROPS Design answered:
Dear Allene, it looks like there is a typo in the US-pattern, replace the first double crochet with 3 chains and the first double treble with 4 chains, pattern will be fixed thanks for noticing. Happy crocheting!
26.02.2024 - 08:26De vraag is al eerder gesteld maar het antwoord heeft mij niet verder geholpen. Het gaat om de instructie voor de mouw. Als ik na de eerste toer 16 stokjes heb gehaakt, moet het werk worden gekeerd. Ik haak de 3 lossen maar heb dan geen lossenlus maar 16 stokjes voor me. Welke lossenlus wordt bedoeld?
06.10.2023 - 22:40Hej igen! Hittade mina fel hehe tack ändå!
28.07.2023 - 21:03Hej! Förstår inte riktigt mönstret. Har nu repeterat A.1 6 gånger och har 15 maskor kvar att virka i. Men jag behöver ju repetera A.1 en gång till. Vart har jag gjort fel? Sen ska ju A.2 ha 5 maskor och sen avsluta med 3, det finns inte nog med maskor kvar. Snälla hjälp!
28.07.2023 - 20:46DROPS Design answered:
Hej Eliza, du har 73 stolpar, Sedan virkas det mönster så här: 1 stolpe i var och en av de första 4 stolparna, A.1 totalt 6 gånger (= 60st ), A.2 (5 st) och 1 stolpe i var och en av de sista 4 stolparna = totalt 73
07.08.2023 - 10:40Bonjour,\r\nMerci beaucoup pour votre réponse très rapide. Toutes mes amitiés. Chantal
09.06.2023 - 09:21Bonsoir,\r\nJe viens de terminer le devant droit. En fin d’explications, il est noté. : « crocheter seulement les 5 mailles de bordure devant pendant encore 6,5 cm ». Faudra-t-il coudre cette petite bande autour de l’encolure du dos ? Il n’y a aucune indication à ce sujet. Merci de votre réponse. Chantal Bonneton
09.06.2023 - 00:03DROPS Design answered:
Bonjour Mme Bonneton, effectivement, cette info manque (je remonte tout ça à nos stylistes, merci); cette petite bande correspond effectivement à la bordure d'encolure que l'on va ensuite assembler avec celle de l'autre devant, puis le long de l'encolure dos. Bon crochet!
09.06.2023 - 09:12Scusate, non riesco a capire come lavorare nel filo davanti/dietro per il bordo. Si intende maglie in rilievo davanti/dietro o altro? Grazie, Sara
11.04.2023 - 13:35DROPS Design answered:
Buonasera Sara, deve lavorare in entrambi i fili delle maglie. Buon lavoro!
11.04.2023 - 22:40For the size large, is the last increase on the back piece supposed to be after the start of the armholes? Also regarding the armholes, the pattern mentions "making sure the next row is a row of double crochets," does this just mean the row without any lace motif?
25.02.2023 - 06:25DROPS Design answered:
Dear Emile, no, the first increase is already included in the total times. So, for size L, you increase after 4.5, 9 and 13.5cm, from the 15 cm mark. Therefore, you should be at 28.5cm after all increases and start the armholes at 30cm. And yes, a row of double crochets is one where you are only working double crochets, with no lace motifs. Happy crocheting!
26.02.2023 - 23:27