
Popular categories
Looking for a yarn?


|
|
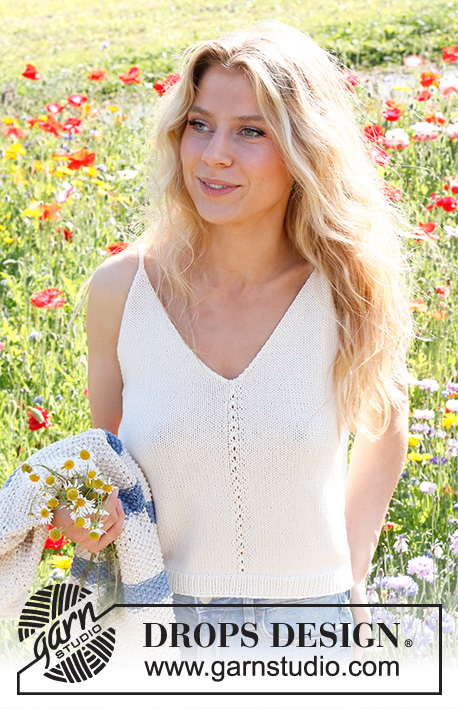
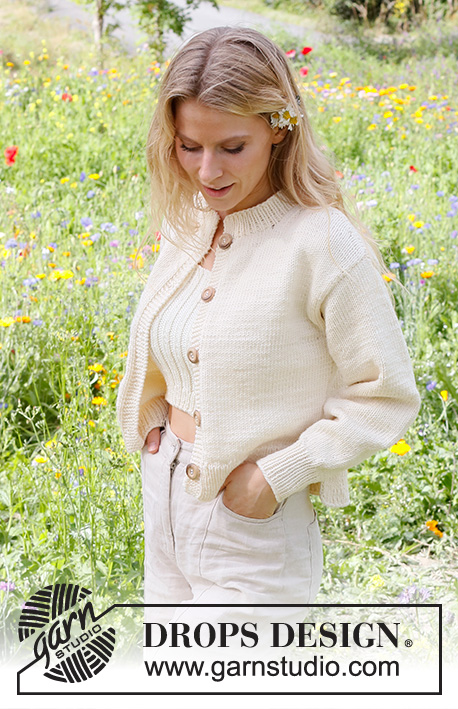
Prairie Rose Set |
|
 |
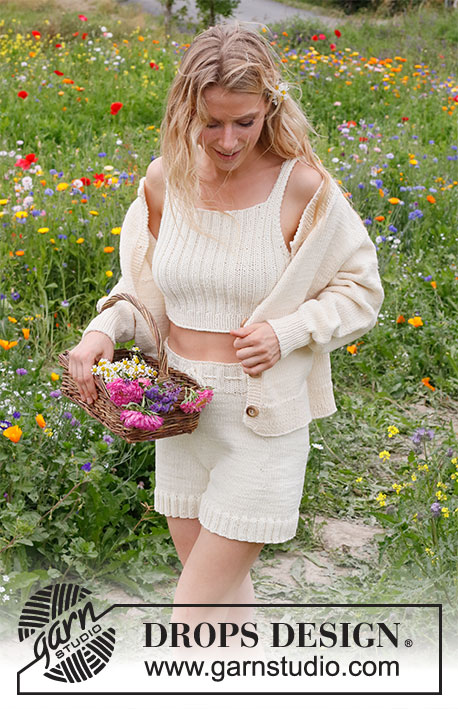 |
Knitted singlet / crop top and shorts in DROPS Big Merino. Knit the singlet bottom up in rib. Knit the shorts top down in stocking stitch. Size: S - XXXL
DROPS 230-3 |
|
|
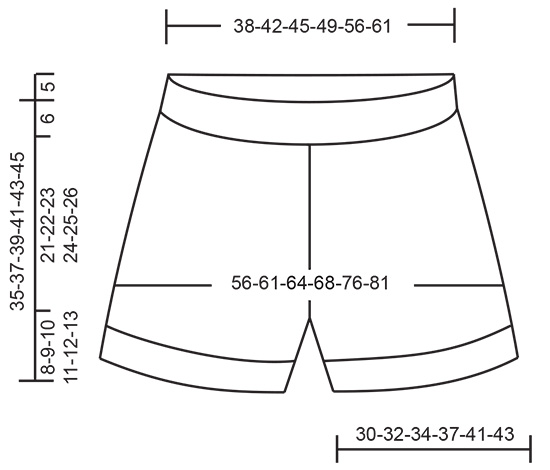
---------------------------------------------------------- EXPLANATION FOR THE PATTERN: ---------------------------------------------------------- GARTER STITCH (worked in the round): 1 ridge vertically = 2 rounds, i.e. knit 1 round and purl 1 round. GARTER STITCH (back and forth): Knit all rows. 1 ridge vertically = knit 2 rows. DECREASE TIP (applies to armholes on singlet): Decrease inside 2 stitches in garter stitch. All decreases are done from the right side! DECREASE AS FOLLOWS AFTER 2 STITCHES IN GARTER STITCH: Slip 1 stitch knitwise, knit 1, pass slipped stitch over stitch worked. DECREASE AS FOLLOWS BEFORE 2 STITCHES IN GARTER STITCH: Work until 2 stitches remain before the 2 stitches in garter stitch, knit 2 together and work 2 stitches in garter stitch. INCREASE TIP (applies to shorts): BEFORE MARKER THREAD: The new stitch is twisted towards the right. Use left needle to pick up yarn between 2 stitches from round below, pick up yarn from the back and knit stitch in front loop of stitch. AFTER MARKER THREAD: The new stitch is twisted towards the left. Use left needle to pick up yarn between 2 stitches from round below, pick up yarn from the front and knit stitch in back loop of stitch. ---------------------------------------------------------- START THE PIECE HERE: ---------------------------------------------------------- SINGLET - SHORT OVERVIEW OF THE PIECE: Work body in the round on circular needle, from the bottom and up to armholes. Then finish front piece and back piece back and forth on circular needle separately until finished measurements. BODY: Cast on 144-160-176-192-208-224 stitches on circular needle size 4 mm with DROPS Big Merino. Knit 1 round. Then work rib as follows: * Purl 1, knit 1 *, repeat from *-* the entire round. When rib measures 4 cm, switch to circular needle size 4.5 mm. Insert 1 marker thread at beginning of round and 1 marker thread after 72-80-88-96-104-112 stitches. Marker threads mark the sides of body – move the marker threads upwards when working. Now work rib as follows: Purl 1, * knit 2, purl 2 *, work from *-* until 3 stitches remain on round, knit 2, and finish with purl 1. Continue rib like this. REMEMBER THE KNITTING TENSION! When piece measures 16-17-18-19-20-21 cm, work 2 ridges in GARTER STITCH – read explanation above, over the middle 10-10-10-18-18-18 stitches in each side (marker threads is in the middle of these 10-10-10-18-18-18 stitches – work the other stitches on row in rib as before). On first round after the 2 ridges, cast off for armholes as follows: Cast off 3-3-3-7-7-7 stitches, work 2 stitches in garter stitch, 62-70-78-78-86-94 stitches in rib as before (begin and end with knit 2), 2 stitches in garter stitch, cast off 6-6-6-14-14-14 stitches (marker thread is in the middle of these 6-6-6-14-14-14 stitches), work 2 stitches in garter stitch, 62-70-78-78-86-94 stitches in rib (begin and end with knit 2), 2 stitches in garter stitch, cast off the last 3-3-3-7-7-7 stitches. Cut the yarn. Finish front and back piece separately. BACK PIECE: = 66-74-82-82-90-98 stitches. Begin from wrong side, and continue rib back and forth with 2 stitches in garter stitch in each side. AT THE SAME TIME on next row from right side, decrease 1 stitch in each side for armholes - read DECREASE TIP. Decrease for armholes like this on every other row 0-0-4-0-3-2 times in total, and then on every 4th row 4-4-4-4-5-6 times in total = 58-66-66-74-74-82 stitches. Continue rib with 2 stitches in garter stitch in each side. When piece measures 27-29-30-32-33-35 cm, cast off for neck as follows: Work the first 10-10-14-14-18-18 stitches as before, and then slip the stitches on a thread for strap, cast off 38-46-38-46-38-46 stitches for neck, and work as before over the last 10-10-14-14-18-18 stitches. Then work straps as explained below. STRAP: = 10-10-14-14-18-18 stitches. Work rib back and forth as before with 2 stitches in garter stitch in each side until piece measures 34-36-38-40-42-44 cm from cast-on edge (strap measures approx. 7-7-8-8-9-9 cm). Cast off. Slip stitches from thread back on circular needle size 4.5 mm , and work strap the same way as first strap. FRONT PIECE: = 66-74-82-82-90-98 stitches. Work the same way as back piece, cast off for neck and work straps the same way as on back piece. ASSEMBLY: Sew straps together inside cast-off edge at the top of each shoulder. ---------------------------------------------------------- SHORTS - SHORT OVERVIEW OF THE PIECE: Worked in the round on circular needle from mid back, top down. To make the shorts higher mid back work an elevation. Then continue piece in the round before dividing for legs. Work each leg in the round on circular needle, top down. Twine a string at the end for edge with eyelet holes in the waist. EDGE: Cast on 128-144-152-168-192-208 stitches on circular needle size 4 mm with DROPS Big Merino. Knit 1 round. Then work rib as follows: Knit 1, * purl 2, knit 2 *, work from *-* until 3 stitches remain on round, purl 2, and finish with knit 1. When rib measures 3 cm, work a round with eyelet holes for tie as follows: Knit 1, * make 1 yarn over, purl 2 together, knit 2 *, work from *-* until 3 stitches remain on round, make 1 yarn over, purl 2 together, and finish with knit 1. Continue rib = knit 2/purl 2 until edge measures 6 cm from cast-on edge. Knit 1 round while increasing 2-2-4-4-6-6 stitches evenly = 130-146-156-172-198-214 stitches. Then work shorts as explained below. SHORTS: Switch to circular needle size 5 mm. Insert 1 marker at beginning of round = mid back. Work elevation as follows: Begin from right side at the marker, knit 8-9-10-11-12-13, turn piece, tighten yarn, purl 16-18-20-22-24-26, turn piece, tighten yarn, knit 24-27-30-33-36-39, turn piece, tighten yarn, purl 32-36-40-44-48-52. Continue back and forth like this by working 8-9-10-11-12-13 stitches more on every turn until 96-108-120-132-144-156 stitches in total have been worked back and forth (do not work over the middle 34-38-36-40-54-58 stitches mid front). When elevation is done, knit until mid back. Shorts now measures approx. 5 cm vertically mid back. Insert 6 marker threads in piece as explained below. Use marker threads when increasing and insert every marker thread between 2 stitches. Replace the marker mid back with a marker thread, count 24-27-29-32-38-41 stitches, insert 1 marker thread before next stitch, count 17-19-20-22-23-25 stitches (in the side on shorts), insert 1 marker thread before next stitch, count 24-27-29-32-38-41 stitches, insert 1 marker thread before next stitch (mid front), count 24-27-29-32-38-41 stitches, insert 1 marker thread before next stitch, count 17-19-20-22-23-25 stitches (in the side on shorts), insert 1 marker thread before next stitch, 24-27-29-32-38-41 stitches remain on round after last marker thread. Work in stocking stitch in the round. When piece measures 2-3-3-3-3-4 cm measured after rib mid front, increase 1 stitch BEFORE every marker thread - read INCREASE TIP (= 6 stitches increased) - NOTE: To avoid moving the marker thread mid back do the increase before this marker thread at the end of round. When piece measures 5-6-6-6-6-7 cm measured after rib mid front, increase 1 stitch AFTER every marker thread- remember INCREASE TIP (= 6 stitches increased). Increase alternately before and after the 6 marker threads every 3 cm 6 times in total = 166-182-192-208-234-250 stitches (remember that the increase before marker thread mid back is done at the end of round). When piece measures 18-19-20-21-22-23 cm measured after rib mid front, remove the marker threads. Now insert 1 marker in first stitch on round, and 1 marker in the 84th-92nd-97th-105th-118th-126th stitch on round (mid back and mid front). On next round increase both BEFORE and AFTER stitches with markers - remember INCREASE TIP (= 4 stitches increased). Increase like this on EVERY round 6 times in total = 190-206-216-232-258-274 stitches. After last increase piece measures approx. 27-28-29-30-31-32 cm from cast-on edge mid front. Now divide the piece at both markers and finish each leg separately. Slip the first 95-103-108-116-129-137 stitches on short circular needle size 5 mm and leave the remaining 95-103-108-116-129-137 stitches on circular needle size 5 mm. Cut the yarn. LEG: = 95-103-108-116-129-137 stitches. Cast on 3-3-4-4-5-5 stitches at the beginning of row, work in stocking stitch over the 95-103-108-116-129-137 stitches, and cast on 3-3-4-4-5-5 stitches at the end of row = 101-109-116-124-139-147 stitches. Slip the piece together, and work in stocking stitch in the round until piece measures 4-5-6-7-8-9 cm, or desired length. Knit 1 round while increasing 31-35-36-36-41-45 stitches evenly = 132-144-152-160-180-192 stitches. Switch to a short circular needle size 4 mm. Work rib in the round = knit 2/purl 2 for 4 cm. Loosely cast off. Leg measures approx. 8-9-10-11-12-13 Slip stitches from the other leg on a short circular needle size 5 mm and work the same way as first leg. ASSEMBLY: Sew opening between legs, i.e. sew seam along mid front to mid back in the 6-6-8-8-10-10 stitches cast on in each side on each leg. TWINED STRING: Cut 3 strands Big Merino of 3½-3½-4½-4½-5½-5½ metres each, twine the strands together until they resist, fold the string double so that it twines again. Make a knot at each end. Begin mid front on shorts and thread tie up and down through eyelet row on edge. |
|

|
|
|
|
|
Have you made this or any other of our designs? Tag your pictures in social media with #dropsdesign so we can see them! Do you need help with this pattern?You'll find tutorial videos, a Comments/Questions area and more by visiting the pattern on garnstudio.com. © 1982-2024 DROPS Design A/S. We reserve all rights. This document, including all its sub-sections, has copyrights. Read more about what you can do with our patterns at the bottom of each pattern on our site. |
|


With over 40 years in knitting and crochet design, DROPS Design offers one of the most extensive collections of free patterns on the internet - translated to 17 languages. As of today we count 304 catalogues and 11422 patterns - 11422 of which are translated into English (UK/cm).
We work hard to bring you the best knitting and crochet have to offer, inspiration and advice as well as great quality yarns at incredible prices! Would you like to use our patterns for other than personal use? You can read what you are allowed to do in the Copyright text at the bottom of all our patterns. Happy crafting!
Comments / Questions (28)
Bonjour je voudrais faire se modèle pour ma petite fille mais je ne tricoté qu avec des aiguilles droites et non circulaires je voulais savoir si c est le même nombres de mailles et faire pareil je vous remercie d avance
16.04.2024 - 21:37DROPS Design answered:
Bonjour Mme Pousset, cette leçon va vous donner quelques pistes pour pouvoir adapter un modèle sur aiguilles droites. Bon tricot!
17.04.2024 - 08:29I am at the point where my body work for the tank top reached 19cm. I am confused about the DECREASE TIP and other decreases that are listed on the garter stitch. It is unclear whether I should decrease before starting the first row of garter stitches or not. Could you clarify when to start decreasing the armholes? Is the DECREASE TIP only for the back piece?
16.04.2024 - 16:28DROPS Design answered:
Dear Isabelle, the DECREASE TIP tells you to decrease inside the garter stitch, that is, at the beginning of the row, after the two stitches knitted at the edge with gater stitch, at the end of the row just before the two last stitch, that is knitted with garter stitch. Happy Crafting!
16.04.2024 - 21:51I am starting the back piece—are the decreases only done on the right side and the rib pattern continues with the knitting done on the wrong side.? Just a little confused.
18.03.2024 - 07:56DROPS Design answered:
Dear Robin, the decreases for armholes are worked on every row from right side, decrease as explained under DECREASE TIP (applies to armholes on singlet):, at the same time work in rib as before with 2 edge sts in garter stitch on each side (decreases are worked inside these 2 sts). Happy knitting!
18.03.2024 - 15:09Where are the 18 stitches supposed to be in the singlet pattern to do the garter stitch? I am working on the body and have a total of 208 stitches. With markers at the beginning and again at 104 stitches.
14.03.2024 - 19:39DROPS Design answered:
Dear Robin, the 18 sts in garter stitch will be worked on both sides of body, on either side of markers, ie you will work in garter stitch 9 sts before the marker + 9 sts after the marker and repeat at the other marker. Happy knitting!
15.03.2024 - 08:20I am working on the body of the singlet and am at the point where you are to do garter stitch over middle of 18 stitches. The pattern says the thread marker is in the middle. I am not sure where the 18 stitches are. I have a total of 208 stitches and markers at the beginning and after 104 stitches.
14.03.2024 - 19:36How many yards of yarn are required for the shorts? I want to use a different yarn so the weight will be different.
11.02.2024 - 00:48DROPS Design answered:
Dear Sarah, you can calculate the yards of yarn from the yardage of the yarn used. 50g of Big Merino = 82 yards. From here, you can obtain how many yards of yarn you will need for your size. Happy knitting!
11.02.2024 - 23:15Vorrei fare i pantaloni, ma non ho capito una cosa: le misure del campione si riferiscono al lavoro con i ferri 5mm? Io ho ottenuto il campione con i 4,5 quindi devo fare le coste con quelli del 3,5? grazie mille in anticipo
14.12.2023 - 17:55DROPS Design answered:
Buonasera Niccolò, è corretto, se ha raggiunto il campione con i ferri n° 4,5 mm farà le coste con i ferri n° 3,5 mm. Buon lavoro!
15.12.2023 - 21:46Hi, I’m having trouble with the shorts pattern: It says to increase before every marker thread until the piece measures 6cm from the rib edge. I’ve increased every row, for 3 cm and now I have more stitches in the needle than it’s mentioned in the pattern. Am I supposed to only increase every 3cm rather than increase throughout until the piece has the required measurement?
08.11.2023 - 22:24DROPS Design answered:
Dear Djoyce, you first increase 1 stitch before each marker thread (= 6 sts increased), then next time (after 3 cm) you will increase 1 stitch after each marker thread (= 6 sts increased). Repeat these increases a total of 6 times (4 more times) = you will have increased 6 sts a total of 6 times on every 3rd cm = 36 sts. Happy knitting!
09.11.2023 - 08:33Hei! Jeg bare lurte på hvorfor man må ha både rundpinne 4 og 4,5 for toppen? Er det mulig å strikke med bare en av størrelsene?
13.08.2023 - 00:39DROPS Design answered:
Hei Malin, Man legger opp og strikker første delen av vrangbord med pinnestørrelse 4, slik at den sitter tettere til kroppen. Også bytter man til størrelse 4.5 for resten av toppen. God fornøyelse!
14.08.2023 - 06:52I was wondering how much negative ease you recommend for this pattern? Also is the measurements of the garment taken not stretched, stretched, or roughly stretched.
03.08.2023 - 14:31DROPS Design answered:
Hi Ella, To get the shape shown in the photograph, use the body measurements given in the measurements chart to work the correct size. Happy knitting!
04.08.2023 - 06:41