DROPS Air
DROPS Air
65% Alpaca, 28% Polyamide, 7% Wool
from 5.30 € /50g
DROPS Fabel
DROPS Fabel
75% Wool, 25% Polyamide
from 2.50 € /50g
Get the yarn to make this pattern from 34.00€.

The yarn cost is calculated from the pattern’s smallest size and the yarn’s cheapest product type. Looking for an even better price? You might find it on the DROPS Deals!

DROPS SS24

Dawn Mist

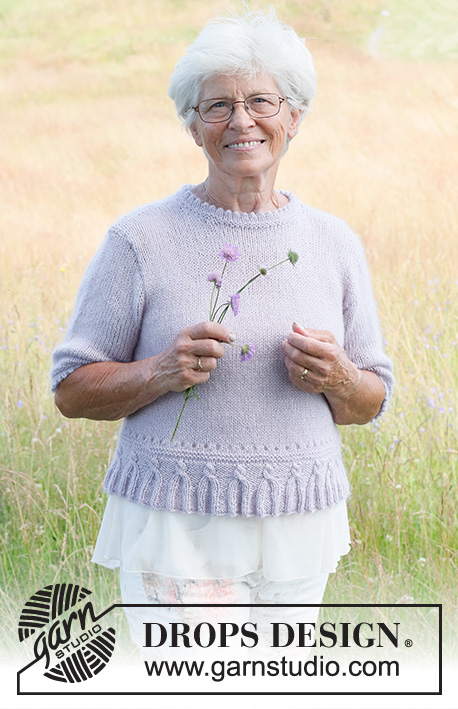
Knitted jumper in DROPS Fabel and DROPS Air. The piece is worked top down with increases on shoulders and stocking stitch. Sizes S - XXXL.

DROPS 232-50
DROPS Design: Pattern fa-488
Yarn group A + C or D
-------------------------------------------------------

SIZES:
S - M - L - XL - XXL - XXXL

MATERIALS:
DROPS AIR from Garnstudio (belongs to yarn group C)
250-250-300-300-350-350 g colour 02, wheat
And use:
DROPS FABEL from Garnstudio (belongs to yarn group A)
150-200-200-200-250-250 g colour 904, lavender

NEEDLES:
DROPS CIRCULAR NEEDLE SIZE 7 MM: Length 40 cm and 80 cm.
DROPS CIRCULAR NEEDLE SIZE 6 MM: Length 80 cm.
DROPS DOUBLE POINTED NEEDLES SIZE 7 MM.
DROPS DOUBLE POINTED NEEDLES SIZE 6 MM.
The technique MAGIC LOOP can be used – you then only need circular needle of 80 cm in each size.

KNITTING TENSION:
12 stitches in width and 16 rows in height with stocking stitch and 1 strand of each quality = 10 x 10 cm.
NOTE: Needle size is only a guide. If you get too many stitches on 10 cm, change to a larger needle size. If you get too few stitches on 10 cm, change to a smaller needle size.

-------------------------------------------------------

Alternative Yarn – See how to change yarns here
Yarn Groups A to F – Use the same pattern and change the yarn here
Yarn usage using an alternative yarn – Use our yarn converter here

-------------------------------------------------------

DROPS Air
DROPS Air
65% Alpaca, 28% Polyamide, 7% Wool
from 5.30 € /50g
DROPS Fabel
DROPS Fabel
75% Wool, 25% Polyamide
from 2.50 € /50g
Get the yarn to make this pattern from 34.00€.

The yarn cost is calculated from the pattern’s smallest size and the yarn’s cheapest product type. Looking for an even better price? You might find it on the DROPS Deals!

Pattern instructions

NOTE: This pattern is written in British English. All measurements in charts are in cm. For conversion from cm to inches - click here. There are different terms for crocheting in British and American English. If this pattern includes crochet, click for "crochet terms" here. For this pattern in American English, please click here.
-------------------------------------------------------

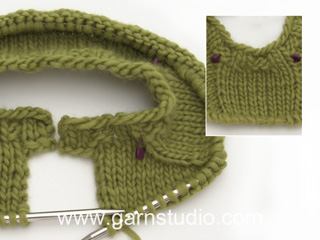
EXPLANATIONS FOR THE PATTERN:

-------------------------------------------------------

RIDGE/GARTER STITCH (worked back and forth):
Knit all rows.
1 ridge = knit 2 rows.

ELEVATION (back of neck):
Start from the right side at the marker-thread mid-back, knit 6-6-7-7-7-8, turn, tighten the strand, purl 12-12-14-14-14-16 turn, tighten the strand, knit 18-18-21-21-21-24, turn, tighten the strand, purl 24-24-28-28-28-32, turn, tighten the strand, knit 30-30-35-35-35-40 (here you must also increase for the shoulder as described in the text – the increased stitches are not counted). Turn, tighten the strand, purl 36-36-42-42-42-48 (remember to increase for the shoulder). Turn, tighten the strand and knit to the marker-thread mid-back (remember to increase for the shoulder). The elevation is now finished and you have increased 2 times for the shoulders (8 stitches). Now work the yoke as described in the text.

INCREASE TIP-1 (from right side):
BEFORE THE MARKER:
The new stitch twists to the right.
Use left needle to pick up thread between 2 stitches from round/row below, pick up thread from behind and knit stitch in front loop.
AFTER THE MARKER:
The new stitch twists to the left.
Use left needle to pick up thread between 2 stitches from round/row below, pick up thread from from front and knit stitch in back loop.

INCREASE TIP-2 (from wrong side – when working the elevation):
BEFORE THE MARKER:
The new stitch twists to the right.
Use left needle to pick up thread between 2 stitches from row below, pick up thread from from front and purl stitch in back loop.
AFTER THE MARKER:
The new stitch twists to the left.
Use left needle to pick up thread between 2 stitches from row below, pick up thread from behind and purl stitch in front loop.

DECREASE TIP (for sleeves):
Decrease 1 stitch on either side of the marker as follows: Work until there are 3 stitches left before the marker, knit 2 together, knit 2 (marker sits between these 2 stitches), slip 1 stitch as if to knit, knit 1 and pass the slipped stitch over the knitted stitch (2 stitches decreased).

-------------------------------------------------------

START THE PIECE HERE:

-------------------------------------------------------


JUMPER – SHORT OVERVIEW OF THE PIECE:
The neck and yoke are worked in the round with circular needle, from mid back and top down. You can work an elevation at the back of the neck if you wish. The yoke is divided for body and sleeves and the body is continued in the round with circular needle. The sleeves are worked with short circular needle/double pointed needles.

NECK:
Cast on 57-60-63-66-69-72 stitches with circular needle size 6 mm and 1 strand DROPS Fabel and 1 strand DROPS Air. Knit 1 round, then work rib in the round (knit 1 twisted, purl 2) for 4 cm.
Knit 1 round where you decrease 3-2-1-0-3-2 stitches evenly spaced = 54-58-62-66-66-70 stitches.
Insert 1 marker in the middle of the round (mid-front) – the yoke is measured from this marker!

YOKE:
Change to circular needle size 7 mm. Insert 1 marker-thread at the beginning of the round (mid-back).
Insert 2 more markers without working the stitches and inserting them in stitches. These markers are used when increasing for the shoulders and should be of a different colour to the marker mid-front.
Marker 1: Start mid-back, count 13-14-15-16-16-17 stitches (½ back piece), insert marker in the next stitch.
Marker 2: Count 26-28-30-32-32-34 stitches from marker 1 (front piece), insert marker in the next stitch.
There are 13-14-15-16-16-17 stitches left after marker 2.
Allow these 2 markers to follow your work onwards.
You can now work an ELEVATION at the back of the neck – read description above. Note the increases to shoulders are worked at the same time as the last 3 rows in the elevation – read INCREASES TO SHOULDERS and INCREASE TIP-2 (when working from the wrong side).
If you do not want an elevation, go straight to INCREASES TO SHOULDERS.

INCREASES TO SHOULDERS:
Work in the round, in stocking stitch.
AT THE SAME TIME on the first round increase 4 stitches as follows:
Increase BEFORE and AFTER marker-stitches 1 and 2 – read INCREASE TIP-1.

Increase like this on every round a total of 13-15-16-18-22-24 times = 106-118-126-138-154-166 stitches. REMEMBER THE KNITTING TENSION!
Knit 1 round where you cast off the marker-stitches = 104-116-124-136-152-164 stitches. Cut the strands. Keep the stitches for the back piece on the needle (stitches between markers 1 and 2) and place the other stitches on a thread for the front piece. 52-58-62-68-76-82 stitches on the needle for the back piece and 52-58-62-68-76-82 stitches on the thread for the front piece.

BACK PIECE:
Work stocking stitch back and forth for 19-20-21-22-23-24 cm. Cast on 1 edge stitch on each side = 54-60-64-70-78-84 stitches. Insert 1 marker in each side (used when working the sleeves). Continue working until the piece measures 38-40-42-44-46-48 cm from the division. Purl 1 row from the wrong side where you increase 11-11-13-13-17-17 stitches evenly spaced = 65-71-77-83-95-101 stitches. Change to circular needle size 6 mm and work as follows from the right side: 2 stitches in GARTER STITCH – see description above, * knit 1 twisted, purl 2 *, work from *-* until there are 3 stitches left, knit 1 twisted and 2 stitches in garter stitch. Continue this rib for 16 cm, cast off with knit over knit and purl over purl. The piece measures approx. 56-58-60-62-64-66 cm from the shoulder down.

FRONT PIECE:
Place the stitches from the thread on circular needle size 7 mm and work in the same way as the back piece.

SLEEVES:
The sleeves are worked top down. Start at the marker on the front piece and knit up 22-24-26-27-28-29 stitches up to the shoulder, then 22-24-26-27-28-29 stitches down to the marker on the back piece = 44-48-52-54-56-58 stitches. Work stocking stitch in the round. Insert 1 marker mid-under the sleeve. When the piece measures 4 cm decrease 1 stitch on each side of the marker – read DECREASE TIP. Decrease like this every 7½-6½-5-4½-4½-3½ cm a total of 6-7-8-9-9-10 times = 32-34-36-36-38-38 stitches. Continue working until the sleeve measures 46-45-44-43-41-40 cm, knit 1 round where you increase 4-2-3-6-4-7 stitches evenly spaced = 36-36-39-42-42-45 stitches. Change to double pointed needles size 6 mm and work rib (knit 1 twisted, purl 2) for 6 cm. Cast off. The sleeve measures 52-51-50-49-47-46 cm. Work the other sleeve in the same way, but knit up stitches from the back piece first, up to the shoulder then down the front piece.

ASSEMBLY:
Sew the side seams leaving 18 cm at the bottom = split

This pattern has been corrected.

Updated online: 23.03.2022
NECK:
Cast on 57-60-63-66-69-72 stitches with circular needle size 6 mm and 1 strand DROPS Fabel and 1 strand DROPS Air. Knit 1 round, then work rib in the round (knit 1 twisted, purl 2) for 4 cm.
Knit 1 round where you decrease 3-2-1-0-3-2 stitches evenly spaced ...

Diagram

diagram measurements

Each of our patterns has specific tutorial videos to help you.

Do you have a question? See a list of frequently asked questions (FAQ)

Knitting tension is what determines the final measurements of your work, and is usually measured per 10 x 10 cm. It is provided like so: number of stitches in width x number of rows in height - eg: 19 stitches x 26 rows = 10 x 10 cm.

The knitting tension is very individual; some people knit/crochet loosely while others work tightly. You adjust the knitting tension with the needle size, which is why the suggested needle size is only meant as a guide! You need to adjust this (up or down) to ensure that YOUR knitting tension matches the knitting tension provided in the pattern. If you work with a different knitting tension than provided you will have a different yarn consumption, and your work will have different measurements than what the pattern suggests.

The knitting tension also determines which yarns can replace each other. As long as you achieve the same knitting tension you can replace one yarn with another.

See DROPS lesson: How to measure your tension/gauge

See DROPS video: How to make a gauge tension swatch

The required amount of yarn is provided in grams, eg: 450 g. To calculate how many balls you’ll need you first need to know how many grams are in 1 ball (25g, 50g or 100g). This information is available if you click on the individual yarn quality on our pages. Divide the amount required with the amount of each ball. For example, if each ball is 50g (the most common amount), the calculation will be as follows: 450 / 50 = 9 balls.

The important thing when changing from one yarn to another is that the knitting/crochet tension remains the same. This is so that the measurements of the finished piece will be the same as on the sketch provided. It is easier to achieve the same knitting tension using yarns from the same yarn group. It is also possible to work with multiple strands of a thinner yarn to achieve the knitting tension of a thicker one. Please try our yarn converter. We recommend you to always work a test swatch.

Please NOTE: when changing yarn the garment might have a different look and feel to the garment in the photo, due to individual properties and qualities of each yarn.

See DROPS lesson: Can I use a different yarn than the one mentioned in the pattern?

All our yarns are categorised into yarn groups (from A to F) according to thickness and knitting tension – group A contains the thinnest yarns and group F the thickest. This makes it easier for you to find alternative yarns to our patterns, should you wish to switch yarn. All yarns within the same group have a similar knitting tension and can easily replace each other. However, different yarn qualities have different structures and properties which will give the finished work a unique look and feel.

Click here for an overview of the yarns in each yarn group

At the top of all our patterns you’ll find a link to our yarn calculator, which is a helpful tool should you wish to use a different yarn than suggested. By filling in the yarn quality you wish to replace, the amount (in your size) and number of strands, the calculator will present good alternative yarns with the same knitting tension. Additionally it will tell you how much you’ll require in the new qualities and whether you’ll need to work with multiple strands. Most skeins are 50g (some are 25g or 100g).

If the pattern is worked with multiple colours, every colour will have to be calculated separately. Similarly, if the pattern is worked with several strands of different yarns (for example 1 strand Alpaca and 1 strand Kid-Silk) you will have to find alternatives for each, individually.

Click here to see our yarn calculator

Since different yarns have different qualities and textures we have chosen to keep the original yarn in our patterns. However, you can easily find options among our available qualities by using our yarn calculator, or simply pick a yarn from the same yarn group.

It is possible that some retailers still have discontinued yarns in stock, or that someone has a few skeins at home that they would like to find patterns for.

The yarn calculator will provide both alternative yarn as well as required amount in the new quality.

If you think it's hard to decide what size to make, it can be a good idea to measure a garment you own already and like the size of. Then you can pick the size by comparing those measures with the ones available in the pattern's size chart.

You'll find the size chart at the bottom of the pattern.

See DROPS lesson: How to read size chart

The needle size provided in the pattern serves only as a guide, the important thing is to follow the knitting tension. And since knitting tension is very individual, you will have to adjust the needle size to ensure that YOUR tension is the same as in the pattern – maybe you’ll have to adjust 1, or even 2 needle sizes, up or down to achieve the correct tension. For this, we recommend that you work test swatches.

Should you work with a different knitting tension than the one provided, the measurements of the finished garment might deviate from the measurement sketch.

See DROPS lesson: How to measure your tension/gauge

See DROPS video: How to make a tension/gauge swatch

Working a garment top-down provides more flexibility and room for personal adjustment. For example it is easier to try the garment on while working, as well as making adjustments to length of yoke and shoulder caps.

The instructions are carefully explaining every step, in the correct order. Diagrams are adjusted to the knitting direction and are worked as usual.

The diagram depicts all rows/rounds, and every stitch seen from the right side. It is read from bottom to top, from right to left. 1 square = 1 stitch.

When working back and forth, every other row is worked from the right side and every other row is worked from the wrong side. When working from the wrong side, the diagram will have to be worked reversed: from left to right, knit stitches are purled, purl stitches are knit etc.

When working in the round every round is worked from the right side and the diagram are worked from right to left on all rounds.

See DROPS lesson: How to read knitting diagrams

The diagram depicts all rows/rounds, and every stitch seen from the right side. It is worked from bottom to top, from right to left.

When working back and forth every other row is worked from the right side: from right to left and every other row is worked from the wrong side: from left to right.

When working in the round, every row in the diagram are worked from the right side, from right to left.

When working a circular diagram you start in the middle and work your way outwards, counter clockwise, row by row.

The rows usually start with a given number of chain stitches (equivalent to the height of the following stitch), this will either be depicted in the diagram or explained in the pattern.

See DROPS lesson: How to read crochet diagrams

Instructions for working several diagrams after each other on the same row/round, will often be written like so: “work A.1, A.2, A.3 a total of 0-0-2-3-4 times". This means you work A.1 once, then A.2 is worked once, and A.3 is repeated (in width) the number of times provided for your size – in this case like so: S = 0 times, M = 0 times, L=2 times, XL= 3 times and XXL = 4 times.

The diagrams are worked as usual: begin with the first row in A.1, then work the first row in A.2 etc.

See DROPS lesson: How to read knitting diagrams

See DROPS lesson: How to read crochet diagrams

The total width of the garment (from wrist-to-wrist) will be larger in the larger sizes, despite the actual sleeves being shorter. The larger sizes have longer sleeve caps and wider shoulders, so there will be a good fit in all sizes.

The measurement sketch/schematic drawing provides information regarding the full length of the garment. If it’s a jumper or a jacket the length is measured from the highest point on the shoulder closest to the neckline, and straight down to the bottom of the garment. It is NOT measured from the tip of shoulder. Similarly, the length of yoke is measured from the highest point on the shoulder and down to where yoke is split into body and sleeves.

On a jacket measures are never taken along bands, unless specifically stated. Always measure inside band stitches when measuring the length.

See DROPS lesson: How to read a schematic drawing

Diagrams are often repeated on the round or in height. 1 repeat is the diagram the way it appears in the pattern. If it says to work 5 repeats of A.1 in the round, then you work A.1 a total of 5 times after/next to each other in the round. If it says to work 2 repeats of A.1 vertically/in height you work the entire diagram once, then begin again at the start and work the entire diagram one more time.

Chain stitches are slightly narrower than other stitches and to avoid working the cast-on edge too tight, we simply chain more stitches to begin with. The stitch count will be adjusted on the following row to fit the pattern and measurement sketch.

The rib edge is more elastic and will contract slightly compared to, for example, stocking stitch. By increasing before the rib edge, you avoid a visible difference in width between the rib edge and the rest of the body.

It’s very easy to cast off too tightly, and by making yarn overs while casting off (and simultaneously casting these off) you avoid a too tight cast off edge.

See DROPS video: How to bind off with yarn overs (yo)

To achieve an even increase (or decrease) you can increase on, for example: every 3rd and 4th row alternately, like so: work 2 rows and increase on the 3rd row, work 3 rows and increase on the 4th. Repeat this until the increase is complete.

See DROPS lesson: Increase or decrease 1 st on every 3rd and 4th row alternately

Should you prefer to work in the round instead of back and forth, you may of course adjust the pattern. You’ll need to add steeks mid-front (usually 5 stitches), and follow the instructions. When you would normally turn and work from the wrong side, simply work across the steek and continue in the round. At the end you’ll cut the piece open, pick up stitches to work bands, and cover the cut edges.

See DROPS video: How to knit steeks and cut open

Should you prefer to work back and forth instead of in the round, you may of course adjust the pattern so you work the pieces separately and then assemble them at the end. Divide the stitches for the body in 2, add 1 edge stitch in each side (for sewing) and work the front and back pieces separately.

See DROPS lesson: Can I adapt a pattern for circular needles into straight needles?

Pattern repeats can vary slightly in the different sizes, in order to get the correct proportions. If you’re not working the exact same size as the garment in the photo, yours might deviate slightly. This has been carefully developed and adjusted so that the complete impression of the garment is the same in all sizes.

Make sure to follow instructions and diagrams for your size!

If you have found a pattern you like which is available in women’s size it’s not very difficult to convert it to men’s size. The biggest difference will be the length of sleeves and body. Start working on the women size that you think would fit across the chest. The additional length will be worked right before you cast off for the armhole/sleeve cap. If the pattern is worked top-down you can add the length right after the armhole or before the first decrease on sleeve.

Regarding additional yarn amount, this will depend on how much length you add, but it is better with a skein too many than too few.

All yarns will have excess fibres (from production) that might come off as lint or shedding. Brushed yarns (ie hairier yarns) have more of these loose, excess fibres, causing more shedding.

Shedding also depends on what is worn under or over the garment, and whether this pulls at the yarn fibres. It’s therefore not possible to guarantee that there will be no shedding

Below are some tips on how to get the best result when working with hairier yarns:

1. When the garment is finished (before you wash it) shake it vigorously so the looser hairs come off. NOTE: do NOT use a lint roller, brush or any method that pulls at the yarn.

2. Place the garment in a plastic bag and put it in your freezer - the temperature will cause the fibres to become less attached to each other, and excess fibres will come off easier.

3. Leave in the freezer for a few hours before taking it out and shaking it again.

4. Wash the garment according to the instructions on the yarn label.

Pilling is a natural process that happens to even the most exclusive of fibers. It's a natural sign of wear and tear that is hard to avoid, and that is most visible in high friction areas of your garment like a sweater's arms and cuffs.

You can make your garment look as new by removing the pilling, using a fabric comb or a pill/lint remover.

Still can't find the answer you need? Then scroll down and leave your question so one of our experts can try to help you. This will be done normally within 5 to 10 working days.
In the meantime, you can read the questions and answers that others have left to this pattern or join the DROPS Workshop on Facebook to get help from fellow knitters/crocheters!

You might also like...

Post a comment to pattern DROPS 232-50

We would love to hear what you have to say about this pattern!

If you want to leave a question, please make sure you select the correct category in the form below, to speed up the answering process. Required fields are marked *.

Comments / Questions (8)

country flag Hanne wrote:

Det står at bolen strikkes rundt på rundpinne, men i oppskriften står det at bakstykket strikke frem og tilbake først, og deretter forstykket frem og tilbake. Og at delene skal syes sammen etterpå.

31.03.2022 - 11:25

DROPS Design answered:

Hei Hanne, Ja, du har rett at bolen er strikket i deler, fram og tilbake etter bærestykket er delt for ermehullene. Sidesømmene er sydd til slutt. God fornøyelse!

01.04.2022 - 06:58

country flag Sabine Adam wrote:

Vielen Dank!

22.03.2022 - 22:20

country flag Sabine Adam wrote:

Vielen Dank für Ihre schnelle Antwort! Hestetømmekant oder Hestetømmeaflukning stammt aus einer dänischen Strickanleitung und es handelt sich glaube ich um das Arbeiten eines Randes (kant = Kante), wie ich in YouTube gesehen habe. Ich wüsste gerne, wie das auf Deutsch heißt. Viele Grüße

18.03.2022 - 21:46

DROPS Design answered:

Liebe Sabine, es handelt sich dabei um den I-Cord-Rand, mit dem abgekettet wird. Im Deutschen nennt sich die I-Cord auch Strickkordel. Auf unserer Homepage finden Sie unter Videotutorials -> Strickvideos -> Abketten das Video "Wie man mit einem Kordel-Rand (I-Cord-Rand) abkettet". Viel Spaß beim Stricken!

22.03.2022 - 20:14

country flag Sabine Adam wrote:

Danke, aber das soll ein Strickmuster sein..........

18.03.2022 - 15:25

DROPS Design answered:

Liebe Frau Adam, was meinen Sie hier? Es gibt kein Diagram für dieses Modell, es wird - wie in der Anleitung geschrieben - mit Rippenmuster (1 Masche rechts verschränkt / 2 Maschen links) oder glat rechts gestrickt. Oder misverstehe ich Ihre Frage?

18.03.2022 - 15:27

country flag Sabine Adam wrote:

Guten Tag, können Sie mir sagen, was 'Hestetømmeaflukning' oder 'Hestetømme' (dänisch) auf Deutsch bedeutet? Vielen Dank. Sabine Adam

17.03.2022 - 23:07

DROPS Design answered:

Liebe Frau Adam - nach Google Übersetzer bedeutet das "Pferdeentleerung".

18.03.2022 - 09:38

country flag Sonja wrote:

Hübsches Modell. Watercolors

08.02.2022 - 19:50

country flag Nina wrote:

En rigtig stor trøje Navn BEDST

17.01.2022 - 17:10

country flag Drahomíra Rezlerová wrote:

Pruhované rolo

16.01.2022 - 16:47