DROPS Fabel
DROPS Fabel
75% Wool, 25% Polyamide
from 3.00 $ /50g
DROPS Brushed Alpaca Silk
77% Alpaca, 23% Silk
from 3.95 $ /25g
Get the yarn to make this pattern from 31.75$.

The yarn cost is calculated from the pattern’s smallest size and the yarn’s cheapest product type. Looking for an even better price? You might find it on the DROPS Deals!

DROPS SS24

Luminous Sand

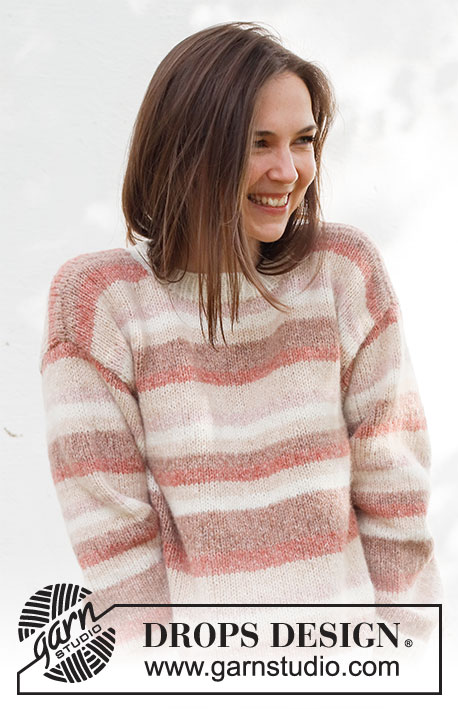
Knitted sweater in DROPS Fabel and DROPS Brushed Alpaca Silk. The piece is worked top down with raglan, double neck, lace pattern and split in the sides. Sizes S - XXXL.

DROPS 232-37
DROPS Design: Pattern no fa-486
Yarn group A + C
-------------------------------------------------------

SIZES:
S - M - L - XL - XXL – XXXL
Finished measurements:
Chest measurements: 98-104-114-124-138-144 cm = 38½"-41"-45"-48¾"-54¼"-56½"
Full length: 54-56-58-60-62-64 cm = 21¼"-22"-22¾"-23⅝"-24⅜"-25¼"
All measurements in charts are in cm.

MATERIALS:
DROPS FABEL from Garnstudio (belongs to yarn group A)
200-200-250-250-300-300 g color 912, soft chocolate
And use:
DROPS BRUSHED ALPACA SILK from Garnstudio (belongs to yarn group C)
125-150-175-175-200-225 g color 01, off white

NEEDLES:
DROPS CIRCULAR NEEDLE SIZE 5.5 MM = US 9: Length 40 cm = 16" and 60-60-60-80-80-80 cm = 24"-24"-24"-32"-32"-32".
DROPS CIRCULAR NEEDLE SIZE 4.5 MM = US 7: Length 40 cm = 16" and 60-60-60-80-80-80 cm = 24"-24"-24"-32"-32"-32".
DROPS DOUBLE POINTED NEEDLES SIZE 5.5 MM = US 9.
DROPS DOUBLE POINTED NEEDLES SIZE 4.5 MM = US 7.
The technique MAGIC LOOP can be used – you then only need circular needle of 80 cm = 32" in each size.

KNITTING GAUGE:
13 stitches in width and 17 rows in height with lace pattern and 1 strand of each quality = 10 x 10 cm = 4" x 4".

NOTE: Needle size is only a guide. If you get too many stitches on 10 cm = 4", change to a larger needle size. If you get too few stitches on 10 cm = 4", change to a smaller needle size.

-------------------------------------------------------

Alternative Yarn – See how to change yarns here
Yarn Groups A to F – Use the same pattern and change the yarn here
Yarn usage using an alternative yarn – Use our yarn converter here

-------------------------------------------------------

DROPS Fabel
DROPS Fabel
75% Wool, 25% Polyamide
from 3.00 $ /50g
DROPS Brushed Alpaca Silk
77% Alpaca, 23% Silk
from 3.95 $ /25g
Get the yarn to make this pattern from 31.75$.

The yarn cost is calculated from the pattern’s smallest size and the yarn’s cheapest product type. Looking for an even better price? You might find it on the DROPS Deals!

Pattern instructions

NOTE: This pattern is written in American English. All measurements in charts are in cm. For conversion from inches to cm - click here. There are different terms for crocheting in American and British English. If this pattern includes crochet, click for "crochet terms" here. For this pattern in British English, please click here.
-------------------------------------------------------

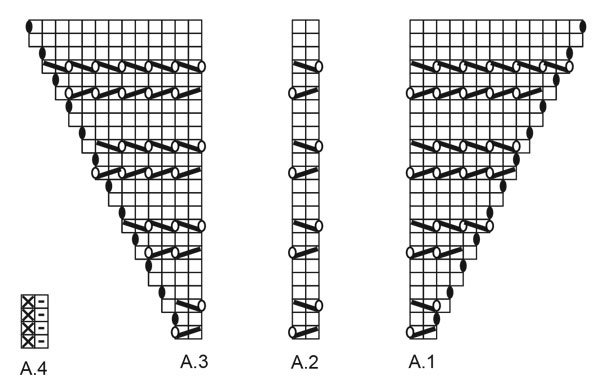
EXPLANATIONS FOR THE PATTERN:


-------------------------------------------------------

RIDGE/GARTER STITCH (worked in the round):
1 ridge in height = 2 rounds; Knit 1 round and purl 1 round.

RIDGE/GARTER STITCH (worked back and forth):
Knit all rows.
1 ridge = knit 2 rows.

PATTERN:
See diagrams A.1 to A.4. The diagrams show all rows in the pattern from the right side.

INCREASE TIP (evenly spaced):
To work out how to increase evenly, count the total number of stitches on the needle (e.g. 58 stitches) and divide by the number of increases to be made (e.g. 41) = 1.4.
In this example, increase by making 1 yarn over after alternately each 1st and each 2nd stitch. On the next row work the yarn overs twisted to avoid holes.

DECREASE TIP (for sleeves):
Decrease 1 stitch on either side of the marker thread as follows: Work until there are 3 stitches left before the marker, knit 2 together, knit 2 (marker sits between these 2 stitches), slip 1 stitch as if to knit, knit 1 and pass the slipped stitch over the knitted stitch (2 stitches decreased).

BINDING-OFF TIP:
To avoid the bind-off edge being tight you can bind off with a larger size needle. If the edge is still tight, make 1 yarn over after approx. each 4th stitch at the same time as binding off; the yarn overs are bind off as normal stitches.

-------------------------------------------------------

START THE PIECE HERE:

-------------------------------------------------------

SWEATER – SHORT OVERVIEW OF THE PIECE:
The neck and yoke are worked in the round with circular needle, top down, from the transition between the back piece and the right sleeve. The yoke is divided for body and sleeves and the body is continued in the round as far as the split, then finished back and forth. The sleeves are worked with double pointed needles/short circular needle, top down.

DOUBLE NECK:
Cast on 108-108-117-117-126-126 stitches with short circular needle size 4.5 MM = US 7 and 1 strand DROPS Fabel and 1 strand DROPS Brushed Alpaca Silk (= 2 strands). Knit 1 round. Then work rib (knit 1 twisted, purl 2) in the round for 2 cm = ¾". Now purl together all 2-purl to purl-1 = 72-72-78-78-84-84 stitches.
Continue the new rib (knit 1 twisted, purl 1) until the neck measures 5 cm = 2".
Now work bobbles along the folding edge as follows:
ROUND 1: * Knit 1, but do not drop the stitch from the needle, make 1 yarn over, knit 1 in the same stitch, 1 yarn over, knit 1 in the same stitch (= 3 stitches + 2 yarn overs in 1 stitch), purl 1, knit 1 twisted, purl 1 *, work from *-* to the end of the round = 120-120-130-130-140-140 stitches.
ROUNDS 2 and 3: * Knit the first 5 stitches, purl 1, knit 1 twisted, purl 1, knit 1 twisted, purl 1 *, work from *-* to the end of the round.
ROUND 4: * Knit together the first/next 6 stitches (= 5 knitted stitches + 1 purled stitch), 1 yarn over, knit 1 twisted, purl 1, knit 1 twisted, purl 1*, work from *-* to the end of the round = 72-72-78-78-84-84 stitches.
ROUND 5: * Knit 1 twisted, purl 1*, work from *-* to the end of the round.
Continue with rib (knit 1 twisted, purl 1) until the neck measures 11 cm = 4⅜".

YOKE:
Change to circular needle size 5.5 MM = US 9. Insert 1 marker; the yoke is measured from here!
Knit 1 round where you adjust the number of stitches to 72-72-76-80-84-84 stitches (decrease 2 stitches in M and increase 2 stitches in XXL. In S, L, XL and XXXL the number stays the same).
Insert 4 markers without working the stitches:
Marker 1: Insert at the beginning of the round (= transition between back piece and right sleeve).
Marker 2: Skip 10 stitches (= right sleeve), insert marker here.
Marker 3: Skip 26-26-28-30-32-32 stitches (= front piece), insert marker here.
Marker 4: Skip 10 stitches (= left sleeve), insert marker here.
There are 26-26-28-30-32-32 stitches left after marker 4 (= back piece).

Now work pattern as follows: * Knit 1, work A.1 over the next 2 stitches, A.2 over the next 4 stitches, A.3 over the next 2 stitches, knit 2 (marker sits between these 2 stitches), A.1 over the next 2 stitches, A.2 over the next 20-20-22-24-26-26 stitches, A.3 over the next 2 stitches, knit 1 *, work from *-* 1 more time.
REMEMBER THE KNITTING GAUGE!
Continue the pattern and increase to raglan every 2nd round a total of 16-18-20-20-20-22 times (increase as shown in the diagram – the black circles are increases to raglan, and repeat the pattern in height) = 200-216-236-240-244-260 stitches.
The increases in S, M and L are finished.
Continue to increase in XL, XXL and XXXL as follows:
Increase on the front and back pieces only (= 4 stitches increased on the round) 2-4-4 times = 248-260-276 stitches.

All sizes:
Continue working until the piece measures 22-24-26-28-30-32 cm = 8¾"-9½"-10¼"-11"-11¾"-12½" from the marker on the neck.
Divide the yoke for the body and sleeves as follows:
Place the first 42-46-50-50-50-54 stitches on a thread for the sleeve, cast on 6-6-6-6-10-10 stitches (= side under the sleeve), work the next 58-62-68-74-80-84 stitches (= front piece), place the next 42-46-50-50-50-54 stitches on a thread for the sleeve, cast on 6-6-6-6-10-10 stitches (= side under the sleeve), work the last 58-62-68-74-80-84 stitches (= back piece).
The body and sleeves are finished separately. THE PIECE IS NOW MEASURED FROM HERE.

BODY:
= 128-136-148-160-180-188 stitches. Insert 1 marker thread in the middle of the 6-6-6-6-10-10 stitches cast on under each sleeve (= 3-3-3-3-5-5 new stitches on each side of the thread).
Start the new round 1 stitch after one of the marker threads.
Continue in the round with A.2 – make sure you start on the correct row to continue the pattern from the yoke.
Work the pattern for 13 cm = 5⅛" in all sizes – adjust so the last round does not have yarn overs.
Try the sweater on and work to desired length (there is approx. 15 cm = 6" left).
Work GARTER STITCH – read description above, over 10 stitches on each side, i.e. 5 stitches on each side of both marker threads. When you have worked 2 ridges, divide for the split at both marker threads and continue the back and front pieces separately, back and forth.

FRONT PIECE:
Work back and forth with pattern over the middle 54-58-64-70-80-84 stitches and garter stitch over the 5 outermost stitches on both sides. When the split measures 5 cm = 2", work as follows from the right side:
5 stitches in garter stitch, knit 54-58-64-70-80-84 and increase 39-41-45-49-53-57 stitches evenly over these stitches, 5 stitches in garter stitch = 103-109-119-129-143-151 stitches.
Change to circular needle size 4.5 MM = US 7. Purl 1 row with 5 stitches in garter stitch on each side. Now work rib as follows: 5 stitches in garter stitch, A.4 until there are 6 stitches left, work the first stitch in A.4 (so the rib is symmetrical) and 5 stitches in garter stitch. Continue this rib for 10 cm = 4". Bind off with knit over knit and purl over purl – read BINDING-OFF TIP. The sweater measures approx. 54-56-58-60-62-64 cm = 21¼"-22"-22¾"-23⅝"-24⅜"-25¼" from the shoulder down.

BACK PIECE:
Work in the same way as the front piece.

SLEEVES:
Place the 42-46-50-50-50-54 stitches from the thread on the one side of the piece on short circular needle/double pointed needles size 5.5 MM = US 9 and knit up 1 stitch in each of the 6-6-6-6-10-10 stitches cast on under the sleeve = 48-52-56-56-60-64 stitches. Insert a marker thread in the middle of the 6-6-6-6-10-10 stitches under the sleeve.
Start at the marker thread and work pattern as follows: Knit 1, A.2 as before over the next 46-50-54-54-58-62 stitches and knit 1. Continue this pattern in the round for 4 cm = 1½".
Now decrease 2 stitches under the sleeve – read DECREASE TIP. Decrease like this every 3-2½-2-2-1-1 cm = 1⅛"-1"-¾"-¾"-⅜"-⅜" a total of 6-7-8-8-9-11 times = 36-38-40-40-42-42 stitches. The stitches which do not fit into the pattern are worked in stockinette stitch. Continue working until the sleeve measures 34-33-31-25-30-28-27 cm = 13⅜"-13"-12¼"-9¾"-11¾"-11"-10⅝" from the division. Try the sweater on and work to desired length; there is approx. 10 cm = 4" left. Knit 1 round where you increase 22-22-22-24-26-26 stitches evenly spaced = 58-60-62-64-68-68 stitches. Change to double pointed needles size 4.5 MM = US 7 and work rib (knit 1 twisted, purl 1) for 10 cm = 4". Bind off with knit over knit and purl over purl – remember BINDING-OFF TIP! The sleeve measures approx. 44-43-41-40-38-37 cm = 17¼"-17"-16⅛"-15¾"-15"-14½".
Work the other sleeve in the same way.

ASSEMBLY:
Fold the neck double (along the line of bobbles) to the inside and sew down. To avoid the neck being tight and rolling outwards, it is important that the seam is elastic.

Diagram

All measurements in charts are in cm.

symbols = knit from right side, purl from wrong side
symbols = between 2 stitches make 1 yarn over
symbols = knit 2 together
symbols = slip 1 stitch as if to knit, knit 1 and pass the slipped stitch over the knitted stitch
symbols = knit twisted from right side, purl twisted from wrong side
symbols = purl from right side, knit from wrong side
symbols = between 2 stitches make 1 yarn over. On the next round work the yarn over twisted to avoid a hole
diagram
diagram

Each of our patterns has specific tutorial videos to help you.

Do you have a question? See a list of frequently asked questions (FAQ)

Knitting tension is what determines the final measurements of your work, and is usually measured per 10 x 10 cm. It is provided like so: number of stitches in width x number of rows in height - eg: 19 stitches x 26 rows = 10 x 10 cm.

The knitting tension is very individual; some people knit/crochet loosely while others work tightly. You adjust the knitting tension with the needle size, which is why the suggested needle size only serve as a guide! You need to adjust this (up or down) to ensure that YOUR knitting tension matches the knitting tension provided in the pattern. If you work with a different knitting tension than provided you will have a different yarn consumption, and your work will have different measurements than what the pattern suggests.

The knitting tension also determines which yarns can replace each other. As long as you achieve the same knitting tension you can replace one yarn with another.

See DROPS lesson: How to measure your tension/gauge

See DROPS video: How to make a gauge tension swatch

The required amount of yarn is provided in grams, eg: 450 g. To calculate how many balls you’ll need you first need to know how many grams are in 1 ball (25g, 50g or 100g). This information is available if you click on the individual yarn quality on our pages. Divide the amount required with the amount of each ball. For example, if each ball is 50g (the most common amount), the calculation will be as follows: 450 / 50 = 9 balls.

The important thing when changing from one yarn to another is that the knitting/crochet tension remains the same. This is so that the measurements of the finished piece will be the same as on the sketch provided. It is easier to achieve the same knitting tension using yarns from the same yarn group. It is also possible to work with multiple strands of a thinner yarn to achieve the knitting tension of a thicker one. Please try our yarn converter. We recommend you to always work a test swatch.

Please NOTE: when changing yarn the garment might have a different look and feel to the garment in the photo, due to individual properties and qualities of each yarn.

See DROPS lesson: Can I use a different yarn than the one mentioned in the pattern?

All our yarns are categorised into yarn groups (from A to F) according to thickness and knitting tension – group A contains the thinnest yarns and group F the thickest. This makes it easier for you to find alternative yarns to our patterns, should you wish to switch yarn. All yarns within the same group have a similar knitting tension and can easily replace each other. However, different yarn qualities have different structures and properties which will give the finished work a unique look and feel.

Click here for an overview of the yarns in each yarn group

At the top of all our patterns you’ll find a link to our yarn converter, which is a helpful tool should you wish to use a different yarn than suggested. By filling in the yarn quality you wish to replace, the amount (in your size) and number of strands, the converter will present good alternative yarns with the same knitting tension. Additionally it will tell you how much you’ll require in the new qualities and whether you’ll need to work with multiple strands. Most skeins are 50g (some are 25g or 100g).

If the pattern is worked with multiple colours, every colour will have to be converted separately. Similarly, if the pattern is worked with several strands of different yarns (for example 1 strand Alpaca and 1 strand Kid-Silk) you will have to find alternatives for each, individually.

Click here to see our yarn converter

Since different yarns have different qualities and textures we have chosen to keep the original yarn in our patterns. However, you can easily find options among our available qualities by using our yarn converter, or simply pick a yarn from the same yarn group.

It is possible that some retailers still have discontinued yarns in stock, or that someone has a few skeins at home that they would like to find patterns for.

The yarn converter will provide both alternative yarn as well as required amount in the new quality.

If you think it's hard to decide what size to make, it can be a good idea to measure a garment you own already and like the size of. Then you can pick the size by comparing those measures with the ones available in the pattern's size chart.

You'll find the size chart at the bottom of the pattern.

See DROPS lesson: How to read size chart

The needle size provided in the pattern serves only as a guide, the important thing is to follow the knitting tension. And since knitting tension is very individual, you will have to adjust the needle size to ensure that YOUR tension is the same as in the pattern – maybe you’ll have to adjust 1, or even 2 needle sizes, up or down to achieve the correct tension. For this, we recommend that you work test swatches.

Should you work with a different knitting tension than the one provided, the measurements of the finished garment might deviate from the measurement sketch.

See DROPS lesson: How to measure your tension/gauge

See DROPS video: How to make a gauge tension swatch

Working a garment top-down provides more flexibility and room for personal adjustment. For example it is easier to try the garment on while working, as well as making adjustments to length of yoke and shoulder caps.

The instructions are carefully explaining every step, in the correct order. Diagrams are adjusted to the knitting direction and are worked as usual.

The diagram depicts all rows/rounds, and every stitch seen from the right side. It is read from bottom to top, from right to left. 1 square = 1 stitch.

When working back and forth, every other row is worked from the right side and every other row is worked from the wrong side. When working from the wrong side, the diagram will have to be worked reversed: from left to right, knit stitches are purled, purl stitches are knit etc.

When working in the round every round is worked from the right side and the diagram are worked from right to left on all rounds.

See DROPS lesson: How to read knitting diagrams

The diagram depicts all rows/rounds, and every stitch seen from the right side. It is worked from bottom to top, from right to left.

When working back and forth every other row is worked from the right side: from right to left and every other row is worked from the wrong side: from left to right.

When working in the round, every row in the diagram are worked from the right side, from right to left.

When working a circular diagram you start in the middle and work your way outwards, counter clockwise, row by row.

The rows usually start with a given number of chain stitches (equivalent to the height of the following stitch), this will either be depicted in the diagram or explained in the pattern.

See DROPS lesson: How to read crochet diagrams

Instructions for working several diagrams after each other on the same row/round, will often be written like so: “work A.1, A.2, A.3 a total of 0-0-2-3-4 times". This means you work A.1 once, then A.2 is worked once, and A.3 is repeated (in width) the number of times provided for your size – in this case like so: S = 0 times, M = 0 times, L=2 times, XL= 3 times and XXL = 4 times.

The diagrams are worked as usual: begin with the first row in A.1, then work the first row in A.2 etc.

See DROPS lesson: How to read knitting diagrams

See DROPS lesson: How to read crochet diagrams

The total width of the garment (from wrist-to-wrist) will be larger in the larger sizes, despite the actual sleeves being shorter. The larger sizes have longer sleeve caps and wider shoulders, so there will be a good fit in all sizes.

The measurement sketch/schematic drawing provides information regarding the full length of the garment. If it’s a jumper or a jacket the length is measured from the highest point on the shoulder (usually closest to the neckline), and straight down to the bottom of the garment. It is NOT measured from the tip of shoulder. Similarly, the length of yoke is measured from the highest point on the shoulder and down to where yoke is split into body and sleeves.

See DROPS lesson: How to read a schematic drawing

Diagrams are often repeated on the round or in height. 1 repeat is the diagram the way it appears in the pattern. If it says to work 5 repeats of A.1 in the round, then you work A.1 a total of 5 times after/next to each other in the round. If it says to work 2 repeats of A.1 vertically/in height you work the entire diagram once, then begin again at the start and work the entire diagram one more time.

Chain stitches are slightly narrower than other stitches and to avoid working the cast-on edge too tight, we simply chain more stitches to begin with. The stitch count will be adjusted on the following row to fit the pattern and measurement sketch.

The rib edge is more elastic and will contract slightly compared to, for example, stocking stitch. By increasing before the rib edge, you avoid a visible difference in width between the rib edge and the rest of the body.

It’s very easy to cast off too tightly, and by making yarn overs while casting off (and simultaneously casting these off) you avoid a too tight cast off edge.

See DROPS video: How to bind off with yarn overs (yo)

To achieve an even increase (or decrease) you can increase on, for example: every 3rd and 4th row alternately, like so: work 2 rows and increase on the 3rd row, work 3 rows and increase on the 4th. Repeat this until the increase is complete.

See DROPS lesson: Increase or decrease 1 st on every 3rd and 4th row alternately

Should you prefer to work in the round instead of back and forth, you may of course adjust the pattern. You’ll need to add steeks mid-front (usually 5 stitches), and follow the instructions. When you would normally turn and work from the wrong side, simply work across the steek and continue in the round. At the end you’ll cut the piece open, pick up stitches to work bands, and cover the cut edges.

See DROPS video: How to knit steeks and cut open

Should you prefer to work back and forth instead of in the round, you may of course adjust the pattern so you work the pieces separately and then assemble them at the end. Divide the stitches for the body in 2, add 1 edge stitch in each side (for sewing) and work the front and back pieces separately.

See DROPS lesson: Can I adapt a pattern for circular needles into straight needles?

Pattern repeats can vary slightly in the different sizes, in order to get the correct proportions. If you’re not working the exact same size as the garment in the photo, yours might deviate slightly. This has been carefully developed and adjusted so that the complete impression of the garment is the same in all sizes.

Make sure to follow instructions and diagrams for your size!

If you have found a pattern you like which is available in women’s size it’s not very difficult to convert it to men’s size. The biggest difference will be the length of sleeves and body. Start working on the women size that you think would fit across the chest. The additional length will be worked right before you cast off for the armhole/sleeve cap. If the pattern is worked top-down you can add the length right after the armhole or before the first decrease on sleeve.

Regarding additional yarn amount, this will depend on how much length you add, but it is better with a skein too many than too few.

All yarns will have excess fibres (from production) that might come off as lint or shedding. Brushed yarns (ie hairier yarns) have more of these loose, excess fibres, causing more shedding.

Shedding also depends on what is worn under or over the garment, and whether this pulls at the yarn fibres. It’s therefore not possible to guarantee that there will be no shedding

Below are some tips on how to get the best result when working with hairier yarns:

1. When the garment is finished (before you wash it) shake it vigorously so the looser hairs come off. NOTE: do NOT use a lint roller, brush or any method that pulls at the yarn.

2. Place the garment in a plastic bag and put it in your freezer - the temperature will cause the fibres to become less attached to each other, and excess fibres will come off easier.

3. Leave in the freezer for a few hours before taking it out and shaking it again.

4. Wash the garment according to the instructions on the yarn label.

Pilling is a natural process that happens to even the most exclusive of fibers. It's a natural sign of wear and tear that is hard to avoid, and that is most visible in high friction areas of your garment like a sweater's arms and cuffs.

You can make your garment look as new by removing the pilling, using a fabric comb or a pill/lint remover.

Still can't find the answer you need? Then scroll down and leave your question so one of our experts can try to help you. This will be done normally within 5 to 10 working days.
In the meantime, you can read the questions and answers that others have left to this pattern or join the DROPS Workshop on Facebook to get help from fellow knitters/crocheters!

You might also like...

Post a comment to pattern DROPS 232-37

We would love to hear what you have to say about this pattern!

If you want to leave a question, please make sure you select the correct category in the form below, to speed up the answering process. Required fields are marked *.

Comments / Questions (8)

country flag Isabella wrote:

In de beschrijving van de noppen blijkt een fout te zitten. Dat is blijkbaar al een paar keer aangegeven. Waarom wordt dit niet aangepast? Ik denk dat Marlies op 3-4-2023 de juiste oplossing al heeft gegeven. Daar kom je helaas pas achter als je naald 2 van de noppen wilt gaan breien.

06.01.2024 - 14:09

country flag Castelli wrote:

Bonjour Je commence le pull ref:232-37, je ne peux pas réaliser le tour 4. Avant le tour 1 on parle de nopes. OK ça, je sais faire. Hors dans les tours 1 , 2 et 3 ce ne sont pas des nopes. Tour 4, tricoter ensemble les 6 premières mailles , impossible à réaliser. pouvez vous m'expliquez le point svp? D'avance merci.

03.04.2023 - 14:45

DROPS Design answered:

Bonjour Mme Castelli, pour tricoter ces nopes, suivez bien les tours 1 à 4, au 1er tour, on va augmenter en tricotant plusieurs fois la même maille (chaque nope sera espacée de 3 mailles), vous tricotez ensuite les tours 2 et 3 ocmme indiqué (on tricote ici toutes les mailles des tours, pas seulement celles des nopes) et, au 4ème tour, on diminue les mailles augmentées au 1er tour pour former les nopes. Dans cette vidéo, nous montrons comment tricoter 5 mailles ensemble à l'endroit, procédez de la même façon mais avec les 6 mailles de chaque nope. Bon tricot!

11.04.2023 - 11:06

country flag Marlies wrote:

In de beschrijving van dit patroon zit een fout, denk ik. Bij naald 1 bolletjes in de boordt moet staan: NAALD 1: * 1 recht, maar laat de steek niet van de naald af glijden, maak 1 omslag, 1 recht in dezelfde steek, 1 omslag, 1 recht in dezelfde steek (= 3 steken + 2 omslagen in 1 steek), 1 averecht, 1 gedraaid recht, 1 averecht , 1 gedraaid recht, 1 averecht*, brei van *-* tot het einde van de naald = 120-120-130-130-140-140 steken.

03.04.2023 - 09:12

country flag Maria Karlsson wrote:

Jag förstår inte denna beskrivning. Den är för mig väldigt otydlig. Jag har stickat havskanten och första möstervarvet på oket, men hur gör jag på varv 2 och tre.? Det står bara”” ”fortsätt så runt”. Hurdå fortsätt SÅ ? Förstår inte diagrammet, då det inte stämmer överens med matskandaler och det inte står något om vad man gör i mellanrummet mellan diagrammen. Dessutom står det fel i teckenbeskrivningen. Det står samma sak på 2 tecken.

21.03.2023 - 17:19

DROPS Design answered:

Hei Maria. Diagramteksten er oppdatert, takk for at du gjorde oss oppmerksom på dette. Når du har strikket 1. omgang slik det står i oppskriften og etter diagrammene, fortsetter du på samme måte når du skal starte på 2. omgang. Når du følger forklaringen er det beskrever hva du skal strikke mellom diagrammene. I f.eks str. S har du 72 masker etter halskanten, så strikker du 1 m rett + A.1 (2 m) + A.2 (4 m) + A.3 (2 m) + 2 m rett + A.1 (2 m) + A.2 (20 m) + A.3 (2 m) + 1 m rett = 36 masker, så gjentas alt dette 1 gang til = 36+36= 72 masker. mvh DROPS Design

27.03.2023 - 10:23

country flag Doris Soehe wrote:

Ich stricke dieses Modell in Gr. S und verstehe nicht was gemeint ist mit " das Muster in der Höhe wiederholen". Ich habe das Diagramm einmal fertig, es fehlen mir aber noch 4 Raglanzunahmen bis ich auf 200 Maschen komme. Im welcher Weise (in welchem Musterverlauf) soll ich weiter stricken nach Ende des Diagramms. Neu beginnen ab Reihe 1 des Diagramms oder die Fortsetzung selbst ausrechnen nach Reihe 24 Danke für Ihre Antwort.

18.01.2023 - 10:53

DROPS Design answered:

Liebe Frau Soehe, jetzt stricken Sie das Lochmuster wie zuvor mit (1 Runde mit Lochmuster, 1 Runde rechts, 1 Runde mit Lochumster, 3 Runden rechts) und gleichzeitig nehmen Sie wie zuvor in jeder 2. Runde zu. dh ab der 13. Reihe im A.2/A.3 wiederholen, bis die Zunahmenanzahl erreicht wird. Viel Spaß beim stricken!

18.01.2023 - 16:51

country flag Heidi Poelmans wrote:

Ik kom niet uit met de noppen... Ik heb 72 steken maar kom nooit tot 120 steken. Niet zoals beschreven in patroon en niet als ik bijhorend filmpje volg. Doe ik zelf iets fout...

16.10.2022 - 12:54

DROPS Design answered:

Dag Heidi,

Het lijkt inderdaad of het aantal steken niet klopt na de eerste naald. Maar als je het patroon volgt kom je, als het goed is, na naald 4 weer uit op 72 steken. Ik zal het even doorgeven aan de ontwerpafdeling om te controleren en eventueel aan te passen.

26.10.2022 - 09:42

country flag Joyce Clews wrote:

When I try to print this pattern it only prints up to Diagram section/header and wont print the charts etc. This is happening with all the patterns I’ve tried to download? I tired turning it into a PDF and downloading but I then get the first page greyed out and “Accept terms and conditions” over the pattern. Also it only downloads up to the Diagram section and no charts

01.08.2022 - 09:10

country flag Conny wrote:

Cuddly hideaway

15.01.2022 - 11:11