DROPS Air
DROPS Air
65% Alpaca, 28% Polyamide, 7% Wool
from 6.45 $ /50g
Get the yarn to make this pattern from 51.60$.

The yarn cost is calculated from the pattern’s smallest size and the yarn’s cheapest product type. Looking for an even better price? You might find it on the DROPS Deals!

DROPS SS24

Mars Sunrise

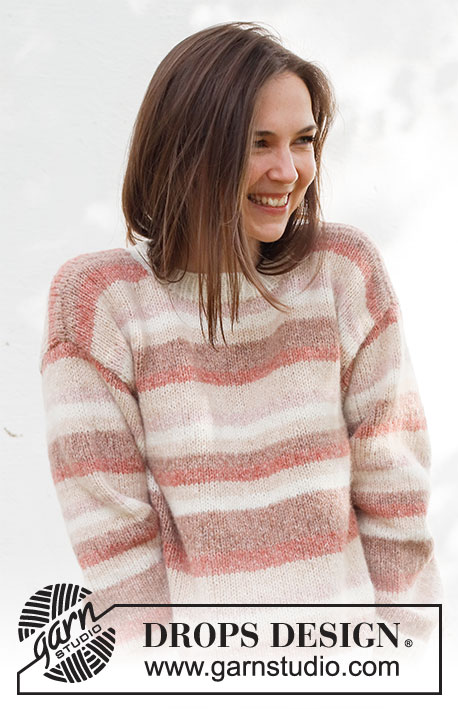
Knitted jacket in DROPS Air. The piece is worked bottom up with stripes. Sizes S - XXXL.

DROPS 232-22
DROPS Design: Pattern ai-386
Yarn group C or A + A
-------------------------------------------------------

SIZES:
S - M - L - XL - XXL – XXXL

Finished measurements:
Chest measurements: 102-108-118-128-138-156 cm = 40"-42½"-46½"-50⅜"-54¼"-61⅜"
Full length: 52-54-56-58-60-62 cm = 20½"-21¼"-22"-22¾"-23⅝"-24⅜"
All measurements in charts are in cm.

MATERIALS:
DROPS AIR from Garnstudio (belongs to yarn group C)
100-100-150-150-150-150 g color 01, off-white
100-100-100-100-100-100 g color 02, wheat
100-100-100-100-100-100 g color 34, pink marble
50-50-50-100-100-100 g color 32, blush
50-50-50-50-50-50 g color 33, pink sand

DROPS BUTTONS NO 521: 5-5-5-6-6-6 items.

NEEDLES:
DROPS CIRCULAR NEEDLE SIZE 5 MM = US 8: Length 40 cm = 16" and 80 cm = 32".
DROPS CIRCULAR NEEDLE SIZE 4 MM = US 6: Length 80 cm = 32".
DROPS DOUBLE POINTED NEEDLES SIZE 5 MM = US 8.
DROPS DOUBLE POINTED NEEDLES SIZE 4 MM = US 6.
The technique MAGIC LOOP can be used – you then only need circular needle of 80 cm = 32" in each size.

KNITTING GAUGE:
17 stitches in width and 22 rows in height with stockinette stitch = 10 x 10 cm = 4" x 4".
NOTE: Needle size is only a guide. If you get too many stitches on 10 cm = 4", change to a larger needle size. If you get too few stitches on 10 cm = 4", change to a smaller needle size.

-------------------------------------------------------

Alternative Yarn – See how to change yarns here
Yarn Groups A to F – Use the same pattern and change the yarn here
Yarn usage using an alternative yarn – Use our yarn converter here

-------------------------------------------------------

DROPS Air
DROPS Air
65% Alpaca, 28% Polyamide, 7% Wool
from 6.45 $ /50g
Get the yarn to make this pattern from 51.60$.

The yarn cost is calculated from the pattern’s smallest size and the yarn’s cheapest product type. Looking for an even better price? You might find it on the DROPS Deals!

Pattern instructions

NOTE: This pattern is written in American English. All measurements in charts are in cm. For conversion from inches to cm - click here. There are different terms for crocheting in American and British English. If this pattern includes crochet, click for "crochet terms" here. For this pattern in British English, please click here.
-------------------------------------------------------

EXPLANATIONS FOR THE PATTERN:

-------------------------------------------------------


RIDGE/GARTER STITCH (worked back and forth):
Knit all rows.
1 ridge = knit 2 rows.

STRIPES:
* 8 rows with color pink marble,
4 rows with color wheat,
4 rows with color off-white,
4 rows with color pink sand,
8 rows with color wheat,
6 rows with color blush,
12 rows with color pink marble,
4 rows with color off-white,
4 rows with color wheat,
4 rows with color blush,
4 rows with color pink marble,
4 rows with color wheat,
4 rows with color off-white,
4 rows with color pink sand,
8 rows with color wheat,
4 rows with color blush *,
repeat from *-*.

INCREASE TIP (under sleeves):
Work until there are 2 stitches left before the marker, 1 yarn over, knit 4 (marker thread sits between these 4 stitches), 1 yarn over. On the next round knit the yarn overs twisted to avoid holes. Then work the new stitches in stockinette stitch.

-------------------------------------------------------

START THE PIECE HERE:

-------------------------------------------------------

JACKET - SHORT OVERVIEW OF THE PIECE:
The back and front pieces are worked separately, with circular needle, back and forth and bottom up. The bands are worked on the front pieces. The sleeves are worked in the round with double pointed needles/short circular needle. The piece is sewn together and the neck is worked to finish.


BACK PIECE:
Cast on 105-113-123-133-145-161 stitches with circular needle size 4 MM = US 6 and DROPS Air in color off-white. Purl 1 row from the wrong side. Then work rib from the right side as follows: 1 edge stitch in GARTER STITCH – read description above, * knit 1, purl 1 *, work from *-* until there are 2 stitches left, knit 1 and 1 edge stitch in garter stitch. When the rib measures 4 cm = 1½", change to circular needle size 5 MM = US 8. Continue with stockinette stitch, 1 edge stitch in garter stitch on each side and STRIPES – read description above; AT THE SAME TIME, on row 1 decrease 17-19-21-23-25-27 stitches evenly spaced = 88-94-102-110-120-134 stitches. REMEMBER THE KNITTING GAUGE!
When the piece measures 33-34-35-36-37-38 cm = 13"-13⅜"-13¾"-14¼"-14½"-15", bind off 6-7-9-10-12-17 stitches at the beginning of the next 2 rows for the armholes = 76-80-84-90-96-100 stitches. When the piece measures 50-52-54-56-58-60 cm = 19¾"-20½"-21¼"-22"-22¾"-23⅝", bind off the middle 26-28-30-32-34-36 stitches for the neck and finish each shoulder separately. Bind off 1 stitch on the next row from the neck = 24-25-26-28-30-31 stitches on the shoulder. Bind off when the piece measures 52-54-56-58-60-62 cm = 20½"-21¼"-22"-22¾"-23⅝"-24⅜". Work the other shoulder in the same way.

LEFT FRONT PIECE:
Cast on 54-58-62-68-74-82 stitches with circular needle size 4 MM = US 6 and DROPS Air in color off-white. Purl 1 row from the wrong side. Then work rib from the right side as follows: 1 edge stitch in garter stitch, * purl 1, knit 1 *, work from *-* until there is 1 stitch left, 1 edge stitch in garter stitch. When the rib measures 4 cm = 1½", change to circular needle size 5 MM = US 8. Continue with stockinette stitch, 1 edge stitch in garter stitch on each side and stripes; AT THE SAME TIME, on row 1 decrease 9-10-10-12-13-14 stitches evenly spaced = 45-48-52-56-61-68 stitches.
When the piece measures 33-34-35-36-37-38 cm = 13"-13⅜"-13¾"-14¼"-14½"-15", bind off the first 6-7-9-10-12-17 stitches on the next row from the right side for the armhole = 39-41-43-46-49-51 stitches.
When the piece measures 46-48-49-51-52-54 cm = 18"-19"-19¼"-20"-20½"-21¼", place the first 11-12-13-14-15-16 stitches on the next row from the wrong side on a thread for the neck (working them first), then bind off at the beginning of each row from the wrong side: 2 stitches 1 time, then 1 stitch 2 times = 24-25-26-28-30-31 stitches on the shoulder. Bind off when the piece measures 52-54-56-58-60-62 cm = 20½"-21¼"-22"-22¾"-23⅝"-24⅜".

LEFT BAND:
Knit up from the right side 94 to 110 stitches with color off-white and circular needle size 4 MM = US 6, inside the 1 edge stitch and down the left front piece (number of stitches should be divisible by 2). Work as follows from the bottom and wrong side: 2 edge stitches in garter stitch, * purl 1, knit 1 *, work from *-* until there are 2 stitches left, purl 1 and 1 edge stitch in garter stitch. Continue this rib back and forth for 4 cm = 1½" (adjust so the next row is from the wrong side). Knit 1 row from the wrong side and bind off with knit from the right side.

RIGHT FRONT PIECE:
Cast on 54-58-62-68-74-82 stitches with circular needle size 4 MM = US 6 and DROPS Air in color off-white. Knit 1 row from the wrong side. Then work rib from the right side as follows: 1 edge stitch in garter stitch, * knit 1, purl 1 *, work from *-* until there is 1 stitch left, 1 edge stitch in garter stitch. When the rib measures 4 cm = 1½", change to circular needle size 5 MM = US 8. Continue with stockinette stitch, 1 edge stitch in garter stitch on each side and stripes; AT THE SAME TIME, on row 1 decrease 9-10-10-12-13-14 stitches evenly spaced = 45-48-52-56-61-68 stitches.
When the piece measures 33-34-35-36-37-38 cm = 13"-13⅜"-13¾"-14¼"-14½"-15", bind off the first 6-7-9-10-12-17 stitches on the next row from the wrong side for the armhole = 39-41-43-46-49-51 stitches.
When the piece measures 46-48-49-51-52-54 cm = 18"-19"-19¼"-20"-20½"-21¼", place the first 11-12-13-14-15-16 stitches on the next row from the right side on a thread for the neck (working them first), then bind off at the beginning of each row from the right side: 2 stitches 1 time, then 1 stitch 2 times = 24-25-26-28-30-31 stitches on the shoulder. Bind off when the piece measures 52-54-56-58-60-62 cm = 20½"-21¼"-22"-22¾"-23⅝"-24⅜".

RIGHT BAND:
Knit up from the right side 94 to 110 stitches with color off-white and circular needle size 4 MM = US 6, inside the 1 edge stitch and up the right front piece (number of stitches should be divisible by 2). Work as follows from the top and wrong side: 1 edge stitch in garter stitch, * purl 1, knit 1 *, work from *-* until there are 3 stitches left, purl 1 and 2 edge stitches in garter stitch. Continue this rib back and forth for 2 cm = ¾". Now work 4-4-4-5-5-5 buttonholes evenly along the band. The bottom buttonhole is positioned 6 cm = 2⅜" up from the bottom edge and the top buttonhole 7-8 cm = 2¾"-3⅛" down from the top edge (the last buttonhole is worked when you work the neck). Work the buttonholes by making 1 yarn over and working 2 together. Continue the rib for another 2 cm = ¾". Knit 1 row from the wrong side and bind off with knit from the right side.

SLEEVES:
Cast on 62-64-66-68-70-72 stitches with double pointed needles size 4 MM = US 6 and color off-white. Knit 1 round then work rib in the round (knit 1, purl 1) for 4 cm = 1½". Change to double pointed needles size 5 MM = US 8. Knit 1 round where you decrease 6 stitches evenly spaced = 56-58-60-62-64-66 stitches. Insert 1 marker at the beginning of the round = mid-under sleeve. Continue with stockinette stitch and stripes. When the sleeve measures 8 cm = 3⅛", increase 1 stitch on each side of the marker – read INCREASE TIP. Increase like this every 12-9-7-6½-5-4 cm = 4¾"-3½"-2¾"-2½"-2"-1½" a total of 4-5-6-6-7-8 times = 64-68-72-74-78-82 stitches. When the sleeve measures 47-47-46-44-42-39 cm = 18½"-18½"-18"-17¼"-16½"-15¼", work the sleeve cap back and forth from mid-under the sleeve for 4-4-5-6-7-10 cm = 1½"-1½"-2"-2⅜"-2¾"-4". Bind off. Work the other sleeve in the same way.

ASSEMBLY:
Sew the shoulder seams. Sew the sleeve cap to the armhole, then the split to the bottom of the armhole – see sketch. Sew the side seams inside the 1 edge stitch.

NECK:
Start from the right side and knit up 81 to 123 stitches around the neck with circular needle size 4 MM = US 6 and color off-white (including the bands and the stitches on the threads), The number of stitches should be divisible by 2 + 1. Work as follows from the wrong side: 1 edge stitch in garter stitch, purl 1, * knit 1, purl 1 *, work from *-* until there are 1 stitch left, 1 edge stitch in garter stitch. Continue this rib for 2 cm = ¾". Now work the last buttonhole at the beginning of the next row from the right side: 1 edge stitch in garter stitch, knit 1, purl 1, knit 2 together, 1 yarn over, then work to the end of the row. Continue the rib for a further 2 cm = ¾". Loosely bind off with knit from the right side.

ASSEMBLY-2:
Sew the buttons onto the left band.

Diagram

All measurements in charts are in cm.

symbols = Sew sleeve cap to armhole: a to A and b to B
diagram
diagram

Each of our patterns has specific tutorial videos to help you.

Do you have a question? See a list of frequently asked questions (FAQ)

Knitting tension is what determines the final measurements of your work, and is usually measured per 10 x 10 cm. It is provided like so: number of stitches in width x number of rows in height - eg: 19 stitches x 26 rows = 10 x 10 cm.

The knitting tension is very individual; some people knit/crochet loosely while others work tightly. You adjust the knitting tension with the needle size, which is why the suggested needle size only serve as a guide! You need to adjust this (up or down) to ensure that YOUR knitting tension matches the knitting tension provided in the pattern. If you work with a different knitting tension than provided you will have a different yarn consumption, and your work will have different measurements than what the pattern suggests.

The knitting tension also determines which yarns can replace each other. As long as you achieve the same knitting tension you can replace one yarn with another.

See DROPS lesson: How to measure your tension/gauge

See DROPS video: How to make a gauge tension swatch

The required amount of yarn is provided in grams, eg: 450 g. To calculate how many balls you’ll need you first need to know how many grams are in 1 ball (25g, 50g or 100g). This information is available if you click on the individual yarn quality on our pages. Divide the amount required with the amount of each ball. For example, if each ball is 50g (the most common amount), the calculation will be as follows: 450 / 50 = 9 balls.

The important thing when changing from one yarn to another is that the knitting/crochet tension remains the same. This is so that the measurements of the finished piece will be the same as on the sketch provided. It is easier to achieve the same knitting tension using yarns from the same yarn group. It is also possible to work with multiple strands of a thinner yarn to achieve the knitting tension of a thicker one. Please try our yarn converter. We recommend you to always work a test swatch.

Please NOTE: when changing yarn the garment might have a different look and feel to the garment in the photo, due to individual properties and qualities of each yarn.

See DROPS lesson: Can I use a different yarn than the one mentioned in the pattern?

All our yarns are categorised into yarn groups (from A to F) according to thickness and knitting tension – group A contains the thinnest yarns and group F the thickest. This makes it easier for you to find alternative yarns to our patterns, should you wish to switch yarn. All yarns within the same group have a similar knitting tension and can easily replace each other. However, different yarn qualities have different structures and properties which will give the finished work a unique look and feel.

Click here for an overview of the yarns in each yarn group

At the top of all our patterns you’ll find a link to our yarn converter, which is a helpful tool should you wish to use a different yarn than suggested. By filling in the yarn quality you wish to replace, the amount (in your size) and number of strands, the converter will present good alternative yarns with the same knitting tension. Additionally it will tell you how much you’ll require in the new qualities and whether you’ll need to work with multiple strands. Most skeins are 50g (some are 25g or 100g).

If the pattern is worked with multiple colours, every colour will have to be converted separately. Similarly, if the pattern is worked with several strands of different yarns (for example 1 strand Alpaca and 1 strand Kid-Silk) you will have to find alternatives for each, individually.

Click here to see our yarn converter

Since different yarns have different qualities and textures we have chosen to keep the original yarn in our patterns. However, you can easily find options among our available qualities by using our yarn converter, or simply pick a yarn from the same yarn group.

It is possible that some retailers still have discontinued yarns in stock, or that someone has a few skeins at home that they would like to find patterns for.

The yarn converter will provide both alternative yarn as well as required amount in the new quality.

If you think it's hard to decide what size to make, it can be a good idea to measure a garment you own already and like the size of. Then you can pick the size by comparing those measures with the ones available in the pattern's size chart.

You'll find the size chart at the bottom of the pattern.

See DROPS lesson: How to read size chart

The needle size provided in the pattern serves only as a guide, the important thing is to follow the knitting tension. And since knitting tension is very individual, you will have to adjust the needle size to ensure that YOUR tension is the same as in the pattern – maybe you’ll have to adjust 1, or even 2 needle sizes, up or down to achieve the correct tension. For this, we recommend that you work test swatches.

Should you work with a different knitting tension than the one provided, the measurements of the finished garment might deviate from the measurement sketch.

See DROPS lesson: How to measure your tension/gauge

See DROPS video: How to make a gauge tension swatch

Working a garment top-down provides more flexibility and room for personal adjustment. For example it is easier to try the garment on while working, as well as making adjustments to length of yoke and shoulder caps.

The instructions are carefully explaining every step, in the correct order. Diagrams are adjusted to the knitting direction and are worked as usual.

The diagram depicts all rows/rounds, and every stitch seen from the right side. It is read from bottom to top, from right to left. 1 square = 1 stitch.

When working back and forth, every other row is worked from the right side and every other row is worked from the wrong side. When working from the wrong side, the diagram will have to be worked reversed: from left to right, knit stitches are purled, purl stitches are knit etc.

When working in the round every round is worked from the right side and the diagram are worked from right to left on all rounds.

See DROPS lesson: How to read knitting diagrams

The diagram depicts all rows/rounds, and every stitch seen from the right side. It is worked from bottom to top, from right to left.

When working back and forth every other row is worked from the right side: from right to left and every other row is worked from the wrong side: from left to right.

When working in the round, every row in the diagram are worked from the right side, from right to left.

When working a circular diagram you start in the middle and work your way outwards, counter clockwise, row by row.

The rows usually start with a given number of chain stitches (equivalent to the height of the following stitch), this will either be depicted in the diagram or explained in the pattern.

See DROPS lesson: How to read crochet diagrams

Instructions for working several diagrams after each other on the same row/round, will often be written like so: “work A.1, A.2, A.3 a total of 0-0-2-3-4 times". This means you work A.1 once, then A.2 is worked once, and A.3 is repeated (in width) the number of times provided for your size – in this case like so: S = 0 times, M = 0 times, L=2 times, XL= 3 times and XXL = 4 times.

The diagrams are worked as usual: begin with the first row in A.1, then work the first row in A.2 etc.

See DROPS lesson: How to read knitting diagrams

See DROPS lesson: How to read crochet diagrams

The total width of the garment (from wrist-to-wrist) will be larger in the larger sizes, despite the actual sleeves being shorter. The larger sizes have longer sleeve caps and wider shoulders, so there will be a good fit in all sizes.

The measurement sketch/schematic drawing provides information regarding the full length of the garment. If it’s a jumper or a jacket the length is measured from the highest point on the shoulder (usually closest to the neckline), and straight down to the bottom of the garment. It is NOT measured from the tip of shoulder. Similarly, the length of yoke is measured from the highest point on the shoulder and down to where yoke is split into body and sleeves.

See DROPS lesson: How to read a schematic drawing

Diagrams are often repeated on the round or in height. 1 repeat is the diagram the way it appears in the pattern. If it says to work 5 repeats of A.1 in the round, then you work A.1 a total of 5 times after/next to each other in the round. If it says to work 2 repeats of A.1 vertically/in height you work the entire diagram once, then begin again at the start and work the entire diagram one more time.

Chain stitches are slightly narrower than other stitches and to avoid working the cast-on edge too tight, we simply chain more stitches to begin with. The stitch count will be adjusted on the following row to fit the pattern and measurement sketch.

The rib edge is more elastic and will contract slightly compared to, for example, stocking stitch. By increasing before the rib edge, you avoid a visible difference in width between the rib edge and the rest of the body.

It’s very easy to cast off too tightly, and by making yarn overs while casting off (and simultaneously casting these off) you avoid a too tight cast off edge.

See DROPS video: How to bind off with yarn overs (yo)

To achieve an even increase (or decrease) you can increase on, for example: every 3rd and 4th row alternately, like so: work 2 rows and increase on the 3rd row, work 3 rows and increase on the 4th. Repeat this until the increase is complete.

See DROPS lesson: Increase or decrease 1 st on every 3rd and 4th row alternately

Should you prefer to work in the round instead of back and forth, you may of course adjust the pattern. You’ll need to add steeks mid-front (usually 5 stitches), and follow the instructions. When you would normally turn and work from the wrong side, simply work across the steek and continue in the round. At the end you’ll cut the piece open, pick up stitches to work bands, and cover the cut edges.

See DROPS video: How to knit steeks and cut open

Should you prefer to work back and forth instead of in the round, you may of course adjust the pattern so you work the pieces separately and then assemble them at the end. Divide the stitches for the body in 2, add 1 edge stitch in each side (for sewing) and work the front and back pieces separately.

See DROPS lesson: Can I adapt a pattern for circular needles into straight needles?

Pattern repeats can vary slightly in the different sizes, in order to get the correct proportions. If you’re not working the exact same size as the garment in the photo, yours might deviate slightly. This has been carefully developed and adjusted so that the complete impression of the garment is the same in all sizes.

Make sure to follow instructions and diagrams for your size!

If you have found a pattern you like which is available in women’s size it’s not very difficult to convert it to men’s size. The biggest difference will be the length of sleeves and body. Start working on the women size that you think would fit across the chest. The additional length will be worked right before you cast off for the armhole/sleeve cap. If the pattern is worked top-down you can add the length right after the armhole or before the first decrease on sleeve.

Regarding additional yarn amount, this will depend on how much length you add, but it is better with a skein too many than too few.

All yarns will have excess fibres (from production) that might come off as lint or shedding. Brushed yarns (ie hairier yarns) have more of these loose, excess fibres, causing more shedding.

Shedding also depends on what is worn under or over the garment, and whether this pulls at the yarn fibres. It’s therefore not possible to guarantee that there will be no shedding

Below are some tips on how to get the best result when working with hairier yarns:

1. When the garment is finished (before you wash it) shake it vigorously so the looser hairs come off. NOTE: do NOT use a lint roller, brush or any method that pulls at the yarn.

2. Place the garment in a plastic bag and put it in your freezer - the temperature will cause the fibres to become less attached to each other, and excess fibres will come off easier.

3. Leave in the freezer for a few hours before taking it out and shaking it again.

4. Wash the garment according to the instructions on the yarn label.

Pilling is a natural process that happens to even the most exclusive of fibers. It's a natural sign of wear and tear that is hard to avoid, and that is most visible in high friction areas of your garment like a sweater's arms and cuffs.

You can make your garment look as new by removing the pilling, using a fabric comb or a pill/lint remover.

Still can't find the answer you need? Then scroll down and leave your question so one of our experts can try to help you. This will be done normally within 5 to 10 working days.
In the meantime, you can read the questions and answers that others have left to this pattern or join the DROPS Workshop on Facebook to get help from fellow knitters/crocheters!

You might also like...

Post a comment to pattern DROPS 232-22

We would love to hear what you have to say about this pattern!

If you want to leave a question, please make sure you select the correct category in the form below, to speed up the answering process. Required fields are marked *.

Comments / Questions (9)

country flag Mara wrote:

IL y a une erreur dans le nombre de pelotes: j'ai eu besoin de 2,5 pelotes du coloris 34, c'était très gênant car j'ai été bloqué dans mon tricot, le temps de recevoir ma pelote supplémentaire.

22.02.2024 - 16:52

DROPS Design answered:

Bonjour Mara, tricotez-vous bien en DROPS Air? Quelle taille tricotez-vous? Avez-vous bien la bonne tension en hauteur en tricotant? Autrement dit toujours 22 rangs = 10 cm? Merci pour votre retour. Bonne continuation!

23.02.2024 - 08:28

country flag Margrethe wrote:

Hej:) Jeg vil blot lige høre, om det er korrekt, at man skal bruge næsten samme garnmængde til alle størrelser, eller er det en fejl?

19.07.2023 - 08:49

DROPS Design answered:

Hei Margrethe. Det skiller 100 gram / 300 meter fra den minste til den største str. Nå har jeg ikke oversikten over garnutregningen, men det kan godt hende at i f.eks i str. M i farge 01 natur så går det 104 gram, mens i str XXXL går det 148 gram. Da må begge ha 150 gram 01, natur. Man vil kanskje ha mer garn igjen i de minste str. der det er den samme garnmengden som i de største str., men man kan ikke skrive f.eks 50 gram om det er brukt f.eks 53 gram. mvh DROPS Design

25.07.2023 - 08:53

country flag Gunhild wrote:

Hva menes det med "Fell av masker 1 gang og deretter 1 maske 2 ganger =[...]" på venstre og høyre forstykke?

20.04.2023 - 13:39

DROPS Design answered:

Hei Gunhild. Her var et tall (2) blitt borte under VENSTRE FORSTYKKE. Var riktig under høyre forstykke. Takk for at du gjorde oss oppmerksom på dette. Vi vil fikse dette asap. mvh DROPS Design

24.04.2023 - 11:48

country flag Judy Fish wrote:

My granddaughter likes your Candy Bar Jacket pattern but she is 142cm and growing. Do you have a similar pattern with balloon sleeves which I could use. I like this Mars Sunrise (for women) but can't work out your sizing. I have some wool that is 17 st and 28 rows for 10 sq cm that I would like to use. Many thanks for your help

08.04.2023 - 16:53

DROPS Design answered:

Dear Judy, the measurements for each size are indicated in the schematic after the pattern instructions; to better understand them you can read the following lesson: https://www.garnstudio.com/lesson.php?id=24&cid=19. Some patterns similar to Candy Bar Jacket could be these: https://www.garnstudio.com/pattern.php?id=9009&cid=19 https://www.garnstudio.com/pattern.php?id=9393&cid=19. You should be able to use the same yarn for these patterns as in the Candy Bar Jacket. Happy knitting!

08.04.2023 - 22:46

country flag Ruth Volders wrote:

Is het mogelijk om de het vest met gewone naalden ipv rondbreinaalden te breien .

28.03.2023 - 11:11

DROPS Design answered:

Dag Ruth,

Ja, je zou dit vest ook wel met gewone naalden kunnen breien. Om een patroon aan te passen om op rechte naalden te breien hebben we een instructie gemaakt. Deze vind je hier.

28.03.2023 - 21:18

country flag Connie Stjerndrup wrote:

Hvorfor skal der strikket med pind 5 på på højre forkant og pind 4 på Venstre forkant . Er det en fejl

24.03.2023 - 08:40

DROPS Design answered:

Hei Connie. Ja,her er det feil. Høyre og venstre stolpe skal strikkes med samme pinne, pinne 4, samme som vrangborden. Takk for at du gjorde oss oppmerksom på dette, vi skal få ordnet dette asap. mvh DROPS Design

27.03.2023 - 13:23

country flag Siksou wrote:

Bonjour pour la taille M : après avoir tricoter pour la manche 46 cm vous dites \"tricotez la tête de manche sur 5 cm\". Cela veut -il seulement dire de continuer à tricoter.sans diminution ..?\r\nA quoi correspondent les pointillés sur le graphique?\r\nMerci de votre réponse

16.01.2023 - 13:31

DROPS Design answered:

Bonjour Mme Siksou, tout à fait, à 47 (pas 46, la taille M est la 2ème taille) cm de hauteur totale, on tricote désormais en rangs, à partir du milieu sous la manche, mais sans rabattre ni diminuer. Les lignes pointillés correspondent aux parties b et B: b = les 4 cm tricotés en rangs à la fin de la manche, B = les mailles rabattues pour les emmanchures. Cette vidéo montre comment on va assembler la manche. Bon tricot!

16.01.2023 - 16:31

country flag Eva E wrote:

Hej! När det står "Garngrupp C eller A + A", betyder det att jag kan använda samma mönster, men ta 2 trådar av ett garn som är inom garngrupp A? Så jag använder samma storlek på stickor mm, men bara tar 2 trådar istället?

08.11.2022 - 09:34

DROPS Design answered:

Hej Eva, ja det stemmer, men husk at strikke en prøve, så strikkefastheden bliver samme som i det mønster du følger :)

08.11.2022 - 14:21

country flag Sonja wrote:

Schöne Farben. Sugar Ray klingt gut

08.02.2022 - 19:42