
Popular categories
Looking for a yarn?


|
|||||||||||||||||||||||||||||||||||||
Crystal Lattice |
|||||||||||||||||||||||||||||||||||||
 |
 |
||||||||||||||||||||||||||||||||||||
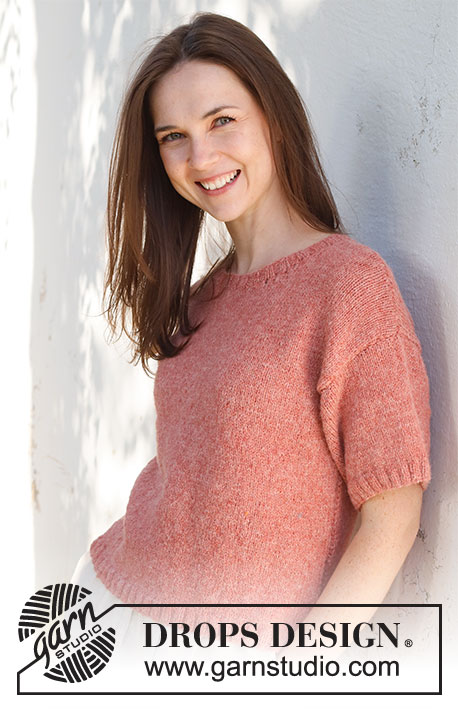
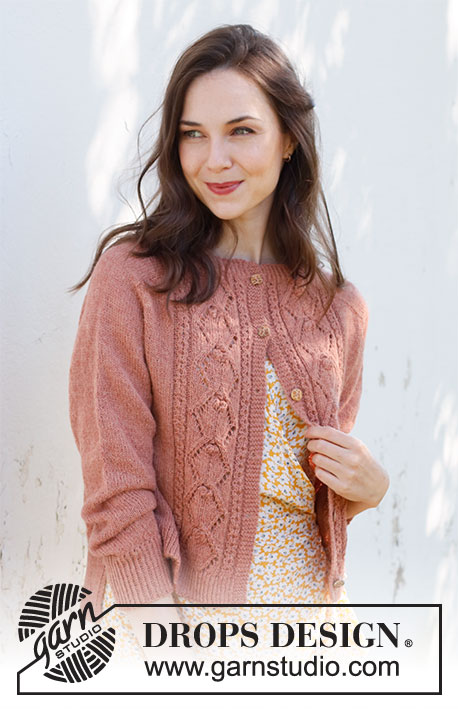
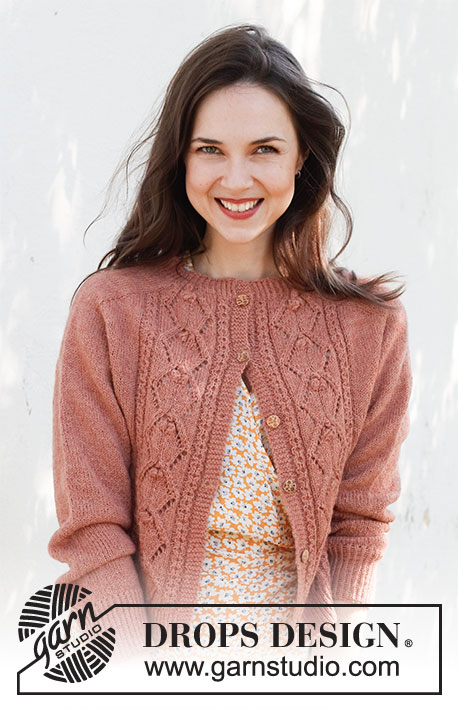
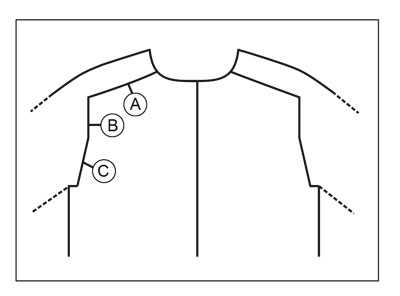
Knitted jacket in DROPS Alpaca or DROPS BabyMerino. The piece is worked top down, with saddle-shoulders, lace pattern, bobbles and split in the sides. Sizes S - XXXL.
DROPS 231-24 |
|||||||||||||||||||||||||||||||||||||
|
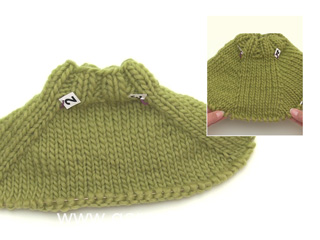
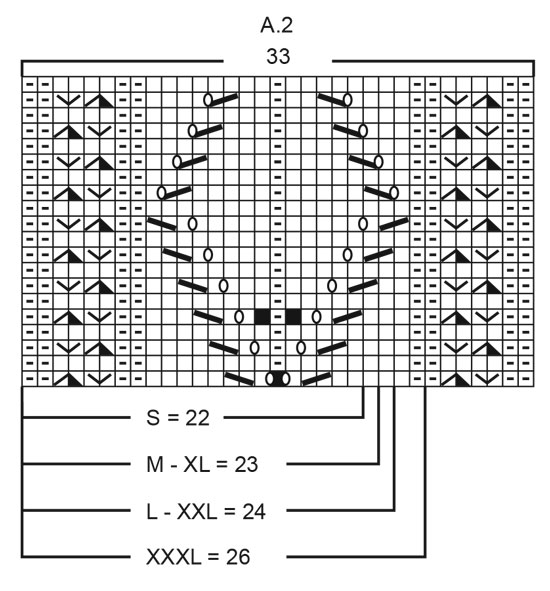
------------------------------------------------------- EXPLANATIONS FOR THE PATTERN: ------------------------------------------------------- RIDGE/GARTER STITCH (worked back and forth): Knit all rows. 1 ridge = knit 2 rows. PATTERN: See diagrams A.1 and A.2. The diagrams show all rows in the pattern from the right side. INCREASE TIP-1 (from the right side): BEFORE MARKER: The new stitch will twist to the right. Use left needle to pick up yarn between 2 stitches from the row below, pick up yarn from the back and knit stitch in front loop. AFTER MARKER: The new stitch will twist to the left. Use left needle to pick up yarn between 2 stitches from the row below, pick up yarn from the front and knit stitch in back loop. INCREASE TIP-2 (from the wrong side): BEFORE MARKER: The new stitch will twist to the right. Use left needle to pick up thread between 2 stitches from the row below, pick up thread from from front and purl stitch in back loop. AFTER MARKER: The new stitch will twist to the left. Use left needle to pick up thread between 2 stitches from the row below, pick up thread from behind and purl stitch in front loop. DECREASE TIP (for sleeves): Decrease 1 stitch on either side of the marker thread as follows: Work until there are 3 stitches left before the marker thread, knit 2 together, knit 2 (marker sits between these 2 stitches), slip 1 stitch as if to knit, knit 1 and pass the slipped stitch over the knitted stitch (2 stitches decreased). BUTTONHOLES: Work buttonholes on the right band (when the garment is worn). Work from the right side when there are 4 stitches left on the row as follows: Make 1 yarn over, knit 2 together and knit 2. On the next row (wrong side), knit the yarn over to leave a hole. The first buttonhole is worked when the neck is finished. Then work the other 5-5-5-5-6-6 buttonholes with approx. 8-8-8½-9-7½-8 cm = 3⅛"-3⅛"-3¼"-3½"-2⅞"-3⅛" between each one. ------------------------------------------------------- START THE PIECE HERE: ------------------------------------------------------- JACKET – SHORT OVERVIEW OF THE PIECE. The neck and yoke are worked back and forth with circular needle, from mid front and top down. The yoke is divided for body and sleeves and the body continued back and forth with circular needle. Before the rib, the body is divided for the split in each side and the pieces are finished separately, with the back piece slightly longer than the front pieces. The sleeves are worked in the round with short circular needle/double pointed needles. NECK: Cast on 139-143-147-153-157-163 stitches with circular needle size 3 MM = US 2.5 and DROPS Alpaca or DROPS Baby Merino. Change to circular needle size 2.5 MM = US 1.5 and purl 1 row from the wrong side. Then work rib as follows: ROW 1 (right side): 6 band stitches in GARTER STITCH – read description above, * knit 1 twisted, purl 1 *, work from *-* until there are 7 stitches left, knit 1 twisted and 6 band stitches in garter stitch. ROW 2 (wrong side): 6 band stitches in garter stitch, * purl 1 twisted, knit 1*, work from *-* until there are 7 stitches left, purl 1 twisted and 6 band stitches in garter stitch. Repeat rows 1 and 2 until the rib measures 3 cm = 1⅛". Knit 1 row from the right side where you increase 5-5-5-3-3-5 stitches evenly spaced (do not increase over the bands) = 144-148-152-156-160-168 stitches. Remember the BUTTONHOLES on the right band – read description above. Purl 1 row from the wrong side with 6 band stitches in garter stitch on each side. YOKE: Change to circular needle size 3 MM = US 2.5. Insert 1 marker-thread after the band at the beginning of the row – THE PIECE IS NOW MEASURED FROM THIS MARKER-THREAD! In addition insert 4 markers, without working the stitches and inserting the markers between 2 stitches as follows. The markers are used when increasing for the shoulders. Count 28-29-30-29-30-32 stitches (front piece), insert marker 1 before the next stitch. Count 26-26-26-30-30-30 (shoulder), insert marker 2 before the next stitch. Count 36-38-40-38-40-44 stitches (back piece), insert marker 3 before the next stitch. Count 26-26-26-30-30-30 stitches (shoulder), insert marker 4 before the next stitch. There are 28-29-30-29-30-32 stitches left after marker 4. Allow the markers to follow your work onwards; you will increase at each marker. INCREASES TO SADDLE-SHOULDERS: You now work pattern and increase at the same time for the shoulders. Read the next section before continuing! FIRST ROW FROM THE RIGHT SIDE: 6 band stitches in garter stitch, work A.1 (= 22-23-24-23-24-26 stitches), increase BEFORE marker 1 – read INCREASE TIP-1, work stockinette stitch over shoulder stitches to marker 2, increase AFTER marker 2, work stockinette stitch over back piece stitches to marker 3 increase BEFORE marker 3, work stockinette stitch over shoulder stitches to marker 4, increase AFTER marker 4, work A.2 (= 22-23-24-23-24-26 stitches) and 6 band stitches in garter stitch . You have increased 4 stitches for the saddle shoulders – the number of stitches on the front and back pieces increases and the number of stitches on the shoulders remains the same. NEXT ROW FROM THE WRONG SIDE: Work the pattern back from the wrong side and increase BEFORE markers 4 and 2 and AFTER markers 3 and 1 – read INCREASE TIP-2. Continue this pattern back and forth and increase on all rows as above; differently from the right and wrong side so the stitches lie neatly. The increased stitches are worked into A.1 and A.2 until the pattern covers 33 stitches (if there is not room for the decrease and the yarn over in the pattern while increasing for the saddle shoulders, do not work the yarn over until there is room to both decrease and work the yarn over). When you have a enough stitches for 1 width of A.1/A.2 continue the increased stitches in stockinette stitch. Repeat A.1 and A.2 in height. Increase a total of 24-26-28-32-34-36 times = 240-252-264-284-296-312 stitches. REMEMBER THE KNITTING GAUGE! After the last increase the yoke measures approx. 8-8-9-10-11-11 cm = 3⅛"-3⅛"-3½"-4"-4⅜"-4⅜" from the marker-thread on the neck. INCREASES TO SLEEVES: Continue the pattern back and forth as before. AT THE SAME TIME increase 4 stitches for the sleeves as follows: RIGHT SIDE: Increase AFTER markers 1 and 3 and BEFORE markers 2 and 4 – remember INCREASE TIP-1. WRONG SIDE: Increase AFTER markers 4 and 2 and BEFORE markers 3 and 1 – remember INCREASE TIP-2. You now are increasing on the sleeves, the number of stitches on the front and back pieces remains the same. Work the increased stitches in stockinette stitch. Increase EACH row a total of 8-9-10-5-10-3 times = 272-288-304-304-336-324 stitches. The yoke measures approx. 10-11-12-12-14-12 cm = 4"-4⅜"-4¾"-4¾"-5½"-4¾" from the marker-thread. INCREASES TO YOKE: Move the 4 markers so each marker sits in the outermost stitch on each side of the sleeves, with 40-42-44-38-48-34 stitches between the markers on each sleeve. On the next row from the right side increase 8 stitches, increasing both before and after each marker-stitch – remember INCREASE TIP-1. You are now increasing on the front/back pieces and on the sleeves and the increased stitches are worked in stockinette stitch. Increase like this every 2nd row (each row from the right side) a total of 11-13-15-20-20-26 times = 360-392-424-464-496-532 stitches. When all the increases are finished the yoke measures approx. 17-19-21-24-26-28 cm = 6¾"-7½"-8¼"-9½"-10¼"-11" from the marker-thread. Continue working without further increases until the yoke measures 20-22-24-25-27-29 cm = 8"-8¾"-9½"-9¾"-10⅝"-11⅜" from the marker-thread. On the next row, divide for the body and sleeves as follows: Work the first 61-66-70-76-82-89 stitches (front piece), place the next 68-74-82-90-94-98 stitches on a thread for the sleeve, cast on 8-8-10-10-12-12 stitches (in side under sleeve), work 102-112-120-132-144-158 stitches (back piece), place the next 68-74-82-90-94-98 stitches on a thread for the sleeve, cast on 8-8-10-10-12-12 stitches (in side under sleeve), work the last 61-66-70-76-82-89 stitches (front piece). The body and sleeves are finished separately. THE PIECE IS NOW MEASURED FROM HERE! BODY: = 240-260-280-304-332-360 stitches. Work the first row from the right side as follows: 6 band stitches in garter stitch, continue A.1 over the next 33 stitches, stockinette stitch until there are 39 stitches left, continue A.2 over the next 33 stitches and 6 band stitches in garter stitch. Continue this pattern back and forth for 19 cm = 7½" – finish after a half or whole repeat of the pattern in height. There is approx. 4 cm = 1½" left on the front pieces (6 cm = 2⅜" on the back piece). Divide the body for the split in each side. Keep the first 65-70-75-81-88-95 stitches from the right side on the needle (left front piece). Place the other stitches on a thread/extra needle. LEFT FRONT PIECE: Knit 1 row from the right side where you increase 19-20-23-25-26-29 stitches evenly spaced (do not increase over the band) = 84-90-98-106-114-124 stitches. Change to circular needle size 2.5 MM = US 1.5. Work rib as follows: ROW 1 (wrong side): 3 stitches in garter stitch, * purl 1 twisted, knit 1*, work from *-* until there are 7 stitches left, purl 1 twisted and 6 band stitches in garter stitch. ROW 2 (right side): 6 band stitches in garter stitch, * knit 1 twisted, purl 1*, work from *-* until there are 4 stitches left, knit 1 twisted and 3 stitches in garter stitch. Repeat rows 1 and 2 until the rib measures 4 cm = 1½". The front piece measures approx. 48-50-52-54-56-58 cm = 19"-19¾"-20½"-21¼"-22"-22¾" from the shoulder down. Bind off a little loosely. RIGHT FRONT PIECE: Place the 65-70-75-81-88-95 stitches on the other side on circular needle size 3 MM = US 2.5 and knit 1 row from the right side where you increase 19-20-23-25-26-29 stitches evenly spaced (do not increase over the band) = 84-90-98-106-114-124 stitches. Change to circular needle size 2.5 MM = US 1.5. Work rib as follows: ROW 1 (wrong side): 6 band stitches in garter stitch, * purl 1 twisted, knit 1*, work from *-* until there are 4 stitches left, purl 1 twisted and 3 stitches in garter stitch. ROW 2 (right side): 3 stitches in garter stitch, * knit 1 twisted, purl 1*, work from *-* until there are 7 stitches left, knit 1 twisted and 6 band stitches in garter stitch. Repeat rows 1 and 2 until the rib measures 4 cm = 1½". The front piece measures approx. 48-50-52-54-56-58 cm = 19"-19¾"-20½"-21¼"-22"-22¾" from the shoulder down. Bind off a little loosely. BACK PIECE: Place the remaining 110-120-130-142-156-170 stitches on circular needle size 3 MM = US 2.5 and knit 1 row from the right side where you increase 33-35-39-43-47-51 stitches evenly spaced = 143-155-169-185-203-221 stitches. Change to circular needle size 2.5 MM = US 1.5 and work rib as follows: ROW 1 (wrong side): 3 stitches in garter stitch, * purl 1 twisted, knit 1*, work from *-* until there are 4 stitches left, purl 1 twisted and 3 stitches in garter stitch. ROW 2 (right side): 3 stitches in garter stitch, * knit 1 twisted, purl 1*, work from *-* until there are 4 stitches left, knit 1 twisted and 3 stitches in garter stitch. Repeat rows 1 and 2 until the rib measures 6 cm = 2⅜" (2 cm = ¾" more than the front pieces). The back piece measures approx. 50-52-54-56-58-60 cm = 19¾"-20½"-21¼"-22"-22¾"-23⅝" from the shoulder down. Bind off a little loosely. SLEEVES: Place the 68-74-82-90-94-98 stitches from the thread on the one side of the piece on short circular needle/double pointed needles size 3 MM = US 2.5 and knit up 1 stitch in each of the 8-8-10-10-12-12 stitches cast on under the sleeve = 76-82-92-100-106-110 stitches. Insert a marker thread in the middle of the 6-6-8-8-10-12 stitches under the sleeve. Allow the thread to follow your work onwards; it will be used when decreasing under the sleeve. Start at the marker thread and work stockinette stitch in the round 2 cm = ¾". Now decrease 2 stitches under the sleeve – read DECREASE TIP. Decrease like this every 1½ cm = ½" a total of 3-5-8-12-15-18 times, then every 4th round 4-4-4-3-2-0 times = 62-64-68-70-72-74 stitches. Continue working until the sleeve measures 36-34-33-33-32-30 cm = 14¼"-13⅜"-13"-13"-12½"-11¾" from the division. There is approx. 8 cm = 3⅛" left; try the jacket on and work to desired length. Change to double pointed needles size 2.5 MM = US 1.5 and work rib (knit 1 twisted, purl 1) for 8 cm = 3⅛". Bind off a little loosely. The sleeve measures approx. 44-42-41-41-40-38 cm = 17¼"-16½"-16⅛"-16⅛"-15¾"-15" from the division. Work the other sleeve in the same way. ASSEMBLY: Sew the buttons onto the left band. |
|||||||||||||||||||||||||||||||||||||
Diagram explanations |
|||||||||||||||||||||||||||||||||||||
|
|||||||||||||||||||||||||||||||||||||

|
|||||||||||||||||||||||||||||||||||||
|
|||||||||||||||||||||||||||||||||||||

|
|||||||||||||||||||||||||||||||||||||
|
|||||||||||||||||||||||||||||||||||||
|
Have you made this or any other of our designs? Tag your pictures in social media with #dropsdesign so we can see them! Do you need help with this pattern?You'll find tutorial videos, a Comments/Questions area and more by visiting the pattern on garnstudio.com. © 1982-2024 DROPS Design A/S. We reserve all rights. This document, including all its sub-sections, has copyrights. Read more about what you can do with our patterns at the bottom of each pattern on our site. |
|||||||||||||||||||||||||||||||||||||


With over 40 years in knitting and crochet design, DROPS Design offers one of the most extensive collections of free patterns on the internet - translated to 17 languages. As of today we count 304 catalogs and 11422 patterns - 11417 of which are translated into English (US/in).
We work hard to bring you the best knitting and crochet have to offer, inspiration and advice as well as great quality yarns at incredible prices! Would you like to use our patterns for other than personal use? You can read what you are allowed to do in the Copyright text at the bottom of all our patterns. Happy crafting!
Comments / Questions (19)
Bonjour Je ne comprends pas les augmentations empiècement. En taille L, j'ai bien 304 mailles : 58+46+96+46+58 Je dois avoir 44m pour les manches entre chaque m avec marqueur (44+2) Je dois obtenir 70+82+120+82+70 = 424 après les augmentations. Comment obtenir 82 en ajoutant 30 (15 ×2m)...de même pour le dos ... Merci beaucoup de votre réponse. Cordialement
04.03.2024 - 19:50DROPS Design answered:
Bonjour Mme Rigane, nvous augmentez 15 fois 8 mailles pour le raglan, puis vous divisez l'ouvrage comme indiqué, certaines mailles des devants et du dos vont être attribuées aux manches lors de la division. Tant que votre nombre de mailles total est juste et que la répartition est bonne avant les augmentations du raglan, tout est correct. Bon tricot!
05.03.2024 - 09:05Merci de votre réponse, je me suis compliqué les choses. Je pense avoir compris
11.04.2023 - 20:17BONJOUR, je renouvelle ma question, en taille M, je suis aux augmentations "manches" , j'ai 260 mailles. Je n'arrive pas à comprendre où faire les augmentations pour en 9 fois obtenir 28 mailles et donc les 288 mailles comme vous l'indiquez , d'autant que 28 n'est pas divisible par 9. je suis perdue et vous remercie d'avance de vos conseils. cordialement
09.04.2023 - 11:48DROPS Design answered:
Vous trouverez votre réponse ci-dessous, si elle n'a pas suffit, merci de bien vouloir nous reformuler votre question. Merci pour votre compréhension.
11.04.2023 - 12:30Bonsoir, je fais la taille M, je suis à 252 mailles, je commence l'augmentation des manches. je comprends 4 mailles au rang endroit ( qui est le 27 ° du diagramme) , 4 mailles au rang envers au niveau des marqueurs, soit 8 mailles= 260 mailles. ensuite ce serait 2 augmentations (marqueurs 1 et 3 ?) sur les rangs endroits 9 fois = 278, il m'en manque 10. Par rapport aux marqueurs où se trouvent ces augmentations? Je suis totalement perdue, merci de votre aide
06.04.2023 - 20:23DROPS Design answered:
Bonjour Mme Devauchelle, pour les manches, on augmente effectivement 9 fois (en taille M) 4 mailles tous les rangs (soit 252 + (9x4) = 288 m); les augmentations se font après le 1er et avant le 2ème marqueur + après le 3ème et avant le 4ème marqueur (sur l'endroit) et, sur l'envers: après le 4ème + avant le 3ème marqueur et après le 2ème et avant le 1er marqueur. Bon tricot!
11.04.2023 - 11:54Använder minsta storleken. Mönstret ¿börjar med att lägga upp 139 maskor och öka sedan 5 = 144 efter 3 cm. När jag sedan ska lägga in markörer efter att6,28,26,36,26,28,6 maskor blir detta 156 maskor. Ska det läggas upp 12 maskor extra utöver de 139 i början eller ingår kantmaskorna i de 28?
29.03.2023 - 21:44DROPS Design answered:
Hej Barbro, du tæller alle masker med også kantmaskerne, så du får 28+26+36+26+28= 144 masker :)
13.04.2023 - 09:58Bonjour, je suis arrivée à l'empiècement et j'hésite sur le positionnement des 4 marqueurs du corps. quand vous écrivez de compter 29 mailles pour placer le premier marqueur, est ce y compris les 6 mailles de bordures? merci d'avance de votre réponse
27.03.2023 - 13:05DROPS Design answered:
Bonjour Mme Devauchelle, tout à fait, comptez bien les mailles dès la 1ère du rang soit: 29 m (devant gauche), 26 m (épaule), 38 m (dos), 26 m (épaule) et 29 m (devant droit); on a ainsi bien: 29+26+38+26+29=148 m. Bon tricot!
27.03.2023 - 13:33Onder de telpatronen A.1 en A.2 staan getallen: S=22 , M-XL= 23, L-XXL = 24 enz. Wat wordt hiermee bedoeld?
25.03.2023 - 09:21DROPS Design answered:
Dag Henny,
De getallen zijn het aantal steken, dus het aantal steken dat het patroon breed is. Voor maat S begin je dus met 22 steken van het telpatroon. Voor maat M-XL met 23 steken, enzovoort.
27.03.2023 - 20:45Guten Tag, wenn man für die Passe , vor und nach dem Markierer zunehmen muss, braucht es da keine Zwischenmasche ?
10.11.2022 - 11:22DROPS Design answered:
Liebe Verena, ja genau, die Zunahmen für die Passe werden beidseitig von jeder Masche mit einer Markierung gearbeitet = diese Markierungen sollen in der äußersten Masche an beiden Seiten der Ärmel versetzt werden. Viel Spaß beim stricken!
10.11.2022 - 16:53On crystal lattice, knitting size small: I start chart at 22 stitches. Do I count increases each row and follow chart on each consecutive row from stitch 23, 24,, 25, etc.? And go backwards on A 2? It seems very confusing to me. Appreciate your help, thanks.
02.09.2022 - 02:22DROPS Design answered:
Dear Mrs McDermott, after 1st increase rom WS on the right front piece you will end A.2 with the 23th stitch (seen from WS/from the left, 1 st after the 22th st), and on left front piece you will start A.1 with the 23th stitch in diagram (1 stitch before the 22 sts). Hope it can help. Happy knitting!
02.09.2022 - 09:01Bonjour et merci pour vos modèles gratuits Au moment de commencer le corps, je voudrais savoir si les mailles du raglan sont visibles sur le devant, la manche ou à cheval entre les deux. J'ai le bon nombre de maille total mais je trouve que la répartition est bizarre. Merci si vous pouvez m'aider.
12.07.2022 - 18:07DROPS Design answered:
Bonjour Françoise, il n'y a pas de raglan dans ce modèle. Il a des manches marteau. Ainsi, la distribution sera parallèle à l'épaule. Bon tricot!
24.07.2022 - 19:58