DROPS Alpaca
DROPS Alpaca
100% Alpaca
from 3.40 £ /50g
Get the yarn to make this pattern from 30.60£.

The yarn cost is calculated from the pattern’s smallest size and the yarn’s cheapest product type. Looking for an even better price? You might find it on the DROPS Deals!

DROPS SS24

Nature Lyrics Cardigan

Knitted jacket in 2 strands DROPS Alpaca. The piece is worked top down with raglan, double neck and cables. Sizes S - XXXL.

DROPS 230-11
DROPS Design: Pattern z-963
Yarn group A + A or C
-------------------------------------------------------

SIZES:
S - M - L - XL - XXL - XXXL

MATERIALS:
DROPS Alpaca from Garnstudio (belongs to yarn group A)
450-500-550-600-650-700 g colour 9028, lemon pie

DROPS BUTTONS NO. 629: 5-5-6-6-6-6 items.

NEEDLES:
DROPS CIRCULAR NEEDLE SIZE 5 MM: Length 40 cm and 80 cm.
DROPS CIRCULAR NEEDLE SIZE 4 MM: Length 80 cm.
DROPS DOUBLE POINTED NEEDLES SIZE 5 MM.
DROPS DOUBLE POINTED NEEDLES SIZE 4 MM.
DROPS CABLE NEEDLE – for cables.
The technique MAGIC LOOP can be used – you then only need circular needle of 80 cm in each size.

KNITTING TENSION:
17 stitches in width and 22 rows in height with stocking stitch and 2 strands = 10 x 10 cm.
NOTE: Needle size is only a guide. If you get too many stitches on 10 cm, change to a larger needle size. If you get too few stitches on 10 cm, change to a smaller needle size.

-------------------------------------------------------

Alternative Yarn – See how to change yarns here
Yarn Groups A to F – Use the same pattern and change the yarn here
Yarn usage using an alternative yarn – Use our yarn converter here

-------------------------------------------------------

DROPS Alpaca
DROPS Alpaca
100% Alpaca
from 3.40 £ /50g
Get the yarn to make this pattern from 30.60£.

The yarn cost is calculated from the pattern’s smallest size and the yarn’s cheapest product type. Looking for an even better price? You might find it on the DROPS Deals!

Pattern instructions

NOTE: This pattern is written in British English. All measurements in charts are in cm. For conversion from cm to inches - click here. There are different terms for crocheting in British and American English. If this pattern includes crochet, click for "crochet terms" here. For this pattern in American English, please click here.
-------------------------------------------------------

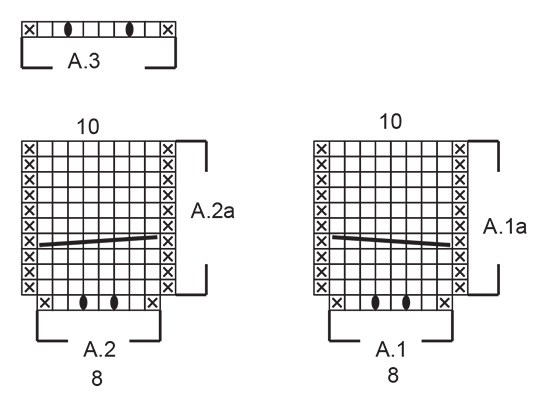
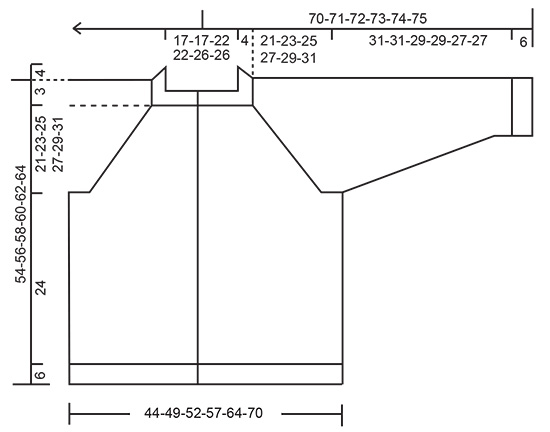
EXPLANATIONS FOR THE PATTERN:

-------------------------------------------------------

RIDGE/GARTER STITCH (worked back and forth):
Knit all rows.
1 ridge = knit 2 rows.

PATTERN:
See diagrams A.1 to A.3. The diagrams show all rows in the pattern from the right side.

BUTTONHOLES:
Work buttonholes on the right band (when the garment is worn). Work from the right side when there are 3 stitches left on the row as follows: Make 1 yarn over, knit 2 together and knit 1. On the next row (wrong side), knit the yarn over to leave a hole.
The first buttonhole is worked at the transition between neck and yoke. Then work the other 4-4-5-5-5-5 buttonholes with approx. 9-9-8-8½-8½-9 cm between each one.

DECREASE TIP (for sleeves):
Decrease 1 stitch on either side of the marker as follows: Work until there are 3 stitches left before the marker, knit 2 together, knit 2 (marker sits between these 2 stitches), slip 1 stitch as if to knit, knit 1 and pass the slipped stitch over the knitted stitch.
-------------------------------------------------------

START THE PIECE HERE:

-------------------------------------------------------

JACKET – SHORT OVERVIEW OF THE PIECE.
The neck and yoke are worked back and forth with circular needle, from mid front and top down. The yoke is divided for body and sleeves and the body continued back and forth with circular needle. The sleeves are worked in the round with short circular needle/double pointed.

DOUBLE NECK:
Cast on 80-80-96-96-112-112 stitches with circular needle size 4 mm and 2 strands DROPS Alpaca. Purl 1 row (= wrong side), then work rib from the right side as follows: 1 edge stitch in GARTER STITCH – read description above, knit 2, * purl 2, knit 2 *, work from *-* until there is 1 stitch left, 1 edge stitch in garter stitch.
At the end of the next 2 rows cast on 4 stitches for the bands = 88-88-104-104-120-120 stitches. The band stitches are worked in garter stitch (5 band stitches on each side).
When the rib measures 9 cm change to circular needle size 5 mm.
Insert 1 marker after the front band stitches at the beginning of the row; the yoke is measured from this marker!

YOKE:
On the next row from the right side work pattern and increase to raglan as follows:
5 band stitches in garter stitch, 7-7-11-11-15-15 stitches in stocking stitch, 1 yarn over, A.1, 1 yarn over, 8 stitches in stocking stitch, 1 yarn over, A.2, 1 yarn over, 16-16-24-24-32-32 stitches in stocking stitch, 1 yarn over, A.1, 1 yarn over, 8 stitches in stocking stitch, 1 yarn over, A.2, 1 yarn over, 7-7-11-11-15-15 stitches in stocking stitch, 5 band stitches in garter stitch. REMEMBER THE BUTTONHOLES – see description above.
There are 104-104-120-120-136-136 stitches after the first row in A.1 and A.2, i.e. after increasing 1 stitch on each side of each A.1/A.2 to raglan and 2 stitches in each A.1/A.2. The yarn overs in A.1/A.2 are worked twisted to avoid holes, the other yarn overs are not worked twisted to leave holes. REMEMBER THE KNITTING TENSION!
Increase 1 stitch on each side of A.1a/A.2a on each row from the right side a total of 19-23-21-25-26-31 times = 248-280-280-312-336-376 stitches. Repeat A.1a and A.2a in height.
Continue the pattern until the yoke measures 21-23-25-27-29-31 cm from the marker.
On the next row divide for the body and sleeves as follows:
Work 5 band stitches in garter stitch, 26-30-32-36-41-46 stitches in stocking stitch and A.1a as before (10 stitches), place the next 46-54-50-58-60-70 stitches on a thread for the sleeve and cast on 8-8-10-10-12-12 stitches under sleeve, work A.2a as before (10 stitches), 54-62-66-74-84-94 stitches in stocking stitch, A.1a as before (10 stitches), place the next 46-54-50-58-60-70 stitches on a thread for the sleeve and cast on 8-8-10-10-12-12 stitches under sleeve, work A.2a (10 stitches), 26-30-32-36-41-46 stitches in stocking stitch, 5 band stitches in garter stitch.

BODY:
= 172-188-200-216-240-260 stitches. Continue with garter stitch, stocking stitch and A.1a/A.2a, working the cast-on stitches under each sleeve in stocking stitch.
When the body measures 24 cm from the division in all sizes, increase as follows on the next row from the right side:
Work 5 band stitches in garter stitch, 26-30-32-36-41-46 stitches in stocking stitch and increase 5-5-7-7-10-9 stitches evenly spaced over these stitches, A.3 over A.1a, 8-8-10-10-12-12 stitches in stocking stitch and increase 0-0-2-2-0-0 stitches, A.3 over A.2a, 54-62-66-74-84-94 stitches in stocking stitch and increase 10-10-14-14-16-18 stitches, A.3 over A.1a, 8-8-10-10-12-12 stitches in stocking stitch and increase 0-0-2-2-0-0 stitches, A.3 over A.2a, 26-30-32-36-41-46 stitches in stocking stitch and increase 5-5-7-7-10-9 stitches, 5 band stitches in garter stitch = 200-216-240-256-284-304 stitches.
Change to circular needle size 4 mm and work rib as follows from the right side:
5 band stitches in garter stitch, * knit 2, purl 2 *, work from *-* until there are 7 stitches left, knit 2 and 5 band stitches in garter stitch.
Work this rib for 6 cm. Cast off with knit.

SLEEVES:
Place the 46-54-50-58-60-70 stitches from the thread on the one side of the piece on short circular needle/double pointed needles size 5 mm and knit up 1 stitch in each of the 8-8-10-10-12-12 stitches cast on under the sleeve = 54-62-60-68-72-82 stitches. Insert a marker in the middle of the new stitches under the sleeve. Allow the marker to follow your work onwards; it will be used when decreasing under the sleeve.
Continue with stocking stitch in the round for 4 cm. Now decrease 2 stitches under the sleeve – read DECREASE TIP. Decrease like this every 8-4-5-2½-2-1 cm a total of 4-7-5-8-9-13 times = 46-48-50-52-54-56 stitches. Continue working until the sleeve measures 30-29-26-25-22-21 cm from the division. Knit 1 round where you increase 6-8-6-8-6-8 stitches evenly spaced = 52-56-56-60-60-64 stitches. Change to double pointed needles size 4 mm and work rib (knit 2, purl 2) for 6 cm. Cast off with knit. Work the other sleeve in the same way.

ASSEMBLY:
Fold the neck double to the inside and sew down. To avoid the neck being tight and rolling outwards, it is important that the seam is elastic.
Sew the buttons onto the left band.

Diagram

symbols = knit from right side, purl from wrong side
symbols = purl from right side, knit from wrong side
symbols = between 2 stitches make 1 yarn over; work the yarn over twisted on the next row to avoid a hole
symbols = place 4 stitches on cable needle in front of piece, knit 4, knit 4 from cable needle
symbols = place 4 stitches on cable needle behind the piece, knit 4, knit 4 from cable needle
diagram
diagram

Each of our patterns has specific tutorial videos to help you.

Do you have a question? See a list of frequently asked questions (FAQ)

Knitting tension is what determines the final measurements of your work, and is usually measured per 10 x 10 cm. It is provided like so: number of stitches in width x number of rows in height - eg: 19 stitches x 26 rows = 10 x 10 cm.

The knitting tension is very individual; some people knit/crochet loosely while others work tightly. You adjust the knitting tension with the needle size, which is why the suggested needle size is only meant as a guide! You need to adjust this (up or down) to ensure that YOUR knitting tension matches the knitting tension provided in the pattern. If you work with a different knitting tension than provided you will have a different yarn consumption, and your work will have different measurements than what the pattern suggests.

The knitting tension also determines which yarns can replace each other. As long as you achieve the same knitting tension you can replace one yarn with another.

See DROPS lesson: How to measure your tension/gauge

See DROPS video: How to make a gauge tension swatch

The required amount of yarn is provided in grams, eg: 450 g. To calculate how many balls you’ll need you first need to know how many grams are in 1 ball (25g, 50g or 100g). This information is available if you click on the individual yarn quality on our pages. Divide the amount required with the amount of each ball. For example, if each ball is 50g (the most common amount), the calculation will be as follows: 450 / 50 = 9 balls.

The important thing when changing from one yarn to another is that the knitting/crochet tension remains the same. This is so that the measurements of the finished piece will be the same as on the sketch provided. It is easier to achieve the same knitting tension using yarns from the same yarn group. It is also possible to work with multiple strands of a thinner yarn to achieve the knitting tension of a thicker one. Please try our yarn converter. We recommend you to always work a test swatch.

Please NOTE: when changing yarn the garment might have a different look and feel to the garment in the photo, due to individual properties and qualities of each yarn.

See DROPS lesson: Can I use a different yarn than the one mentioned in the pattern?

All our yarns are categorised into yarn groups (from A to F) according to thickness and knitting tension – group A contains the thinnest yarns and group F the thickest. This makes it easier for you to find alternative yarns to our patterns, should you wish to switch yarn. All yarns within the same group have a similar knitting tension and can easily replace each other. However, different yarn qualities have different structures and properties which will give the finished work a unique look and feel.

Click here for an overview of the yarns in each yarn group

At the top of all our patterns you’ll find a link to our yarn calculator, which is a helpful tool should you wish to use a different yarn than suggested. By filling in the yarn quality you wish to replace, the amount (in your size) and number of strands, the calculator will present good alternative yarns with the same knitting tension. Additionally it will tell you how much you’ll require in the new qualities and whether you’ll need to work with multiple strands. Most skeins are 50g (some are 25g or 100g).

If the pattern is worked with multiple colours, every colour will have to be calculated separately. Similarly, if the pattern is worked with several strands of different yarns (for example 1 strand Alpaca and 1 strand Kid-Silk) you will have to find alternatives for each, individually.

Click here to see our yarn calculator

Since different yarns have different qualities and textures we have chosen to keep the original yarn in our patterns. However, you can easily find options among our available qualities by using our yarn calculator, or simply pick a yarn from the same yarn group.

It is possible that some retailers still have discontinued yarns in stock, or that someone has a few skeins at home that they would like to find patterns for.

The yarn calculator will provide both alternative yarn as well as required amount in the new quality.

If you think it's hard to decide what size to make, it can be a good idea to measure a garment you own already and like the size of. Then you can pick the size by comparing those measures with the ones available in the pattern's size chart.

You'll find the size chart at the bottom of the pattern.

See DROPS lesson: How to read size chart

The needle size provided in the pattern serves only as a guide, the important thing is to follow the knitting tension. And since knitting tension is very individual, you will have to adjust the needle size to ensure that YOUR tension is the same as in the pattern – maybe you’ll have to adjust 1, or even 2 needle sizes, up or down to achieve the correct tension. For this, we recommend that you work test swatches.

Should you work with a different knitting tension than the one provided, the measurements of the finished garment might deviate from the measurement sketch.

See DROPS lesson: How to measure your tension/gauge

See DROPS video: How to make a tension/gauge swatch

Working a garment top-down provides more flexibility and room for personal adjustment. For example it is easier to try the garment on while working, as well as making adjustments to length of yoke and shoulder caps.

The instructions are carefully explaining every step, in the correct order. Diagrams are adjusted to the knitting direction and are worked as usual.

The diagram depicts all rows/rounds, and every stitch seen from the right side. It is read from bottom to top, from right to left. 1 square = 1 stitch.

When working back and forth, every other row is worked from the right side and every other row is worked from the wrong side. When working from the wrong side, the diagram will have to be worked reversed: from left to right, knit stitches are purled, purl stitches are knit etc.

When working in the round every round is worked from the right side and the diagram are worked from right to left on all rounds.

See DROPS lesson: How to read knitting diagrams

The diagram depicts all rows/rounds, and every stitch seen from the right side. It is worked from bottom to top, from right to left.

When working back and forth every other row is worked from the right side: from right to left and every other row is worked from the wrong side: from left to right.

When working in the round, every row in the diagram are worked from the right side, from right to left.

When working a circular diagram you start in the middle and work your way outwards, counter clockwise, row by row.

The rows usually start with a given number of chain stitches (equivalent to the height of the following stitch), this will either be depicted in the diagram or explained in the pattern.

See DROPS lesson: How to read crochet diagrams

Instructions for working several diagrams after each other on the same row/round, will often be written like so: “work A.1, A.2, A.3 a total of 0-0-2-3-4 times". This means you work A.1 once, then A.2 is worked once, and A.3 is repeated (in width) the number of times provided for your size – in this case like so: S = 0 times, M = 0 times, L=2 times, XL= 3 times and XXL = 4 times.

The diagrams are worked as usual: begin with the first row in A.1, then work the first row in A.2 etc.

See DROPS lesson: How to read knitting diagrams

See DROPS lesson: How to read crochet diagrams

The total width of the garment (from wrist-to-wrist) will be larger in the larger sizes, despite the actual sleeves being shorter. The larger sizes have longer sleeve caps and wider shoulders, so there will be a good fit in all sizes.

The measurement sketch/schematic drawing provides information regarding the full length of the garment. If it’s a jumper or a jacket the length is measured from the highest point on the shoulder closest to the neckline, and straight down to the bottom of the garment. It is NOT measured from the tip of shoulder. Similarly, the length of yoke is measured from the highest point on the shoulder and down to where yoke is split into body and sleeves.

On a jacket measures are never taken along bands, unless specifically stated. Always measure inside band stitches when measuring the length.

See DROPS lesson: How to read a schematic drawing

Diagrams are often repeated on the round or in height. 1 repeat is the diagram the way it appears in the pattern. If it says to work 5 repeats of A.1 in the round, then you work A.1 a total of 5 times after/next to each other in the round. If it says to work 2 repeats of A.1 vertically/in height you work the entire diagram once, then begin again at the start and work the entire diagram one more time.

Chain stitches are slightly narrower than other stitches and to avoid working the cast-on edge too tight, we simply chain more stitches to begin with. The stitch count will be adjusted on the following row to fit the pattern and measurement sketch.

The rib edge is more elastic and will contract slightly compared to, for example, stocking stitch. By increasing before the rib edge, you avoid a visible difference in width between the rib edge and the rest of the body.

It’s very easy to cast off too tightly, and by making yarn overs while casting off (and simultaneously casting these off) you avoid a too tight cast off edge.

See DROPS video: How to bind off with yarn overs (yo)

To achieve an even increase (or decrease) you can increase on, for example: every 3rd and 4th row alternately, like so: work 2 rows and increase on the 3rd row, work 3 rows and increase on the 4th. Repeat this until the increase is complete.

See DROPS lesson: Increase or decrease 1 st on every 3rd and 4th row alternately

Should you prefer to work in the round instead of back and forth, you may of course adjust the pattern. You’ll need to add steeks mid-front (usually 5 stitches), and follow the instructions. When you would normally turn and work from the wrong side, simply work across the steek and continue in the round. At the end you’ll cut the piece open, pick up stitches to work bands, and cover the cut edges.

See DROPS video: How to knit steeks and cut open

Should you prefer to work back and forth instead of in the round, you may of course adjust the pattern so you work the pieces separately and then assemble them at the end. Divide the stitches for the body in 2, add 1 edge stitch in each side (for sewing) and work the front and back pieces separately.

See DROPS lesson: Can I adapt a pattern for circular needles into straight needles?

Pattern repeats can vary slightly in the different sizes, in order to get the correct proportions. If you’re not working the exact same size as the garment in the photo, yours might deviate slightly. This has been carefully developed and adjusted so that the complete impression of the garment is the same in all sizes.

Make sure to follow instructions and diagrams for your size!

If you have found a pattern you like which is available in women’s size it’s not very difficult to convert it to men’s size. The biggest difference will be the length of sleeves and body. Start working on the women size that you think would fit across the chest. The additional length will be worked right before you cast off for the armhole/sleeve cap. If the pattern is worked top-down you can add the length right after the armhole or before the first decrease on sleeve.

Regarding additional yarn amount, this will depend on how much length you add, but it is better with a skein too many than too few.

All yarns will have excess fibres (from production) that might come off as lint or shedding. Brushed yarns (ie hairier yarns) have more of these loose, excess fibres, causing more shedding.

Shedding also depends on what is worn under or over the garment, and whether this pulls at the yarn fibres. It’s therefore not possible to guarantee that there will be no shedding

Below are some tips on how to get the best result when working with hairier yarns:

1. When the garment is finished (before you wash it) shake it vigorously so the looser hairs come off. NOTE: do NOT use a lint roller, brush or any method that pulls at the yarn.

2. Place the garment in a plastic bag and put it in your freezer - the temperature will cause the fibres to become less attached to each other, and excess fibres will come off easier.

3. Leave in the freezer for a few hours before taking it out and shaking it again.

4. Wash the garment according to the instructions on the yarn label.

Pilling is a natural process that happens to even the most exclusive of fibers. It's a natural sign of wear and tear that is hard to avoid, and that is most visible in high friction areas of your garment like a sweater's arms and cuffs.

You can make your garment look as new by removing the pilling, using a fabric comb or a pill/lint remover.

Still can't find the answer you need? Then scroll down and leave your question so one of our experts can try to help you. This will be done normally within 5 to 10 working days.
In the meantime, you can read the questions and answers that others have left to this pattern or join the DROPS Workshop on Facebook to get help from fellow knitters/crocheters!

You might also like...

Post a comment to pattern DROPS 230-11

We would love to hear what you have to say about this pattern!

If you want to leave a question, please make sure you select the correct category in the form below, to speed up the answering process. Required fields are marked *.

Comments / Questions (24)

country flag Sylvie wrote:

Je tricote la taille M. Je viens de commencer l'empiècement. J'ai tricoté le premier rang endroit en suivant vos explications (1er rang de A.1/A.2) et donc obtenu 104 mailles qui correspondent bien à la taille M. Mais je ne comprends pas la suite "Augmenter AINSI pour le raglan 19-23-21-25-26-31 fois 1 maille au total de chaque côté de A.1a/A.2a tous les rangs sur l'endroit". (Dans mon cas il s'agirait d'augmenter 23 fois). Pouvez-vous donner plus de détails ?

17.01.2024 - 21:43

DROPS Design answered:

Bonjour Sylvie, au 1er rang vous avez fait 4 jetés: 1 avant et 1 après chaque A.1 et chaque A2, il s'agissait des augmentations du raglan, continuez donc ainsi en jersey, point mousse et les diagrammes et tous les rangs sur l'endroit, augmentez de chaque côté des diagrammes encore 22 autres fois (soit 23 fois au total tous les 2 rangs). Bon tricot!

18.01.2024 - 08:55

country flag Yvonne Lindqvist wrote:

Spørgsmål Kan jeg strikke model 230-11 i bomuld? Hvis hvilket er bedst? Drops Paris eller Drops love you 8

01.05.2023 - 18:17

DROPS Design answered:

Hei Yvonne. Begge kvalitetene er fine å strikke med. Drops love you 8 er 10 meter lengre pr nøste enn Paris og de har ca samme pris, så kanskje strikke med den kvaliteten du (ditt barnebarn) finner den farger dere ønsker? mvh DROPS Design

02.05.2023 - 14:09

country flag Yvonne Lindqvist wrote:

Mit barnebarn vil gerne have jeg strikker model 230-11. Kan jeg strikke den i bomuld? Hvis hvilket er bedst? Håber på hurtigt svar

01.05.2023 - 18:11

DROPS Design answered:

Hei Yvonne. Se vårt tidligere svar til deg under. mvh DROPS Design

02.05.2023 - 14:04

country flag Yvonnelindqvist wrote:

Mit barnebarn ønsker jeg strikker denne model i bomuldsgarn. Landet lade sig gøre ? Hvis hvilket bomuldsgarn skal/kan jegvælge\r\nMed venlig hilsen Yvonne

30.04.2023 - 11:16

DROPS Design answered:

Hei Yvonnelindqvist Ja, du kan strikke den med 2 tråder DROSP Safran eller 1 tråd DROPS Paris. Bruk vår Garnkalkulator (link til høyre for eller under bildet) for å regne garnmengden du trenger i den str. du skal strikke. mvh DROPS Design

02.05.2023 - 13:15

country flag Elly wrote:

Klopt het dat er in de voorbies geen extra toeren moeten worden gebreid? ( Bijv.oorbeeld om de vijf ribbels om te voorkomen dat de voorbies te kort wordt.)

07.02.2023 - 20:43

DROPS Design answered:

Dag Elly,

Nee dit hoeft inderdaad niet. Dit wordt alleen gedaan als er een ronding in zit, bijvoorbeeld bij een v-hals waarbij de voorbies doorloopt in de hals.

08.02.2023 - 11:19

country flag Elly wrote:

Dank voor het antwoord. Later zag ik, dat bij patroon 230-12 de trui staat met wel een foto van de voorkant. Dat helpt ook.

20.11.2022 - 17:47

country flag Elly wrote:

Ik wil graag aan dit vestje beginnen, maar aarzel, omdat er geen goede foto van de voorkant is. Kan die alsnog geplaatst worden? Ook zou ik graag het antwoord zien op de vraag van Hennie 2-10-22. Bij voorbaat dank.

20.11.2022 - 11:58

DROPS Design answered:

Dag Elly,

Helaas is er geen goede foto van de voorkant, voor zover ik weet.

Na het opzetten en na het opzetten van steken voor de biezen heb je 88 steken. Na de eerste naald zoals beschreven in de pas, kom ik op 104 steken in totaal (inclusief de omslagen in de beschrijving én inclusief de omlagen in A.1 en A.2).

20.11.2022 - 17:09

country flag Hennie Meinen wrote:

Volgens mij klopt dit patroon niet: Ik moet een dubbele hals opzetten met 80 steken. Kom ik bij de pas dan mag ik meerderen voor de mouwen. Los van het meerderen tel ik het aantal steken die ik ertussen moet breien. In totaal = 46 steken. Ik hou 34 steken over en loop nu al vast. Wie kan mij helpen?

02.10.2022 - 14:22

DROPS Design answered:

Dag Hennie,

Na het opzetten en na het opzetten van steken voor de biezen heb je 88 steken. Na de eerste naald zoals beschreven in de pas, kom ik op 104 steken in totaal (inclusief de omslagen in de beschrijving én inclusief de omlagen in A.1 en A.2).

20.11.2022 - 17:12

country flag Marthe wrote:

Bonjour, Dans la présentation de la collection printemps été 2022 il y avait une petite veste jaune cintrée par une pince sous poitrine. Modèle que l'on trouvait aussi sous forme de pull. Mais où est rendu ce modèle ? Il n'apparaît plus dans les patrons de la collection. Je n'attendais que ce patron pour mon prochain projet. Déception que je souhaite temporaire.

15.04.2022 - 23:00

DROPS Design answered:

Bonjour Marthe, si votre modèle a été retenu après les votes pour la collection printemps-été, il sera alors prochainement publié, merci d'avance pour votre patience. Et, en avance, bon tricot!

19.04.2022 - 10:48

country flag Birgit Espersen wrote:

Jeg strikker Nature lyrics cardigan og er nået til at ryg og forstå. Måler 24 cm. Så strikker jeg kantmasker og 36 masker til snoningen. Der står jeg skal tage 7 masker ud jævnt fordelt. Det forstår jeg ikke, da jeg er nået til snoningen, og hvorfor skal der tages ud. Venlig hilsen Birgit

03.04.2022 - 22:11