DROPS Sky
DROPS Sky
74% Alpaca, 18% Polyamide, 8% Wool
from 5.40 € /50g
Get the yarn to make this pattern from 27.00€.

The yarn cost is calculated from the pattern’s smallest size and the yarn’s cheapest product type. Looking for an even better price? You might find it on the DROPS Deals!

DROPS SS24

Daisy Lane

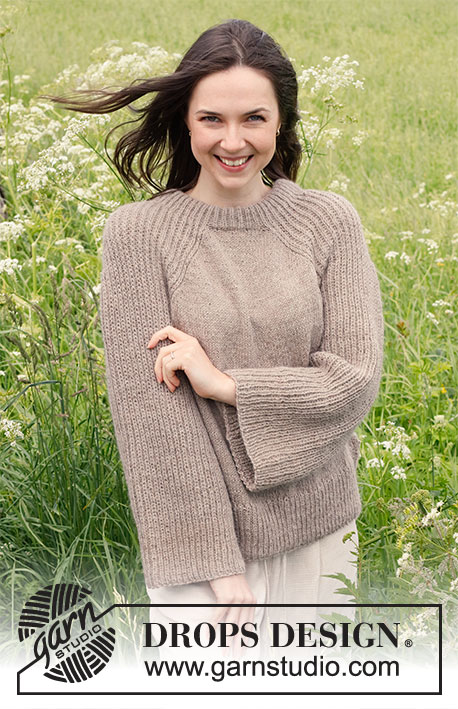
Knitted jumper in DROPS Sky. Piece is knitted top down with round yoke, stocking stitch, short sleeves and vents in the sides. Size XS – XXL.

DROPS 231-53
DROPS design: Pattern sk-165
Yarn group B
----------------------------------------------------------

SIZE:
XS - S - M - L - XL - XXL

MATERIALS:
DROPS SKY from Garnstudio (belongs to yarn group B)
250-250-300-300-350-400 g colour 02, pearl grey

NEEDLES:
DROPS CIRCULAR NEEDLE SIZE 4 mm: Length 40 cm and 60-60-60-80-80-80 cm.
DROPS CIRCULAR NEEDLE SIZE 3 mm: Length 40 cm and 60-60-60-80-80-80 cm.
DROPS DOUBLE POINTED NEEDLES SIZE 4 mm
DROPS DOUBLE POINTED NEEDLES SIZE 3 mm
The technique MAGIC LOOP can be used – you then only need circular needle of 80 cm in each size.

KNITTING TENSION:
21 stitches in width and 28 rows vertically in stocking stitch = 10 x 10 cm.
NOTE! Remember that needle size is only a suggestion. If you have too many stitches on 10 cm switch to larger needles. If you have too few stitches on 10 cm switch to smaller needles.

-------------------------------------------------------

Alternative Yarn – See how to change yarns here
Yarn Groups A to F – Use the same pattern and change the yarn here
Yarn usage using an alternative yarn – Use our yarn converter here

-------------------------------------------------------

DROPS Sky
DROPS Sky
74% Alpaca, 18% Polyamide, 8% Wool
from 5.40 € /50g
Get the yarn to make this pattern from 27.00€.

The yarn cost is calculated from the pattern’s smallest size and the yarn’s cheapest product type. Looking for an even better price? You might find it on the DROPS Deals!

Pattern instructions

----------------------------------------------------------

EXPLANATION FOR THE PATTERN:

----------------------------------------------------------

GARTER STITCH (back and forth):
Knit all rows.
1 ridge vertically = knit 2 rows.

PATTERN:
See diagrams A.1 and A.2.

INCREASE TIP:
Increase by making 1 yarn over after every other purl section. On next round purl yarn over twisted to avoid holes.

INCREASE/DECREASE TIP (evenly):
To calculate how to increase/decrease evenly, use the total number of stitches on row (e.g. 168 stitches) and divide stitches by number of increases/decreases to be done (e.g. 2) = 84.
In this example increase by making 1 yarn over after every 84th stitch. On next round work yarn overs twisted to avoid holes.
To decrease in this example knit every 83rd and 84th stitch together.

DECREASE TIP (applies to mid under sleeves):
Decrease 1 stitch on each side of marker thread as follows: Work until 3 stitches remain before marker thread, knit 2 together, knit 2 stitches (marker thread is between these 2 stitches), slip 1 stitch knitwise, knit 1, pass slipped stitch over stitch worked (= 2 stitches decreased).

CAST-OFF TIP:
To avoid a tight cast-off edge when casting off, you may use a larger needle. If this still is too tight make 1 yarn over after approx. every 6th stitch while casting off (cast off yarn overs as stitches).

----------------------------------------------------------

START THE PIECE HERE:

----------------------------------------------------------

JUMPER - SHORT OVERVIEW OF THE PIECE:
Work neck edge and yoke in the round on circular needle from mid back, top down. Now divide yoke for body and sleeves. Body is worked in the round on circular needle until vent. Then work front piece and back piece back and forth separately. Work sleeves in the round on double pointed needles/short circular needle, top down.

NECK EDGE AND YOKE:
Cast on 108-112-120-124-132-136 stitches on circular needle size 3 mm with DROPS Sky.
Knit 1 round. Then work rib in the round = knit 1 twisted/ purl 1. When rib measures 3 cm, increase every other 1 purl stitch to 2 purl stitches - read INCREASE TIP = 135-140-150-155-165-170 stitches. When piece measures 5 cm, increase the remaining 1 purl stitches to 2 purl stitches = 162-168-180-186-198-204 stitches.
When rib measures 8 cm, work in the different sizes as follows:

SIZE XS:
Knit 1 round while at the same time decrease 4 stitches evenly - read INCREASE/DECREASE TIP = 158 stitches.

SIZE S, M, L, XL AND XXL:
Knit 1 round while increasing 2-10-12-18-30 stitches evenly - read INCREASE/DECREASE TIP = 170-190-198-216-234 stitches.

ALL SIZES:
Insert a marker here. NOW MEASURE PIECE FROM HERE!
Switch to circular needle size 4 mm.
Work in stocking stitch in the round. When piece measures 4 cm from marker, work pattern as follows:
Knit 2-0-3-2-3-2, work A.1 until 1-0-2-1-3-2 stitches remain (= 31-34-37-39-42-46 repetitions of 5 stitches), knit 1-0-2-1-3-2. When A.1 has been worked vertically, 220-238-264-276-300-326 stitches remain on round. Continue in the round in stocking stitch.
When piece measures 9-9-10-11-12-13 cm from marker, work pattern as follows: Knit 2-0-3-2-3-2, work A.2 until 1-0-2-1-3-2 stitches remain (= 31-34-37-39-42-46 repetitions of 7 stitches), knit 1-0-2-1-3-2. When A.2 has been worked vertically, 282-306-338-354-384-418 stitches remain on round.
Then work in stocking stitch until piece measures 13-13-15-16-18-20 cm from marker.

Now divide piece for body and sleeves as follows:
Work the first 40-43-47-50-56-62 stitches (= half back piece), slip the next 60-66-74-76-80-84 stitches on a strand for sleeve, cast on 8-10-10-12-12-12 new stitches on needle (= in the side under sleeve), work the next 81-87-95-101-112-125 stitches (= front piece), slip the next 60-66-74-76-80-84 stitches on a strand for sleeve, cast on 8-10-10-12-12-12 new stitches on needle (= in the side under sleeve), work the last 41-44-48-51-56-63 stitches (= half back piece).
Finish body and sleeves separately. NOW MEASURE THE PIECE FROM HERE!

BODY:
= 178-194-210-226-248-274 stitches. Work stocking stitch in the round until piece measures approx. 19-21-21-22-22-22 cm from division. Try the jumper and work to desired length. 8 cm remain until finished measurements.
Now divide the piece in each side so that there are 89-97-105-113-124-137 stitches for front piece and 89-97-105-113-124-137 stitches for back piece. Then finish each part separately.

BACK PIECE:
Knit 1 row from right side while increasing 12-14-16-16-17-20 stitches evenly, but not over the 2 outermost stitches in each side = 101-111-121-129-141-157 stitches. Switch to circular needle size 3 mm. Purl 1 row with 2 stitches in garter stitch in each side.
Now work rib back and forth as follows:
ROW 1 (= right side): Work 2 stitches in garter stitch, * knit 1 twisted, purl 1 *, work from *-* until 3 stitches remain, knit 1 twisted, 2 stitches in garter stitch.
ROW 2 (= wrong side): Work 2 stitches in garter stitch, * purl 1 twisted, knit 1 *, repeat from *-* until 3 stitches remain, purl 1 twisted, 2 stitches in garter stitch.
Continue back and forth like this until rib measures 8 cm. Cast off with knit over twisted knit, knit over garter stitch and purl over purl – read CAST-OFF TIP.
Jumper measures approx. 52-54-56-58-60-62 cm from shoulder and down.

FRONT PIECE:
Work the same way as on back piece- remember CAST OFF TIP.

SLEEVES:
Slip the stitches 60-66-74-76-80-84 stitches from thread in one side of piece on double pointed needles/a short circular needle size 4 mm and pick in addition up 1 stitch in each of the 8-10-10-12-12-12 new stitches cast on under sleeve = 68-76-84-88-92-96 stitches.
Insert a marker thread in the middle of the new stitches (= 4-5-5-6-6-6 new stitches on each side of marker thread). Move marker thread upwards when working. Use it later when decreasing under sleeve. Work in stocking stitch in the round.
When piece measures 2 cm from division, decrease under sleeve - read DECREASE TIP.
Cast off like this every 2½-1½-1-1-1-1 cm 5-8-8-8-8-7 times in total = 58-60-68-72-76-82 stitches. Continue until sleeve measures 13-14-12-12-10-8 cm (shorter measurements in the larger sizes because of wider neck and longer yoke). Try the jumper and work to desired length. 4 cm rib remain until finished measurements.
Knit 1 round while increasing 4-4-4-6-6-6 stitches evenly = 62-64-72-78-82-88 stitches.
Switch to double pointed needles size 3 mm. Work rib (= knit 1 twisted/purl 1) for 4 cm. Cast off with knit over twisted knit and purl over purl – remember CAST-OFF TIP. Sleeve measures 17-18-16-16-14-12 cm in total from division. Work the other sleeve the same way.

Diagram

symbols = knit
symbols = knit 1 without dropping stitch off the needle, make 1 yarn over, knit 1 in same stitch but in back loop and then slip stitch off left needle. On next round knit yarn over twisted to avoid holes (= 2 stitches increased)
diagram

Each of our patterns has specific tutorial videos to help you.

Do you have a question? See a list of frequently asked questions (FAQ)

Knitting tension is what determines the final measurements of your work, and is usually measured per 10 x 10 cm. It is provided like so: number of stitches in width x number of rows in height - eg: 19 stitches x 26 rows = 10 x 10 cm.

The knitting tension is very individual; some people knit/crochet loosely while others work tightly. You adjust the knitting tension with the needle size, which is why the suggested needle size is only meant as a guide! You need to adjust this (up or down) to ensure that YOUR knitting tension matches the knitting tension provided in the pattern. If you work with a different knitting tension than provided you will have a different yarn consumption, and your work will have different measurements than what the pattern suggests.

The knitting tension also determines which yarns can replace each other. As long as you achieve the same knitting tension you can replace one yarn with another.

See DROPS lesson: How to measure your tension/gauge

See DROPS video: How to make a gauge tension swatch

The required amount of yarn is provided in grams, eg: 450 g. To calculate how many balls you’ll need you first need to know how many grams are in 1 ball (25g, 50g or 100g). This information is available if you click on the individual yarn quality on our pages. Divide the amount required with the amount of each ball. For example, if each ball is 50g (the most common amount), the calculation will be as follows: 450 / 50 = 9 balls.

The important thing when changing from one yarn to another is that the knitting/crochet tension remains the same. This is so that the measurements of the finished piece will be the same as on the sketch provided. It is easier to achieve the same knitting tension using yarns from the same yarn group. It is also possible to work with multiple strands of a thinner yarn to achieve the knitting tension of a thicker one. Please try our yarn converter. We recommend you to always work a test swatch.

Please NOTE: when changing yarn the garment might have a different look and feel to the garment in the photo, due to individual properties and qualities of each yarn.

See DROPS lesson: Can I use a different yarn than the one mentioned in the pattern?

All our yarns are categorised into yarn groups (from A to F) according to thickness and knitting tension – group A contains the thinnest yarns and group F the thickest. This makes it easier for you to find alternative yarns to our patterns, should you wish to switch yarn. All yarns within the same group have a similar knitting tension and can easily replace each other. However, different yarn qualities have different structures and properties which will give the finished work a unique look and feel.

Click here for an overview of the yarns in each yarn group

At the top of all our patterns you’ll find a link to our yarn calculator, which is a helpful tool should you wish to use a different yarn than suggested. By filling in the yarn quality you wish to replace, the amount (in your size) and number of strands, the calculator will present good alternative yarns with the same knitting tension. Additionally it will tell you how much you’ll require in the new qualities and whether you’ll need to work with multiple strands. Most skeins are 50g (some are 25g or 100g).

If the pattern is worked with multiple colours, every colour will have to be calculated separately. Similarly, if the pattern is worked with several strands of different yarns (for example 1 strand Alpaca and 1 strand Kid-Silk) you will have to find alternatives for each, individually.

Click here to see our yarn calculator

Since different yarns have different qualities and textures we have chosen to keep the original yarn in our patterns. However, you can easily find options among our available qualities by using our yarn calculator, or simply pick a yarn from the same yarn group.

It is possible that some retailers still have discontinued yarns in stock, or that someone has a few skeins at home that they would like to find patterns for.

The yarn calculator will provide both alternative yarn as well as required amount in the new quality.

If you think it's hard to decide what size to make, it can be a good idea to measure a garment you own already and like the size of. Then you can pick the size by comparing those measures with the ones available in the pattern's size chart.

You'll find the size chart at the bottom of the pattern.

See DROPS lesson: How to read size chart

The needle size provided in the pattern serves only as a guide, the important thing is to follow the knitting tension. And since knitting tension is very individual, you will have to adjust the needle size to ensure that YOUR tension is the same as in the pattern – maybe you’ll have to adjust 1, or even 2 needle sizes, up or down to achieve the correct tension. For this, we recommend that you work test swatches.

Should you work with a different knitting tension than the one provided, the measurements of the finished garment might deviate from the measurement sketch.

See DROPS lesson: How to measure your tension/gauge

See DROPS video: How to make a tension/gauge swatch

Working a garment top-down provides more flexibility and room for personal adjustment. For example it is easier to try the garment on while working, as well as making adjustments to length of yoke and shoulder caps.

The instructions are carefully explaining every step, in the correct order. Diagrams are adjusted to the knitting direction and are worked as usual.

The diagram depicts all rows/rounds, and every stitch seen from the right side. It is read from bottom to top, from right to left. 1 square = 1 stitch.

When working back and forth, every other row is worked from the right side and every other row is worked from the wrong side. When working from the wrong side, the diagram will have to be worked reversed: from left to right, knit stitches are purled, purl stitches are knit etc.

When working in the round every round is worked from the right side and the diagram are worked from right to left on all rounds.

See DROPS lesson: How to read knitting diagrams

The diagram depicts all rows/rounds, and every stitch seen from the right side. It is worked from bottom to top, from right to left.

When working back and forth every other row is worked from the right side: from right to left and every other row is worked from the wrong side: from left to right.

When working in the round, every row in the diagram are worked from the right side, from right to left.

When working a circular diagram you start in the middle and work your way outwards, counter clockwise, row by row.

The rows usually start with a given number of chain stitches (equivalent to the height of the following stitch), this will either be depicted in the diagram or explained in the pattern.

See DROPS lesson: How to read crochet diagrams

Instructions for working several diagrams after each other on the same row/round, will often be written like so: “work A.1, A.2, A.3 a total of 0-0-2-3-4 times". This means you work A.1 once, then A.2 is worked once, and A.3 is repeated (in width) the number of times provided for your size – in this case like so: S = 0 times, M = 0 times, L=2 times, XL= 3 times and XXL = 4 times.

The diagrams are worked as usual: begin with the first row in A.1, then work the first row in A.2 etc.

See DROPS lesson: How to read knitting diagrams

See DROPS lesson: How to read crochet diagrams

The total width of the garment (from wrist-to-wrist) will be larger in the larger sizes, despite the actual sleeves being shorter. The larger sizes have longer sleeve caps and wider shoulders, so there will be a good fit in all sizes.

The measurement sketch/schematic drawing provides information regarding the full length of the garment. If it’s a jumper or a jacket the length is measured from the highest point on the shoulder closest to the neckline, and straight down to the bottom of the garment. It is NOT measured from the tip of shoulder. Similarly, the length of yoke is measured from the highest point on the shoulder and down to where yoke is split into body and sleeves.

On a jacket measures are never taken along bands, unless specifically stated. Always measure inside band stitches when measuring the length.

See DROPS lesson: How to read a schematic drawing

Diagrams are often repeated on the round or in height. 1 repeat is the diagram the way it appears in the pattern. If it says to work 5 repeats of A.1 in the round, then you work A.1 a total of 5 times after/next to each other in the round. If it says to work 2 repeats of A.1 vertically/in height you work the entire diagram once, then begin again at the start and work the entire diagram one more time.

Chain stitches are slightly narrower than other stitches and to avoid working the cast-on edge too tight, we simply chain more stitches to begin with. The stitch count will be adjusted on the following row to fit the pattern and measurement sketch.

The rib edge is more elastic and will contract slightly compared to, for example, stocking stitch. By increasing before the rib edge, you avoid a visible difference in width between the rib edge and the rest of the body.

It’s very easy to cast off too tightly, and by making yarn overs while casting off (and simultaneously casting these off) you avoid a too tight cast off edge.

See DROPS video: How to bind off with yarn overs (yo)

To achieve an even increase (or decrease) you can increase on, for example: every 3rd and 4th row alternately, like so: work 2 rows and increase on the 3rd row, work 3 rows and increase on the 4th. Repeat this until the increase is complete.

See DROPS lesson: Increase or decrease 1 st on every 3rd and 4th row alternately

Should you prefer to work in the round instead of back and forth, you may of course adjust the pattern. You’ll need to add steeks mid-front (usually 5 stitches), and follow the instructions. When you would normally turn and work from the wrong side, simply work across the steek and continue in the round. At the end you’ll cut the piece open, pick up stitches to work bands, and cover the cut edges.

See DROPS video: How to knit steeks and cut open

Should you prefer to work back and forth instead of in the round, you may of course adjust the pattern so you work the pieces separately and then assemble them at the end. Divide the stitches for the body in 2, add 1 edge stitch in each side (for sewing) and work the front and back pieces separately.

See DROPS lesson: Can I adapt a pattern for circular needles into straight needles?

Pattern repeats can vary slightly in the different sizes, in order to get the correct proportions. If you’re not working the exact same size as the garment in the photo, yours might deviate slightly. This has been carefully developed and adjusted so that the complete impression of the garment is the same in all sizes.

Make sure to follow instructions and diagrams for your size!

If you have found a pattern you like which is available in women’s size it’s not very difficult to convert it to men’s size. The biggest difference will be the length of sleeves and body. Start working on the women size that you think would fit across the chest. The additional length will be worked right before you cast off for the armhole/sleeve cap. If the pattern is worked top-down you can add the length right after the armhole or before the first decrease on sleeve.

Regarding additional yarn amount, this will depend on how much length you add, but it is better with a skein too many than too few.

All yarns will have excess fibres (from production) that might come off as lint or shedding. Brushed yarns (ie hairier yarns) have more of these loose, excess fibres, causing more shedding.

Shedding also depends on what is worn under or over the garment, and whether this pulls at the yarn fibres. It’s therefore not possible to guarantee that there will be no shedding

Below are some tips on how to get the best result when working with hairier yarns:

1. When the garment is finished (before you wash it) shake it vigorously so the looser hairs come off. NOTE: do NOT use a lint roller, brush or any method that pulls at the yarn.

2. Place the garment in a plastic bag and put it in your freezer - the temperature will cause the fibres to become less attached to each other, and excess fibres will come off easier.

3. Leave in the freezer for a few hours before taking it out and shaking it again.

4. Wash the garment according to the instructions on the yarn label.

Pilling is a natural process that happens to even the most exclusive of fibers. It's a natural sign of wear and tear that is hard to avoid, and that is most visible in high friction areas of your garment like a sweater's arms and cuffs.

You can make your garment look as new by removing the pilling, using a fabric comb or a pill/lint remover.

Still can't find the answer you need? Then scroll down and leave your question so one of our experts can try to help you. This will be done normally within 5 to 10 working days.
In the meantime, you can read the questions and answers that others have left to this pattern or join the DROPS Workshop on Facebook to get help from fellow knitters/crocheters!

You might also like...

Post a comment to pattern DROPS 231-53

We would love to hear what you have to say about this pattern!

If you want to leave a question, please make sure you select the correct category in the form below, to speed up the answering process. Required fields are marked *.

Comments / Questions (34)

country flag Chrisja wrote:

Ik brei maat m. Na de hals heb je 180 steken. Dan moet je er 12 meerderen en kom ik dus op 192 steken. Patroon zegt 198. Dan moet je 37 keer 2 steken meerderen volgens patroon A1 en kom ik op 271 steken en niet op 264. Daarna weer 37 keer 2 steken meerderen en kom ik op 350 en geen 354 steken. Beschrijving klopt dus niet helemaal.

18.04.2024 - 18:14

country flag Karin Jensen wrote:

Hej Det ville være rart hvis kommentarer / spørgsmål fra andre lande var oversat til Dansk, for måske havde andre de samme ting at spørge om. MVH Karin

19.02.2024 - 13:09

country flag Karin Jensen wrote:

Hej I opskriften hvor der står : ALLE STØRRELSER : Jeg har 190 masker på pinden ( strikker str. M ) og skal strikke mønsterA1 , når jeg har strikket mønstret får jeg 266 masker på pinden og der skulle være 238 masker. jeg forstår ikke hvorfor jeg får flere masker ??? Er der måske en fejl i opskriften for det hele ser ellers rigtig ud. MVH Karin

19.02.2024 - 13:06

country flag Carolina Toffetti wrote:

Anche per me non è chiaro come devono essere fatti gli aumenti per il collo. Cioè avrò alcuni punti con coste 1/1 e in altri, dove ho fatto l’aumento 1dir + e rov ?

11.02.2024 - 13:38

DROPS Design answered:

Buongiorno Carolina, gli aumenti sono a sezioni alterne, per cui prima si aumenta in alcune sezioni, poi all'aumento successivo si aumenta nelle sezioni rimaste. Buon lavoro!

11.02.2024 - 14:40

country flag Monica wrote:

Sto realizzando questo modello nella taglia XL. Ho avviato 124 maglie, a 3 cm. ho aumentato 31 maglie (totale 155), a 5 cm. ho aumentato 31 maglie (totale 186), a 8 cm. ho aumentato 18 maglie. Il mio totale è di 186+18=204. Perché le spiegazioni mi danno 216 maglie?

28.01.2024 - 14:10

DROPS Design answered:

Buongiorno Monica, le 124 maglie di avvio sono per la taglia L, per la XL si avviano 132 maglie: quale taglia sta lavorando? Buon lavoro!

03.02.2024 - 11:39

country flag Ria De Waard wrote:

Ik brei maat Small, na 8 cm zijn er 168 steken. Dan moeten er 10 steken worden gemeerderd. Maar dan staat er dat er 190 steken zijn. En ik kom op 178. Wat moet ik doen????

15.12.2023 - 13:46

DROPS Design answered:

Dag Ria,

Je hebt 168 steken en je meerdert 2 steken, zodat je daarna 170 steken hebt. Die paragraaf telt namelijk voor maat S t/m XXL, waardoor het eerste getal voor maat S geldt.

15.12.2023 - 19:44

country flag Charlotta wrote:

Jag förstår inte hur jag ska göra en vriden avig maska på omslagen, utan att det blir hål? Under Ökningstips står det att omslagen skall stickas vriden avigmaska, just för att det inte skall bli hål. Något tips jag kan ha nytta av?

21.10.2023 - 07:51

DROPS Design answered:

Hej Charlotta. I denna video ser du hur man stickar en vriden avig maska. Mvh DROPS Design

23.10.2023 - 14:49

country flag Noelia wrote:

Hi there, I would like to make it with long sleeves. Is it just the matter of knitting the sleeves to the desire length? Thanks

27.09.2023 - 23:55

DROPS Design answered:

Dear Noelia, if you simply continue knitting from: "Try the jumper and work to desired length. 4 cm rib remain until finished measurements." the sleeve will be quite wide at the wrist. Therefore, you should continue working decreases until you reach the desired width and length of the sleeve. Happy knitting!

30.09.2023 - 23:29

country flag Anne De Keersmaeker wrote:

Bonjour, Je souhaite tricoter ce pull Daisy Lane (taille S) et avoue ne pas bien comprendre comment faire les augmentations. Pouvez-vous me dire à quels rangs il faut les faire et combien chaque fois ? Merci beaucoup. Anne

03.09.2023 - 15:08

DROPS Design answered:

Bonjour Mme De Keersmaeker, les augmentations de l'empiècement se font d'abord à intervalles réguliers (2 augmentations pour avoir 170 mailles), puis on tricotant le diagramme A.1 (2 mailles augmentées dans chacun des 34 répétitions) = on passe à 238 m; puis en tricotant A.2 où on augmente également 2 mailles dans chacun des 34 A.2 - 306 mailles. Bon tricot!

04.09.2023 - 08:40

country flag Ana Rivas wrote:

No tengo idea de como tejer con aguja circular ¿cómo puedo adaptar este modelo para tejerlo con agujas rectas? gracias y saludos

23.07.2023 - 03:19

DROPS Design answered:

Hola Ana, te recomendamos leer la siguiente lección sobre cómo adaptar estos patrones para trabajar con agujas rectas: https://www.garnstudio.com/lesson.php?id=13&cid=23.

23.07.2023 - 19:42