
Popular categories
Looking for a yarn?


|
||||||||||||||||||||||||||||
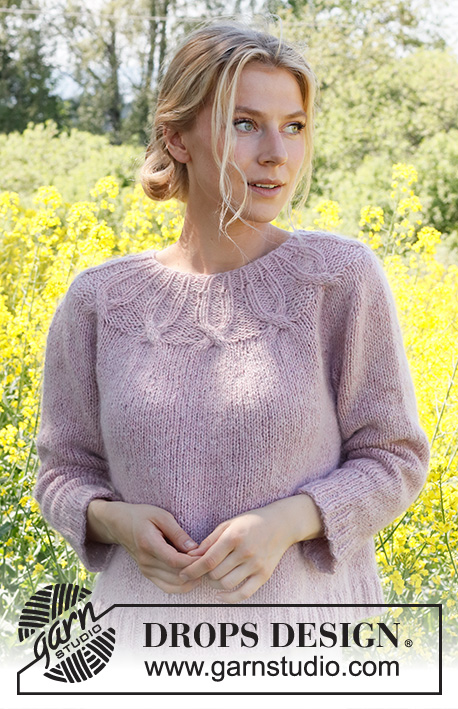
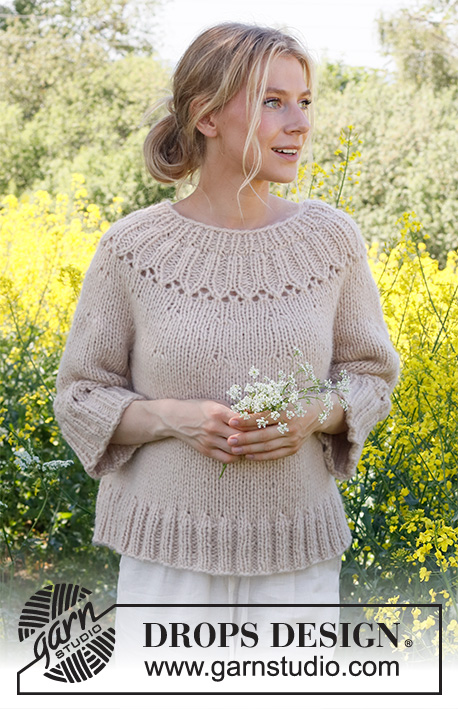
Harvest Wreath |
||||||||||||||||||||||||||||
 |
 |
|||||||||||||||||||||||||||
Knitted jumper in DROPS Wish or 2 strands DROPS Air. Piece is knitted top down with round yoke, lace pattern and ¾ sleeves. Size: S - XXXL
DROPS 232-45 |
||||||||||||||||||||||||||||
|
---------------------------------------------------------- EXPLANATION FOR THE PATTERN: ---------------------------------------------------------- PATTERN: See diagrams A.1 to A.4. INCREASE TIP (evenly): To calculate how to increase evenly, use the total number of stitches on row (e.g. 56 stitches) and divide stitches by number of increases to be done (e.g. 32) = 1.7. In this example increase by making 1 yarn over after alternately approx. every and every other stitch. On next round work yarn overs twisted to avoid holes. DECREASE TIP (applies to mid under sleeves): Decrease 1 stitch on each side of marker thread as follows: Work until 3 stitches remain before marker thread, knit 2 together, knit 2 stitches (marker thread is between these 2 stitches), slip 1 stitch knitwise, knit 1, pass slipped stitch over stitch worked (= 2 stitches decreased). CAST-OFF TIP: To avoid a tight cast-off edge when casting off, you may use a larger needle. If this still is too tight make 1 yarn over after approx. every 8th stitch while casting off (cast off yarn overs as stitches). ---------------------------------------------------------- START THE PIECE HERE: ---------------------------------------------------------- JUMPER - SHORT OVERVIEW OF THE PIECE: Work neck edge and yoke in the round on circular needle from mid back, top down. Now divide yoke for body and sleeves. Work body in the round on needle, top down. Work sleeves in the round on double pointed needles/short circular needle, top down. NECK EDGE: Cast on 56-60-62-64-68-70 stitches on a short circular needle size 7 mm with DROPS Wish or 2 strands DROPS Air. Knit 1 round. Work next round as follows: * Knit 1, purl 1 *, repeat from *-* the entire round. Continue rib like this for 4 cm. Knit 1 round while increasing 32-32-34-36-36-46 stitches evenly - read INCREASE TIP = 88-92-96-100-104-116 stitches. Knit 1 round (always knit yarn overs twisted to avoid holes). YOKE: Now work rib as follows: * Knit 1, purl 2, knit 1*, repeat from *-* the entire round. Continue rib like this for 5-5-5-6-6-6 cm. Begin on round with arrow and work A.1 (= 22-23-24-25-26-29 repetitions of 4 stitches) on the round. When A.1 has been worked vertically, work yoke as explained below. Switch to circular needle size 9 mm. Insert a marker here, measure yoke from this marker. Now work in stocking stitch. When piece measures 2 cm from the marker, work as follows: Size S and XXL: Work A.2 (choose diagram for your size) until 4-4 stitches remain (= 14-20 repetitions of 6-5 stitches), work the first 4-4 stitches in A.2 Size M, L, XL and XXXL: Work A.2 (choose diagram for your size) until 2-0-0-1 stitch remains on round (= 15-16-20-23 repetitions of 6-6-5-5 stitches), work 2-0-0-1 stitch in stocking stitch. All sizes: When diagram has been worked vertically, 30-30-32-40-42-46 stitches have been increased and there are 118-122-128-140-146-162 stitches on round. Work until piece measures 9-9-9-10-10-10 cm from marker. REMEMBER THE KNITTING TENSION! Work next round as follows: Size S, M, L, XL and XXXL: Work A.3 (choose diagram for your size) until 1-3-2-0-2 stitches remain on round (= 13-17-18-20-20 repetitions of 9-7-7-7-8 stitches), work 1-3-2-0-2 stitches in stocking stitch. Size XXL: Work A.3 (choose diagram for your size) until 6 stitches remain on round (= 20 repetitions of 7 stitches), work the first 6 stitches in A.3. All sizes: When A.3 has been worked vertically, 26-34-36-40-42-40 stitches have been increased and there are 144-156-164-180-188-202 stitches on round. Then work in stocking stitch until piece measures 25-27-29-31-33-35 cm in total from cast-on edge. Now divide piece for body and sleeves as follows: Work the first 22-24-25-27-29-31 stitches (= half back piece), slip the next 28-30-32-36-36-38 stitches on a thread for sleeve, cast on 6-6-8-10-10-10 new stitches on needle (= in the side under sleeve), work the next 44-48-50-54-58-63 stitches (= front piece), slip the next 28-30-32-36-36-38 stitches on a thread for sleeve, cast on 6-6-8-10-10-10 new stitches on needle (= in the side under sleeve), work the last 22-24-25-27-29-32 stitches (= half back piece). Then finish body and sleeves separately. NOW MEASURE PIECE FROM HERE! BODY: = 100-108-116-128-136-146 stitches. Work in stocking stitch until piece measures 20 cm from division. Approx. 8 cm remain until finished measurements. Try the jumper and work to desired length before rib. Knit 1 round while increasing 40-44-48-48-52-54 stitches evenly = 140-152-164-176-188-200 stitches. Switch to circular needle size 7 mm. Now work rib as follows: * Knit 2, purl 2 *, repeat from *-* the entire round. Continue rib like this for 8 cm. Cast off with knit over knit and purl over purl - read CAST-OFF TIP. Piece measures approx. 53-55-57-59-61-63 cm from shoulder and down. SLEEVES: Slip the 28-30-32-36-36-38 stitches from stitch holder in one side of piece on double pointed needles or a short circular needle size 9 mm and pick in addition up 1 stitch in each of the 6-6-8-10-10-10 new stitches cast on under sleeve = 34-36-40-46-46-48 stitches. Insert a marker thread in the middle of the 6-6-8-10-10-10 stitches (= 3-3-4-5-5-5 new stitches on each side of marker thread). Marker thread should be used later when decreasing under sleeve and working pattern (only applies to size L, XL, XXL and XXXL - do not decrease in size S and M). Work the different sizes as follows: Size S and M: Work in stocking stitch in the round until measures 14-12 cm from division. Approx. 15 cm remain until finished measurements (i.e. 7 cm lace pattern + 8 cm rib). Try the jumper and work to desired length. Knit 1 round while adjusting number of stitch to 35-35, i.e. increase 1 stitch in S and decrease 1 stitch in M. Size L, XL, XXL and XXXL: Work in stocking stitch in the round. When sleeve measures 2 cm from division, decrease 1 stitch on each side of marker thread - read DECREASE TIP. Decrease like this approx. every 3-1-1-1 cm 2-2-2-3 times in total = 36-42-42-42 stitches. Work until sleeve measures 11-9-8-8 cm from division. Approx. 15 cm remain until finished measurements (i.e. 7 cm lace pattern + 8 cm rib). Try the jumper and work to desired length. Knit 1 round while at the same time decreasing 1-0-0-0 stitches evenly = 35-42-42-42 stitches. All sizes: Now work pattern A.4 in the round (= 5-5-5-6-6-6 repetitions of 7 stitches). When A.4 has been worked, sleeve measures approx. 21-19-18-16-15-15 cm from division. Knit 1 round while increasing 9-9-9-10-10-10 stitches evenly = 44-44-44-52-52-52 stitches. Switch to double pointed needle size 7 mm. Work rib (knit 2/purl 2) in the round for 8 cm. Cast off with knit over knit and purl over purl - remember CAST-OFF TIP. Sleeve measures approx. 29-27-26-24-23-23 cm from division. Work the other sleeve the same way. |
||||||||||||||||||||||||||||
Diagram explanations |
||||||||||||||||||||||||||||
|
||||||||||||||||||||||||||||

|
||||||||||||||||||||||||||||

|
||||||||||||||||||||||||||||
|
Have you made this or any other of our designs? Tag your pictures in social media with #dropsdesign so we can see them! Do you need help with this pattern?You'll find tutorial videos, a Comments/Questions area and more by visiting the pattern on garnstudio.com. © 1982-2024 DROPS Design A/S. We reserve all rights. This document, including all its sub-sections, has copyrights. Read more about what you can do with our patterns at the bottom of each pattern on our site. |
||||||||||||||||||||||||||||


With over 40 years in knitting and crochet design, DROPS Design offers one of the most extensive collections of free patterns on the internet - translated to 17 languages. As of today we count 304 catalogues and 11422 patterns - 11422 of which are translated into English (UK/cm).
We work hard to bring you the best knitting and crochet have to offer, inspiration and advice as well as great quality yarns at incredible prices! Would you like to use our patterns for other than personal use? You can read what you are allowed to do in the Copyright text at the bottom of all our patterns. Happy crafting!
Comments / Questions (22)
When you get to the A.3 diagram, there isn't one for size XXL (and there are two for XXXL). Is it possible that the A.3 diagram that starts with 7 sts is supposed to be labeled "M - L - XL - XXL"? (And also that that section should be labeled "Size S, M, L, XL and XXL" instead of "Size S, M, L, XL and XXXL"?) Thank you!
25.03.2023 - 04:58DROPS Design answered:
Dear Deberah, yes, there is a typo in the A.3 charts, it should be the second A.3 chart (alongside M, L, XL and XXL). However, the section header is correct, since you can see how many stitches each repeat for each size has: 9-7-7-7-8 stitches (9 for size S chart, 7 for sizes M, L and XL and 8 for size XXXL). The next section, the one named size XXL, has repeats of 7 stitches, which would correspond to the middle chart. Therefore, only the charts are incorrect. We'll correct it as soon as possible. Thank you. Happy knitting!
26.03.2023 - 18:54Hi! I am wokring on the sleeve, just increased the round by 9 stitches. The instructions now say to shift to circular needles 7 mm and start working rib. However, won't be difficult t o start working rib since I'll have 9 increased stitches from the previous round? Wouldn't be better to add another round to work the increased stitches to simplify the rib?
31.01.2023 - 11:50DROPS Design answered:
Dear Mary, just work the increases made on last round with larger needles into the rib - if you made yarn overs to increase, work the yarn over twisted either K or P to fit the rib. Happy knitting!
31.01.2023 - 17:29Hi! Sorry, regarding the sleeves, there is something I am not clear about: I have to start with short circular needle size 9 and then (looking at the corrections) shift to needle size 7 only before starting working rib (knit 2/purl 2) in the round for 8 cm?
29.01.2023 - 21:05DROPS Design answered:
Dear Mary, if you are checking the online version then you don't need to look at the corrections; they have already been applied to the pattern posted online. You only need to change to the 7mm needles after working A.4, just when you start working the rib. Happy knitting!
29.01.2023 - 22:30Vorrei avere delle spiegazioni iniziando dalla base della maglia maniche e collo. Grazie
26.01.2023 - 20:01DROPS Design answered:
Buonasera Rosaria, questo modello è lavorato dall'alto in basso; sul nostro sito può trovare tantissimi altri modelli con lavorazione bottom-up. Buon lavoro!
26.01.2023 - 20:59Continuo a non capire: devo iniziare da dove c'è la freccia e non si tratta di coste. Le coste vengono sopo a scendere ma i diagrammi non dovrebbero essere letti dal basso verso l'alto?
23.01.2023 - 22:01DROPS Design answered:
Buonasera Maria, si, deve iniziare all'altezza della freccia e proseguire verso l'alto. Buon lavoro!
25.01.2023 - 22:13Ho un po' di confusione con il diagramma A1. Il diagramma è composta da 6 giri, contando dal basso del diagramma. Devo partire da quello con la freccia- cioè in pratica parto dal terzo giro. Ma poi devo procedere andando verso l'alto? E quindi fare 4-5-6? Se sì, quando faccio i primi due giri? Dopo aver terminato 4-5-6 passo a fare 1-2? Grazie mille in anticipo!
22.01.2023 - 23:08DROPS Design answered:
Buonasera Maria, deve lavorare A.1 fino alla fine e poi proseguire come indicato nello sprone. I primi giri di A.1 sono le coste. Buon lavoro!
23.01.2023 - 21:56Sto facendo la S e quindi, prima dello sprone, devo lavorare il motivo A1. Mi potete confermare che, partendo dalla freccia, va letto così: Subito un gettato, due maglie insieme a rovescio e un dritto? E capisco bene che devo fare solo un giro così?
21.01.2023 - 18:31DROPS Design answered:
Buonasera Maria, A.1 inizia all'altezza della freccia e deve lavorare 1 gettato, 1 maglia diritto, due maglie insieme a rovescio e un dritto? Poi deve proseguire anche con gli altri ferri di A.1. Buon lavoro!
21.01.2023 - 22:14Hi there, I'm finding that the hem at the bottom of the body is flaring out quite a bit. It's there something I can do to make sure this doesn't happen? Perhaps I am doing something incorrectly. Thank you
31.10.2022 - 23:35DROPS Design answered:
Dear Davina, body part should be straight (without decreasing nor increasing), you will increase before working rib but just because you need more stitches with smaller needle size for rib than for stocking stitch with larger needles. Happy knitting!
01.11.2022 - 10:23Ben aan het breien gegaan van deze trui maar als je het patroon volgt, kom je toch een fout tegen. De hals is 1 recht en 1 averecht, dan moet je 1 recht en 2 averecht gaan breien, dan merk je dat je verder het patroon ga volgen dat die aangegeven 1 recht en 2 averecht niet goed zijn om het patroon te maken dat je naar elkaar toe geknepen afgeronde onderkanten krijgt, daar heb je 2 rechte steken voor nodig, om te krijgen wat het patroon vraagt, wil u er even naar kijken? Dank u wel.
12.06.2022 - 11:35Bonjour , L empiècement tricoté jusqu'à 5 cm (taille s) est beaucoup trop petit. Sur la photo, on voit que l arrondi est beaucoup plus long que le col de 4cm? Ne faut il pas tricoté 10 cm?
08.04.2022 - 23:50DROPS Design answered:
Bonjour Béatrice, lorsque vous avez tricoté les 5 premiers cm pour l'empiècement, vous devez tricoter le diagramme a.1 puis continuer avec l'aiguille circulaire 9 et tricoter A.2, puis continuer jusqu'à 9 cm et tricoter A.4, et continuer ensuite jusqu'à 25 cm de hauteur totale depuis le rang de montage et alors diviser pour les manches. Bon tricot!
19.04.2022 - 14:30