DROPS Flora
DROPS Flora
65% Wool, 35% Alpaca
from 4.60 CAD /50g
DROPS Kid-Silk
DROPS Kid-Silk
75% Mohair, 25% Silk
from 9.40 CAD /25g
Get the yarn to make this pattern from 56.00CAD.

The yarn cost is calculated from the pattern’s smallest size and the yarn’s cheapest product type. Looking for an even better price? You might find it on the DROPS Deals!

DROPS SS24

Tree of Life

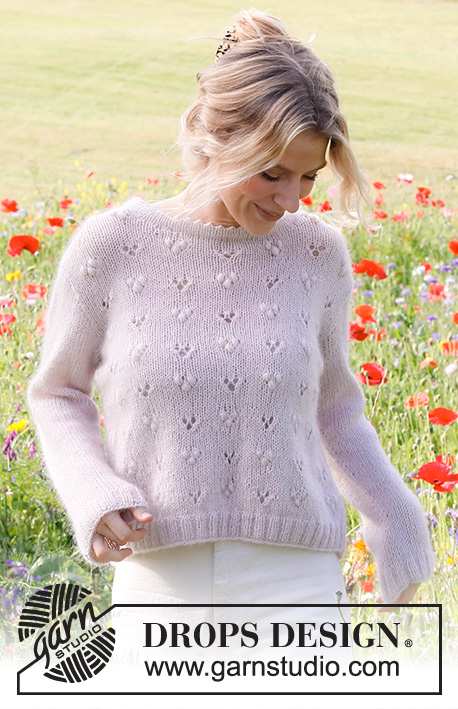
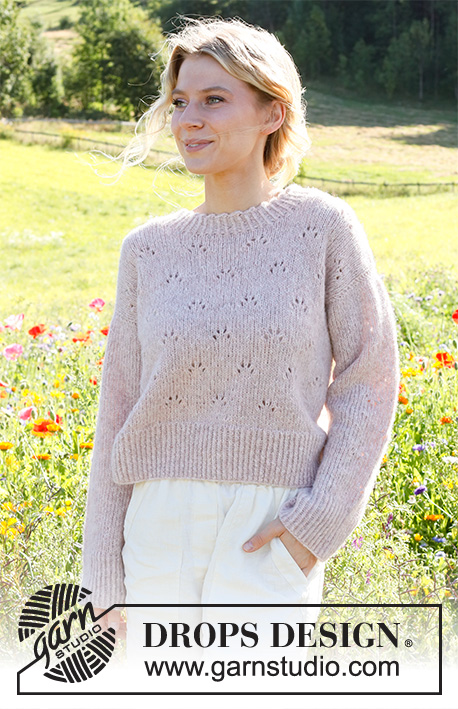
Knitted jacket in DROPS Flora and DROPS Kid-Silk. The piece is worked with lace pattern and bobbles. Sizes S - XXXL.

DROPS 231-3
DROPS Design: Pattern fl-070
Yarn group A + A or C
-------------------------------------------------------

SIZES:
S - M - L - XL - XXL – XXXL

Finished measurements:
Chest measurements: 88-98-104-118-126-140 cm = 34 5/8"-38 1/2"-41"-46 1/2"-49 1/2"-55"
Full length: 50-52-54-56-58-60 cm = 19 3/4"-20 1/2"-21 1/4"-22"-22 3/4"-23 5/8"
All measurements in charts are in cm.

MATERIALS:
DROPS FLORA from Garnstudio (belongs to yarn group A)
200-200-250-250-300-300 g color 22, white fog
And use:
DROPS KID-SILK from Garnstudio (belongs to yarn group A)
100-100-125-125-150-150 g color 40, pink pearl

DROPS BUTTONS NO 521: 5-5-6-6-6-6 items.

NEEDLES:
DROPS CIRCULAR NEEDLE SIZE 5 MM = US 8: Length 80 cm = 32”.
DROPS CIRCULAR NEEDLE SIZE 4 MM = US 6: Length 80 cm = 32”.

KNITTING GAUGE:
17 stitches in width and 22 rows in height with stockinette stitch and 1 strand of each quality = 10 x 10 cm = 4” x 4”.
NOTE: Needle size is only a guide. If you get too many stitches on 10 cm = 4”, change to a larger needle size. If you get too few stitches on 10 cm = 4”, change to a smaller needle size.

-------------------------------------------------------

Alternative Yarn – See how to change yarns here
Yarn Groups A to F – Use the same pattern and change the yarn here
Yarn usage using an alternative yarn – Use our yarn converter here

-------------------------------------------------------

DROPS Flora
DROPS Flora
65% Wool, 35% Alpaca
from 4.60 CAD /50g
DROPS Kid-Silk
DROPS Kid-Silk
75% Mohair, 25% Silk
from 9.40 CAD /25g
Get the yarn to make this pattern from 56.00CAD.

The yarn cost is calculated from the pattern’s smallest size and the yarn’s cheapest product type. Looking for an even better price? You might find it on the DROPS Deals!

Pattern instructions

NOTE: This pattern is written in American English. All measurements in charts are in cm. For conversion from inches to cm - click here. There are different terms for crocheting in American and British English. If this pattern includes crochet, click for "crochet terms" here. For this pattern in British English, please click here.
-------------------------------------------------------

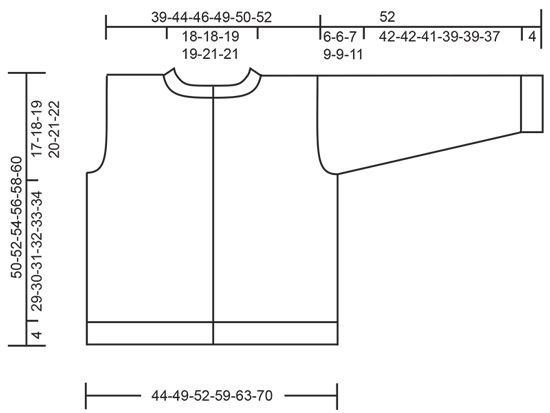
EXPLANATIONS FOR THE PATTERN:

-------------------------------------------------------

RIDGE/GARTER STITCH (worked back and forth):
Knit all rows.
1 ridge = knit 2 rows.

PATTERN:
See diagram A.1. Choose the diagram for your size. The diagram shows all rows in the pattern from the right side.

INCREASE TIP (sleeves):
All increases are worked from the right side!
Increase by making 1 yarn over inside 2 stitches on each side (2 stitches increased).
On the next row purl the yarn overs twisted, then work the new stitches in stockinette stitch.

BUTTONHOLES:
Work buttonholes on the right band. 1 BUTTONHOLE = Knit together the 3rd and 4th stitches from the edge and make 1 yarn over. On the next row knit the yarn over to leave a hole.
The last buttonhole is worked on the next-to-last row before stitches are placed on a thread for the neck.
Work the buttonholes when the piece measures:
S: 4, 14, 24, 33 and 42 cm = 1 1/2", 5 1/2", 9 1/2", 13" and 16 1/2"
M: 5, 15, 25, 35 and 44 cm = 2", 6", 9 3/4", 13 3/4" and 17 1/4"
L: 4, 12, 20, 28, 36 and 44 cm = 1 1/2", 4 3/4", 8", 11", 14 1/4" and 17 1/4"
XL: 4, 13, 22, 30, 38 and 46 cm = 1 1/2", 5 1/8", 8 3/4", 11 3/4", 15" and 18"
XXL: 4, 13, 22, 30, 38 and 46 cm = 1 1/2", 5 1/8", 8 3/4", 11 3/4", 15" and 18"
XXXL: 5, 14, 23, 32, 40 and 48 cm = 2", 5 1/2", 9", 12 1/2", 15 3/4" and 19"

-------------------------------------------------------

START THE PIECE HERE:

-------------------------------------------------------

JACKET – SHORT OVERVIEW OF THE PIECE:
The piece is worked in sections, bottom up and back and forth, then sewn together.

BACK PIECE:
Cast on 88-96-108-120-128-140 stitches with circular needle size 4 MM = US 6 and 1 strand of each quality. Purl 1 row from the wrong side, then work rib as follows: 1 edge stitch in GARTER STITCH – read description above, * purl 2, knit 2 *, work from *-* until there are 3 stitches left, purl 2 and 1 edge stitch in garter stitch. When the rib measures 4 cm = 1 1/2", change to circular needle size 5 MM = US 8. Knit 1 row from the right side where you decrease 11-11-17-17-19-19 stitches evenly spaced = 77-85-91-103-109-121 stitches.
Continue with stockinette stitch and 1 edge stitch in garter stitch on each side. REMEMBER THE KNITTING GAUGE!
When the piece measures 33-34-35-36-37-38 cm = 13"-13 3/8"-13 3/4"-14 1/4"-14 1/2"-15", bind off for the armholes at the beginning of each row as follows: 3-3-3-5-5-7 stitches 1 time, 2 stitches 0-0-0-1-2-3 times and 1 stitch 1-1-2-2-2-2 times on each side = 69-77-81-85-87-91 stitches.
When the piece measures 46-48-50-52-54-56 cm = 18"-19"-19 3/4"-20 1/2"-21 1/4"-22", bind off the middle 25-25-27-27-29-29 stitches for the neck and finish each shoulder separately (22-26-27-29-29-31 stitches on each shoulder). Continue with stockinette stitch and 1 edge stitch in garter stitch on each side. AT THE SAME TIME bind off on each row from the neck as follows: 1 stitch 2 times = 20-24-25-27-27-29 stitches. Continue working until the piece measures 50-52-54-56-58-60 cm = 19 3/4"-20 1/2"-21 1/4"-22"-22 3/4"-23 5/8". Bind off. Work the other shoulder in the same way.

RIGHT FRONT PIECE:
Cast on 52-56-60-64-68-76 stitches with circular needle size 4 MM = US 6 and 1 strand of each quality. The first row is worked as follows from the wrong side: 1 edge stitch in garter stitch, purl until there are 5 stitches left and 5 band stitches in garter stitch.
Then work next row from the right side as follows: 5 band stitches in garter stitch, * knit 2, purl 2*, work from *-* until there are 3 stitches left, knit 2 and 1 edge stitch in garter stitch. Continue like this.
When the rib measures 4 cm = 2", change to circular needle size 5 MM = US 8. Remember the BUTTONHOLES on the right band – see description above! Then work next row from the right side as follows: 5 band stitches in garter stitch, * knit 2, purl 2*, work from *-* until there are 3 stitches left, knit 2 and 1 edge stitch in garter stitch. Continue this pattern for 4 cm = 1 1/2". Change to
circular needle size 5 MM = US 8 and work as follows from the right side: 5 band stitches in garter stitch, purl 1, work A.1 AT THE SAME TIME as you decrease 0-0-2-2-0-0 stitches evenly spaced, stockinette stitch until there is 1 stitch left and decrease 8-8-7-5-8-10 stitches evenly over these stitches, 1 edge stitch in garter stitch = 44-48-51-57-60-66 stitches. Work the next row from the wrong side as follows: 1 edge stitch in garter stitch, 9-13-14-20-21-27 stitches in stockinette stitch (purl from the wrong side), A.1, knit 1 and 5 front band stitches in garter stitch.
REMEMBER THE KNITTING GAUGE!


When the piece measures 33-34-35-36-37-38 cm = 13"-13 3/8"-13 3/4"-14 1/4"-14 1/2"-15", bind off for the armhole at the beginning of each row from the wrong side as follows: 3-3-3-5-5-7 stitches 1 time, 2 stitches 0-0-0-1-2-3 times and 1 stitch 1-1-2-2-2-2 times = 40-44-46-48-49-51 stitches.
When the piece measures 42-44-44-46-46-48 cm = 16 1/2"-17 1/4"-17 1/4"-18"-18"-19", work the first 14 stitches from the right side and place them on a thread for the neck (i.e. 5 band stitches, purl 1 and 8 stitches from A.1) = 26-30-32-34-35-37 stitches on the shoulder.
Continue working as before. AT THE SAME TIME bind off for the neck at the beginning of each row from the right side as follows: 2 stitches 2 times and 1 stitch 2-2-3-3-4-4 times = 20-24-25-27-27-29 stitches.
Continue the pattern until the piece measures 50-52-54-56-58-60 cm = 19 3/4"-20 1/2"-21 1/4"-22"-22 3/4"-23 5/8". Bind off.

LEFT FRONT PIECE:
Cast on 52-56-60-64-68-76 stitches with circular needle size 4 MM = US 6 and 1 strand of each quality. The first row from the wrong side is worked as follows:
5 band stitches in garter stitch, purl until there is 1 stitch left and 1 edge stitch in garter stitch. Work the next row from the right side as follows:
1 edge stitch in garter stitch, * knit 2, purl 2 *, work from *-* until there are 7 stitches left, knit 2 and 5 band stitches in garter stitch.
Continue this rib for 4 cm = 1 1/2". Change to circular needle size 5 MM = US 8 and work as follows from the right side:
1 edge stitch in garter stitch, stockinette stitch over the next 17-21-21-25-29-37 stitches and decrease 8-8-7-5-8-10 stitches evenly over these stitches, work A.1 and decrease 0-0-2-2-0-0 stitches evenly over A.1, purl 1 and 5 band stitches in garter stitch = 44-48-51-57-60-66 stitches.

Work next rom from the wrong side as follows: 5 front band stitches. in garter stitch, knit 1, A.1, 9-13-14-20-21-27 stitches in stockinette stitch (purl from the wrong side), 1 edge stitch in garter stitch.

When the piece measures 33-34-35-36-37-38 cm = 13"-13 3/8"-13 3/4"-14 1/4"-14 1/2"-15", bind off for the armhole at the beginning of each row from the right side as follows: 3-3-3-5-5-7 stitches 1 time, 2 stitches 0-0-0-1-2-3 times and 1 stitch 1-1-2-2-2-2 times = 40-44-46-48-49-51 stitches.
When the piece measures 42-44-44-46-46-48 cm = 16 1/2"-17 1/4"-17 1/4"-18"-18"-19", work the next row from the right side until there are 14 stitches left and place these 14 stitches on a thread for the neck = 26-30-32-34-35-37 stitches on the shoulder.
Continue working as before. AT THE SAME TIME bind off for the neck at the beginning of each row from the wrong side as follows:
2 stitches 2 times and 1 stitch 2-2-3-3-4-4 times = 20-24-25-27-27-29 stitches.
Continue the pattern until the piece measures 50-52-54-56-58-60 cm = 19 3/4"-20 1/2"-21 1/4"-22"-22 3/4"-23 5/8". Bind off.

SLEEVES:
Cast on 50-54-54-58-62-62 stitches with circular needle size 4 MM = US 6 and 1 strand of each quality. Purl 1 row from the wrong side, then work rib (knit 2, purl 2) with 1 edge stitch in garter stitch on each side. When the rib measures 4 cm = 1 1/2", change to circular needle size 5 MM = US 8 and continue with stockinette stitch and 1 edge stitch in garter stitch on each side. On the first row decrease 8-10-8-10-10-8 stitches evenly spaced = 42-44-46-48-52-54 stitches. When the sleeve measures 12 cm = 4 3/4", increase 1 stitch on each side – read INCREASE TIP! Increase like this every 6-5-4½-4-3-2½ cm = 2 3/8"-2"-1 5/8"-1 1/2"-1 1/8"-1" a total of 6-7-8-8-9-11 times = 54-58-62-64-70-74 stitches. When the sleeve measures 46-46-45-43-43-41 cm = 18"-18"-17 3/4"-17"-17"-16 1/8" bind off for the sleeve cap at the beginning of each row as follows:
4 stitches 1 time, 2 stitches 3 times, 1 stitch 2 times on each side, then 2 stitches on each side until the sleeve measures 51 cm = 20", bind off 3 stitches at the beginning of the next 2 rows. Bind off. Work the other sleeve in the same way.

ASSEMBLY:
Sew the shoulder seams. Sew in the sleeves and sew the sleeve and side seams in one go, inside the 1 edge stitch. Sew the buttons onto the left band.

NECK:
Knit up from the right side around the neck, using circular needle size 4 MM = US 6 and 1 strand of each quality as follows:
Place the 14 stitches from the thread on the right front piece on the needle and knit them, knit up 56 to 76 stitches inside the 1 edge stitch as far as the stitches on the other thread and place these 14 stitches on the needle and knit them = 84 to 104 stitches. The number of stitches should be divisible by 4.
Work rib as follows from the wrong side:
5 band stitches in garter stitch, * purl 2, knit 2 *, work from *-* until there are 7 stitches left, purl 2 and 5 band stitches in garter stitch. Continue this rib back and forth for 3 cm = 1 1/8". Bind off.

This pattern has been corrected.

Updated online: 16.08.2022
RIGHT FRONT PIECE: ...Work the next row from the wrong side as follows: 1 edge stitch in garter stitch, 9-13-14-20-21-27 stitches in stockinette stitch (purl from the wrong side), A.1, knit 1 and 5 front band stitches in garter stitch... + LEFT FRONT PIECE:...Work next row from the wrong side as follows: 5 front band stitches in garter stitch, knit 1, A.1, 9-13-14-20-21-27 stitches in stockinette stitch (purl from the wrong side), 1 edge stitch in garter stitch.

Diagram

symbols = knit from right side, purl from wrong side
symbols = purl from right side, knit from wrong side
symbols = knit 2 together. At the neck, if there are not enough stitches to make the yarn over, do not decrease either
symbols = slip 1 stitch as if to knit, knit 1 and pass the slipped stitch over the knitted stitch. At the neck, if there are not enough stitches to make the yarn over, do not decrease either
symbols = between 2 stitches make 1 DOUBLE yarn over; on the next row work the one yarn over and drop the other
symbols = between 2 stitches make 1 yarn over
symbols = knit 3, pass the first stitch worked over the other 2 stitches (= 1 stitch decreased)
symbols = bobble: Work 5 stitches in 1 stitch as follows: knit 1, 1 yarn over, knit 1, 1 yarn over and knit 1, turn. Work 5 rows of stockinette stitch over these stitches (do not work any of the other stitches), knit all 5 stitches together
symbols = this square has no stitch as it was decreased earlier; go straight to the next symbol in the diagram
diagram
diagram

Each of our patterns has specific tutorial videos to help you.

Do you have a question? See a list of frequently asked questions (FAQ)

Knitting tension is what determines the final measurements of your work, and is usually measured per 10 x 10 cm. It is provided like so: number of stitches in width x number of rows in height - eg: 19 stitches x 26 rows = 10 x 10 cm.

The knitting tension is very individual; some people knit/crochet loosely while others work tightly. You adjust the knitting tension with the needle size, which is why the suggested needle size only serve as a guide! You need to adjust this (up or down) to ensure that YOUR knitting tension matches the knitting tension provided in the pattern. If you work with a different knitting tension than provided you will have a different yarn consumption, and your work will have different measurements than what the pattern suggests.

The knitting tension also determines which yarns can replace each other. As long as you achieve the same knitting tension you can replace one yarn with another.

See DROPS lesson: How to measure your tension/gauge

See DROPS video: How to make a gauge tension swatch

The required amount of yarn is provided in grams, eg: 450 g. To calculate how many balls you’ll need you first need to know how many grams are in 1 ball (25g, 50g or 100g). This information is available if you click on the individual yarn quality on our pages. Divide the amount required with the amount of each ball. For example, if each ball is 50g (the most common amount), the calculation will be as follows: 450 / 50 = 9 balls.

The important thing when changing from one yarn to another is that the knitting/crochet tension remains the same. This is so that the measurements of the finished piece will be the same as on the sketch provided. It is easier to achieve the same knitting tension using yarns from the same yarn group. It is also possible to work with multiple strands of a thinner yarn to achieve the knitting tension of a thicker one. Please try our yarn converter. We recommend you to always work a test swatch.

Please NOTE: when changing yarn the garment might have a different look and feel to the garment in the photo, due to individual properties and qualities of each yarn.

See DROPS lesson: Can I use a different yarn than the one mentioned in the pattern?

All our yarns are categorised into yarn groups (from A to F) according to thickness and knitting tension – group A contains the thinnest yarns and group F the thickest. This makes it easier for you to find alternative yarns to our patterns, should you wish to switch yarn. All yarns within the same group have a similar knitting tension and can easily replace each other. However, different yarn qualities have different structures and properties which will give the finished work a unique look and feel.

Click here for an overview of the yarns in each yarn group

At the top of all our patterns you’ll find a link to our yarn converter, which is a helpful tool should you wish to use a different yarn than suggested. By filling in the yarn quality you wish to replace, the amount (in your size) and number of strands, the converter will present good alternative yarns with the same knitting tension. Additionally it will tell you how much you’ll require in the new qualities and whether you’ll need to work with multiple strands. Most skeins are 50g (some are 25g or 100g).

If the pattern is worked with multiple colours, every colour will have to be converted separately. Similarly, if the pattern is worked with several strands of different yarns (for example 1 strand Alpaca and 1 strand Kid-Silk) you will have to find alternatives for each, individually.

Click here to see our yarn converter

Since different yarns have different qualities and textures we have chosen to keep the original yarn in our patterns. However, you can easily find options among our available qualities by using our yarn converter, or simply pick a yarn from the same yarn group.

It is possible that some retailers still have discontinued yarns in stock, or that someone has a few skeins at home that they would like to find patterns for.

The yarn converter will provide both alternative yarn as well as required amount in the new quality.

If you think it's hard to decide what size to make, it can be a good idea to measure a garment you own already and like the size of. Then you can pick the size by comparing those measures with the ones available in the pattern's size chart.

You'll find the size chart at the bottom of the pattern.

See DROPS lesson: How to read size chart

The needle size provided in the pattern serves only as a guide, the important thing is to follow the knitting tension. And since knitting tension is very individual, you will have to adjust the needle size to ensure that YOUR tension is the same as in the pattern – maybe you’ll have to adjust 1, or even 2 needle sizes, up or down to achieve the correct tension. For this, we recommend that you work test swatches.

Should you work with a different knitting tension than the one provided, the measurements of the finished garment might deviate from the measurement sketch.

See DROPS lesson: How to measure your tension/gauge

See DROPS video: How to make a gauge tension swatch

Working a garment top-down provides more flexibility and room for personal adjustment. For example it is easier to try the garment on while working, as well as making adjustments to length of yoke and shoulder caps.

The instructions are carefully explaining every step, in the correct order. Diagrams are adjusted to the knitting direction and are worked as usual.

The diagram depicts all rows/rounds, and every stitch seen from the right side. It is read from bottom to top, from right to left. 1 square = 1 stitch.

When working back and forth, every other row is worked from the right side and every other row is worked from the wrong side. When working from the wrong side, the diagram will have to be worked reversed: from left to right, knit stitches are purled, purl stitches are knit etc.

When working in the round every round is worked from the right side and the diagram are worked from right to left on all rounds.

See DROPS lesson: How to read knitting diagrams

The diagram depicts all rows/rounds, and every stitch seen from the right side. It is worked from bottom to top, from right to left.

When working back and forth every other row is worked from the right side: from right to left and every other row is worked from the wrong side: from left to right.

When working in the round, every row in the diagram are worked from the right side, from right to left.

When working a circular diagram you start in the middle and work your way outwards, counter clockwise, row by row.

The rows usually start with a given number of chain stitches (equivalent to the height of the following stitch), this will either be depicted in the diagram or explained in the pattern.

See DROPS lesson: How to read crochet diagrams

Instructions for working several diagrams after each other on the same row/round, will often be written like so: “work A.1, A.2, A.3 a total of 0-0-2-3-4 times". This means you work A.1 once, then A.2 is worked once, and A.3 is repeated (in width) the number of times provided for your size – in this case like so: S = 0 times, M = 0 times, L=2 times, XL= 3 times and XXL = 4 times.

The diagrams are worked as usual: begin with the first row in A.1, then work the first row in A.2 etc.

See DROPS lesson: How to read knitting diagrams

See DROPS lesson: How to read crochet diagrams

The total width of the garment (from wrist-to-wrist) will be larger in the larger sizes, despite the actual sleeves being shorter. The larger sizes have longer sleeve caps and wider shoulders, so there will be a good fit in all sizes.

The measurement sketch/schematic drawing provides information regarding the full length of the garment. If it’s a jumper or a jacket the length is measured from the highest point on the shoulder (usually closest to the neckline), and straight down to the bottom of the garment. It is NOT measured from the tip of shoulder. Similarly, the length of yoke is measured from the highest point on the shoulder and down to where yoke is split into body and sleeves.

See DROPS lesson: How to read a schematic drawing

Diagrams are often repeated on the round or in height. 1 repeat is the diagram the way it appears in the pattern. If it says to work 5 repeats of A.1 in the round, then you work A.1 a total of 5 times after/next to each other in the round. If it says to work 2 repeats of A.1 vertically/in height you work the entire diagram once, then begin again at the start and work the entire diagram one more time.

Chain stitches are slightly narrower than other stitches and to avoid working the cast-on edge too tight, we simply chain more stitches to begin with. The stitch count will be adjusted on the following row to fit the pattern and measurement sketch.

The rib edge is more elastic and will contract slightly compared to, for example, stocking stitch. By increasing before the rib edge, you avoid a visible difference in width between the rib edge and the rest of the body.

It’s very easy to cast off too tightly, and by making yarn overs while casting off (and simultaneously casting these off) you avoid a too tight cast off edge.

See DROPS video: How to bind off with yarn overs (yo)

To achieve an even increase (or decrease) you can increase on, for example: every 3rd and 4th row alternately, like so: work 2 rows and increase on the 3rd row, work 3 rows and increase on the 4th. Repeat this until the increase is complete.

See DROPS lesson: Increase or decrease 1 st on every 3rd and 4th row alternately

Should you prefer to work in the round instead of back and forth, you may of course adjust the pattern. You’ll need to add steeks mid-front (usually 5 stitches), and follow the instructions. When you would normally turn and work from the wrong side, simply work across the steek and continue in the round. At the end you’ll cut the piece open, pick up stitches to work bands, and cover the cut edges.

See DROPS video: How to knit steeks and cut open

Should you prefer to work back and forth instead of in the round, you may of course adjust the pattern so you work the pieces separately and then assemble them at the end. Divide the stitches for the body in 2, add 1 edge stitch in each side (for sewing) and work the front and back pieces separately.

See DROPS lesson: Can I adapt a pattern for circular needles into straight needles?

Pattern repeats can vary slightly in the different sizes, in order to get the correct proportions. If you’re not working the exact same size as the garment in the photo, yours might deviate slightly. This has been carefully developed and adjusted so that the complete impression of the garment is the same in all sizes.

Make sure to follow instructions and diagrams for your size!

If you have found a pattern you like which is available in women’s size it’s not very difficult to convert it to men’s size. The biggest difference will be the length of sleeves and body. Start working on the women size that you think would fit across the chest. The additional length will be worked right before you cast off for the armhole/sleeve cap. If the pattern is worked top-down you can add the length right after the armhole or before the first decrease on sleeve.

Regarding additional yarn amount, this will depend on how much length you add, but it is better with a skein too many than too few.

All yarns will have excess fibres (from production) that might come off as lint or shedding. Brushed yarns (ie hairier yarns) have more of these loose, excess fibres, causing more shedding.

Shedding also depends on what is worn under or over the garment, and whether this pulls at the yarn fibres. It’s therefore not possible to guarantee that there will be no shedding

Below are some tips on how to get the best result when working with hairier yarns:

1. When the garment is finished (before you wash it) shake it vigorously so the looser hairs come off. NOTE: do NOT use a lint roller, brush or any method that pulls at the yarn.

2. Place the garment in a plastic bag and put it in your freezer - the temperature will cause the fibres to become less attached to each other, and excess fibres will come off easier.

3. Leave in the freezer for a few hours before taking it out and shaking it again.

4. Wash the garment according to the instructions on the yarn label.

Pilling is a natural process that happens to even the most exclusive of fibers. It's a natural sign of wear and tear that is hard to avoid, and that is most visible in high friction areas of your garment like a sweater's arms and cuffs.

You can make your garment look as new by removing the pilling, using a fabric comb or a pill/lint remover.

Still can't find the answer you need? Then scroll down and leave your question so one of our experts can try to help you. This will be done normally within 5 to 10 working days.
In the meantime, you can read the questions and answers that others have left to this pattern or join the DROPS Workshop on Facebook to get help from fellow knitters/crocheters!

You might also like...

Post a comment to pattern DROPS 231-3

We would love to hear what you have to say about this pattern!

If you want to leave a question, please make sure you select the correct category in the form below, to speed up the answering process. Required fields are marked *.

Comments / Questions (18)

country flag Ruta wrote:

What does it mean "5 band stiches in garter stitch"? I am beginner and cannot find it in the Internet as well.

12.01.2024 - 20:16

DROPS Design answered:

Hi Ruta, 5 band stitches = outermost (edge) stitches on each front edge, with buttons on one side and buttonholes on the other. Explanation for ridge/garter stitch see in the Explanations fot the pattern above the text. Happy knitting!

13.01.2024 - 17:35

country flag Anne-Grethe Aase wrote:

Hei) Jeg har akkurat fullført jakken til min svigerdatter. Den ble nydelig! Men mitt barnebarn ( 7) ønsker også en!! Finner jeg denne i barnestørrelse? Mvh Anne-Grethe 👍

02.11.2022 - 15:50

DROPS Design answered:

Hei Anne-Grethe, Du finner alle våre barngensere ved å søke i søkeboksen. Hvis du vil ha akkurat den samme genseren, kan du justere antall masker og pinner for å redusere størrelsen. Lykke til! God fornøyelse!

03.11.2022 - 07:04

country flag Elisabeth wrote:

Hei, spm mine over her gjaldt forstykket, tror dere svarer på bakstykket? Jeg lurer på om/hvordan jeg skal felle samtidig som A1 skal strikkes (1 omg etter vrangbord).

07.07.2022 - 07:23

DROPS Design answered:

Hej Elisabeth, Du feller ved at strikke 2 vrangmasker sammen på hver side af hul/boblemønsteret i A.1 når du strikker 1.pind (1.pind = nederste pind i diagrammet) 2.pind strikker du fra vrangen (vi beskriver hvordan det skal se ud fra retsiden), vi skal prøve at skrive det tydeligere i opskriften :)

02.08.2022 - 14:11

country flag Elisabeth wrote:

To spm: Jeg skjønner ikke 1. omg etter vrangbord på forstykket. I str S, skal d felles jevnt 8 m over 17 m, samtidig som man begynner på A1? Neste omg som beskrives (omg 2 etter vrangbord?) er også fra retten. Hvordan skal vrangen i mellom strikkes?

05.07.2022 - 21:59

DROPS Design answered:

Hei Elizabeth, Etter vrangborden, strikker du 1 rad rett og feller 11 masker jevnt på raden. Deretter strikker du glattstrikk (vrang fra vrangen på rad 2) med 1 kantmaske i rille i hver side. Forsetter med glattstrikk fram og tilbake. God fornøyelse!

06.07.2022 - 07:01

country flag Mietje Ghijsens wrote:

Hallo ik heb het patroon van drops design.patroon fl -070 garengroep a+a...gebreide damesvest met knobbeltjes.bij de beschrijving staat dat ik met dubbele draad moet breien..hoe komt het dan dat ik 200gr kleur 22 van drops flora en maar 100gr kleur 40 van drops kid _silk nodig heb.volgens het patroon moet ik alles met dubbele draad breien.\r\nGroetjes

13.02.2022 - 14:05

country flag Vicky Fernández wrote:

No hay diagramas

11.02.2022 - 17:22

country flag Maria Marcela wrote:

Hola, no puedo ver ni descargar los diagramas del patrón

10.02.2022 - 20:10

country flag Karina wrote:

No se pueden ver los diagramas

09.02.2022 - 00:48

country flag Sofie Deylgat wrote:

Primavera

01.02.2022 - 11:42

country flag Samantha wrote:

Heather

17.01.2022 - 10:40