DROPS Kid-Silk
DROPS Kid-Silk
75% Mohair, 25% Silk
from 6.75 $ /25g
Get the yarn to make this pattern from 33.75$.

The yarn cost is calculated from the pattern’s smallest size and the yarn’s cheapest product type. Looking for an even better price? You might find it on the DROPS Deals!

DROPS SS24

Violet Meadow

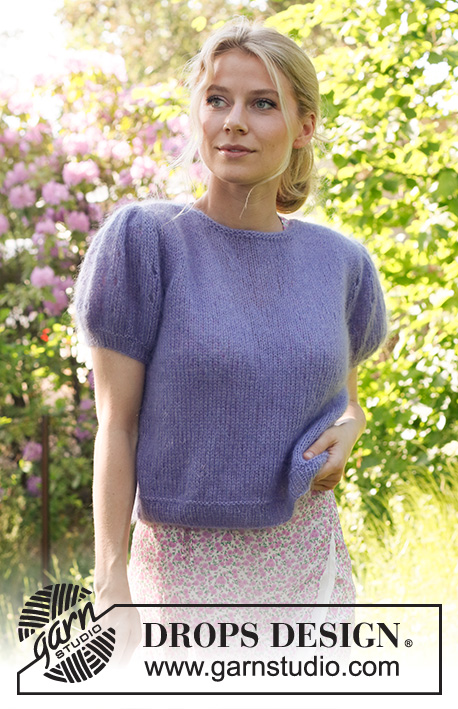
Knitted sweater in 2 strands DROPS Kid-Silk. The piece is worked bottom up with short, puffed sleeves. Sizes S - XXXL.

DROPS 230-55
DROPS Design: Pattern ks-194
Yarn group A + A or C
-------------------------------------------------------

SIZES:
S - M - L - XL - XXL – XXXL

Finished measurements:
Chest measurements: 88-96-104-114-126-138 cm = 34⅝"-37¾"-41"-45"-49½"-54¼"
Full length: 50-52-54-56-58-60 cm = 19¾"-20½"-21¼"-22"-22¾"-23⅝"
All measurements in charts are in cm.

MATERIALS:
DROPS KID-SILK from Garnstudio (belongs to yarn group A)
125-150-150-175-200-200 g color 11, lavender

NEEDLES:
DROPS CIRCULAR NEEDLE SIZE 5 MM = US 8: Length 80 cm = 32".
DROPS CIRCULAR NEEDLE SIZE 4 MM = US 6: Length 40 cm = 16" and 80 cm = 32".
The technique MAGIC LOOP can be used – you then only need circular needle of 80 cm = 32" in each size.

KNITTING GAUGE:
17 stitches in width and 22 rows in height with stockinette stitch = 10 x 10 cm = 4" x 4".
NOTE: Needle size is only a guide. If you get too many stitches on 10 cm = 4", change to a larger needle size. If you get too few stitches on 10 cm = 4", change to a smaller needle size.

-------------------------------------------------------

Alternative Yarn – See how to change yarns here
Yarn Groups A to F – Use the same pattern and change the yarn here
Yarn usage using an alternative yarn – Use our yarn converter here

-------------------------------------------------------

DROPS Kid-Silk
DROPS Kid-Silk
75% Mohair, 25% Silk
from 6.75 $ /25g
Get the yarn to make this pattern from 33.75$.

The yarn cost is calculated from the pattern’s smallest size and the yarn’s cheapest product type. Looking for an even better price? You might find it on the DROPS Deals!

Pattern instructions

NOTE: This pattern is written in American English. All measurements in charts are in cm. For conversion from inches to cm - click here. There are different terms for crocheting in American and British English. If this pattern includes crochet, click for "crochet terms" here. For this pattern in British English, please click here.
-------------------------------------------------------

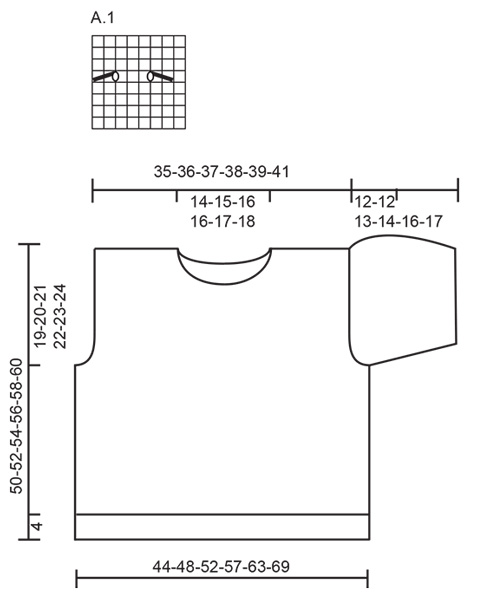
EXPLANATIONS FOR THE PATTERN:

-------------------------------------------------------

RIDGE/GARTER STITCH (worked back and forth):
Knit all rows.
1 ridge = knit 2 rows.

PATTERN:
See diagram A.1. The diagram shows all rows in the pattern from the right side.

-------------------------------------------------------

START THE PIECE HERE:

-------------------------------------------------------

SWEATER – SHORT OVERVIEW OF THE PIECE:
The piece is worked in sections, back and forth and bottom up, then sewn together. The neck is worked to finish.

BACK PIECE:
Cast on 93-103-113-125-135-149 stitches with circular needle size 4 MM = US 6 and 2 strands DROPS Kid-Silk. Purl 1 row from the wrong side. Then work the next row from the right side as follows: 1 edge stitch in GARTER STITCH – read description above, * knit 1, purl 1 * work from *-* until there are 2 stitches left, knit 1 and 1 edge stitch in garter stitch. Continue this rib for 4 cm = 1½". Knit 1 row from the right side where you decrease 16-20-22-26-26-30 stitches evenly spaced = 77-83-91-99-109-119 stitches. Knit 1 row from the wrong side. Change to circular needle size 5 MM = US 8 and continue stockinette stitch with 1 edge stitch in garter stitch on each side. REMEMBER THE KNITTING GAUGE!
When the piece measures 31-32-33-34-35-36 cm = 12¼"-12½"-13"-13⅜"-13¾"-14¼", bind off at the beginning of each row for the armholes as follows: 3 stitches 1 time, 2 stitches 2-3-4-5-7-9 times and 1 stitch 2-2-3-4-4-4 times on each side = 59-61-63-65-67-69 stitches.
When the piece measures 44-46-48-50-52-54 cm = 17¼"-18"-19"-19¾"-20½"-21¼", bind off the middle 21-23-25-25-27-29 stitches for the neck and finish each shoulder separately. Bind off 1 stitch on the next row from the neck = 18-18-18-19-19-19 stitches on the shoulder.
When the piece measures 50-52-54-56-58-60 cm = 19¾"-20½"-21¼"-22"-22¾"-23⅝", bind off. Work the other shoulder in the same way.

FRONT PIECE:
Cast on 93-103-113-125-135-149 stitches with circular needle size 4 MM = US 6 and 2 strands DROPS Kid-Silk. Purl 1 row from the wrong side. Then work the next row from the right side as follows: 1 edge stitch in garter stitch, * purl 1, knit 1 * work from *-* until there are 2 stitches left, purl 1 and 1 edge stitch in garter stitch. Continue this rib for 4 cm = 1½". Knit 1 row from the right side where you decrease 16-20-22-26-26-30 stitches evenly spaced = 77-83-91-99-109-119 stitches. Knit 1 row from the wrong side. Change to circular needle size 5 MM = US 8 and continue with stockinette stitch and 1 edge stitch in garter stitch on each side.
When the piece measures 31-32-33-34-35-36 cm = 12¼"-12½"-13"-13⅜"-13¾"-14¼", bind off at the beginning of each row for the armholes as follows: 3 stitches 1 time, 2 stitches 2-3-4-5-7-9 times and 1 stitch 2-2-3-4-4-4 times on each side = 59-61-63-65-67-69 stitches.
When the piece measures 44-46-48-50-52-54 cm = 17¼"-18"-19"-19¾"-20½"-21¼", place the middle 15-17-19-19-21-23 stitches on a thread for the neck and finish each shoulder separately. Bind off on each row from the neck as follows: 2 stitches 1 time and 1 stitch 2 times = 18-18-18-19-19-19 stitches on the shoulder.
When the piece measures 50-52-54-56-58-60 cm = 19¾"-20½"-21¼"-22"-22¾"-23⅝", bind off. Work the other shoulder in the same way.

SHORT, PUFFED SLEEVES:
Cast on 48-50-52-54-56-58 stitches with circular needle size 4 MM = US 6 and 2 strands DROPS Kid-Silk. Purl 1 row from the wrong side. Then work the next row from the right side as follows: 1 edge stitch in garter stitch, * knit 1, purl 1 * work from *-* until there is 1 stitch left, 1 edge stitch in garter stitch. Continue this rib for 3 cm = 1⅛". Knit 1 row from the right side where you increase 13 stitches evenly in all sizes = 61-63-65-67-69-71 stitches. Knit 1 row from the wrong side. Change to circular needle size 5 MM = US 8. On the next row from the right side work as follows: Knit 12-13-11-12-10-11, then increase 12-12-14-14-16-16 stitches over the next 36-36-42-42-48-48 stitches by making 1 yarn over after each 3rd stitch, knit the last 13-14-12-13-11-12 stitches = 73-75-79-81-85-87 stitches. On the next row purl the yarn overs twisted.
On the next row from the right side work pattern as follows: 1 edge stitch in garter stitch, 3-0-2-3-5-2 stitches in stockinette stitch, work A.1 8-9-9-9-9-10 times in width, 4-1-3-4-6-3 stitches in stockinette stitch and 1 edge stitch in garter stitch. Continue this pattern until the sleeve measures 9 cm = 3½". Bind off 4 stitches at the beginning of the next 2 rows for the armhole. The stitches which do not fit into A.1 are worked in stockinette stitch. When the sleeve measures 10 cm = 4" decrease 2 stitches on each side, decrease on a row from the right side, by knitting the first and last 3 stitches together. Decrease like this every 8th-8th-6th-6th-6th-6th row a total of 3-3-4-4-4-4 times = 53-55-55-57-61-63 stitches. When the sleeve measures 20-20-21-22-24-25 cm = 8"-8"-8¼"-8¾"-9½"-9¾" purl 1 row from the wrong side where you decrease 2-4-1-3-1-3 stitches evenly spaced = 51-51-54-54-60-60 stitches. On the next row knit all stitches together 3 and 3 = 17-17-18-18-20-20 stitches. Bind off. The sleeve measures approx. 21-21-22-23-25-26 cm = 8¼"-8¼"-8¾"-9"-9¾"-10¼".

ASSEMBLY:
Sew the shoulder seams. Sew in the sleeves. Sew the sleeve and side seams inside the 1 edge stitch.

NECK:
Using short circular needle size 4 MM = US 6 and 2 strands DROPS Kid-Silk, starting on one shoulder seam, knit up 60 to 88 stitches around the neck (including the stitches from the thread). Purl 1 round, knit 1 round, purl 1 round. Bind off with knit.

Diagram

All measurements in charts are in cm.

symbols = knit from right side, purl from wrong side
symbols = between 2 stitches make 1 yarn over
symbols = knit 2 together
symbols = slip 1 stitch as if to knit, knit 1 and pass the slipped stitch over the knitted stitch
diagram

Each of our patterns has specific tutorial videos to help you.

Do you have a question? See a list of frequently asked questions (FAQ)

Knitting tension is what determines the final measurements of your work, and is usually measured per 10 x 10 cm. It is provided like so: number of stitches in width x number of rows in height - eg: 19 stitches x 26 rows = 10 x 10 cm.

The knitting tension is very individual; some people knit/crochet loosely while others work tightly. You adjust the knitting tension with the needle size, which is why the suggested needle size only serve as a guide! You need to adjust this (up or down) to ensure that YOUR knitting tension matches the knitting tension provided in the pattern. If you work with a different knitting tension than provided you will have a different yarn consumption, and your work will have different measurements than what the pattern suggests.

The knitting tension also determines which yarns can replace each other. As long as you achieve the same knitting tension you can replace one yarn with another.

See DROPS lesson: How to measure your tension/gauge

See DROPS video: How to make a gauge tension swatch

The required amount of yarn is provided in grams, eg: 450 g. To calculate how many balls you’ll need you first need to know how many grams are in 1 ball (25g, 50g or 100g). This information is available if you click on the individual yarn quality on our pages. Divide the amount required with the amount of each ball. For example, if each ball is 50g (the most common amount), the calculation will be as follows: 450 / 50 = 9 balls.

The important thing when changing from one yarn to another is that the knitting/crochet tension remains the same. This is so that the measurements of the finished piece will be the same as on the sketch provided. It is easier to achieve the same knitting tension using yarns from the same yarn group. It is also possible to work with multiple strands of a thinner yarn to achieve the knitting tension of a thicker one. Please try our yarn converter. We recommend you to always work a test swatch.

Please NOTE: when changing yarn the garment might have a different look and feel to the garment in the photo, due to individual properties and qualities of each yarn.

See DROPS lesson: Can I use a different yarn than the one mentioned in the pattern?

All our yarns are categorised into yarn groups (from A to F) according to thickness and knitting tension – group A contains the thinnest yarns and group F the thickest. This makes it easier for you to find alternative yarns to our patterns, should you wish to switch yarn. All yarns within the same group have a similar knitting tension and can easily replace each other. However, different yarn qualities have different structures and properties which will give the finished work a unique look and feel.

Click here for an overview of the yarns in each yarn group

At the top of all our patterns you’ll find a link to our yarn converter, which is a helpful tool should you wish to use a different yarn than suggested. By filling in the yarn quality you wish to replace, the amount (in your size) and number of strands, the converter will present good alternative yarns with the same knitting tension. Additionally it will tell you how much you’ll require in the new qualities and whether you’ll need to work with multiple strands. Most skeins are 50g (some are 25g or 100g).

If the pattern is worked with multiple colours, every colour will have to be converted separately. Similarly, if the pattern is worked with several strands of different yarns (for example 1 strand Alpaca and 1 strand Kid-Silk) you will have to find alternatives for each, individually.

Click here to see our yarn converter

Since different yarns have different qualities and textures we have chosen to keep the original yarn in our patterns. However, you can easily find options among our available qualities by using our yarn converter, or simply pick a yarn from the same yarn group.

It is possible that some retailers still have discontinued yarns in stock, or that someone has a few skeins at home that they would like to find patterns for.

The yarn converter will provide both alternative yarn as well as required amount in the new quality.

If you think it's hard to decide what size to make, it can be a good idea to measure a garment you own already and like the size of. Then you can pick the size by comparing those measures with the ones available in the pattern's size chart.

You'll find the size chart at the bottom of the pattern.

See DROPS lesson: How to read size chart

The needle size provided in the pattern serves only as a guide, the important thing is to follow the knitting tension. And since knitting tension is very individual, you will have to adjust the needle size to ensure that YOUR tension is the same as in the pattern – maybe you’ll have to adjust 1, or even 2 needle sizes, up or down to achieve the correct tension. For this, we recommend that you work test swatches.

Should you work with a different knitting tension than the one provided, the measurements of the finished garment might deviate from the measurement sketch.

See DROPS lesson: How to measure your tension/gauge

See DROPS video: How to make a gauge tension swatch

Working a garment top-down provides more flexibility and room for personal adjustment. For example it is easier to try the garment on while working, as well as making adjustments to length of yoke and shoulder caps.

The instructions are carefully explaining every step, in the correct order. Diagrams are adjusted to the knitting direction and are worked as usual.

The diagram depicts all rows/rounds, and every stitch seen from the right side. It is read from bottom to top, from right to left. 1 square = 1 stitch.

When working back and forth, every other row is worked from the right side and every other row is worked from the wrong side. When working from the wrong side, the diagram will have to be worked reversed: from left to right, knit stitches are purled, purl stitches are knit etc.

When working in the round every round is worked from the right side and the diagram are worked from right to left on all rounds.

See DROPS lesson: How to read knitting diagrams

The diagram depicts all rows/rounds, and every stitch seen from the right side. It is worked from bottom to top, from right to left.

When working back and forth every other row is worked from the right side: from right to left and every other row is worked from the wrong side: from left to right.

When working in the round, every row in the diagram are worked from the right side, from right to left.

When working a circular diagram you start in the middle and work your way outwards, counter clockwise, row by row.

The rows usually start with a given number of chain stitches (equivalent to the height of the following stitch), this will either be depicted in the diagram or explained in the pattern.

See DROPS lesson: How to read crochet diagrams

Instructions for working several diagrams after each other on the same row/round, will often be written like so: “work A.1, A.2, A.3 a total of 0-0-2-3-4 times". This means you work A.1 once, then A.2 is worked once, and A.3 is repeated (in width) the number of times provided for your size – in this case like so: S = 0 times, M = 0 times, L=2 times, XL= 3 times and XXL = 4 times.

The diagrams are worked as usual: begin with the first row in A.1, then work the first row in A.2 etc.

See DROPS lesson: How to read knitting diagrams

See DROPS lesson: How to read crochet diagrams

The total width of the garment (from wrist-to-wrist) will be larger in the larger sizes, despite the actual sleeves being shorter. The larger sizes have longer sleeve caps and wider shoulders, so there will be a good fit in all sizes.

The measurement sketch/schematic drawing provides information regarding the full length of the garment. If it’s a jumper or a jacket the length is measured from the highest point on the shoulder (usually closest to the neckline), and straight down to the bottom of the garment. It is NOT measured from the tip of shoulder. Similarly, the length of yoke is measured from the highest point on the shoulder and down to where yoke is split into body and sleeves.

See DROPS lesson: How to read a schematic drawing

Diagrams are often repeated on the round or in height. 1 repeat is the diagram the way it appears in the pattern. If it says to work 5 repeats of A.1 in the round, then you work A.1 a total of 5 times after/next to each other in the round. If it says to work 2 repeats of A.1 vertically/in height you work the entire diagram once, then begin again at the start and work the entire diagram one more time.

Chain stitches are slightly narrower than other stitches and to avoid working the cast-on edge too tight, we simply chain more stitches to begin with. The stitch count will be adjusted on the following row to fit the pattern and measurement sketch.

The rib edge is more elastic and will contract slightly compared to, for example, stocking stitch. By increasing before the rib edge, you avoid a visible difference in width between the rib edge and the rest of the body.

It’s very easy to cast off too tightly, and by making yarn overs while casting off (and simultaneously casting these off) you avoid a too tight cast off edge.

See DROPS video: How to bind off with yarn overs (yo)

To achieve an even increase (or decrease) you can increase on, for example: every 3rd and 4th row alternately, like so: work 2 rows and increase on the 3rd row, work 3 rows and increase on the 4th. Repeat this until the increase is complete.

See DROPS lesson: Increase or decrease 1 st on every 3rd and 4th row alternately

Should you prefer to work in the round instead of back and forth, you may of course adjust the pattern. You’ll need to add steeks mid-front (usually 5 stitches), and follow the instructions. When you would normally turn and work from the wrong side, simply work across the steek and continue in the round. At the end you’ll cut the piece open, pick up stitches to work bands, and cover the cut edges.

See DROPS video: How to knit steeks and cut open

Should you prefer to work back and forth instead of in the round, you may of course adjust the pattern so you work the pieces separately and then assemble them at the end. Divide the stitches for the body in 2, add 1 edge stitch in each side (for sewing) and work the front and back pieces separately.

See DROPS lesson: Can I adapt a pattern for circular needles into straight needles?

Pattern repeats can vary slightly in the different sizes, in order to get the correct proportions. If you’re not working the exact same size as the garment in the photo, yours might deviate slightly. This has been carefully developed and adjusted so that the complete impression of the garment is the same in all sizes.

Make sure to follow instructions and diagrams for your size!

If you have found a pattern you like which is available in women’s size it’s not very difficult to convert it to men’s size. The biggest difference will be the length of sleeves and body. Start working on the women size that you think would fit across the chest. The additional length will be worked right before you cast off for the armhole/sleeve cap. If the pattern is worked top-down you can add the length right after the armhole or before the first decrease on sleeve.

Regarding additional yarn amount, this will depend on how much length you add, but it is better with a skein too many than too few.

All yarns will have excess fibres (from production) that might come off as lint or shedding. Brushed yarns (ie hairier yarns) have more of these loose, excess fibres, causing more shedding.

Shedding also depends on what is worn under or over the garment, and whether this pulls at the yarn fibres. It’s therefore not possible to guarantee that there will be no shedding

Below are some tips on how to get the best result when working with hairier yarns:

1. When the garment is finished (before you wash it) shake it vigorously so the looser hairs come off. NOTE: do NOT use a lint roller, brush or any method that pulls at the yarn.

2. Place the garment in a plastic bag and put it in your freezer - the temperature will cause the fibres to become less attached to each other, and excess fibres will come off easier.

3. Leave in the freezer for a few hours before taking it out and shaking it again.

4. Wash the garment according to the instructions on the yarn label.

Pilling is a natural process that happens to even the most exclusive of fibers. It's a natural sign of wear and tear that is hard to avoid, and that is most visible in high friction areas of your garment like a sweater's arms and cuffs.

You can make your garment look as new by removing the pilling, using a fabric comb or a pill/lint remover.

Still can't find the answer you need? Then scroll down and leave your question so one of our experts can try to help you. This will be done normally within 5 to 10 working days.
In the meantime, you can read the questions and answers that others have left to this pattern or join the DROPS Workshop on Facebook to get help from fellow knitters/crocheters!

You might also like...

Post a comment to pattern DROPS 230-55

We would love to hear what you have to say about this pattern!

If you want to leave a question, please make sure you select the correct category in the form below, to speed up the answering process. Required fields are marked *.

Comments / Questions (37)

country flag Pratheeksha wrote:

I am unable to understand sleeve instructions from here, please help me Bind off 4 stitches at the beginning of the next 2 rows for the armhole. The stitches which do not fit into A.1 are worked in stockinette stitch. When the sleeve measures 10 cm = 4” decrease 2 stitches on each side, decrease on a row from the right side, by knitting the first and last 3 stitches together.

27.12.2022 - 12:38

country flag Pratheeksha wrote:

I am unable to understand the sleeve instruction from here, please help me Bind off 4 stitches at the beginning of the next 2 rows for the armhole. The stitches which do not fit into A.1 are worked in stockinette stitch. When the sleeve measures 10 cm = 4” decrease 2 stitches on each side, decrease on a row from the right side, by knitting the first and last 3 stitches together.

27.12.2022 - 12:33

DROPS Design answered:

Dear Mrs Pratheeksha, you first cast off 4 sts at the beg of next 2 rows (= 4 sts on each side = 8 sts mid under sleeve) then continue working as before without decreasing/casting off, then when sleeve measures 4"/10 cm, decrease 2 sts on each side a total of 3-4 times on every 8-6 rows (see size) by working from RS: K3 tog, work until 3 sts remain, K3 tog (2 sts decreased on each side). Happy knitting!

02.01.2023 - 09:56

country flag Henriette wrote:

Hej jeg mangler stadig svar på mit spørgsmål vedr ærmerne,- Hvordan skal mønsteret strikkes når arbejdet måler 9 cm,- der hvor der skal tages 4 masker ind i hver side? Skal man stadig strikke 1 kantmaske, glatstrik og så A1?

24.11.2022 - 19:27

DROPS Design answered:

Hej Henriette, nej, kantmaskerne lukker du af, så du fortsætter mønsteret over de masker du har tilbage. Har du ikke nok masker til mønster i siderne skal maskerne strikkes i glatstrik :)

30.11.2022 - 13:51

country flag Wilmo wrote:

The sleeves are knitted flat? so I do not understand that part : "When the sleeve measures 10 cm decrease 2 stitches on each side, decrease on a row from the right side, by knitting the first and last 3 stitches together. " Do I knit knit 2 together on each side of the sleeve inside an edge stitch? Thanks for the answer.

23.11.2022 - 16:10

DROPS Design answered:

Dear Wilmo, you knit 3 stitches together after the edge stitch at the beg of the row and knit 3 stitches together before the edge stitch at th end of the row (= decrease 2 sts on each side = 4 sts on the same row every time you decrease). Happy knitting!

24.11.2022 - 09:18

country flag Henriette wrote:

Strikker trøjen i str M., og er kommet til pufærmerne. Når jeg begynder at lukke maskerne af i begyndelsen af pinderne til ærmegabet,- skal jeg så strikke (fra retsiden) 1 kantmaske og 2 ret og så A1 eller går jeg direkte til A1 ?

21.11.2022 - 16:00

country flag Joanne wrote:

Can you please explain the cast off for the armholes. I seem to have too many stitches when I follow the pattern. When the piece measures 32 cm, cast off at the beginning of each row etc. I am making size M Many thanks

02.10.2022 - 22:17

DROPS Design answered:

Dear Joanne, cast off 3 stitches at the beginning, one by one. Then, for size M, cast off 2 stitches 3 times. That is, cast off 2 stitches at the beginning, continue the whole row, turn and cast off the first 2 stitches at the beggining of the row on the wrong side. Cast off 2 and 2 stitches twice more. Then do the same when casting off 1 stitch on both sides twice. In total, you have cast off 22 stitches. Happy knitting!

03.10.2022 - 00:15

country flag Catalina wrote:

Hola. Tengo una duda respecto a esto: "Cuando la manga mida 10 cm disminuir 2 puntos a cada lado, disminuir en una hilera por el lado derecho tejiendo los primeros y los últimos 3 puntos juntos de derecho. Disminuir así cada 8ª-8ª-6ª-6ª-6ª-6ª hilera un total de 3-3-4-4-4-4 veces = 53" Se refiere a cada 8ª hilera de derecho o contando las hileras de reves también? Gracias.

10.08.2022 - 11:23

DROPS Design answered:

Hola Catalina, cada 8ª hilera significa 8 filas (incluyendo tanto las filas de derecho como las de revés).

14.08.2022 - 21:46

country flag Nicola Scott wrote:

When the piece measures 31-32-33-34-35-36 cm, cast off at the beginning of each row for the armholes as follows: 3 stitches 1 time, 2 stitches 2-3-4-5-7-9 times and 1 stitch 2-2-3-4-4-4 times on each side = 59-61-63-65-67-69 stitches. This implies casting off at the beginning of the first 10 rows and on each end for the last 4 rows (xxxlarge size) but the final number of stitches indicates cast of at each end of each row. Can you please clarify before I try to undo last 14 rows

30.06.2022 - 15:06

DROPS Design answered:

Dear Mrs Scott, in size XXXL you will cast off 3 sts at the beginning of next 2 rows, then 2 stitches at the beginning of the next 18 rows and finally 1 stitch at the beginning of next 8 rows. Now cast off 4 sts at the beginning of next 2 rows, and decrease now on every RS row by knitting together the stitches 2 by 2 or 3 by 3 a total of 6 times, then decrease evenly and finally knit all sts together 3 by 3. Happy knitting!

30.06.2022 - 16:56

country flag Rebecca wrote:

Jag har stickat en provlapp och får nu rätt antal maskor, men förstår inte hur jag ska överföra det till de mått som står i mönstret för att välja rätt storlek? De siffror som är angivna är det mått i cm? Eller antal maskor? Rebecca

13.05.2022 - 20:28

DROPS Design answered:

Hei Rebecca. Målene i målskissen er i cm. Om du scroller deg nederst på oppskriften og under Har du problemer med å forstå oppskriften? Klikk på bildet: Slik leser du en målskisse. mvh DROPS Design

16.05.2022 - 08:17

country flag Katheryn wrote:

The Needles section lists 5mm needles twice, but the cast on seems to be in 4mm needles. Can you clarify which of the 5mm listings should actually be 4mm? Do I need a 40cm circ in 4mm or 5mm?

27.02.2022 - 14:47

DROPS Design answered:

Dear Katheryn, yes, it seems to be a typo in the needles section. The 2nd set of needles are 4mm needles (you need 40 and 80 cm needles). Since it's bottom up, you start working with the 80 cm needles to cast on. Thank you and happy knitting!

27.02.2022 - 16:08