
Popular categories
Looking for a yarn?


|
|||||||
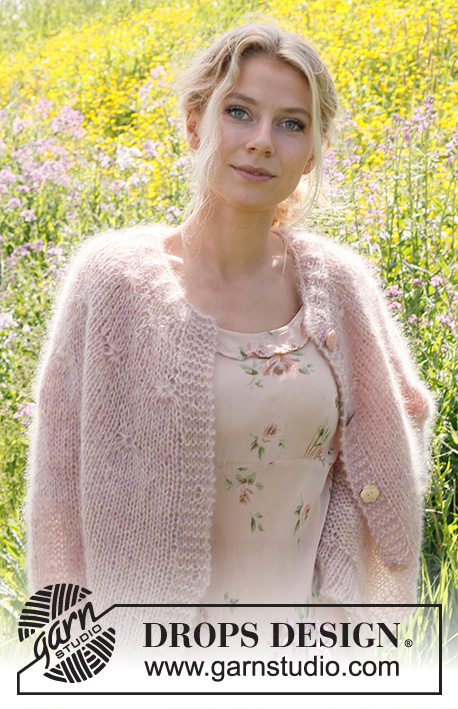
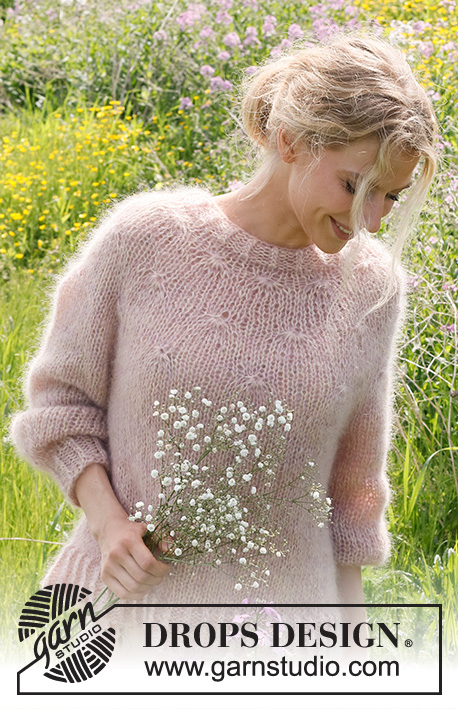
Misty Rose |
|||||||
 |
 |
||||||
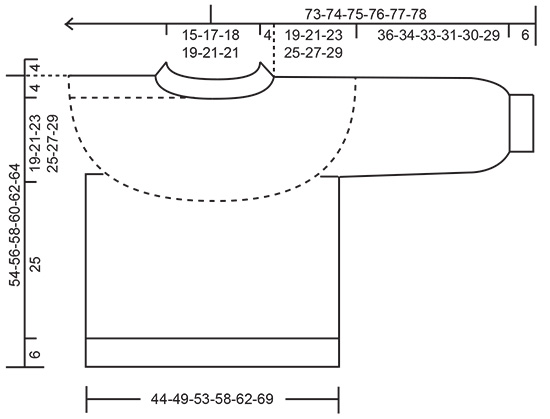
Knitted sweater in 4 strands of DROPS Kid-Silk. The piece is worked top down, with round yoke and balloon sleeves. Sizes S - XXXL.
DROPS 232-6 |
|||||||
|
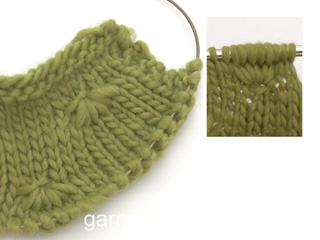
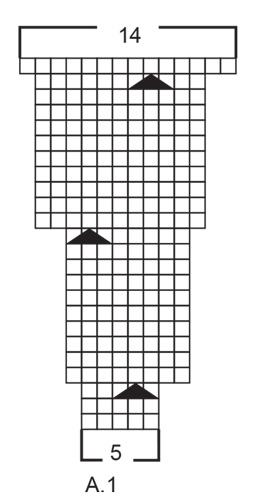
------------------------------------------------------- EXPLANATIONS FOR THE PATTERN: ------------------------------------------------------- PATTERN: See diagram A.1. DECREASE TIP (mid-top and mid-under the sleeve): Decrease 1 stitch on either side of the marker as follows: Work until there are 3 stitches left before the marker, knit 2 together, knit 2 (marker sits between these 2 stitches), slip 1 stitch as if to knit, knit 1 and pass the slipped stitch over the knitted stitch. ------------------------------------------------------- START THE PIECE HERE: ------------------------------------------------------- SWEATER – SHORT OVERVIEW OF THE PIECE: The neck and yoke are worked in the round with circular needle, from mid-back and top down. The yoke is divided for body and sleeves and the body is continued in the round with circular needle. The sleeves are worked with short circular needle/double pointed needles, top down. The sweater is worked with 4 strands DROPS Kid-Silk. NECK: Cast on 57-60-63-66-69-72 stitches with circular needle size 6 MM = US 10 and 2 strands vanilla, 1 strand light lavender and 1 strand old pink (4 strands). Knit 1 round, then work rib (knit 1 twisted, purl 2) in the round for 4 cm = 1½". Change to circular needle size 8 MM = US 11. Knit 1 round where the number of stitches is adjusted to 50-55-60-65-70-75 stitches. Insert a marker at the beginning of the round (mid-back); the yoke is measured from this marker! YOKE: Work A.1 10-11-12-13-14-15 times in width on the round. REMEMBER THE KNITTING GAUGE! When A.1 has been completed in height there are 140-154-168-182-196-210 stitches on the needle. Knit 1 round where you increase 6-6-4-6-6-6 stitches evenly spaced = 146-160-172-188-202-216 stitches. Continue with stockinette stitch. When the piece measures 19-21-23-25-27-29 cm = 7½"-8¼"-9"-9¾"-10⅝"-11⅜" from the marker, divide for the body and sleeves as follows: Work the first 21-24-26-28-30-33 stitches (half back piece), place the next 31-32-34-38-41-42 stitches on a thread for the sleeve, cast on 6-6-6-8-8-10 stitches (in side under sleeve), work 42-48-52-56-60-66 stitches (front piece), place the next 31-32-34-38-41-42 stitches on a thread for the sleeve, cast on 6-6-6-8-8-10 stitches (in side under sleeve), work the last 21-24-26-28-30-33 stitches (half back piece). THE PIECE IS NOW MEASURED FROM HERE! BODY: = 96-108-116-128-136-152 stitches. Continue in the round with stockinette stitch for 25 cm = 9¾". Knit 1 round where you increase 18-18-22-22-26-25 stitches evenly spaced = 114-126-138-150-162-177 stitches. Change to circular needle size 6 MM = US 10. Work rib (knit 1 twisted, purl 2) for 6 cm = 2⅜", then bind off. The sweater measures approx. 54-56-58-60-62-64 cm = 21¼"-22"-22¾"-23⅝"-24⅜"-25¼" from the shoulder down. SLEEVES: Place the 31-32-34-38-41-42 stitches from the thread on the one side of the piece on short circular needle/double pointed needles size 8 MM = US 11 and knit up 1 stitch in each of the 6-6-6-8-8-10 stitches cast on under the sleeve = 37-38-40-46-49-52 stitches. Start in the middle of the new stitches under the sleeve and work stockinette stitch in the round. When the sleeve measures 28-26-25-23-22-21 from the division insert 2 markers, one at the beginning of the round (mid-under sleeve) and 1 after 18-19-20-23-24-26 stitches (top of sleeve). Now decrease 2 stitches on each side of both markers – read DECREASE TIP. Decrease like this every 4-4-4-3-3-3 cm = 1½"-1½"-1½"-1⅛"-1⅛"-1⅛" a total of 3-3-3-4-4-4 times = 25-26-28-30-33-36 stitches. The piece now measures approx. 36-34-33-31-30-29 cm = 14¼"-13⅜"-13"-12¼"-11¾"-11⅜". Knit 1 round where you increase 5-4-5-6-6-3 stitches evenly spaced = 30-30-33-36-39-39 stitches. Change to double pointed needles size 6 MM = US 10. Work rib (knit 1 twisted, purl 2) for 6 cm = 2⅜", then bind off. The sleeve measures approx. 42-40-39-37-36-35 cm = 16½"-15¾"-15¼"-14½"-14¼"-13¾". Work the other sleeve in the same way. |
|||||||
Diagram explanations |
|||||||
|
|||||||
|
|||||||
|
|||||||
|
Have you made this or any other of our designs? Tag your pictures in social media with #dropsdesign so we can see them! Do you need help with this pattern?You'll find tutorial videos, a Comments/Questions area and more by visiting the pattern on garnstudio.com. © 1982-2024 DROPS Design A/S. We reserve all rights. This document, including all its sub-sections, has copyrights. Read more about what you can do with our patterns at the bottom of each pattern on our site. |
|||||||


With over 40 years in knitting and crochet design, DROPS Design offers one of the most extensive collections of free patterns on the internet - translated to 17 languages. As of today we count 304 catalogs and 11422 patterns - 11417 of which are translated into English (US/in).
We work hard to bring you the best knitting and crochet have to offer, inspiration and advice as well as great quality yarns at incredible prices! Would you like to use our patterns for other than personal use? You can read what you are allowed to do in the Copyright text at the bottom of all our patterns. Happy crafting!
Comments / Questions (15)
Jeg vurderer å strikke genseren Misty Rose 232-6. Jeg ønsker en genser som jeg kan bruke på kontoret og hjemme på vinteren og ute på litt kalde sommer kvelder. Tror dere denne genseren vil bli for varm til det? Er det i såfall mulig å strikke den med bare 3 tråder? Hvilken pinnetykkelse burde jeg i såfall bruke?
10.08.2023 - 11:53DROPS Design answered:
Hej Bente, den bliver perfekt til det som den er. Husk at hvis du fjernet en tråd, så er det stadigvæk vigtigt at du holder strikkefastheden som står i opskriften, ellers kommer målene ikke til at stemme med dem du ser i måleskitsen :)
11.08.2023 - 14:30Se eseguo il lavoro dal basso verso l'alto, come posso ottenere lo stesso motivo nello sprone facendo diminuzioni anziché aumenti? Grazie,!
24.01.2023 - 18:05DROPS Design answered:
Buonasera Maria, questo maglione è lavorato dall'alto in basso. Buon lavoro!
25.01.2023 - 22:19Impossible de faire le point de noeud l'aiguille ne passe pas dans les 3 mailles la premiere fois passe encore mais les fois suivantes rien a faire cela fait 2 jours que je tente rien a faire si quelqu'un y est arrivé qu'il m'explique comment
07.12.2022 - 11:53DROPS Design answered:
Bonjour Mme Calsat, avez-vous vu la vidéo qui montre comment faire? Retrouvez-la ici - essayez éventuellement avec un crochet, vous serez peut-être plus à l'aise. Bon tricot!
07.12.2022 - 16:30Comment faire un noeud,l'augmentation de trois mailles dans ce modèle, merci beaucoup
06.09.2022 - 14:47DROPS Design answered:
Bonjour Francine, regardez la video ICI. Bon tricot!
06.09.2022 - 16:06Hello, Is the Brushed Alpaca silk softer than the Kid Silk as it is alpaca and not mohair? I would like to knit a pattern with a combined yarn thickness of E as this is the first sweater I have made for 30 years,I am wondering if 4 strands of Kid Silk would be tricky for and advanced beginner? Thank you Linda
27.06.2022 - 14:00DROPS Design answered:
Dear Linda, both are soft, your DROPS Store might be help you to choose the best matching yarn even per mail or telephone - you could use here either 2 strands Brushed Alpaca Silk or 4 strands Air as described here. Working with several strands together just means to work 1 streand from either 2 or 4 balls at the same time just as there was just one ball/thread. Hope it can help. Happy knitting!
27.06.2022 - 15:30Hello, how many balls of Kid silk do I need if I want to knit just in one color? Size S
25.05.2022 - 11:26DROPS Design answered:
Dear Elena, you would need 11 balls of Kid Silk. Happy knitting!
25.05.2022 - 20:21Jeg vil gerne have en løs og luftig bluse som jeres model Cotton Candy (223/22). Kan man strikke denne model med tre tråde i stedet for fire?
23.05.2022 - 19:33DROPS Design answered:
Hej Joan, ja absolut, (god ide ;) ) men strikkefastheden er vigtig, så det kan være at du skal strikke på lidt tykkere pinde for at få den strikkefasthed som står i opskriften :)
25.05.2022 - 13:20Knut med ökning från 3m till 6m, förstår inte beskrivningen. Lättare om det visades på video.
13.03.2022 - 14:33DROPS Design answered:
Hej Rigmor, jo du strikker de 3 masker sammen ialt 6 gange og det gør du i skiftevis ret og vrang. Når du har 6 masker på højre pind slipper du de 3 masker du har strikket sammen af venstre pind :)
15.03.2022 - 15:24I opskriften under afsnittet bærestykke står, at når A1 er strikket færdigt i højden, strikkes en omgang ret og derefter tages jævnt ind…??? Det må være jævnt udtagning, der skal stå.
12.02.2022 - 18:33Rosy summer
17.01.2022 - 12:23