
Popular categories
Looking for a yarn?


|
|||||||
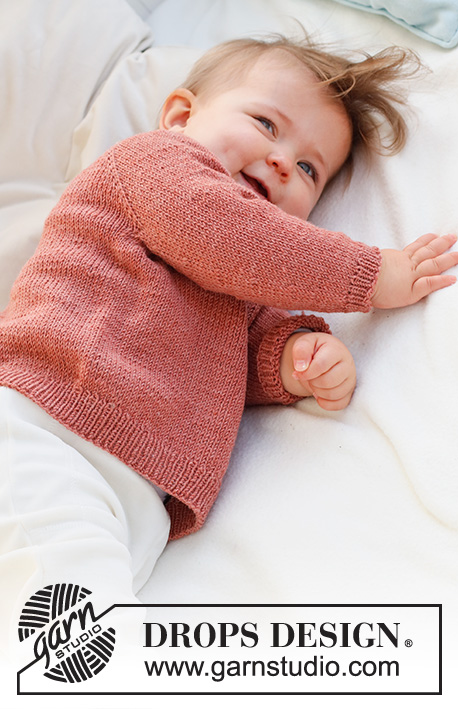
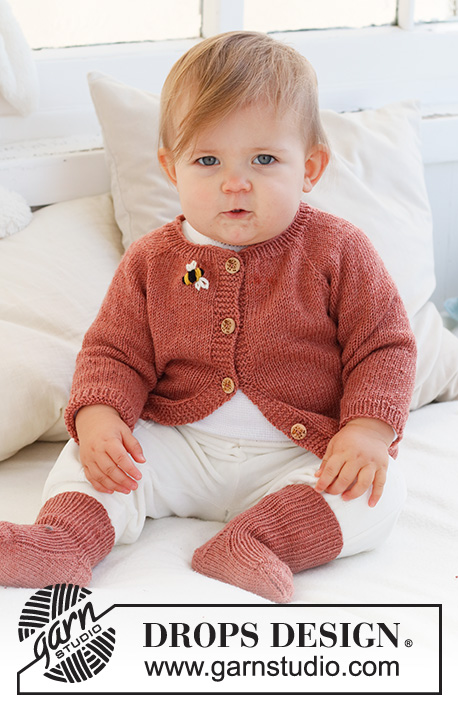
Little Bee Cardigan |
|||||||
 |
 |
||||||
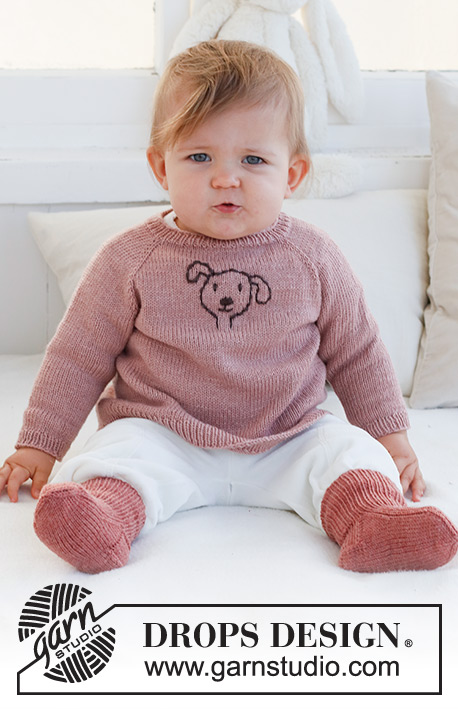
Knitted jacket for babies and children in DROPS BabyMerino. The piece is worked top down, with raglan and embroidered bee. Sizes 0 - 4 years.
DROPS Baby 42-4 |
|||||||
|
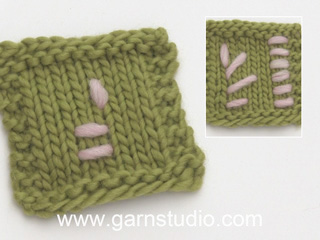
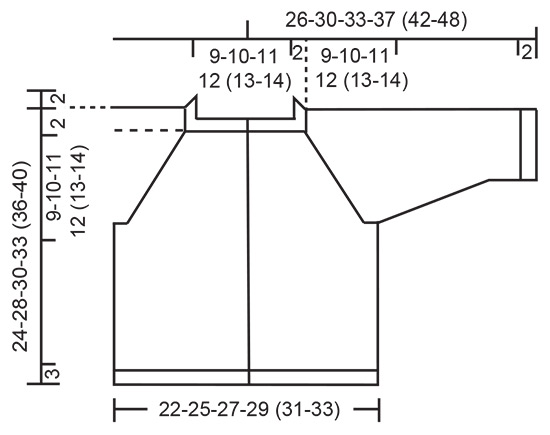
------------------------------------------------------- EXPLANATIONS FOR THE PATTERN: ------------------------------------------------------- RIDGE/GARTER STITCH (worked back and forth): Knit all rows. 1 ridge = knit 2 rows. RAGLAN: All increases are worked from the right side! Work to the marker-stitch, 1 yarn over, knit the marker-stitch, 1 yarn over. Increase like this at each marker-stitch (8 stitches increased). On the next row purl the yarn overs twisted to avoid holes. Then work the new stitches in stocking stitch. DECREASE TIP (sleeves): Decrease 1 stitch on either side of the marker as follows: Work until there are 3 stitches left before the marker, knit 2 together, knit 2 (marker sits between these 2 stitches), slip 1 stitch as if to knit, knit 1 and pass the slipped stitch over the knitted stitch. BUTTONHOLES: Work buttonholes on the right band (when the garment is worn). Work from the right side when there are 3 stitches left on the row as follows: Make 1 yarn over, knit 2 together and knit 1. On the next row, knit the yarn over to leave a hole. The first buttonhole is worked when the neck measures 2 cm. Then work the other 4-4-4-4 (5-5) buttonholes with after 5-6-6½-7 (6½-7) cm between each one. ------------------------------------------------------- START THE PIECE HERE: ------------------------------------------------------- JACKET – SHORT OVERVIEW OF THE PIECE: The yoke is worked back and forth with circular needle. It is divided for the body and sleeves and the body continued back and forth. The sleeves are worked in the round with double pointed needles. NECK: Cast on 75-81-85-91 (95-99) stitches with circular needle size 2.5 mm and DROPS Baby Merino. Purl 1 row from the wrong side with 6 band stitches in GARTER STITCH on each side – read description above. Then work rib as follows: 6 band stitches in garter stitch, * knit 1, purl 1 *, work from *-* until there are 7 stitches left, knit 1 and 6 band stitches in garter stitch. When the rib measures 2 cm, change to circular needle size 3 mm. Insert 1 marker after the band at the beginning of the row, the yoke is measured from this marker! YOKE: Work the next row from the right side: 6 band stitches in garter stitch, knit 63-69-73-79 (83-87) and increase 9-11-7-13 (13-17) stitches evenly spread and 6 band stitches in garter stitch = 84-92-92-104 (108-116) stitches. Work the first BUTTONHOLE – read description above. On the next row insert 4 markers as follows: Work 6 band stitches in garter stitch, purl 11-13-13-16 (17-19), insert 1 marker in the next stitch, purl 12, insert 1 marker in the next stitch, purl 22-26-26-32 (34-38), insert 1 marker in the next stitch, purl 12, insert 1 marker in the next stitch, purl 11-13-13-16 (17-19) and 6 band stitches in garter stitch. Continue with stocking stitch and 6 band stitches in garter stitch on each side, increasing as follows: On the next row from the right side increase 1 stitch on each side of all the markers – read RAGLAN! Increase like this every row from the right side 12-14-16-17 (18-19) times = 180-204-220-240 (252-268) stitches. REMEMBER THE KNITTING TENSION! When the piece measures 9-10-11-12 (13-14) cm from the marker, divide for the body and sleeves as follows: Work 6 band stitches in garter stitch, 23-27-29-32 (34-37) stitches in stocking stitch, place the next 38-42-46-50 (52-54) stitches on a thread for the sleeve, cast on 6 stitches, work 46-54-58-64 (68-74) stitches in stocking stitch, place the next 38-42-46-50 (52-54) stitches on a thread for the sleeve, cast on 6 stitches, work 23-27-29-32 (34-37) stitches in stocking stitch and 6 band stitches in garter stitch. BODY: = 116-132-140-152 (160-172) stitches. Continue back and forth with stocking stitch and 6 band stitches in garter stitch on each side. When the piece measures 10-13-14-16 (18-21) cm from the division, increase 13-13-15-15 (17-19) stitches evenly spaced on the next row from the right side (do not increase over the bands) = 129-145-155-167 (177-191) stitches. Change to circular needle size 2.5 mm and work rib, starting from the wrong side as follows: 6 band stitches in garter stitch, * purl 1, knit 1 *, work from *-* until there are 7 stitches left, purl 1 and 6 band stitches in garter stitch. Continue this rib for 3 cm. Cast off. SLEEVES: Place the 38-42-46-50 (52-54) stitches from the thread on the one side of the piece on double pointed needles size 3 mm and knit up 1 stitch in each of the 6 stitches cast on under the sleeve = 44-48-52-56 (58-60) stitches. Insert a marker in the middle of the new stitches under the sleeve. Start at the marker and work stocking stitch in the round. When the sleeve measures 1 cm from the division, decrease 1 stitch on each side of the marker - read DECREASE TIP! Decrease like this every 2½-2½-1½-2 (2-3) cm a total of 3-4-6-7 (7-7) times = 38-40-40-42 (44-46) stitches. When the sleeve measures 8-11-12-15 (18-23) cm, increase 4-4-4-4 (6-6) stitches evenly spaced = 42-44-44-46 (50-52) stitches. Change to double pointed needles size 2.5 mm and work rib (knit 1, purl 1) for 2 cm. Cast off. Work the other sleeve in the same way. BEE: Embroider a bee on the right front piece – see photo. The bee is worked with a single strand and flat stitch, the wings are worked with chain stitch. BEE – BLACK STRIPES: See diagram A and diagram explanations. Using black, start 3 cm below the neck and 4 cm from the band. Embroider 2 flat stitches, diagonally up to the right (towards the band), close together and 0.5 cm in length. Skip 0.5 cm diagonally up to the left and embroider 4 flat stitches close together and parallel to the first 2 stitches, 1 cm in length (= middle of body), skip 0.5 cm, work 2 flat stitches close together and parallel to the 4 stitches, 0.5 cm in length. BEE – MUSTARD STRIPES: Change to mustard. Embroider flat stitches between the black stripes - 4 stitches of the same length as the black stitches they are close to (2 mustard stripes). BEE - WINGS: Use colour off white; the wings consist of 2 chain stitches, both starting from the same hole. Work as follows: STITCH 1: Work 1 chain stitch, 1-1.5 cm in length from the middle of the bee - see diagram B and diagram explanations. STITCH 2: Work 1 chain stitch, 1-1.5 cm in length, starting from the same place. Embroider a set of wings on the other side of the bee. ASSEMBLY: Sew the buttons onto the left band. |
|||||||
Diagram explanations |
|||||||
|
|||||||

|
|||||||

|
|||||||
|
|||||||
|
Have you made this or any other of our designs? Tag your pictures in social media with #dropsdesign so we can see them! Do you need help with this pattern?You'll find tutorial videos, a Comments/Questions area and more by visiting the pattern on garnstudio.com. © 1982-2024 DROPS Design A/S. We reserve all rights. This document, including all its sub-sections, has copyrights. Read more about what you can do with our patterns at the bottom of each pattern on our site. |
|||||||


With over 40 years in knitting and crochet design, DROPS Design offers one of the most extensive collections of free patterns on the internet - translated to 17 languages. As of today we count 304 catalogues and 11422 patterns - 11422 of which are translated into English (UK/cm).
We work hard to bring you the best knitting and crochet have to offer, inspiration and advice as well as great quality yarns at incredible prices! Would you like to use our patterns for other than personal use? You can read what you are allowed to do in the Copyright text at the bottom of all our patterns. Happy crafting!
Comments / Questions (43)
Volgens mij klopt het patroon niet, Als ik aan het begin 92 steken heb, en ik ga ze verdelen in de voorpanden , achterpand en mouwen hou ik 17 steken over?
09.04.2024 - 13:16DROPS Design answered:
Dag Conny,
Klopt het dat je maat 6/9 maanden aan het breien bent? Dan zet je 92 steken op en je meerdert in totaal 128 (16 x 8) steken voor de raglan, waarmee je op een totaal van, 220 steken komt. Vervolgens verdeel je het werk voor het lijf en de mouwen als volgt 6 (voorbies) + 29^(voorpand) + 46 (mouw) + 58 (achterpand) + 46 (mouw) + 29 (voorpand) + 6(voorbies) = 220 steken.
09.04.2024 - 20:41Vad ska jag sticka de centimeterna efter raglan är färdigt men innan de 11 cm efter markören (jag stickat storlek 6-9 mån). Jag har ungefär 2 cm däremellan men vet inte vad jag ska göra.
08.01.2024 - 17:52DROPS Design answered:
Hej Annica, strikker du i DROPS Baby merino og har 32 pinde på 10 cm i højden, for da skal det stemme med raglanudtagninger hele vejen. Hvis du allerede er færdig med dem, så må du fortsætte de sidste 2 cm uden udtagninger :)
11.01.2024 - 15:31Bjr, J'ai commencé tricoter le gilet du model Baby 42-2 . En moment de placer les marqueurs ( taille 12/ 18 mois ) il s'est trouve que j'ai plus des mailles qu'il faut . Dans votre expl. est écrit que j'ai doit augmenter 13 fois les mailles et que j'aurai après aug. 104 mailles . En sèparent 2 x 16 m. devant + 32m dos et 2x 12m manche et puis 2 x 6m la bordure j'ai m'est retrouve avec 88 m sans compter la bordure .Pourquoi j'ai 16 m de trop?
06.12.2023 - 14:26DROPS Design answered:
Bonjour Bernadetta, vous devez avoir ceci: 22 m (devant), 1 maille avec 1 marqueur, 12 m (manche), 1 maille avec 1 marqueur, 32 m (dos), 1 maille avec 1 marqueur, 12 m (manche), 1 maille avec 1 marqueur, 22 m (devant) soit: 22+1+12+1+32+1+12+1+22=104 mailles. Bon tricot!
06.12.2023 - 16:07Little Bee Gardigan kaarrokkeen ohjeessa neuvotaan kiinnittämään 4 merkkiä ”neulo xx silmukkaa nurin, kiinnitä 1 merkki seuraavaan silmukkaan, neulo 12 silmukkaa nurin, kiinnitä 1 merkki seuraavaan silmukkaan, neulo xx silmukkaa nurin ..”. Neulotaanko tuo silmukka, johon merkki kiinnitetään ja lasketaanko se erikseen yhdeksi silmukaksi? (Jos se on yksi nurjista silmukoista, niin silmukkamäärät eivät täsmää, vaan heittää 4 silmukalla eli juuri ”merkkien” määrällä.
19.11.2023 - 21:01DROPS Design answered:
Merkityt silmukat neulotaan myös, mutta ne lasketaan erikseen.
20.11.2023 - 17:46Hej. Kan det virkelig passe, at jeg skal strikke Litle Bee Cardigan på pinde nr. 3,5 i ribben og på pinde nr. 4 glatstrikning ??? Anbefalede pinde er jo nr. 2,5 og 3. Og jeg har læst afsnittet om strikkefasthed, men jeg synes bare, at pinde nr. 4 i glatstrikning er tykke pinde til dette tynde garn. Mange venlige hilsener fra Birgit.
08.11.2023 - 21:25DROPS Design answered:
Hej Birgit, ja, det som er vigtigt er at du har 24 masker på 10 cm i bredden, hvis du overholder strikkefastheden får du målene ifølge opskriften :)
09.11.2023 - 15:44Liebes Drops Team,\\r\\n ich möchte diese Jacke für die Größe 68/74 mit der Nadelstärke 2,5 stricken. Wie muss ich die Maschenzahl ( Aufteilung Halsblende, Passe, Ärmel) verändern, damit die Größe ungefähr hinkommt?\\r\\n Herzlich Grüße \\r\\nGaby
04.11.2023 - 11:42DROPS Design answered:
Liebe Gaby, diese Jacke wurde mit einer Maschenprobe von 24 Maschen x 32 Reihen gestrickt werden, sollte Ihre Maschenprobe unterschiedlich sein, dann sollen Sie die ganze Anleitung neu umrechnen damit alle fertige Maßen stimmen - oder vielleicht einfach die Nadelgrösse anpassen, hier lesen Sie mehr. Viel Spaß beim stricken!
06.11.2023 - 08:11Hallo, Werden in der Passe die 4 Maschen, in die ein Markierer angebracht wird, nicht gestrickt, sondern erst in der nächsten Reihe mit den Raglanzunahmen gestrickt? Ich habe nämlich gena4 Maschen übrig , wenn ich die markierten Maschen in der selben Reihe stricke, in der auch die Markierungen angebracht werden. Danke für eine Erklärung.
02.10.2023 - 21:39DROPS Design answered:
Liebe Barbara, die Maschen mit den Markierungen sind glatt rechts gestrickt, also rechts bei den Hin-Reihen und Zunahmenreihen (- 1 Umschlag, 1 Masche rechts mit dem Markierer, 1 Umschlag), und links bei den Rückreihen (die Umschläge links verschränkt und die Masche mit der Markierung links stricken). Viel Spaß beim stricken!
03.10.2023 - 08:01Liebes Drops Team, Ich verstehe nicht, wie Sie mit einer 3er Nadel bei dieser dünnen Wolle eine Maschenprobe von 24 M in der Breite erreichen. Für 24 M müsste ich eine 4er Nadel nehmen. Dann entsteht aber ein viel zu lockeres Maschenbild. Was kann ich tun? Es betrifft alle Anleitungen mit dieser Wolle. Viele Grüße Barbara
02.10.2023 - 10:13DROPS Design answered:
Liebe Barbara, jede strickt etwas verschieden, einige stricken eher fest, andere eher locker, seien Sie sicher, daß die Arbeit - auch wegen Baby Merino (siehe Farbkarte) - nicht zu locker wird, die Maschenprobe zuerst waschen und spannen, dann entscheiden Sie die Nadelgröße am besten. Gerne kann Ihnen Ihr DROPS Händler damit noch per E-Mail oder Telefon weiterhelfen. Viel Spaß beim stricken!
02.10.2023 - 16:00Hej igen! Läste gamla kommentarer och såg att markeringen ska sättas i maskan istället för mellan. Då löste det sig! 🙂
17.09.2023 - 23:17DROPS Design answered:
Hei Anita. Så bra at du fant ut av det og har fått strikket videre. Psst: husk å hake av for spørsmål når du sender inn spørsmål. Ditt første spørsmål var registrert som en Kommentar (Kommentarer blir ikke besvart). mvh DROPS Design
26.09.2023 - 11:57Jag har börjat sticka Little Bee Cardigan i storlek 6/9 månader. Har avslutat halsresåren och ökat 7 maskor, så jag har 92 maskor på stickorna. Jag får det inte att stämma när jag ska sätta 4 markeringarna på oket. Jag stickar de 6 kantmaskorna följt av 13 aviga maskor, markering, 12 aviga maskor, maskering, 26 aviga maskor, markering, 12 aviga maskor, markering, 13 aviga maskor, markering. Nu har jag 4+6 maskor kvar. Det stämmer inte. Står det verkligen rätt i mönstret?
17.09.2023 - 12:41