DROPS Paris
DROPS Paris
100% Cotton
from 1.60 $ /50g
Get the yarn to make this pattern from 3.20$.

The yarn cost is calculated from the pattern’s smallest size and the yarn’s cheapest product type. Looking for an even better price? You might find it on the DROPS Deals!

DROPS SS24

Santa's Parade

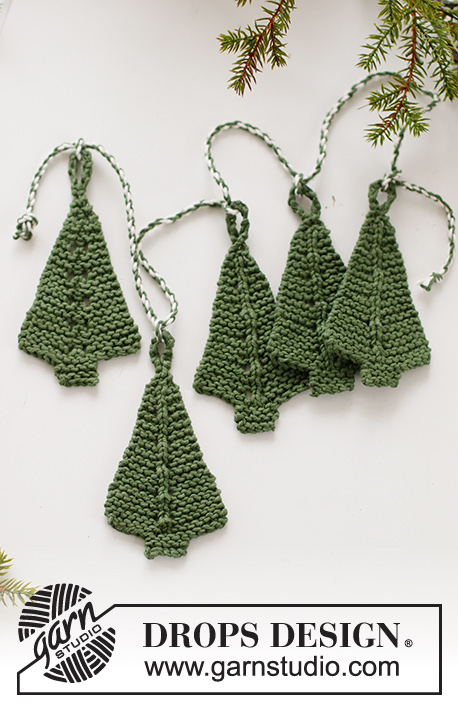
Knitted Christmas Santa decoration in DROPS Paris. The piece is worked top down with garter stitch. Theme: Christmas.

DROPS Extra 0-1543
DROPS Design: Pattern no w-857
Yarn group C or A + A
-------------------------------------------------------

SIZE:
Width at bottom = 8 cm = 3⅛". Length = 10 cm = 4" without loop.

MATERIALS:
DROPS PARIS from Garnstudio (belongs to yarn group C)
50 g color 37, bordeaux
50 g color 17, off white
+ left-over color 43, forest green, for eyes

1 Santa weighs approx. 9 g.

NEEDLES:
DROPS STRAIGHT NEEDLE SIZE 3.5 MM = US 4.

KNITTING GAUGE:
20 stitches in width and 41 rows in height with garter stitch = 10 x 10 cm = 4" x 4".
NOTE: Needle size is only a guide. If you get too many stitches on 10 cm = 4", change to a larger needle size. If you get too few stitches on 10 cm = 4", change to a smaller needle size.

-------------------------------------------------------

Alternative Yarn – See how to change yarns here
Yarn Groups A to F – Use the same pattern and change the yarn here
Yarn usage using an alternative yarn – Use our yarn converter here

-------------------------------------------------------

DROPS Paris
DROPS Paris
100% Cotton
from 1.60 $ /50g
Get the yarn to make this pattern from 3.20$.

The yarn cost is calculated from the pattern’s smallest size and the yarn’s cheapest product type. Looking for an even better price? You might find it on the DROPS Deals!

Pattern instructions

NOTE: This pattern is written in American English. All measurements in charts are in cm. For conversion from inches to cm - click here. There are different terms for crocheting in American and British English. If this pattern includes crochet, click for "crochet terms" here. For this pattern in British English, please click here.
-------------------------------------------------------

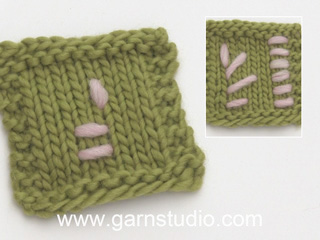
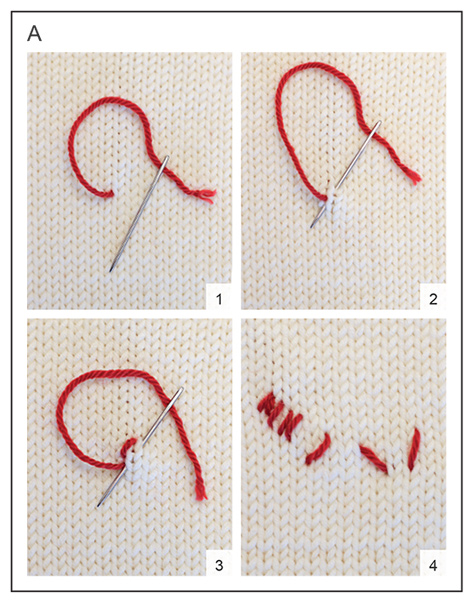
EXPLANATIONS FOR THE PATTERN:

-------------------------------------------------------

RIDGE/GARTER STITCH (worked back and forth):
Knit all rows.
1 ridge = 2 rows.

BOBBLE:
* Knit 1, 1 yarn over *, repeat from *-* in the same stitch until there are 7 stitches, turn, purl the 7 stitches, turn, knit the 7 stitches, turn, purl the 7 stitches, turn and knit the 7 stitches (4 rows of stockinette stitch). Now pass the 2nd stitch over the first stitch, the 3rd stitch over the first stitch and so on until there is 1 stitch left.

-------------------------------------------------------

START THE PIECE HERE:

-------------------------------------------------------

SANTA – SHORT OVERVIEW OF THE PIECE:
The piece is worked from top down. The loop is worked first, then the santa in garter stitch. Change color for the face and a bobble is worked for the nose. The eyes are embroidered to finish.

LOOP:
Cast on 1 stitch with needle size 3.5 MM = US 4 and bordeaux DROPS Paris.
* Make 1 yarn-over, pass the stitch over the yarn-over *, repeat from *-* until the loop measures 5 to 6 cm = 2" to 2⅜". Insert the left needle in the first stitch cast on and knit this stitch = 2 stitches on the needle.

SANTA:
ROW 1 (= wrong side): Knit the 2 stitches.
ROW 2 (= right side): Knit 1, 1 yarn over, knit 1 = 3 stitches – for a neat finish it is best to work the outermost stitch on each side tightly on all rows.
ROW 3 (= wrong side): Knit 1, knit the yarn over twisted to avoid a hole, knit 1, turn. REMEMBER THE KNITTING GAUGE!
Insert 1 marker in the middle-stitch.
Continue with GARTER STITCH back and forth – read description above.
AT THE SAME TIME on the first row from the right side increase 2 stitches by making 1 yarn-over on each side of the marker-stitch – yarn-overs are then knitted twisted on the next row to avoid holes. Increase like this every 6th row a total of 4 times = 11 stitches.

FACE:
When you have worked 25 rows with Bordeaux after the loop, and there are 11 stitches on needle, work the face as follows from right side:
Change to off white. Work 2 ridges and increase on each side of the marker-stitch as before on the last row from the right side = 13 stitches.
Now work the next row as follows from the right side: Knit as far as the marker-stitch, work a BOBBLE in the marker-stitch – read description above (= nose), knit to end of row. Turn and knit back from the wrong side.
Change to bordeaux. Work 2 ridges and increase on each side of the marker-stitch as before on the last row from the right side = 15 stitches.
Bind off with knit from the right side, making 1 yarn-over on each side of the marker-stitch as you bind off (this maintains the shape; yarn-overs bind off as normal stitches). Cut and fasten the strand.

EYES:
Use forest green and embroider the eyes with 2 flat stitches for each eye – see diagram A and the diagram explanations. Each eye is worked 4 stitches in from the side and covers 2 ridges in height.

STIFFENING:
So the santa elf hangs nicely, it can be dipped in sugared water or colorless fizzy drink to stiffen, then laid flat to dry.

TWISTED CORD:
Cut 1 strand bordeaux and 1 strand off-white each approx. 3 metres in length. Tie them together at one end. Twist the strands together until they begin to resist, fold them double; they will continue to twist. Tie a knot in the other end.
Work as many santas elves as you wish and thread the cord through the loop on each santa elf; so the santas elves hang nicely tie a knot with the cord around each loop.

Diagram

All measurements in charts are in cm.

symbols = Flat stitch, Pictures 1-4
PICTURE 1: Insert the needle from the wrong side to the right side, where you wish the stitch to start.
PICTURE 2: Skip 0.5 - 1 cm = ⅛" – ⅜" and thread the needle down and up again to where you want the next flat stitch to start, pull the strand through.
PICTURE 3: Skip 0.5 - 1 cm = ⅛" – ⅜" and thread the needle down and up again to where you want the next flat stitch to start, pull the strand through.
Continue like this until you have enough stitches. Fasten the strand on the wrong side.
PICTURE 4: Flat stitches of different lengths and in different directions.
diagram
Do you have a question? See a list of frequently asked questions (FAQ)

Knitting tension is what determines the final measurements of your work, and is usually measured per 10 x 10 cm. It is provided like so: number of stitches in width x number of rows in height - eg: 19 stitches x 26 rows = 10 x 10 cm.

The knitting tension is very individual; some people knit/crochet loosely while others work tightly. You adjust the knitting tension with the needle size, which is why the suggested needle size only serve as a guide! You need to adjust this (up or down) to ensure that YOUR knitting tension matches the knitting tension provided in the pattern. If you work with a different knitting tension than provided you will have a different yarn consumption, and your work will have different measurements than what the pattern suggests.

The knitting tension also determines which yarns can replace each other. As long as you achieve the same knitting tension you can replace one yarn with another.

See DROPS lesson: How to measure your tension/gauge

See DROPS video: How to make a gauge tension swatch

The required amount of yarn is provided in grams, eg: 450 g. To calculate how many balls you’ll need you first need to know how many grams are in 1 ball (25g, 50g or 100g). This information is available if you click on the individual yarn quality on our pages. Divide the amount required with the amount of each ball. For example, if each ball is 50g (the most common amount), the calculation will be as follows: 450 / 50 = 9 balls.

The important thing when changing from one yarn to another is that the knitting/crochet tension remains the same. This is so that the measurements of the finished piece will be the same as on the sketch provided. It is easier to achieve the same knitting tension using yarns from the same yarn group. It is also possible to work with multiple strands of a thinner yarn to achieve the knitting tension of a thicker one. Please try our yarn converter. We recommend you to always work a test swatch.

Please NOTE: when changing yarn the garment might have a different look and feel to the garment in the photo, due to individual properties and qualities of each yarn.

See DROPS lesson: Can I use a different yarn than the one mentioned in the pattern?

All our yarns are categorised into yarn groups (from A to F) according to thickness and knitting tension – group A contains the thinnest yarns and group F the thickest. This makes it easier for you to find alternative yarns to our patterns, should you wish to switch yarn. All yarns within the same group have a similar knitting tension and can easily replace each other. However, different yarn qualities have different structures and properties which will give the finished work a unique look and feel.

Click here for an overview of the yarns in each yarn group

At the top of all our patterns you’ll find a link to our yarn converter, which is a helpful tool should you wish to use a different yarn than suggested. By filling in the yarn quality you wish to replace, the amount (in your size) and number of strands, the converter will present good alternative yarns with the same knitting tension. Additionally it will tell you how much you’ll require in the new qualities and whether you’ll need to work with multiple strands. Most skeins are 50g (some are 25g or 100g).

If the pattern is worked with multiple colours, every colour will have to be converted separately. Similarly, if the pattern is worked with several strands of different yarns (for example 1 strand Alpaca and 1 strand Kid-Silk) you will have to find alternatives for each, individually.

Click here to see our yarn converter

Since different yarns have different qualities and textures we have chosen to keep the original yarn in our patterns. However, you can easily find options among our available qualities by using our yarn converter, or simply pick a yarn from the same yarn group.

It is possible that some retailers still have discontinued yarns in stock, or that someone has a few skeins at home that they would like to find patterns for.

The yarn converter will provide both alternative yarn as well as required amount in the new quality.

If you think it's hard to decide what size to make, it can be a good idea to measure a garment you own already and like the size of. Then you can pick the size by comparing those measures with the ones available in the pattern's size chart.

You'll find the size chart at the bottom of the pattern.

See DROPS lesson: How to read size chart

The needle size provided in the pattern serves only as a guide, the important thing is to follow the knitting tension. And since knitting tension is very individual, you will have to adjust the needle size to ensure that YOUR tension is the same as in the pattern – maybe you’ll have to adjust 1, or even 2 needle sizes, up or down to achieve the correct tension. For this, we recommend that you work test swatches.

Should you work with a different knitting tension than the one provided, the measurements of the finished garment might deviate from the measurement sketch.

See DROPS lesson: How to measure your tension/gauge

See DROPS video: How to make a gauge tension swatch

Working a garment top-down provides more flexibility and room for personal adjustment. For example it is easier to try the garment on while working, as well as making adjustments to length of yoke and shoulder caps.

The instructions are carefully explaining every step, in the correct order. Diagrams are adjusted to the knitting direction and are worked as usual.

The diagram depicts all rows/rounds, and every stitch seen from the right side. It is read from bottom to top, from right to left. 1 square = 1 stitch.

When working back and forth, every other row is worked from the right side and every other row is worked from the wrong side. When working from the wrong side, the diagram will have to be worked reversed: from left to right, knit stitches are purled, purl stitches are knit etc.

When working in the round every round is worked from the right side and the diagram are worked from right to left on all rounds.

See DROPS lesson: How to read knitting diagrams

The diagram depicts all rows/rounds, and every stitch seen from the right side. It is worked from bottom to top, from right to left.

When working back and forth every other row is worked from the right side: from right to left and every other row is worked from the wrong side: from left to right.

When working in the round, every row in the diagram are worked from the right side, from right to left.

When working a circular diagram you start in the middle and work your way outwards, counter clockwise, row by row.

The rows usually start with a given number of chain stitches (equivalent to the height of the following stitch), this will either be depicted in the diagram or explained in the pattern.

See DROPS lesson: How to read crochet diagrams

Instructions for working several diagrams after each other on the same row/round, will often be written like so: “work A.1, A.2, A.3 a total of 0-0-2-3-4 times". This means you work A.1 once, then A.2 is worked once, and A.3 is repeated (in width) the number of times provided for your size – in this case like so: S = 0 times, M = 0 times, L=2 times, XL= 3 times and XXL = 4 times.

The diagrams are worked as usual: begin with the first row in A.1, then work the first row in A.2 etc.

See DROPS lesson: How to read knitting diagrams

See DROPS lesson: How to read crochet diagrams

The total width of the garment (from wrist-to-wrist) will be larger in the larger sizes, despite the actual sleeves being shorter. The larger sizes have longer sleeve caps and wider shoulders, so there will be a good fit in all sizes.

The measurement sketch/schematic drawing provides information regarding the full length of the garment. If it’s a jumper or a jacket the length is measured from the highest point on the shoulder (usually closest to the neckline), and straight down to the bottom of the garment. It is NOT measured from the tip of shoulder. Similarly, the length of yoke is measured from the highest point on the shoulder and down to where yoke is split into body and sleeves.

See DROPS lesson: How to read a schematic drawing

Diagrams are often repeated on the round or in height. 1 repeat is the diagram the way it appears in the pattern. If it says to work 5 repeats of A.1 in the round, then you work A.1 a total of 5 times after/next to each other in the round. If it says to work 2 repeats of A.1 vertically/in height you work the entire diagram once, then begin again at the start and work the entire diagram one more time.

Chain stitches are slightly narrower than other stitches and to avoid working the cast-on edge too tight, we simply chain more stitches to begin with. The stitch count will be adjusted on the following row to fit the pattern and measurement sketch.

The rib edge is more elastic and will contract slightly compared to, for example, stocking stitch. By increasing before the rib edge, you avoid a visible difference in width between the rib edge and the rest of the body.

It’s very easy to cast off too tightly, and by making yarn overs while casting off (and simultaneously casting these off) you avoid a too tight cast off edge.

See DROPS video: How to bind off with yarn overs (yo)

To achieve an even increase (or decrease) you can increase on, for example: every 3rd and 4th row alternately, like so: work 2 rows and increase on the 3rd row, work 3 rows and increase on the 4th. Repeat this until the increase is complete.

See DROPS lesson: Increase or decrease 1 st on every 3rd and 4th row alternately

Should you prefer to work in the round instead of back and forth, you may of course adjust the pattern. You’ll need to add steeks mid-front (usually 5 stitches), and follow the instructions. When you would normally turn and work from the wrong side, simply work across the steek and continue in the round. At the end you’ll cut the piece open, pick up stitches to work bands, and cover the cut edges.

See DROPS video: How to knit steeks and cut open

Should you prefer to work back and forth instead of in the round, you may of course adjust the pattern so you work the pieces separately and then assemble them at the end. Divide the stitches for the body in 2, add 1 edge stitch in each side (for sewing) and work the front and back pieces separately.

See DROPS lesson: Can I adapt a pattern for circular needles into straight needles?

Pattern repeats can vary slightly in the different sizes, in order to get the correct proportions. If you’re not working the exact same size as the garment in the photo, yours might deviate slightly. This has been carefully developed and adjusted so that the complete impression of the garment is the same in all sizes.

Make sure to follow instructions and diagrams for your size!

If you have found a pattern you like which is available in women’s size it’s not very difficult to convert it to men’s size. The biggest difference will be the length of sleeves and body. Start working on the women size that you think would fit across the chest. The additional length will be worked right before you cast off for the armhole/sleeve cap. If the pattern is worked top-down you can add the length right after the armhole or before the first decrease on sleeve.

Regarding additional yarn amount, this will depend on how much length you add, but it is better with a skein too many than too few.

All yarns will have excess fibres (from production) that might come off as lint or shedding. Brushed yarns (ie hairier yarns) have more of these loose, excess fibres, causing more shedding.

Shedding also depends on what is worn under or over the garment, and whether this pulls at the yarn fibres. It’s therefore not possible to guarantee that there will be no shedding

Below are some tips on how to get the best result when working with hairier yarns:

1. When the garment is finished (before you wash it) shake it vigorously so the looser hairs come off. NOTE: do NOT use a lint roller, brush or any method that pulls at the yarn.

2. Place the garment in a plastic bag and put it in your freezer - the temperature will cause the fibres to become less attached to each other, and excess fibres will come off easier.

3. Leave in the freezer for a few hours before taking it out and shaking it again.

4. Wash the garment according to the instructions on the yarn label.

Pilling is a natural process that happens to even the most exclusive of fibers. It's a natural sign of wear and tear that is hard to avoid, and that is most visible in high friction areas of your garment like a sweater's arms and cuffs.

You can make your garment look as new by removing the pilling, using a fabric comb or a pill/lint remover.

Still can't find the answer you need? Then scroll down and leave your question so one of our experts can try to help you. This will be done normally within 5 to 10 working days.
In the meantime, you can read the questions and answers that others have left to this pattern or join the DROPS Workshop on Facebook to get help from fellow knitters/crocheters!

You might also like...

Santa's Parade

Christine, Germany

Santa's Parade

Maggie, United Kingdom

Post a comment to pattern DROPS Extra 0-1543

We would love to hear what you have to say about this pattern!

If you want to leave a question, please make sure you select the correct category in the form below, to speed up the answering process. Required fields are marked *.

Comments / Questions (11)

country flag Rosella Matt wrote:

Come si realizza l'appendino per Santa's parade? Avrei bisogno di un video

19.12.2022 - 16:56

DROPS Design answered:

Buonasera Rossella, per l'appendino deve seguire le istruzioni riportate nel relativo paragrafo. Buon lavoro!

28.12.2022 - 19:25

country flag Susan wrote:

If y'all count the crochet projects on the Christmas calendar versus the knitted you will find there are more. Granted there are usually more knitted patterns in their other booklets. Do like I did, teach yourself to knit from YouTube. I come from a family of crocheters, no knitters and I'm a lefty to boot. I now knit more than I crochet. Just a suggestion.

29.12.2021 - 13:12

country flag Marijke Veldman wrote:

Leuk om te zien maar hoe komt de kleurovergang zo mooi bij de ribbels?

21.12.2021 - 12:28

DROPS Design answered:

Dag Marijke,

Je wisselt aan de goede kant steeds van kleur, zodat je de overgang aan de verkeerde kant hebt.

23.12.2021 - 15:40

country flag Debbie wrote:

I Love all of your patterns

12.12.2021 - 00:30

country flag Roliene wrote:

Volgens mij is kleur 12 gebruikt ipv kleur 37 klopt dat?

08.12.2021 - 11:32

DROPS Design answered:

Dag Roliene,

Nee, kleur 37 is gebruikt hier; wijnrood. Kleur 12 is feller. Natuurlijk ben je vrij om je eigen kleur te kiezen :) Veel breiplezier!

09.12.2021 - 14:31

country flag Maria Polerube wrote:

Jeg har tilladt mig at udvide jeres sjove lille opskrift lidt. Jeg har strikket en mere , men uden snor og næse og syet den fast som bagside. Lidt fyld giver en god virkning.

04.12.2021 - 10:36

country flag Val wrote:

Bonjour. Les vidéos correspondantes au modèle, oui. Mais en cliquant en haut à gauche de l'écran, puis sur astuce et aide et enfin sur vidéos, celles-ci sont en anglais. Merci de faire le nécessaire.

02.12.2021 - 17:24

DROPS Design answered:

Oups, merci pour votre retour, le nécessaire va être fait effectivement!

03.12.2021 - 07:55

country flag Val wrote:

Bonjour, le site est en français sauf le texte des vidéos. Est-ce normal ? Merci.

02.12.2021 - 07:41

DROPS Design answered:

Bonjour Val, les vidéos sont également disponibles en français, vous y avez accès, en français dès la page des explications - en français. Bon tricot!

02.12.2021 - 09:08

country flag JMFS wrote:

@GH Pool You get what you get and don't pitch a fit! :D We crocheters would love more love, but it's a knitting world out there. Knitting has been around far longer than crochet so we're lagging behind. There will be some crochet patterns in the Christmas Calendar as previous years have shown us. I get it, though, I certainly wouldn't complain if we had more crochet than knit patterns! However, I'm thankful for Every pattern we crocheters can get our hands on. :)

02.12.2021 - 05:08

country flag Kat wrote:

Fun! Thank you!

01.12.2021 - 22:16