
Popular categories
Looking for a yarn?


|
|
Frosted Chocolate |
|
 |
 |
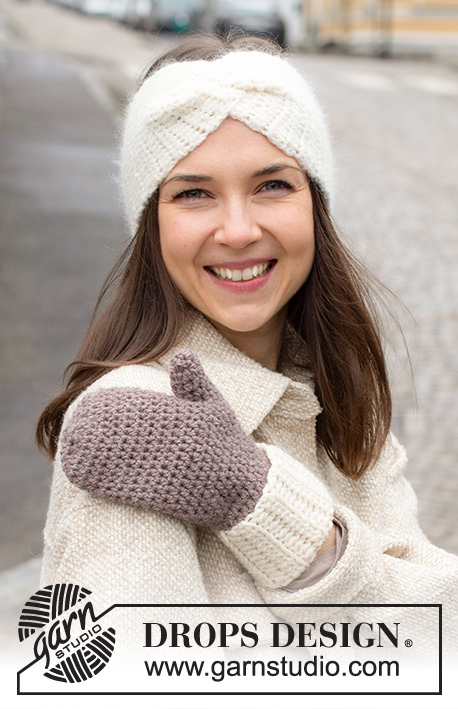
Crocheted head band and mittens in DROPS Alaska. SIZE S - L
DROPS 225-19 |
|
|
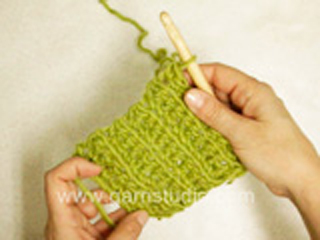
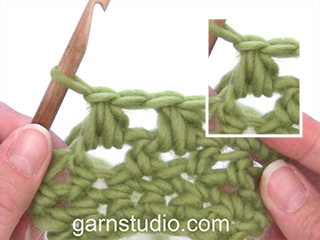
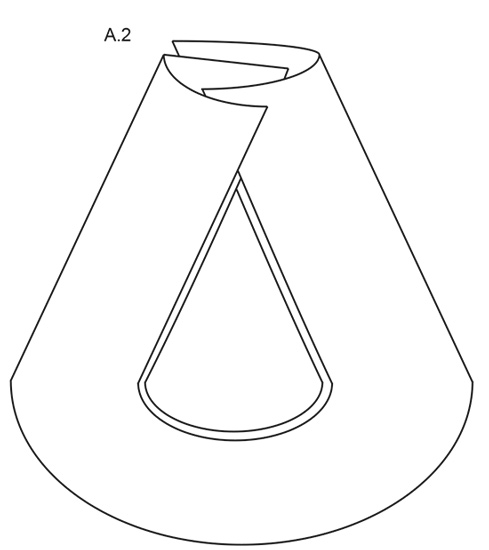
---------------------------------------------------------- EXPLANATION FOR THE PATTERN: ---------------------------------------------------------- DIAGRAM (applies to head band): See diagrams A.1 to A.4. CROCHET TIP FOR CHAIN STITCH: If you work at the end of crochet hook the chain stitch will often be too tight. 1 chain stitch should be just as long as 1 single crochet/half double crochet/double crochet is wide. CROCHET INFORMATION: When working back and forth: At the beginning of every row with half double crochets work 2 chain stitches. These chain stitches do not replace first half double crochet. When working in the round: At the beginning of every round with half double crochets work 2 chain stitches. These chain stitches do not replace first half double crochet. Finish round with 1 slip stitch in 2nd chain stitch on round. 2 HALF DOUBLE CROCHETS IN A STITCH: Work 2 half double crochets together in the last stitch on row as follows: * Make 1 yarn over, insert hook in the stitch, get yarn *, repeat from *-* 2 times in total in the last stitch on row, make 1 yarn over and pull yarn through all 5 loops on hook. WORK 2 HALF DOUBLE CROCHETS TOGETHER: * Make 1 yarn over, insert hook in next stitch, get yarn *, repeat from *-* 2 times in total, make 1 yarn over and pull yarn through all 5 loops on hook (= 1 stitch decreased). DECREASE TIP (evenly): To calculate how to decrease evenly, use the total number of stitches on round (e.g. 29 stitches) , and divide stitches by number of decreases to be done (e.g. 5) = 5.8. In this example decrease by working approx. every 5th and 6th stitch together - read WORK 2 HALF DOUBLE CROCHETS TOGETHER. INCREASE TIP (applies to mittens): Increase 1 stitch by working 2 stitches in same stitch. ---------------------------------------------------------- START THE PIECE HERE: ---------------------------------------------------------- HEAD BAND – SHORT OVERVIEW OF THE PIECE: Worked back and forth from mid front. Sew end together to form a cable mid front on head band. HEAD BAND: Work 21-23 chain stitches – read CROCHET TIP FOR CHAIN STITCH, on hook size 4.5 MM = US 7 with color off white in DROPS Alaska. Turn and work 1 half double crochet in 2nd chain stitch from hook, work 1 half double crochet in every chain stitch until 1 chain stitch remains, work 2 HALF DOUBLE CROCHETS IN A STITCH - read explanation above = 20-22 half double crochets + 2 chain stitches to turn with - read CROCHET INFO. Work back and forth with 1 half double crochet in every half double crochet and work 2 half double crochets in the last half double crochet on every row until piece measures 49-51 cm = 19¼"-20". REMEMBER THE CROCHET GAUGE! Cut and fasten the yarn. ASSEMBLY: The piece is now a flat rectangle, fold it along the long side so that it is double and down with right side out - see diagram A.1. Now place the long sides of head band in towards each other in layers without twisting the piece - see diagram A.2. The ends of the head band should now be alternately inside and outside of each other, and ends should be edge to edge - see diagram A.3. Now sew through all layers as follows: Sew along the dotted line in diagram A.4 (i.e. over the ends of piece), and sew with close whip stitches with 1 stitch in every stitch - it is important to sew through all layers to get an invisible seam when the piece is turned. Cut and fasten the yarn. Turn the piece so that the seam is on the inside of head band. ---------------------------------------------------------- MITTENS - SHORT OVERVIEW OF THE PIECE: First work cuff back and forth and sew it together to form a tube. Then work stitches along the side of cuff and work the rest of mitten in the round. CUFF: Work 18 chain stitches – read CROCHET TIP FOR CHAIN STITCHES, on hook size 4.5 MM = US 7 with color off white in DROPS Alaska. Work back and forth as follows: Work 1 half double crochet in 2nd chain stitch from hook, 1 half double in each of the next 16 chain stitches = 17 half double crochets + 2 chain stitches at the beginning of round – read CROCHET INFO. Then work half double crochets back and forth in back loop of stitch to get a rib texture. REMEMBER THE CROCHET GAUGE! When piece measures 24-25 cm = 9½"-9¾", cut the yarn but leave approx. 20 cm = 8" for assembly. Sew the cuff together stitch by stitch along the last row worked and chain stitch row at the beginning of piece to form a tube. MITTEN: Then continue with color light brown. Work 29-31 half double crochets evenly around one opening of the tube – remember CROCHET INFO. Work 1 half double crochet in every half double crochet. When piece measures 4 cm = 1½" from cuff, insert a marker in the 15th-16th stitch on round. Increase for thumb gusset on each side of stitch with marker - read INCREASE TIP. Then increase on either side of the increased stitches every other round 4-5 times in total = 37-41 half double crochets = 9-11 stitches for thumb). Work until mitten measures 12 cm = 4¾" from cuff. Work next round as follows: Work the first 14-15 stitches, skip the next 9-11 stitches (= thumb stitches), work 1 chain stitch behind the thumb, work the last 14-15 stitches on round = 29-31 stitches. Continue in the round with 1 half double crochet in every stitch until mitten measures 20-21 cm = 8"-8¼" from cuff – try on the mitten and work to desired length (approx. 3 cm = 1⅛" remains until finished measurements). Now begin decrease at the on top of mitten. ROUND 1: Work 1 round with half double crochets while decreasing 5-7 half double crochets evenly - read DECREASE TIP = 24 stitches. ROUND 2: Work * 1 half double crochet in each of the next 2 half double crochets, WORK 2 HALF DOUBLE CROCHETS TOGETHER – read explanation above *, work from *-* 6 times in total = 18 half double crochets. ROUND 3: Work * 1 half double crochet in next half double crochet, work 2 half double crochets together *, work from *-* 6 times in total = 12 half double crochets. ROUND 4: Work * 2 half double crochets together *, work from *-* 6 times in total = 6 half double crochets. Cut the yarn, baste it up and down through the stitches, pull yarn to tighten and fasten tightly. The mitten measures approx. 34-35 cm = 13⅜"-13¾" including cuff. Fold the cuff approx. 8 cm = 3⅛" upwards. THUMB: ROUND 1: Work 1 slip stitch in the first of the 9-11 thumb stitches, 3 chain stitches, then work 1 half double crochet in each of the next 8-10 half double crochets, then work 2 half double crochets around chain stitch behind thumb =10-12 half double crochets. Then work half double crochets until thumb measures approx. 4½ -5 cm = 1⅝"-2". Try the mitten on and work until desired length (approx. 1 cm = ⅜" remains until finished measurements). Now decrease as follows: ROUND 1: Work half double crochets together 2 by 2 the entire round = 5- 6 half double crochets. ROUND 2: Work 1-0 half double crochet, work half double crochets together 2 by 2 the entire round = 3- 3 half double crochets. Cut the yarn, baste it up and down through the stitches, pull yarn to tighten and fasten tightly. Work another mitten the same way. |
|

|
|
|
|
|
Have you made this or any other of our designs? Tag your pictures in social media with #dropsdesign so we can see them! Do you need help with this pattern?You'll find tutorial videos, a Comments/Questions area and more by visiting the pattern on garnstudio.com. © 1982-2024 DROPS Design A/S. We reserve all rights. This document, including all its sub-sections, has copyrights. Read more about what you can do with our patterns at the bottom of each pattern on our site. |
|


With over 40 years in knitting and crochet design, DROPS Design offers one of the most extensive collections of free patterns on the internet - translated to 17 languages. As of today we count 304 catalogs and 11422 patterns - 11417 of which are translated into English (US/in).
We work hard to bring you the best knitting and crochet have to offer, inspiration and advice as well as great quality yarns at incredible prices! Would you like to use our patterns for other than personal use? You can read what you are allowed to do in the Copyright text at the bottom of all our patterns. Happy crafting!
Comments / Questions (6)
Hej, jag förstår inte hur jag ska hopa över maskorna vid tummen?? Tack för hjälp! 🙏🏼🙏🏼🙏🏼
29.10.2023 - 21:26DROPS Design answered:
Hei Hannah. Jo, du har 37-41 masker og du har økt til tommelkilen og når votten måler 12 cm fra mansjetten, skal du kun hekle selve votten. Tommelen hekler du etterpå, men du må hoppe over 9 -11 masker (som senere skal hekles til tommelen). Så hekle de første 14-15 maskene, hopp over de neste 9-11 maskene (= tommelmasker), hekle 1 luftmaske (denne blir bak tommelen), hekle de siste 14-15 maskene på omgangen. Du har nå 29-31 masker. Hekle ferdig votten etter oppskriften, klipp tråden. Nå skal du hekle tommel på de 9-11 maskene du hoppet over + 1 luftmaske. Les under TOMMEL i oppskriften. mvh DROPS Design
30.10.2023 - 13:57Hej jeg forstår ikke hvad der menes med at hækle 1 lm bag tommelfingeren?
31.01.2023 - 13:46DROPS Design answered:
Hej Christine, jo du hækler 1 ekstra maske imellem de andre masker indenfor tommelfingeren :)
31.01.2023 - 15:11När det ska ökas för tumkil på vantarna, hur ska det ökas? Står att det ska ökas på varje sida av de ökade maskorna, menas det att det kommer bli fler och fler maskor mellan ökningsmaskorna för varje varv? Eller ska avståndet mellan ökningsmaskorna vara samma?
11.11.2022 - 14:54DROPS Design answered:
Hei Tess. Øk på hver side av masken med merket i, da vil det på hver øke omgang bli: hekle 2 halvstaver i en 1 maske, hekle maske med merket og hekle 2 halvstaver i neste maske. mvh DROPS Design
14.11.2022 - 11:55Salve, ho visto i vostri modelli e sono davvero bellissimi tutti. Li vorrei creare tutti piano piano però ho un problema nel capire la spiegazione scritta... non capisco i diagrammi quando c è scritto A1 A2 Potrebbe aiutarmi? Grazie in anticipo
16.03.2022 - 11:50DROPS Design answered:
Buonasera Sara, i diagrammi si leggono dal basso verso l'alto e da destra a sinistra per i ferri di andata e da sinistra a destra per quelli di ritorno, oppure sempre da destra verso sinistra durante la lavorazione in tondo. Buon lavoro!
16.03.2022 - 22:51... "sys sammen slik at de danner en tube" - TUBE ?? En tube ser da helt annerledes ut! Det engelske 'tube' heter på norsk 'rør'. Det der står overalt i drops' oppskrifter og ser dumt ut. Sendes som spørsmål, for ellers leser dere det ikke, tror jeg ...
17.12.2021 - 10:38DROPS Design answered:
Hei Snorre. Dumt for noen, men helt normal for andre. Ordet tubestrikk er også mye brukt i strikketermologien, slik at tube kan være enklere å skjønne enn rør i håndarbeids verden. Vi mener det er helt innenfor å bruke det ordet. Både Spørsmål og Kommentarer som blir sendt til oss blir lest, men kun Spørsmål blir besvart. mvh DROPS Design
21.12.2021 - 10:04Gingerbread mittens
04.08.2021 - 10:04