DROPS Air
DROPS Air
65% Alpaca, 28% Polyamide, 7% Wool
from 6.45 $ /50g
Get the yarn to make this pattern from 38.70$.

The yarn cost is calculated from the pattern’s smallest size and the yarn’s cheapest product type. Looking for an even better price? You might find it on the DROPS Deals!

DROPS SS24

Serene Forest Cardigan

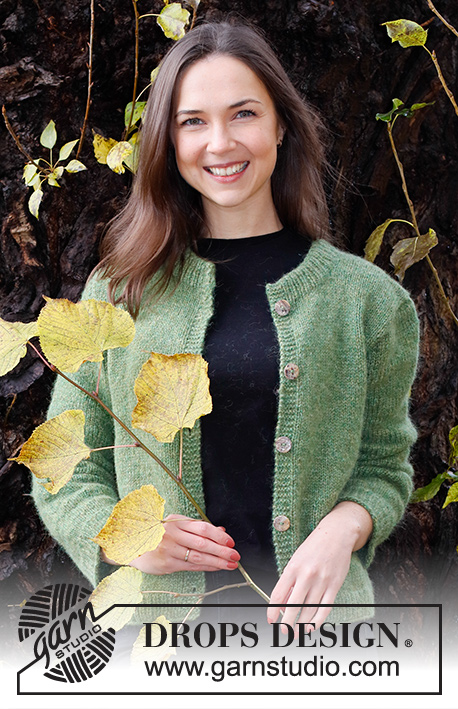
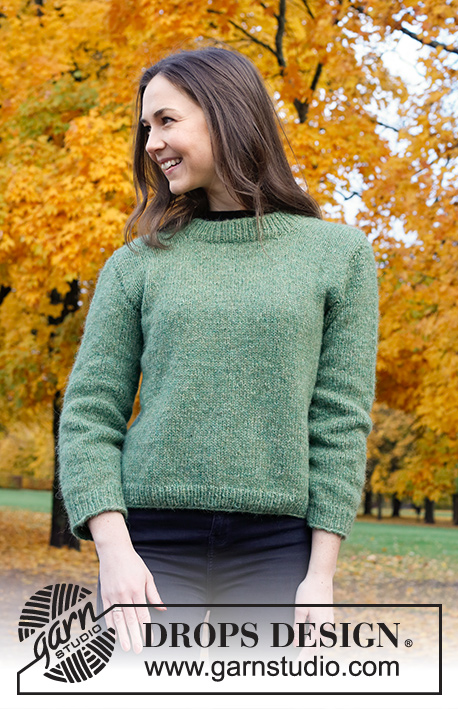
Knitted jacket in DROPS Air. The piece is worked in stockinette stitch, with double neck. Sizes S - XXXL.

DROPS 226-27
DROPS Design: Pattern no ai-347
Yarn group C or A + A
-------------------------------------------------------

SIZES:
S - M - L - XL - XXL – XXXL

Finished measurements:
Chest measurements: 88-96-104-112-128-138 cm = 34⅝"-37¾"-41"-44"-50⅜"-54¼"
Full length: 52-54-56-58-60-62 cm = 20½"-21¼"-22"-22¾"-23⅝"-24⅜"
All measurements in charts are in cm.

MATERIALS:
DROPS AIR from Garnstudio (belongs to yarn group C)
300-350-350-400-400-450 g color 12, moss green

DROPS MOTHER OF PEARL BUTTONS, Arched (white) NO 521: 5-5-5-6-6-6 items

NEEDLES:
DROPS CIRCULAR NEEDLE SIZE 5 MM = US 8: Length 40 cm and 80 cm = 16" and 32" for stockinette stitch.
DROPS CIRCULAR NEEDLE SIZE 4 MM = US 6: Length 40 cm and 80 cm = 16" and 32" for rib.
DROPS DOUBLE POINTED NEEDLES SIZE 5 MM = US 8.
DROPS DOUBLE POINTED NEEDLES SIZE 4 MM = US 6.
The technique MAGIC LOOP can be used – you then only need circular needle of 80 cm = 32" in each size.

KNITTING GAUGE:
17 stitches in width and 22 rows in height with stockinette stitch = 10 x 10 cm = 4" x 4".
NOTE: Needle size is only a guide. If you get too many stitches on 10 cm = 4", change to a larger needle size. If you get too few stitches on 10 cm = 4", change to a smaller needle size.

-------------------------------------------------------

Alternative Yarn – See how to change yarns here
Yarn Groups A to F – Use the same pattern and change the yarn here
Yarn usage using an alternative yarn – Use our yarn converter here

-------------------------------------------------------

DROPS Air
DROPS Air
65% Alpaca, 28% Polyamide, 7% Wool
from 6.45 $ /50g
Get the yarn to make this pattern from 38.70$.

The yarn cost is calculated from the pattern’s smallest size and the yarn’s cheapest product type. Looking for an even better price? You might find it on the DROPS Deals!

Pattern instructions

NOTE: This pattern is written in American English. All measurements in charts are in cm. For conversion from inches to cm - click here. There are different terms for crocheting in American and British English. If this pattern includes crochet, click for "crochet terms" here. For this pattern in British English, please click here.
-------------------------------------------------------

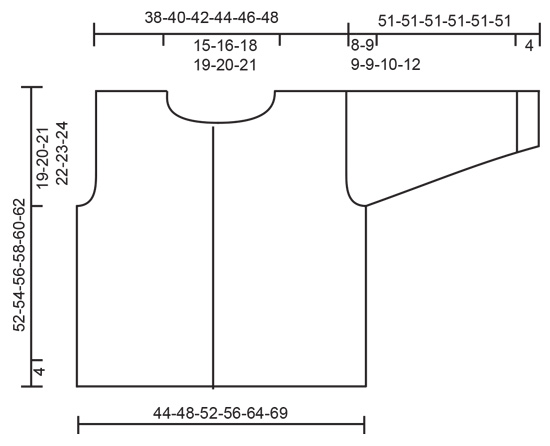
EXPLANATIONS FOR THE PATTERN:

-------------------------------------------------------


RIDGE/GARTER STITCH (worked back and forth):
Knit all rows.
1 ridge = knit 2 rows.

INCREASE TIP:
Work until there are 2 stitches left before the marker, make 1 yarn over, knit 4 (the marker sits in the middle of these 4 stitches), 1 yarn over. On the next round knit the yarn overs twisted to avoid holes. Then work the new stitches in stockinette stitch (= 2 stitches increased).

BUTTONHOLES:
Work buttonholes on the right band. 1 BUTTONHOLE = knit together the third and fourth stitch from the edge and make 1 yarn over. On the next row knit the yarn over to leave a hole.
Work the buttonholes when the piece measures:
S: 5, 15, 25, 35 and 45 cm = 2", 6", 9¾", 13¾" and 17¾"
M: 5, 15, 25, 36 and 47 cm = 2", 6", 9¾", 14¼" and 18½"
L: 5, 16, 27, 38 and 49 cm = 2", 6¼", 10⅝", 15" and 19¼"
XL: 5, 14, 23, 31, 41 and 51 cm = 2", 5½", 9", 12¼", 16⅛" and 20"
XXL: 5, 14, 23, 33, 43 and 53 cm = 2", 5½", 9", 13", 17" and 21"
XXXL: 5, 15, 25, 35, 45 and 55 cm = 2", 6", 9¾", 13¾", 17¾" and 21⅝"

-------------------------------------------------------

START THE PIECE HERE:

-------------------------------------------------------

JACKET – SHORT OVERVIEW OF THE PIECE:
The piece is worked back and forth with circular needle as far as the armholes, then divided and the front and back pieces finished separately. The sleeves are worked in the round, bottom up, with circular needle/double pointed needles. The sleeve cap is worked back and forth.
BODY:
Cast on 159-175-187-203-227-247 stitches with circular needle size 4 MM = US 6 and DROPS Air. Purl 1 row from the wrong side, then work rib as follows from the right side: 5 band stitches in GARTER STITCH – read description above, * knit 1, purl 1 *, work from *-* until there are 6 stitches left, knit 1 and 5 band stitches in garter stitch. Continue this rib for 4 cm = 1½", change to circular needle size 5 MM = US 8. Continue with stockinette stitch and 5 band stitches in garter stitch on each side at the same time, on the first row, decrease 1 stitch = 158-174-186-202-226-246 stitches. Work the BUTTONHOLE on the right band – read description above. REMEMBER THE KNITTING GAUGE. When the piece measures 33-34-35-36-37-38 cm = 13"-13⅜"-13¾"-14¼"-14½"-15", work the next row as follows – binding off for the armholes and then the front and back pieces are finished separately: Work 39-43-46-50-56-61 stitches, bind off 6 stitches, work 68-76-82-90-102-112 stitches, bind off 6 stitches, work the last 39-43-46-50-56-61 stitches. Place the first and last 39-43-46-50-56-61 stitches on a thread and continue working the 68-76-82-90-102-112 stitches on the back piece.

BACK PIECE:
= 68-76-82-90-102-112 stitches. Continue with stockinette stitch, AT THE SAME TIME bind off for the armholes at the beginning of each row: 2 stitches 1-1-1-2-3-4 times and 1 stitch 0-2-3-4-6-7 times on both sides = 64-68-72-74-78-82 stitches. When the piece measures 49-51-53-55-57-59 cm = 19¼"-20"-21"-21⅝"-22½"-23¼", bind off the middle 24-26-28-30-32-34 stitches for the neck and finish each shoulder separately. Bind off 1 stitch on the next row from the neck = 19-20-21-21-22-23 stitches on the shoulder. Continue with stockinette stitch until the piece measures 52-54-56-58-60-62 cm = 20½"-21¼"-22"-22¾"-23⅝"-24⅜" (= 19-20-21-22-23-24 cm = 7½"-8"-8¼"-8¾"-9"-9½" from the bottom of the armholes). Bind off. Work the other shoulder in the same way.

RIGHT FRONT PIECE:
Place the first 39-43-46-50-56-61 stitches back on circular needle size 5 MM = US 8. Continue with stockinette stitch and 5 band stitches in garter stitch towards mid-front and bind off for the armhole at the beginning of each row from the side: 2 stitches 1-1-1-2-3-4 times and 1 stitch 0-2-3-4-6-7 times = 37-39-41-42-44-46 stitches. When the piece measures 46-48-50-52-54-56 cm = 18"-19"-19¾"-20½"-21¼"-22", place the outermost 14-15-16-17-18-19 stitches towards mid-front on a thread for the neck. Then bind off stitches on each row from the neck: Bind off 2 stitches 1 time and 1 stitch 2 times = 19-20-21-21-22-23 stitches left on shoulder. Continue with stockinette stitch until the piece measures 52-54-56-58-60-62 cm = 20½"-21¼"-22"-22¾"-23⅝"-24⅜" (= 19-20-21-22-23-24 cm = 7½"-8"-8¼"-8¾"-9"-9½" from the bottom of the armhole), bind off.
LEFT FRONT PIECE:
Place the last 39-43-46-50-56-61 stitches back on circular needle size 5 MM = US 8. Continue with stockinette stitch and 5 band stitches in garter stitch towards mid-front and bind off for the armhole at the beginning of each row from the side: 2 stitches 1-1-1-2-3-4 times and 1 stitch 0-2-3-4-6-7 times = 37-39-41-42-44-46 stitches. When the piece measures 46-48-50-52-54-56 cm = 18"-19"-19¾"-20½"-21¼"-22", place the outermost 14-15-16-17-18-19 stitches towards mid-front on a thread for the neck. Then bind off stitches on each row from the neck: Bind off 2 stitches 1 time and 1 stitch 2 times = 19-20-21-21-22-23 stitches left on shoulder. Continue with stockinette stitch until the piece measures 52-54-56-58-60-62 cm = 20½"-21¼"-22"-22¾"-23⅝"-24⅜" (= 19-20-21-22-23-24 cm = 7½"-8"-8¼"-8¾"-9"-9½" from the bottom of the armhole), bind off.

SLEEVES:
The sleeves are worked bottom up, with double pointed needles/short circular needle. The sleeve is divided and then the sleeve cap is finished back and forth.

Cast on 48-50-52-54-56-58 stitches with double pointed needles size 4 MM = US 6 and Air. Knit 1 round, then work rib in the round (knit 1, purl 1) for 4 cm = 1½". Change to double pointed needles size 5 MM = US 8. Insert a marker at the beginning of the round = mid-under sleeve. Continue with stockinette stitch, AT THE SAME TIME when the sleeve measures 8 cm = 3⅛", increase 1 stitch on each side of the marker – read INCREASE TIP. Increase like this every 10-8-6-4-3½-2½ cm = 4"-3⅛"-2⅜"-1½"-1¼"-1" a total of 4-5-6-8-9-11 times = 56-60-64-70-74-80 stitches. When the sleeve measures 43-42-42-42-41-39 cm = 17"-16½"-16½"-16½"-16⅛"-15¼", bind off 3 stitches on each side of the marker (= 6 stitches bind off under the sleeve) and work the sleeve cap back and forth. NOTE! Shorter measurements in larger sizes due to wider shoulders and longer sleeve cap. Bind off at the beginning of each row as follows: Bind off 2 stitches 3-3-3-3-3-4 times and 1 stitch 1-2-2-2-3-3 times on both sides. Then bind off 2 stitches on both sides until the sleeve measures 50 cm = 19¾" in all sizes, bind off 3 stitches 1 time on each side and then bind off the remaining stitches. The sleeve measures approx. 51 cm = 20" in all sizes. Work the other sleeve in the same way.

ASSEMBLY:
Sew the shoulder seams. Sew in the sleeves. Sew the buttons onto the left band

DOUBLE NECK:
Start from mid-front and from the right side. Using short circular needle size 4 MM = US 6, knit up 75-93 stitches around the neck, including the stitches on the threads in front (the number of stitches should be divisible by 2 + 1). Work rib as follows from the wrong side: 5 band stitches in garter stitch, work rib (purl 1, knit 1) until there are 6 stitches left, purl 1 and 5 band stitches in garter stitch. Continue this rib for 8 cm = 3⅛". Bind off with knit over knit and purl over purl. Fold the neck double to the inside and sew down. Sew the openings at each end. To avoid the neck being tight and rolling outwards, it is important that the seam is elastic.

Diagram

All measurements in charts are in cm.

diagram measurements

Each of our patterns has specific tutorial videos to help you.

Do you have a question? See a list of frequently asked questions (FAQ)

Knitting tension is what determines the final measurements of your work, and is usually measured per 10 x 10 cm. It is provided like so: number of stitches in width x number of rows in height - eg: 19 stitches x 26 rows = 10 x 10 cm.

The knitting tension is very individual; some people knit/crochet loosely while others work tightly. You adjust the knitting tension with the needle size, which is why the suggested needle size only serve as a guide! You need to adjust this (up or down) to ensure that YOUR knitting tension matches the knitting tension provided in the pattern. If you work with a different knitting tension than provided you will have a different yarn consumption, and your work will have different measurements than what the pattern suggests.

The knitting tension also determines which yarns can replace each other. As long as you achieve the same knitting tension you can replace one yarn with another.

See DROPS lesson: How to measure your tension/gauge

See DROPS video: How to make a gauge tension swatch

The required amount of yarn is provided in grams, eg: 450 g. To calculate how many balls you’ll need you first need to know how many grams are in 1 ball (25g, 50g or 100g). This information is available if you click on the individual yarn quality on our pages. Divide the amount required with the amount of each ball. For example, if each ball is 50g (the most common amount), the calculation will be as follows: 450 / 50 = 9 balls.

The important thing when changing from one yarn to another is that the knitting/crochet tension remains the same. This is so that the measurements of the finished piece will be the same as on the sketch provided. It is easier to achieve the same knitting tension using yarns from the same yarn group. It is also possible to work with multiple strands of a thinner yarn to achieve the knitting tension of a thicker one. Please try our yarn converter. We recommend you to always work a test swatch.

Please NOTE: when changing yarn the garment might have a different look and feel to the garment in the photo, due to individual properties and qualities of each yarn.

See DROPS lesson: Can I use a different yarn than the one mentioned in the pattern?

All our yarns are categorised into yarn groups (from A to F) according to thickness and knitting tension – group A contains the thinnest yarns and group F the thickest. This makes it easier for you to find alternative yarns to our patterns, should you wish to switch yarn. All yarns within the same group have a similar knitting tension and can easily replace each other. However, different yarn qualities have different structures and properties which will give the finished work a unique look and feel.

Click here for an overview of the yarns in each yarn group

At the top of all our patterns you’ll find a link to our yarn converter, which is a helpful tool should you wish to use a different yarn than suggested. By filling in the yarn quality you wish to replace, the amount (in your size) and number of strands, the converter will present good alternative yarns with the same knitting tension. Additionally it will tell you how much you’ll require in the new qualities and whether you’ll need to work with multiple strands. Most skeins are 50g (some are 25g or 100g).

If the pattern is worked with multiple colours, every colour will have to be converted separately. Similarly, if the pattern is worked with several strands of different yarns (for example 1 strand Alpaca and 1 strand Kid-Silk) you will have to find alternatives for each, individually.

Click here to see our yarn converter

Since different yarns have different qualities and textures we have chosen to keep the original yarn in our patterns. However, you can easily find options among our available qualities by using our yarn converter, or simply pick a yarn from the same yarn group.

It is possible that some retailers still have discontinued yarns in stock, or that someone has a few skeins at home that they would like to find patterns for.

The yarn converter will provide both alternative yarn as well as required amount in the new quality.

If you think it's hard to decide what size to make, it can be a good idea to measure a garment you own already and like the size of. Then you can pick the size by comparing those measures with the ones available in the pattern's size chart.

You'll find the size chart at the bottom of the pattern.

See DROPS lesson: How to read size chart

The needle size provided in the pattern serves only as a guide, the important thing is to follow the knitting tension. And since knitting tension is very individual, you will have to adjust the needle size to ensure that YOUR tension is the same as in the pattern – maybe you’ll have to adjust 1, or even 2 needle sizes, up or down to achieve the correct tension. For this, we recommend that you work test swatches.

Should you work with a different knitting tension than the one provided, the measurements of the finished garment might deviate from the measurement sketch.

See DROPS lesson: How to measure your tension/gauge

See DROPS video: How to make a gauge tension swatch

Working a garment top-down provides more flexibility and room for personal adjustment. For example it is easier to try the garment on while working, as well as making adjustments to length of yoke and shoulder caps.

The instructions are carefully explaining every step, in the correct order. Diagrams are adjusted to the knitting direction and are worked as usual.

The diagram depicts all rows/rounds, and every stitch seen from the right side. It is read from bottom to top, from right to left. 1 square = 1 stitch.

When working back and forth, every other row is worked from the right side and every other row is worked from the wrong side. When working from the wrong side, the diagram will have to be worked reversed: from left to right, knit stitches are purled, purl stitches are knit etc.

When working in the round every round is worked from the right side and the diagram are worked from right to left on all rounds.

See DROPS lesson: How to read knitting diagrams

The diagram depicts all rows/rounds, and every stitch seen from the right side. It is worked from bottom to top, from right to left.

When working back and forth every other row is worked from the right side: from right to left and every other row is worked from the wrong side: from left to right.

When working in the round, every row in the diagram are worked from the right side, from right to left.

When working a circular diagram you start in the middle and work your way outwards, counter clockwise, row by row.

The rows usually start with a given number of chain stitches (equivalent to the height of the following stitch), this will either be depicted in the diagram or explained in the pattern.

See DROPS lesson: How to read crochet diagrams

Instructions for working several diagrams after each other on the same row/round, will often be written like so: “work A.1, A.2, A.3 a total of 0-0-2-3-4 times". This means you work A.1 once, then A.2 is worked once, and A.3 is repeated (in width) the number of times provided for your size – in this case like so: S = 0 times, M = 0 times, L=2 times, XL= 3 times and XXL = 4 times.

The diagrams are worked as usual: begin with the first row in A.1, then work the first row in A.2 etc.

See DROPS lesson: How to read knitting diagrams

See DROPS lesson: How to read crochet diagrams

The total width of the garment (from wrist-to-wrist) will be larger in the larger sizes, despite the actual sleeves being shorter. The larger sizes have longer sleeve caps and wider shoulders, so there will be a good fit in all sizes.

The measurement sketch/schematic drawing provides information regarding the full length of the garment. If it’s a jumper or a jacket the length is measured from the highest point on the shoulder (usually closest to the neckline), and straight down to the bottom of the garment. It is NOT measured from the tip of shoulder. Similarly, the length of yoke is measured from the highest point on the shoulder and down to where yoke is split into body and sleeves.

See DROPS lesson: How to read a schematic drawing

Diagrams are often repeated on the round or in height. 1 repeat is the diagram the way it appears in the pattern. If it says to work 5 repeats of A.1 in the round, then you work A.1 a total of 5 times after/next to each other in the round. If it says to work 2 repeats of A.1 vertically/in height you work the entire diagram once, then begin again at the start and work the entire diagram one more time.

Chain stitches are slightly narrower than other stitches and to avoid working the cast-on edge too tight, we simply chain more stitches to begin with. The stitch count will be adjusted on the following row to fit the pattern and measurement sketch.

The rib edge is more elastic and will contract slightly compared to, for example, stocking stitch. By increasing before the rib edge, you avoid a visible difference in width between the rib edge and the rest of the body.

It’s very easy to cast off too tightly, and by making yarn overs while casting off (and simultaneously casting these off) you avoid a too tight cast off edge.

See DROPS video: How to bind off with yarn overs (yo)

To achieve an even increase (or decrease) you can increase on, for example: every 3rd and 4th row alternately, like so: work 2 rows and increase on the 3rd row, work 3 rows and increase on the 4th. Repeat this until the increase is complete.

See DROPS lesson: Increase or decrease 1 st on every 3rd and 4th row alternately

Should you prefer to work in the round instead of back and forth, you may of course adjust the pattern. You’ll need to add steeks mid-front (usually 5 stitches), and follow the instructions. When you would normally turn and work from the wrong side, simply work across the steek and continue in the round. At the end you’ll cut the piece open, pick up stitches to work bands, and cover the cut edges.

See DROPS video: How to knit steeks and cut open

Should you prefer to work back and forth instead of in the round, you may of course adjust the pattern so you work the pieces separately and then assemble them at the end. Divide the stitches for the body in 2, add 1 edge stitch in each side (for sewing) and work the front and back pieces separately.

See DROPS lesson: Can I adapt a pattern for circular needles into straight needles?

Pattern repeats can vary slightly in the different sizes, in order to get the correct proportions. If you’re not working the exact same size as the garment in the photo, yours might deviate slightly. This has been carefully developed and adjusted so that the complete impression of the garment is the same in all sizes.

Make sure to follow instructions and diagrams for your size!

If you have found a pattern you like which is available in women’s size it’s not very difficult to convert it to men’s size. The biggest difference will be the length of sleeves and body. Start working on the women size that you think would fit across the chest. The additional length will be worked right before you cast off for the armhole/sleeve cap. If the pattern is worked top-down you can add the length right after the armhole or before the first decrease on sleeve.

Regarding additional yarn amount, this will depend on how much length you add, but it is better with a skein too many than too few.

All yarns will have excess fibres (from production) that might come off as lint or shedding. Brushed yarns (ie hairier yarns) have more of these loose, excess fibres, causing more shedding.

Shedding also depends on what is worn under or over the garment, and whether this pulls at the yarn fibres. It’s therefore not possible to guarantee that there will be no shedding

Below are some tips on how to get the best result when working with hairier yarns:

1. When the garment is finished (before you wash it) shake it vigorously so the looser hairs come off. NOTE: do NOT use a lint roller, brush or any method that pulls at the yarn.

2. Place the garment in a plastic bag and put it in your freezer - the temperature will cause the fibres to become less attached to each other, and excess fibres will come off easier.

3. Leave in the freezer for a few hours before taking it out and shaking it again.

4. Wash the garment according to the instructions on the yarn label.

Pilling is a natural process that happens to even the most exclusive of fibers. It's a natural sign of wear and tear that is hard to avoid, and that is most visible in high friction areas of your garment like a sweater's arms and cuffs.

You can make your garment look as new by removing the pilling, using a fabric comb or a pill/lint remover.

Still can't find the answer you need? Then scroll down and leave your question so one of our experts can try to help you. This will be done normally within 5 to 10 working days.
In the meantime, you can read the questions and answers that others have left to this pattern or join the DROPS Workshop on Facebook to get help from fellow knitters/crocheters!

You might also like...

Post a comment to pattern DROPS 226-27

We would love to hear what you have to say about this pattern!

If you want to leave a question, please make sure you select the correct category in the form below, to speed up the answering process. Required fields are marked *.

Comments / Questions (18)

country flag Helen wrote:

Back: 68-76-82-90-102-112 stitches. Continue with stocking , AT THE SAME TIME cast off for the armholes at the beginning of each row: 2 stitches 1-1-1-2-3-4 times and 1 stitch 0-2-3-4-6-7 times on both sides = 64-68-72-74-78-82 stitches. I find this confusing: beginning of each row 2 stitches 3 times? 1 stitch 6 times (at beginning of each row or at both ends of row?)

13.01.2024 - 20:02

DROPS Design answered:

Dear Helen, for size XXL you will cast off 2 stitches at the beginning of the next 3 rows on both sides (from the right side and wrong side, so 6 rows in total). Then, you will cast off 1 stitch at the beginning of the next 6 rows, also on both sides (so 12 rows in total). So you will have cast off from 102 stitches to 78 stitches: 24 stitches. Happy knitting!

14.01.2024 - 23:12

country flag Hanna wrote:

Robię sweter Serene Forest Cardigan nr wzoru 226-27 rozm.M. Terzaz powinnam przerabiać sam tył i zamykać oczka pod pachy. Mam 76moczek i teraz jest wzór wg którego mam zamykać oczka. Ma zostać 68 o na koniec. W ogóle wyliczenia nie zgadzają się. Nie wiem ile mam zamknąć tych oczek? Hanna J.

12.12.2023 - 10:23

DROPS Design answered:

Witam, w rozmiarze M zamykasz 1 raz 2 oczka z każdej strony (4 zamknięte oczka) i 2 razy po 1 oczku z każdej strony (4 zamknięte oczka). W sumie jest zamkniętych 8 oczek. 76-8=68. Pozdrawiamy!

12.12.2023 - 11:43

country flag Sol wrote:

Hi, so I don't cast off on ""each row" for left front piece, but just on the beg of a row only on WS? Thanks! DROPS Design answered: "When casting off for neck, work the stitches from wrong side then slip them on a thread, then cast off the stitches for neck at the beginning of a row from wrong side. Happy knitting!"

22.08.2023 - 11:30

DROPS Design answered:

Dear Sol, you will cast off at the beginning of a row from armhole for armhole (from RS on left front piece/from RS on right front piece) and at the beg of a row from band stitches/mid front (from WS on left front piece, from RS on right front piece). You cast off for armhole on each side only for back piece. Happy knitting!

22.08.2023 - 14:13

country flag Sol wrote:

I've started with the left front piece and now on a purl row. Do I bind off 2 sts at the end of the row, turn, BO 1 st (knit row), turn then BO 1 stitch again at the end of the purl row? "...place the outermost 14-15-16-17-18-19 stitches towards mid-front on a thread for the neck. Then bind off stitches on each row from the neck: Bind off 2 stitches 1 time and 1 stitch 2 times = 19-20-21-21-22-23 stitches left on shoulder. "

21.08.2023 - 21:58

DROPS Design answered:

Dear Sol, the stitches for armhole will be cast off at the beginning of a row from armhole, this means for left front piece, cast off the stitches for armhole at the beginning of a row from the right side. When casting off for neck, work the stitches from wrong side then slip them on a thread, then cast off the stitches for neck at the beginning of a row from wrong side. Happy knitting!

22.08.2023 - 09:33

country flag Brigitte JEAN-BAPTISTE wrote:

Bonjour, Concernant les explications du col doublé, que signifie « relever 75-93 mailles »? On doit relever 75 ou 93 mailles ? Merci pour votre réponse. Bien cordialement

09.02.2023 - 19:13

DROPS Design answered:

Bonjour Mme Jean-Baptiste, vous allez relever, en fonction de votre taille et de votre tension entre 75 et 93 mailles le long de l'encolure (y compris les mailles des devants en attente) - ajustez juste pour que le nombre de mailles soit divisible par 2 +1. Bon tricot!

10.02.2023 - 09:22

country flag Marie wrote:

Bonjour, Concernant l'arrondi des manches, rabattre les 2 mailles se fait après la série de diminution ou bien juste avant la dimunution de 3 mailles avant la fin ? Merci pour votre réponse

24.01.2023 - 22:51

DROPS Design answered:

Bonjour Marie, après avoir rabattu les 6 m sous la manche, vous rabattez de chaque côté: 2 x 3 -4 m (cf taille) et 1, 2 ou 3 x 1 m puis vous rabattez 2 m de chaque côté jusqu'à ce que la manche mesure 50 cm - veillez à bien avoir rabattu autant de fois 2 m sur l'endroit et sur l'envers pour que la tête de manche soit symétrique, puis rabattez 3 m de chaque côté, et les mailles restantes. Bon tricot!

25.01.2023 - 12:01

country flag Sara Kittelsen wrote:

Hei, kan dere sjekke maskeantallet på ermene etter øking. Jeg strikker str.M og får 50 msk. + 2 msk. X 8 økninger til å bli 66 Kanskje feil i min forståelse av oppskriften, men sjekk gjerne. Vh Sara

13.09.2022 - 07:30

DROPS Design answered:

Hej Sara, i M starter du med 50 masker, tager 1 m ud 5 gange i hver side = + 10 = 60 masker :)

15.09.2022 - 15:33

country flag Anne -Grete Andersen Aabo wrote:

Hvordan får man trøjen er til at holde op med at \"smitte\" af på andet tøj. Den \"fnulrer\" og da jeg er så glad for den, at jeg ønsker mig een mere, er jeg nødt til at have et svar på spørgsmålet om dette. Ellers et skønt let og varmt materiale. Bh Anne-Grete

24.08.2022 - 17:08

DROPS Design answered:

Hej Anne-Grete, garn med løse fibre vil altid fnuldre mere eller mindre, jeg har selv flere i Air som fnuldrer meget lidt. Hvis du absolut ikke vil det, så kan du strikke den i DROPS Big Merino, eller DROPS Nepal eller DROPS Alaska som kan strikkes på samme strikkefasthed. God fornøjelse!

25.08.2022 - 15:41

country flag Cheryl wrote:

Hei. Strikkes denne jakken med 1 eller 2 tråd? Jeg ville strikke denne i drops brushed alpaca silk som er på samme garngruppe som drops air.

28.06.2022 - 22:24

DROPS Design answered:

Hej Cheryl, jakken strikkes i en tråd og du kan fint bruge DROPS Brushed Alpaca Silk. Strikkefastheden skal være 17 masker på 10 cm (ca pind 5) God fornøjelse!

29.06.2022 - 10:02

country flag Carin wrote:

Hej! Kan jag sticka den i Merino extra fine? Går det att sticka runt och klippa upp i det garnet?

06.05.2022 - 21:08

DROPS Design answered:

Hei Carin. Jakken "Serene Forest Cardigan" er strikket i DROPS Air, som er et tykkere garn enn DROPS Merino Extra Fine, så oppskriften vil ikke stemme med et tynnere garn. Har du sjekket DROPS Big Merino? DROPS Merino Extra Fine er superwash behandlet og fibrene vil nok ikke tove seg sammen så godt ved oppklipp enn et garn som ikke er superwash behandlet. Ville ikke ha klippet opp i dette garnet, ville ha vært redd at garnet skal skli fra hverandre og rakne. mvh DROPS Design

09.05.2022 - 08:42