
Popular categories
Looking for a yarn?


|
|||||||||||||
DROPS 83-6 |
|||||||||||||
|
|
|||||||||||||
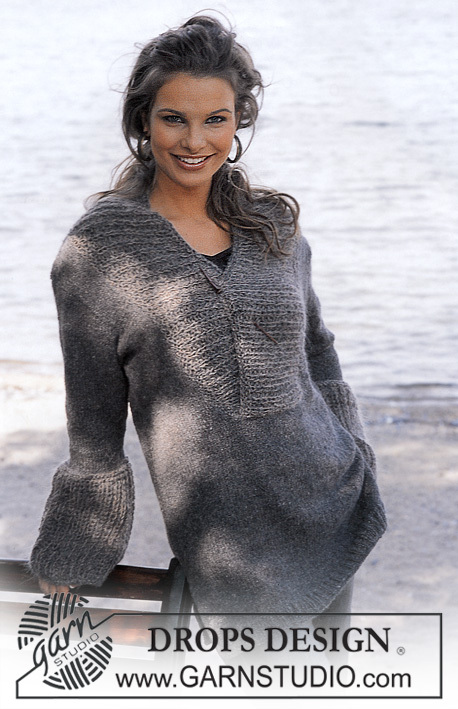
Knitted DROPS jacket with zip in "Snow"
DROPS 83-6 |
|||||||||||||
|
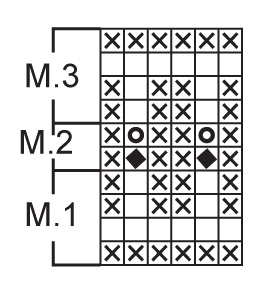
Knitting tension: Remember needle size is only a guide! 10 stitches x 14 rows with needle size 9 mm and stocking stitch = 10 x 10 cm. Rib: * K1, P2 *, repeat from *-*. Ridge/Garter stitch (back and forth on needle): 1 ridge = Knit 2 rows. Pattern: See diagrams M.1, M.2 and M.3. Pattern in diagram is seen from the right side. Lobster stitch: Work double crochets from the right side in the opposite direction, i.e. from left to right. --------------------------------------------------------- Back piece: Cast on 44-47-50-53-56 stitches (incl. 1 edge stitch in each side) with needle size 8 mm and Snow and work rib as follows (row 1 = right side): 1 edge stitch, P1, * K1, P2 * finish with K1, P1 and 1 edge stitch. When rib measures 4 cm change to needle size 9 mm and continue with stocking stitch. Remember the knitting tension! When piece measures 13 cm increase 1 stitch in each side every 12-13-7-5-5 cm a total of 2-2-3-4-4 times = 48-51-56-61-64 stitches. When piece measures 31-32-33-34-36 cm decrease for armholes in each side every 2nd row: 3 stitches 1 time, 2 stitches 0-0-1-2-2 times and 1 stitch 2-3-3-3-4 times = 38-39-40-41-42 stitches. When piece measures 50-52-54-56-58 cm, cast off the middle 16-15-16-15-16 stitches for neck. Then decrease 1 stitch on next row towards neck = 10-11-11-12-12 stitches left on each shoulder. Cast off when piece measures 52-54-56-58-60 cm. Left front piece: Cast on 12-15-15-18-18 stitches (incl. 1 edge stitch in each side) with needle size 8 mm and Snow. Work rib from the side as follows (row 1 = right side): 1 edge stitch, P1, * K1, P2 * repeat from *-*, finish with 1 edge stitch. When rib measures 4 cm change to needle size 9 mm and continue with stocking stitch at the same time as the number of stitches is adjusted to 12-14-15-17-18. When piece measures 10 cm increase 1 stitch in the side every 11-12-7-5-5 cm a total of 2-2-3-4-4 times = 14-16-18-21-22 stitches. When piece measures 32-33-34-35-36 cm decrease for armhole in side as for back piece = 9-10-10-11-11 stitches left on needle. Cast off when piece measures 52-54-56-58-60 cm. Read the whole of the next section before continuing! Band: Knit up 53-62 stitches (divisible by 3+2) inside the 1 edge stitch along the whole of the front piece with needle size 9 mm and Snow. Pattern: Then work M.1 (row 1 = wrong side) 1 time, the outermost stitch towards bottom edge is worked in garter stitch. Continue with M.2 until band measures approx. 9 cm, then work M.3 one time before casting off. The band now measures approx. 11 cm. Neckline: At the same time, when the band measures 1 cm (i.e. the shoulder measures 10-11-11-12-12 cm) cast off 4 stitches from the shoulder for neck, then decrease every 2nd row towards neck: 2 stitches 1 time and 1 stitch 2 times. The neck should now be approx. 8 cm in height. Right front piece: Cast on as for left and work rib from mid front as follows: 1 edge stitch, P2, * K1, P2 * repeat from *-*, finish with K1, P1 and 1 edge stitch. When piece measures 4 cm, continue as for left front piece, but decrease for armhole in opposite side. Work band as for left front piece. Sleeve: Cast on 26-26-29-29-32 stitches (incl. 1 edge stitch in each side) with needle size 9 mm and 2 strands Snow, remove the one strand. Work M.1 (row 1 = wrong side) with 1 edge stitch in each side, continue with M.2 until piece measures 13 cm, then work M.3, piece now measures approx. 16 cm. Continue with stocking stitch at the same time as you increase 1 stitch in each side every 6-4.5-4.5-3.5-3.5 cm a total of 6-7-7-8-8 times = 38-40-43-45-48 stitches. When sleeve measures 48-47-46-45-44 cm decrease for sleeve cap in each side every 2nd row: 3 stitches 1 time, 2 stitches 1 time and 1 stitch 2-2-3-5-6 times, then decrease 2 stitches in each side until piece measures 54-54-54-55-55 cm, finally decrease 3 stitches 1 time in each side. Piece measures 56-56-56-57-57 cm, cast off the remaining stitches. Assembly: Sew shoulder seams. Neck: Knit up approx. 48-54 stitches around the neck (over the bands as well) with needle size 9 mm and Snow and knit 1 row from the wrong side, cast off. Then crochet an edge of lobster stitch with 1 lobster stitch in each stitch and crochet hook size 7 mm. Sew in sleeves. Sew sleeve and side seams in one go inside the 1 edge stitch. Sew in zip. |
|||||||||||||
Diagram explanations |
|||||||||||||
|
|||||||||||||
|
|||||||||||||

|
|||||||||||||
|
Have you made this or any other of our designs? Tag your pictures in social media with #dropsdesign so we can see them! Do you need help with this pattern?You'll find tutorial videos, a Comments/Questions area and more by visiting the pattern on garnstudio.com. © 1982-2024 DROPS Design A/S. We reserve all rights. This document, including all its sub-sections, has copyrights. Read more about what you can do with our patterns at the bottom of each pattern on our site. |
|||||||||||||


With over 40 years in knitting and crochet design, DROPS Design offers one of the most extensive collections of free patterns on the internet - translated to 17 languages. As of today we count 304 catalogues and 11422 patterns - 11422 of which are translated into English (UK/cm).
We work hard to bring you the best knitting and crochet have to offer, inspiration and advice as well as great quality yarns at incredible prices! Would you like to use our patterns for other than personal use? You can read what you are allowed to do in the Copyright text at the bottom of all our patterns. Happy crafting!
Comments / Questions (8)
Existiert eine Anleitung fūr diese Jacke, die ich gerne mit Snow GEFILZT herstellen möchte? Durch den Filzvorgang kann ich vorstehende Anleitung nicht verwenden (Schrumpfungsprozess). Auf Ihre Rückantwort freue ich mich.
13.01.2022 - 18:14DROPS Design answered:
Liebe Frau Cords, leider haben wir bis jetzt nur Anleitungen für gefiltze Accessoires und keine für gefiltze Jacken. Ihr DROPS Laden kann vielleicht Ihnen damit weiterhelfen?
14.01.2022 - 08:44I have 700g of double knitting wool Drops Karisma. I like the Drops pattern 83-6. Would it be possible to knit with Drops Karisma? If not is there another similar Drops pattern for double knitting wool such as Drops Karisma. Thank you.
29.10.2021 - 16:47DROPS Design answered:
Dear Mary, please understand that we cannot modify aour patterns to each individual request. Having said that, Snow yarn is double the thickness of the Karisma, and depending on the size it should be just about enough for the smaller sizes, but it depends on a lot of things,e specially the gauge you are knitting with. So I would suggest that you knit a swatch, wash and dry it and do the necessary calculations. Hapy Knitting!
30.10.2021 - 03:21Diagrammet innehåller 3 rutor med ?. Endast x= am från rätsidan, rm från avigsidan! Vad skall det vara för markering i de tre övriga rutorna? =rm från rätsidan............ = 1 omslag+ lyft........... = från rätsidan........
08.02.2018 - 23:03DROPS Design answered:
Hei Maria. Mulig det er noe feil med din nettleser, alt ser ok her hos oss. Evnt. at det ikke har lastet med alle ikonene (tregt nett). Forklaringen på ikonene er iallefall: Blank rute = rm från rätsidan, am från avigsidan. Rute med kryss = am från rätsidan, rm från avigsidan. Rute med en sort skråstilt firkant = 1 omslag + lyft 1 m som om den stickas rät. Rute med en sirkle = från rätsidan: sticka omslaget och den lyfta m räta tills. God Fornøyelse!
09.02.2018 - 08:36Thanks so much. It is a very pretty pattern.
13.10.2017 - 16:28Hello - I am starting this pattern, but when I read through the directions for the fronts I do not see where within the pattern does it tell me when to start the design from the chart. Only on the sleeves. Can you help, please?
07.10.2017 - 23:24DROPS Design answered:
Dear Karen, when you knit the twofronts you first knit the main part (without pattern), then pick up stitches for the wide buttonband, and only knit that with the pattern. I hope this helps. Happy knitting!
08.10.2017 - 22:17Bonjour je suis en train de réaliser une manche. Novice, Je trouve les diminutions un peu bizarres et ne suit pas certaine de bien les lire. pour la taille M : - de chaque côté, tous les 2 rangs : 1 fois 3 m, 1 fois 2 m et 2 fois 1 m, il reste 40-14 = 26 m - de chaque côté, 1 fois 2 m jusqu’à 54 cm de hauteur totale, il reste 26-4 = 22 m - de chaque côté, 1 fois 3 m il reste 22-6 = 16 m Ma lecture est-elle correcte ? D'avance merci de votre réponse.
12.11.2016 - 19:12DROPS Design answered:
Bonjour Mme Enguehard, votre nombre de mailles à la fin de la manche va dépendre de votre nbe de rangs pour obtenir 54 cm (= le nbe de fois où vous devrez rabattre 2 m de chaque côté pour atteindre cette hauteur), s'il vous en faut 2, alors votre compte sera juste. Bon tricot!
14.11.2016 - 09:36Bonjour existe-t-il une page avec des mesures correspondant aux tailles des modèles (j'hésite entre M et L pour un gilet) ? je n'ai pas trouvé comment savoir le nombre de pelotes à commander. Merci Chantal
16.10.2016 - 17:29DROPS Design answered:
Bonjour Mme Enguehard, vous trouverez à la fin des explications un schéma avec toutes les mesures pour chaque taille, comparez-les à un gilet similaire dont vous aimez la forme pour trouver votre taille. Plus d'infos ici. Bon tricot!
17.10.2016 - 10:02Fantastisk flott jakke! Jeg har fått mange komplimenter for denne!
28.10.2014 - 12:27