
Popular categories
Looking for a yarn?


|
|||||||
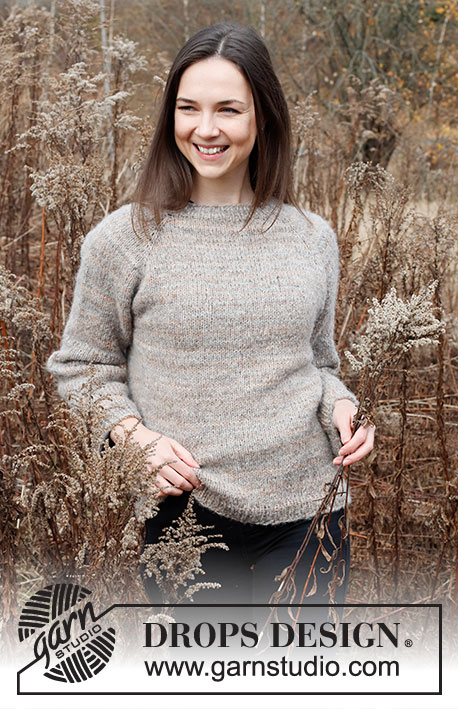
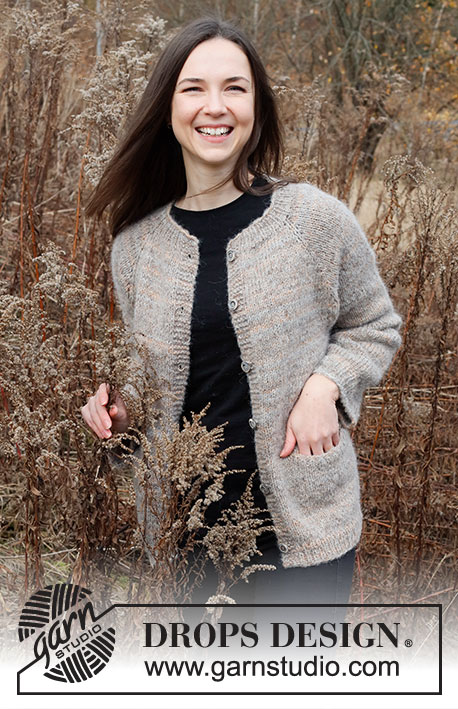
Ash Valley Jacket |
|||||||
 |
 |
||||||
Knitted jacket in DROPS Fabel and DROPS Brushed Alpaca Silk. Piece is knitted top down with raglan and pockets. Size: S - XXXL
DROPS 226-18 |
|||||||
|
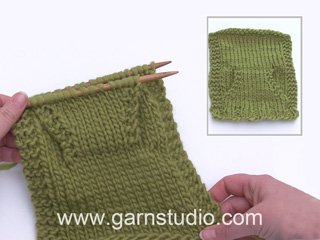
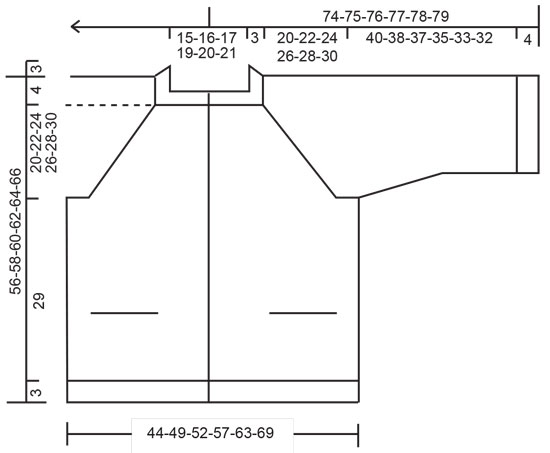
---------------------------------------------------------- EXPLANATION FOR THE PATTERN: ---------------------------------------------------------- GARTER STITCH (back and forth): Knit all rows. 1 ridge vertically = knit 2 rows. PATTERN: See diagram A.1. Diagrams show all rows in pattern seen from the right side. INCREASE TIP (evenly): To calculate how to increase evenly, use the total number of stitches on row (e.g. 79 stitches), minus bands (e.g. 10 stitches), and divide the remaining stitches by number of increases to be done (e.g. 3) = 23. In this example increase by making 1 yarn over after approx. every 23rd stitch and do not increase over bands. On next row work yarn overs twisted to avoid holes. RAGLAN: All increases are done from the right side. Increase 1 stitch on each side of stitch with marker in every transition between front/back piece and sleeves (= 8 stitches increased on row). Increase 1 stitch by making 1 yarn over. On next row purl yarn overs twisted to avoid holes. Then work the new stitches in stocking stitch. DECREASE TIP (applies to mid under sleeves): Decrease 1 stitch on each side of marker thread as follows: Work until 3 stitches remain before marker thread and knit 2 together, knit 2 (marker thread is between these 2 stitches), slip 1 stitch knitwise, knit 1, pass slipped stitch over stitch worked. BUTTONHOLES: Decrease for buttonholes on right band (when garment is worn). Decrease from right side when 3 stitches remain on row as follows: Make 1 yarn over, knit the next 2 stitches together, knit last stitch. On next row (wrong side) knit the yarn over to make a hole. Decrease first buttonhole when rib in neck measures approx. 3 cm. Then decrease the next 5-5-6-6-6-6 buttonholes, approx. 9½-10-8½-9-9-9½ cm apart. CAST-OFF TIP: To avoid a tight cast-off edge when casting off, you may use a larger needle. If this still is too tight make 1 yarn over after approx. every 4th stitch while casting off (cast off yarn overs as stitches). ---------------------------------------------------------- START THE PIECE HERE: ---------------------------------------------------------- JACKET - SHORT OVERVIEW OF THE PIECE: Work neck edge and yoke back and forth on circular needle from mid front, work top down. Now divide yoke for body and sleeves. Work body back and forth on circular needle, top down. Work sleeves in the round on double pointed needles/short circular needle, top down. NECK EDGE: Cast on 79-83-85-91-93-97 stitches on circular needle size 4 mm with 1 strand of each quality (= 2 strands). Purl 1 row (= wrong side). Then work rib as follows: 5 band stitches in GARTER STITCH - read explanation above - * knit 1, purl 1 *, work from *-* until 6 stitches remain, knit 1 and 5 band stitches in garter stitch. Continue back and forth like this until rib measures 3 cm. Decrease for BUTTONHOLES on right band - read explanation above. Purl 1 row from wrong side (knit band stitches) while increasing 3-3-5-7-13-21 stitches evenly - read INCREASE TIP = 82-86-90-98-106-118 stitches. Insert a marker after band at the beginning of row. NOW MEASURE PIECE FROM HERE! YOKE: Switch to circular needle size 5.5 mm. Now insert 4 markers in the piece without working the as follows: Skip the first 17-18-19-21-23-26 stitches, insert a marker in next stitch, skip the next 10 stitches, insert a marker in next stitch, skip the next 24-26-28-32-36-42 stitches, insert a marker in next stitch, skip the next 10 stitches, insert a marker in next stitch, 17-18-19-21-23-26 stitches remain after last stitch with marker. Now work in stocking stitch with 5 band stitches in garter stitch in each side towards mid front, AT THE SAME TIME on first row from right side begin increase for RAGLAN – read explanation above. Increase like this every other row 17-19-20-22-24-26 times in total = 218-238-250-274-298-326 stitches. Work until piece measures 20-22-24-26-28-30 cm from marker. Now divide piece for body and sleeves as follows: Work the first 34-37-39-43-47-52 stitches (= front piece), slip the next 46-50-52-56-60-64 stitches on a stitch holder for sleeve, cast on 8-10-10-10-10-10 new stitches on needle (= in the side under sleeve), work the next 58-64-68-76-84-94 stitches (= back piece), slip the next 46-50-52-56-60-64 stitches on a stitch holder for sleeve, cast on 8-10-10-10-10-10 new stitches on needle (= in the side under sleeve), work the last 34-37-39-43-47-52 stitches (= front piece). Now finish body and sleeves separately. NOW MEASURE PIECE FROM HERE. BODY: = 142-158-166-182-198-218 stitches. Continue back and forth in stocking stitch with 5 band stitches in garter stitch in each side. When piece measures 15 cm in all sizes – adjust so that next row is worked from right side, work next row as follows: Work the first 12-14-15-17-19-21 stitches as before, slip the next 21 stitches on a stitch holder for pocket, cast on 21 new stitches on needle, work the next 76-88-94-106-118-134 stitches, slip the next 21 stitches on a stitch holder for pocket, cast on 21 new stitches on needle and work the remaining 12-14-15-17-19-21 stitches as before = 142-158-166-182-198-218 stitches on needle. Now work back and forth as before but over the 21 new stitches cast on for pocket, work pattern A.1. When A.1 has been worked vertically, work in stocking stitch over all stitches with band stitches in each side as before. When piece measures 29 cm, increase 15-15-17-19-19-21 stitches evenly (but not over the 5 band stitches in each side) = 157-173-183-201-217-239 stitches. Switch to circular needle size 4 mm. Now work rib as follows (from right side): 5 band stitches in garter stitch. * Knit 1, purl 1 *, work from *-* until 6 stitches remain, knit 1, 5 band stitches in garter stitch. When rib measures 3 cm, cast off with knit over knit and purl over purl - read CAST-OFF TIP. Jacket measures approx. 56-58-60-62-64-66 cm from shoulder and down. POCKETS (the other half of pockets): Slip the 21 stitches from one of the stitch holders back on needle size 5.5 mm and work in stocking stitch back and forth until pocket measures 10 cm. Cast off - make sure that the cast-off edge is not too tight. Fasten pocket to inside of jacket with invisible stitches. Work the other pocket the same way. SLEEVES: Slip the 46-50-52-56-60-64 stitches from stitch holder in one side on a short circular needle/double pointed needles size 5.5 mm. Pick in addition up 1 stitch in each of the 8-10-10-10-10-10 stitches cast on under sleeve = 54-60-62-66-70-74 stitches. Insert a marker thread in the middle of the 8-10-10-10-10-10 stitches that were cast on under sleeves. Move markers upwards when working. Decrease on each side of marker thread. When sleeve measures 2 cm from division, decrease 1 stitch on each side of marker thread - read DECREASE TIP. Decrease like this approx. every 5-3-3-2-1½-1½ cm 3-5-5-7-8-9 times in total = 48-50-52-52-54-56 stitches. Continue until sleeve measures 40-38-37-35-33-32 cm from division (shorter measurements in the larger sizes because of wider neck and longer yoke). Knit 1 round while increasing 4-4-4-4-4-6 stitches evenly = 52-54-56-56-58-62 stitches. Switch to double pointed needles size 4 mm. Work rib (knit 1/purl 1) in the round for 4 cm. Cast off with knit over knit and purl over purl - remember CAST-OFF TIP. Sleeve measures 44-42-41-39-37-36 cm in total from division. Work the other sleeve the same way. ASSEMBLY: Sew the buttons on to left band. |
|||||||
Diagram explanations |
|||||||
|
|||||||

|
|||||||
|
|||||||
|
Have you made this or any other of our designs? Tag your pictures in social media with #dropsdesign so we can see them! Do you need help with this pattern?You'll find tutorial videos, a Comments/Questions area and more by visiting the pattern on garnstudio.com. © 1982-2024 DROPS Design A/S. We reserve all rights. This document, including all its sub-sections, has copyrights. Read more about what you can do with our patterns at the bottom of each pattern on our site. |
|||||||


With over 40 years in knitting and crochet design, DROPS Design offers one of the most extensive collections of free patterns on the internet - translated to 17 languages. As of today we count 304 catalogues and 11422 patterns - 11422 of which are translated into English (UK/cm).
We work hard to bring you the best knitting and crochet have to offer, inspiration and advice as well as great quality yarns at incredible prices! Would you like to use our patterns for other than personal use? You can read what you are allowed to do in the Copyright text at the bottom of all our patterns. Happy crafting!
Comments / Questions (13)
Is het de bedoeling dat voor de raglan bij iedere rechtse naald gemeerderd wordt of 1 rechtse naald wel 1 rechtse naald niet?
25.09.2023 - 11:55DROPS Design answered:
Dag Sonja,
Alle raglanmeerderingen worden aan de goede kant gemaakt, dat is inderdaad waar je recht breit en dus niet op de verkeerde kant, waar je averecht breit. Je meerdert dus om de naald voor de raglan (aan de goede kant wel en aan de verkeerde kant niet).
27.09.2023 - 20:30Nybörjarfråga: Ska man räkna med maskorna som sitter på stickan när man mäter? T.ex. vid minskning under ärmarna så spelar det ju verkligen roll. Eller ska man mäta det som redan är färdigstickat under stickan?
08.06.2023 - 11:53DROPS Design answered:
Hej Emelie, räkna med maskorna som sitter på stickan :)
09.06.2023 - 09:38Als je voor dit model een ronding op de achterkant voor de hals wilt breien over hoeveel steken zou je dit dan moeten doen?
16.09.2022 - 09:45DROPS Design answered:
Dag Ria,
Hiervoor zou je even kunnen kijken bij een vest met een vergelijkbaar patroon in dezelfde garendikte. Meestal wordt wel over de hele breedte, van raglanlijn tot raglanlijn een verhoging gebreid.
19.09.2022 - 21:27J\'adore vos modèles Drops.... mais pouvez vous donner les explications avec des aiguilles droites ??? beaucoup d\'entre nous ne savent pas tricoter avec des aiguilles circulaires, hélas... merci pour tout -
08.09.2022 - 16:30DROPS Design answered:
Bonjour Mme Roman et merci. Nous ne sommes malheureusement pas en mesure de pouvoir adapter chacun de nos modèles à chaque demande, toutefois, cette leçon devrait pouvoir vous aider; n'hésitez pas à essayer les aiguilles circulaires, c'est parfois bien plus simple et nombreuses sont celles qui les ont domptées après avoir osé essayer. Bon tricot!
09.09.2022 - 09:18How do I access sound on the videos?
09.08.2022 - 13:20DROPS Design answered:
Dear Mrs Friend, Our videos do not have sound. We are a worldwide company and our videos are watched by people around the world, speaking different languages, many of whom do not understand English. We have therefore written instructions to accompany this video, and there is no sound to disturb while watching. Enjoy!
09.08.2022 - 14:19Hello ash valley jacket a lovely pattern I want to knit could you tell me if aran weight or dk yarn is acceptable?
09.06.2022 - 11:50DROPS Design answered:
Dear Mrs Friend, this jacket is worked with a tension of 15 sts = 10 cm, which is more related to a bulky yarn; find all jackets worked top down with aran yarns here and the ones worked with a dk yarn here. Add more filters to sort the patterns. Happy knitting!
09.06.2022 - 13:26Buongiorno. Nel primo ferro a rovescio a inizio del lavoro si fanno le 5 maglie a legaccio per i bordi davanti? Grazie
27.02.2022 - 08:41DROPS Design answered:
Buonasera Anita, sul 1° ferro dopo l'avvio deve lavorare tutte le maglie a rovescio. Buon lavoro!
27.02.2022 - 21:16I would love to make the Ash valley Jacket. The instructions indicate 2 different yarns. Are they combined so you're knitting with them simultaneously? Thanks very much for your time! Toni ps- Happy New Year!
03.01.2022 - 04:40DROPS Design answered:
Hi Toni, Yes you work with the 2 yarns simultaneously. Happy knitting and happy new year to you too. From the Drops Team.
03.01.2022 - 07:39Jeg mener at garnforbruget er forkert oplyst, jeg har brugt 4 ngl fabel og 5 ngl. alpakka brushed silk til str. L. Målene overholdt. Venligst Ulla Frantsen
26.12.2021 - 13:42Czy mogę zrobić sweterek dwoma nitkami z grupy A, tj. Fabel i Kid-Silk?
07.12.2021 - 18:49DROPS Design answered:
Witaj Marto, gdy zamieniasz włóczkę, najważniejszą sprawą jest to, aby próbka, którą z niej wykonasz, była taka sama jak ta podana dla oryginalnej włóczki we wzorze. W ten sposób wymiary gotowego produktu będą takie same jak na schematycznym rysunku na dole opisu we wzorze. Najłatwiej otrzymasz taką samą próbkę, zastępując oryginalną włóczkę inną włóczką z tej samej Grupy włóczek. Można również przerabiać kilkoma nitkami cieńszej włóczki, które w sumie będą odpowiadać grubszej włóczce i otrzymamy w obydwu przypadkach taką samą próbkę. Zalecamy, aby zawsze wykonywać próbkę. Pozdrawiamy!
08.12.2021 - 08:20