DROPS Alaska
DROPS Alaska
100% Wool
from 2.15 € /50g
Get the yarn to make this pattern from 21.50€.

The yarn cost is calculated from the pattern’s smallest size and the yarn’s cheapest product type. Looking for an even better price? You might find it on the DROPS Deals!

DROPS SS24

Cambridge Connection

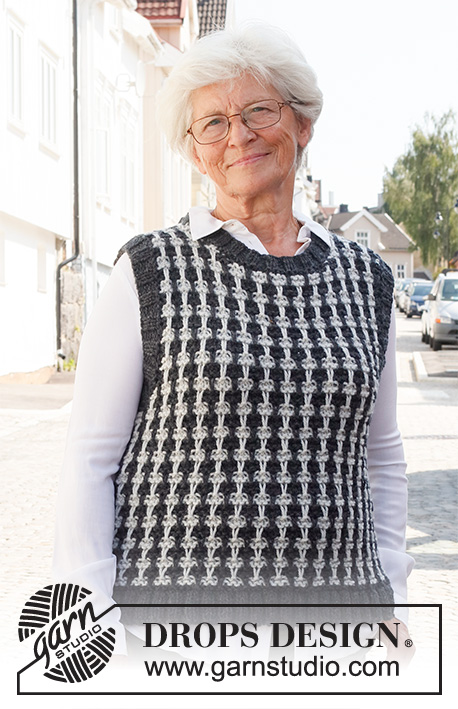
Knitted vest / slipover in DROPS Alaska. Piece is knitted with pepita pattern and edges in rib. Size: S - XXXL

DROPS 228-36
DROPS design: Pattern x-469
Yarn group C or A + A
----------------------------------------------------------

SIZE:
S - M - L - XL - XXL - XXXL

MATERIALS:
DROPS ALASKA from Garnstudio (belongs to yarn group C)
300-350-400-400-450-500 g colour 05, dark grey
200-250-250-300-300-350 g colour 63, pearl grey

NEEDLES:
DROPS SINGLE POINTED NEEDLES SIZE 7 mm
DROPS CIRCULAR NEEDLE SIZE 6 mm : Length 40 and 80 cm.
The technique MAGIC LOOP can be used on the edges – you then only need circular needle of 80 cm in size 6 mm.

KNITTING TENSION:
14 stitches in width and 17 rows vertically in stocking stitch or 27 rows vertically with pepita pattern = 10 x 10 cm.
NOTE! Remember that needle size is only a suggestion. If you have too many stitches on 10 cm switch to larger needles. If you have too few stitches on 10 cm switch to smaller needles.

-------------------------------------------------------

Alternative Yarn – See how to change yarns here
Yarn Groups A to F – Use the same pattern and change the yarn here
Yarn usage using an alternative yarn – Use our yarn converter here

-------------------------------------------------------

DROPS Alaska
DROPS Alaska
100% Wool
from 2.15 € /50g
Get the yarn to make this pattern from 21.50€.

The yarn cost is calculated from the pattern’s smallest size and the yarn’s cheapest product type. Looking for an even better price? You might find it on the DROPS Deals!

Pattern instructions

----------------------------------------------------------

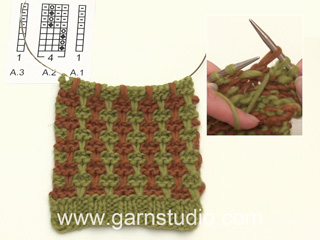
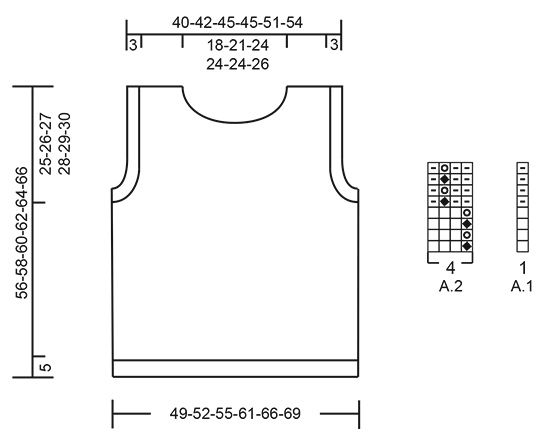
EXPLANATION FOR THE PATTERN:

----------------------------------------------------------

GARTER STITCH (back and forth):
Knit all rows.
1 ridge vertically = knit 2 rows.

PATTERN:
See diagrams A.1 and A.2. Diagrams show all rows in pattern seen from the right side.

DECREASE TIP (evenly):
To calculate how to decrease evenly, use the total number of stitches on row (e.g. 86 stitches), minus edge stitches (2 stitches), and divide the remaining 84 stitches by number of decreases to be done (e.g. 15) = 5.6.
In this example decrease by knitting alternately approx. every 4th and 5th stitch and every 5th and 6th stitch together.

KNITTING TIP:
When decreasing for armholes and neck, continue the pattern as before. If the outermost stitch towards the sides or neck is a stitch to be slipped, replace this stitch with a knit stitch in colour this row is worked with.

CAST-OFF TIP:
To avoid a tight cast-off edge when casting off, you may use a larger needle. If this still is too tight make 1 yarn over after approx. every 4th stitch while casting off (cast off yarn overs as stitches).

----------------------------------------------------------

START THE PIECE HERE:

----------------------------------------------------------

VEST – SHORT SUMMARY OF PIECE:
Work back piece and front piece back and forth on needle separately, bottom up. Sew the piece together as explained in pattern. Then work an edge in rib around the neck and around both armholes.

BACK PIECE:
Cast on 86-90-94-106-114-118 stitches on circular needle size 6 mm with dark grey in DROPS Alaska. Purl 1 row (= wrong side). Then work rib as follows from right side: 1 edge stitch in GARTER STITCH – read explanation above, * knit 2, purl 2 *, work from *-* until 1 stitch remains, and finish with 1 edge stitch in garter stitch.
Continue rib like this for 5 cm.
Switch to single pointed needles size 7 mm. Knit 1 row from right side while decreasing 15-15-15-19-19-19 stitches evenly - read DECREASE TIP = 71-75-79-87-95-99 stitches.
Knit 1 row from wrong side.
Continue to work pattern from right side as follows: Work A.1 (= 1 edge stitch), work A.2 until 2 stitches remain on row (= 17-18-19-21-23-24 repetitions of 4 stitches – first repetition begins with pearl grey background and dark grey stitches that are slipped), work first stitch in A.2, so that pattern begins and ends the same, and finish with A.1 (= 1 edge stitch). Continue pattern back and forth like this. REMEMBER THE KNITTING TENSION!
When piece measures 31-32-33-34-35-36 cm, cast off for armholes at beginning of every row in each side as follows: Read KNITTING TIP and cast off 3 stitches 2-2-2-3-3-3 times in each side, and then 1 stitch 6-6-6-7-7-7 times in each side = 47-51-55-55-63-67 stitches. Continue with pattern as before.
When piece measures 54-56-58-60-62-64 cm, cast off the middle 23-27-31-31-31-35 stitches for neck and finish each shoulder separately.
Continue pattern as before, and cast off 1 stitch on next row from the neck = 11-11-11-11-15-15 stitches remain on shoulder. Work until piece measures 56-58-60-62-64-66 cm (piece measures approx. 25-26-27-28-29-30 cm from where decrease for armholes begin). Cast off knitting from right side. Work the other shoulder the same way.

FRONT PIECE:
Cast on 86-90-94-106-114-118 stitches on circular needle size 6 mm with dark grey in DROPS Alaska. Purl 1 row (= wrong side). Then work rib as follows from right side: 1 edge stitch in garter stitch, * knit 2, purl 2 *, work from *-* until 1 stitch remains, and finish with 1 edge stitch in garter stitch.
Continue rib like this for 5 cm.
Switch to single pointed needles size 7 mm. Knit 1 row from right side while decreasing 15-15-15-19-19-19 stitches evenly - remember DECREASE TIP = 71-75-79-87-95-99 stitches.
Knit 1 row from wrong side.
Continue to work pattern from right side as follows: Work A.1 (= 1 edge stitch), work A.2 until 2 stitches remain on row (= 17-18-19-21-23-24 repetitions of 4 stitches – first repetition begins with pearl grey background and dark grey stitches that are slipped), work first stitch in A.2, so that pattern begins and ends the same, and finish with A.1 (= 1 edge stitch). Continue pattern back and forth like this.
When piece measures 31-32-33-34-35-36 cm, cast off for armholes at beginning of every row in each side as follows: Remember KNITTING TIP and cast off 3 stitches 2-2-2-3-3-3 times in each side, and then 1 stitch 6-6-6-7-7-7 times in each side = 47-51-55-55-63-67 stitches. Continue with pattern as before.
When piece measures 48-50-52-52-54-56 cm, slip the middle 13-17-17-17-17-19 stitches on a stitch holder for neck and finish each shoulder separately.
Continue pattern as before , and cast off for neck at the beginning of every row from neck as follows: Cast off 3 stitches 1-1-1-1-1-1 time, 2 stitches 1-1-2-2-2-2 times and 1 stitch 1-1-1-1-1-2 times = 11-11-11-11-15-15 stitches remain on shoulder.
Work until piece measures 56-58-60-62-64-66 cm (piece measures approx. 25-26-27-28-29-30 cm from where decrease for armholes begin). Cast off knitting from right side. Work the other shoulder the same way.

ASSEMBLY:
Sew in side seams inside 1 edge stitch in each side. Sew shoulder seams inside cast-off edge.

NECK EDGE:
Begin from right side on top of one shoulder, and pick up inside 1 edge stitch approx. 72-84-92-96-96-104 stitches around the neck (including stitches on stitch holders at the front) on a short circular needle size 6 mm with colour dark grey (number of stitches must be divisible by with 4).
Work rib in the round = knit 2/purl 2 for 3 cm. Cast off with knit over knit and purl over purl - read CAST-OFF TIP.

SLEEVE EDGE:
Begin from right side at the bottom of one armhole and pick up inside 1 edge stitch approx. 80-84-88-92-92-96 stitches around the armhole on a short circular needle size 6 mm with colour dark grey (number of stitches must be divisible by 4).
Work rib in the round = knit 2/purl 2 for 3 cm. Cast off with knit over knit and purl over purl - remember CAST-OFF TIP. Work another edge the same way around the other armhole.

Diagram

symbols = knit from right side, knit from wrong side with colour pearl grey
symbols = knit from right side, knit from wrong side with colour dark grey
symbols = slip stitch purlwise on right needle (without knitting it), make sure that yarn worked with is on the wrong side of piece (away from you, seen from right side)
symbols = slip stitch purlwise on right needle (without knitting it), make sure that yarn worked with is on the wrong side of piece (towards you, seen from wrong side)
diagram

Each of our patterns has specific tutorial videos to help you.

Do you have a question? See a list of frequently asked questions (FAQ)

Knitting tension is what determines the final measurements of your work, and is usually measured per 10 x 10 cm. It is provided like so: number of stitches in width x number of rows in height - eg: 19 stitches x 26 rows = 10 x 10 cm.

The knitting tension is very individual; some people knit/crochet loosely while others work tightly. You adjust the knitting tension with the needle size, which is why the suggested needle size is only meant as a guide! You need to adjust this (up or down) to ensure that YOUR knitting tension matches the knitting tension provided in the pattern. If you work with a different knitting tension than provided you will have a different yarn consumption, and your work will have different measurements than what the pattern suggests.

The knitting tension also determines which yarns can replace each other. As long as you achieve the same knitting tension you can replace one yarn with another.

See DROPS lesson: How to measure your tension/gauge

See DROPS video: How to make a gauge tension swatch

The required amount of yarn is provided in grams, eg: 450 g. To calculate how many balls you’ll need you first need to know how many grams are in 1 ball (25g, 50g or 100g). This information is available if you click on the individual yarn quality on our pages. Divide the amount required with the amount of each ball. For example, if each ball is 50g (the most common amount), the calculation will be as follows: 450 / 50 = 9 balls.

The important thing when changing from one yarn to another is that the knitting/crochet tension remains the same. This is so that the measurements of the finished piece will be the same as on the sketch provided. It is easier to achieve the same knitting tension using yarns from the same yarn group. It is also possible to work with multiple strands of a thinner yarn to achieve the knitting tension of a thicker one. Please try our yarn converter. We recommend you to always work a test swatch.

Please NOTE: when changing yarn the garment might have a different look and feel to the garment in the photo, due to individual properties and qualities of each yarn.

See DROPS lesson: Can I use a different yarn than the one mentioned in the pattern?

All our yarns are categorised into yarn groups (from A to F) according to thickness and knitting tension – group A contains the thinnest yarns and group F the thickest. This makes it easier for you to find alternative yarns to our patterns, should you wish to switch yarn. All yarns within the same group have a similar knitting tension and can easily replace each other. However, different yarn qualities have different structures and properties which will give the finished work a unique look and feel.

Click here for an overview of the yarns in each yarn group

At the top of all our patterns you’ll find a link to our yarn calculator, which is a helpful tool should you wish to use a different yarn than suggested. By filling in the yarn quality you wish to replace, the amount (in your size) and number of strands, the calculator will present good alternative yarns with the same knitting tension. Additionally it will tell you how much you’ll require in the new qualities and whether you’ll need to work with multiple strands. Most skeins are 50g (some are 25g or 100g).

If the pattern is worked with multiple colours, every colour will have to be calculated separately. Similarly, if the pattern is worked with several strands of different yarns (for example 1 strand Alpaca and 1 strand Kid-Silk) you will have to find alternatives for each, individually.

Click here to see our yarn calculator

Since different yarns have different qualities and textures we have chosen to keep the original yarn in our patterns. However, you can easily find options among our available qualities by using our yarn calculator, or simply pick a yarn from the same yarn group.

It is possible that some retailers still have discontinued yarns in stock, or that someone has a few skeins at home that they would like to find patterns for.

The yarn calculator will provide both alternative yarn as well as required amount in the new quality.

If you think it's hard to decide what size to make, it can be a good idea to measure a garment you own already and like the size of. Then you can pick the size by comparing those measures with the ones available in the pattern's size chart.

You'll find the size chart at the bottom of the pattern.

See DROPS lesson: How to read size chart

The needle size provided in the pattern serves only as a guide, the important thing is to follow the knitting tension. And since knitting tension is very individual, you will have to adjust the needle size to ensure that YOUR tension is the same as in the pattern – maybe you’ll have to adjust 1, or even 2 needle sizes, up or down to achieve the correct tension. For this, we recommend that you work test swatches.

Should you work with a different knitting tension than the one provided, the measurements of the finished garment might deviate from the measurement sketch.

See DROPS lesson: How to measure your tension/gauge

See DROPS video: How to make a tension/gauge swatch

Working a garment top-down provides more flexibility and room for personal adjustment. For example it is easier to try the garment on while working, as well as making adjustments to length of yoke and shoulder caps.

The instructions are carefully explaining every step, in the correct order. Diagrams are adjusted to the knitting direction and are worked as usual.

The diagram depicts all rows/rounds, and every stitch seen from the right side. It is read from bottom to top, from right to left. 1 square = 1 stitch.

When working back and forth, every other row is worked from the right side and every other row is worked from the wrong side. When working from the wrong side, the diagram will have to be worked reversed: from left to right, knit stitches are purled, purl stitches are knit etc.

When working in the round every round is worked from the right side and the diagram are worked from right to left on all rounds.

See DROPS lesson: How to read knitting diagrams

The diagram depicts all rows/rounds, and every stitch seen from the right side. It is worked from bottom to top, from right to left.

When working back and forth every other row is worked from the right side: from right to left and every other row is worked from the wrong side: from left to right.

When working in the round, every row in the diagram are worked from the right side, from right to left.

When working a circular diagram you start in the middle and work your way outwards, counter clockwise, row by row.

The rows usually start with a given number of chain stitches (equivalent to the height of the following stitch), this will either be depicted in the diagram or explained in the pattern.

See DROPS lesson: How to read crochet diagrams

Instructions for working several diagrams after each other on the same row/round, will often be written like so: “work A.1, A.2, A.3 a total of 0-0-2-3-4 times". This means you work A.1 once, then A.2 is worked once, and A.3 is repeated (in width) the number of times provided for your size – in this case like so: S = 0 times, M = 0 times, L=2 times, XL= 3 times and XXL = 4 times.

The diagrams are worked as usual: begin with the first row in A.1, then work the first row in A.2 etc.

See DROPS lesson: How to read knitting diagrams

See DROPS lesson: How to read crochet diagrams

The total width of the garment (from wrist-to-wrist) will be larger in the larger sizes, despite the actual sleeves being shorter. The larger sizes have longer sleeve caps and wider shoulders, so there will be a good fit in all sizes.

The measurement sketch/schematic drawing provides information regarding the full length of the garment. If it’s a jumper or a jacket the length is measured from the highest point on the shoulder closest to the neckline, and straight down to the bottom of the garment. It is NOT measured from the tip of shoulder. Similarly, the length of yoke is measured from the highest point on the shoulder and down to where yoke is split into body and sleeves.

On a jacket measures are never taken along bands, unless specifically stated. Always measure inside band stitches when measuring the length.

See DROPS lesson: How to read a schematic drawing

Diagrams are often repeated on the round or in height. 1 repeat is the diagram the way it appears in the pattern. If it says to work 5 repeats of A.1 in the round, then you work A.1 a total of 5 times after/next to each other in the round. If it says to work 2 repeats of A.1 vertically/in height you work the entire diagram once, then begin again at the start and work the entire diagram one more time.

Chain stitches are slightly narrower than other stitches and to avoid working the cast-on edge too tight, we simply chain more stitches to begin with. The stitch count will be adjusted on the following row to fit the pattern and measurement sketch.

The rib edge is more elastic and will contract slightly compared to, for example, stocking stitch. By increasing before the rib edge, you avoid a visible difference in width between the rib edge and the rest of the body.

It’s very easy to cast off too tightly, and by making yarn overs while casting off (and simultaneously casting these off) you avoid a too tight cast off edge.

See DROPS video: How to bind off with yarn overs (yo)

To achieve an even increase (or decrease) you can increase on, for example: every 3rd and 4th row alternately, like so: work 2 rows and increase on the 3rd row, work 3 rows and increase on the 4th. Repeat this until the increase is complete.

See DROPS lesson: Increase or decrease 1 st on every 3rd and 4th row alternately

Should you prefer to work in the round instead of back and forth, you may of course adjust the pattern. You’ll need to add steeks mid-front (usually 5 stitches), and follow the instructions. When you would normally turn and work from the wrong side, simply work across the steek and continue in the round. At the end you’ll cut the piece open, pick up stitches to work bands, and cover the cut edges.

See DROPS video: How to knit steeks and cut open

Should you prefer to work back and forth instead of in the round, you may of course adjust the pattern so you work the pieces separately and then assemble them at the end. Divide the stitches for the body in 2, add 1 edge stitch in each side (for sewing) and work the front and back pieces separately.

See DROPS lesson: Can I adapt a pattern for circular needles into straight needles?

Pattern repeats can vary slightly in the different sizes, in order to get the correct proportions. If you’re not working the exact same size as the garment in the photo, yours might deviate slightly. This has been carefully developed and adjusted so that the complete impression of the garment is the same in all sizes.

Make sure to follow instructions and diagrams for your size!

If you have found a pattern you like which is available in women’s size it’s not very difficult to convert it to men’s size. The biggest difference will be the length of sleeves and body. Start working on the women size that you think would fit across the chest. The additional length will be worked right before you cast off for the armhole/sleeve cap. If the pattern is worked top-down you can add the length right after the armhole or before the first decrease on sleeve.

Regarding additional yarn amount, this will depend on how much length you add, but it is better with a skein too many than too few.

All yarns will have excess fibres (from production) that might come off as lint or shedding. Brushed yarns (ie hairier yarns) have more of these loose, excess fibres, causing more shedding.

Shedding also depends on what is worn under or over the garment, and whether this pulls at the yarn fibres. It’s therefore not possible to guarantee that there will be no shedding

Below are some tips on how to get the best result when working with hairier yarns:

1. When the garment is finished (before you wash it) shake it vigorously so the looser hairs come off. NOTE: do NOT use a lint roller, brush or any method that pulls at the yarn.

2. Place the garment in a plastic bag and put it in your freezer - the temperature will cause the fibres to become less attached to each other, and excess fibres will come off easier.

3. Leave in the freezer for a few hours before taking it out and shaking it again.

4. Wash the garment according to the instructions on the yarn label.

Pilling is a natural process that happens to even the most exclusive of fibers. It's a natural sign of wear and tear that is hard to avoid, and that is most visible in high friction areas of your garment like a sweater's arms and cuffs.

You can make your garment look as new by removing the pilling, using a fabric comb or a pill/lint remover.

Still can't find the answer you need? Then scroll down and leave your question so one of our experts can try to help you. This will be done normally within 5 to 10 working days.
In the meantime, you can read the questions and answers that others have left to this pattern or join the DROPS Workshop on Facebook to get help from fellow knitters/crocheters!

You might also like...

Post a comment to pattern DROPS 228-36

We would love to hear what you have to say about this pattern!

If you want to leave a question, please make sure you select the correct category in the form below, to speed up the answering process. Required fields are marked *.

Comments / Questions (5)

country flag Paula wrote:

Buongiorno, non riesco a capire quando lavorare il grigio perla e quando il grigio scuro. la spiegazione mi è un pochettino confusa. le sarei grata, se mi potesse spiegare quando cambiare colore. grazie mille

18.01.2024 - 16:25

country flag Tessie Catsambas wrote:

Can we make this pattern with a tighter rib at the bottom that does not flare out like that? Or is there a reason why this pattern may not work with a tighter rib? If I wanted to make a tighter rib, by how many (if any) stitches should I reduce stitches where now 15 are prescribed?

04.01.2022 - 17:02

DROPS Design answered:

Dear Tessi, the piece was ibntentionally made with a looser ribbing, as not to pull it in, because that shape suite the current fashion trends better. Furthermore, please understand that we cannot modify out patterns to each induvidual request. Having said that, if you really want to do a thighter rib, you might try to use smaller needles, or look for the stitches decreases after the ribbing and start with the stitchnumber that does not include these stitches. Happy Knitting!

05.01.2022 - 02:14

country flag Isabelle wrote:

C'est à dire sans le point fantaisie mais en jersey tout simple

12.12.2021 - 16:03

DROPS Design answered:

Bonjour Isabelle, si vous souhaitez un modèle jersey, consultez ces modèles pour en trouver un qui sera à votre goût et à tricoter en jersey, ce sera bien plus simple si vous débutez de bien suivre un modèle prévu pour du jersey. Bon tricot!

13.12.2021 - 09:56

country flag Isabelle wrote:

Bonjour je soushaite realiser ce pull mais je suis debutante , est ce que je peux le faire tout uni sans changer le nombre de mailles ? Merci pour votre aide

12.12.2021 - 15:59

DROPS Design answered:

Bonjour Isabelle, si vous souhaitez le tricoter en uni, suivez bien les indications pour la taille choisie en augmentant/diminuant comme indiqué, en tricotant au point mousse, en suivant les diagrammes - pensez à bien réaliser votre échantillon pour vérifier vos mesures et pour que les dimensions finales soient justes. Cf FAQ. Bon tricot!

13.12.2021 - 09:54

country flag Francine wrote:

Bonjour, est-ce que je pourrais tricoter le bas du chandail en rond ?Est-ce que j’éliminerais le A-1? Merci

24.10.2021 - 22:05

DROPS Design answered:

Bonjour Francine, probablement, vous devrez juste adapter le point mousse en rond (alternez 1 tour endroit, 1 tour envers) et le point fantaisie. Bon tricot!

03.11.2021 - 07:20