DROPS Air
DROPS Air
65% Alpaca, 28% Polyamide, 7% Wool
from 36.95 kr /50g
Get the yarn to make this pattern from 222.00kr.

The yarn cost is calculated from the pattern’s smallest size and the yarn’s cheapest product type. Looking for an even better price? You might find it on the DROPS Deals!

DROPS SS24

Merry Stars

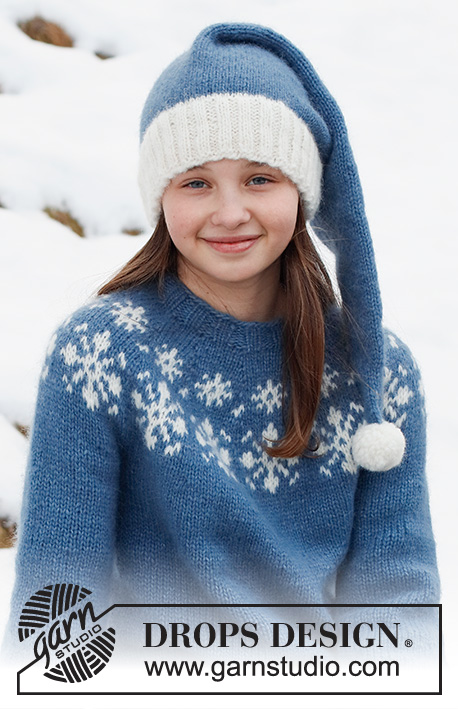
Knitted Christmas jumper in DROPS Air. Piece is knitted top down with round yoke and snowflake pattern. Size XS – XXL. Theme: Christmas.

DROPS 228-49
DROPS design: Pattern ai-344
Yarn group C or A + A
----------------------------------------------------------

SIZE:
XS - S - M - L - XL - XXL

MATERIALS:
DROPS AIR from Garnstudio (belongs to yarn group C)
250-300-300-350-350-400 g colour no 17, denim blue
50-50-50-50-50-50 g colour 01, off white

NEEDLES:
DROPS CIRCULAR NEEDLE SIZE 5 mm: Length 40 and 80 cm.
DROPS CIRCULAR NEEDLE SIZE 4 mm: Length 40 and 80 cm.
DROPS DOUBLE POINTED NEEDLES SIZE 5 mm
DROPS DOUBLE POINTED NEEDLES SIZE 4 mm
The technique MAGIC LOOP can be used – you then only need circular needle of 80 cm in each size.

KNITTING TENSION:
17 stitches in width and 22 rows vertically in stocking stitch = 10 x 10 cm.
NOTE! Remember that needle size is only a suggestion. If you have too many stitches on 10 cm switch to larger needles. If you have too few stitches on 10 cm switch to smaller needles.

-------------------------------------------------------

Alternative Yarn – See how to change yarns here
Yarn Groups A to F – Use the same pattern and change the yarn here
Yarn usage using an alternative yarn – Use our yarn converter here

-------------------------------------------------------

DROPS Air
DROPS Air
65% Alpaca, 28% Polyamide, 7% Wool
from 36.95 kr /50g
Get the yarn to make this pattern from 222.00kr.

The yarn cost is calculated from the pattern’s smallest size and the yarn’s cheapest product type. Looking for an even better price? You might find it on the DROPS Deals!

Pattern instructions

NOTE: This pattern is written in British English. All measurements in charts are in cm. For conversion from cm to inches - click here. There are different terms for crocheting in British and American English. If this pattern includes crochet, click for "crochet terms" here. For this pattern in American English, please click here.
----------------------------------------------------------

EXPLANATION FOR THE PATTERN:

----------------------------------------------------------

INCREASE TIP (evenly):
To calculate how to increase evenly, use the total number of stitches on row (e.g. 80 stitches) and divide stitches by number of increases to be done (e.g. 16) = 5.
In this example increase by making 1 yarn over after every 5th stitch. On next round knit yarns over twisted to avoid holes.

PATTERN:
See diagram A.1. Choose diagram for your size. Work the entire pattern in stocking stitch.

KNITTING TIP:
To avoid the garment losing elasticity when working pattern, it is important not to tighten the strands on back side of piece. Switch to a higher needle number when working pattern if the pattern is somewhat tight.

DECREASE TIP (applies to sleeves):
Decrease 1 stitch on each side of marker thread as follows: Work until 3 stitches remain before marker thread and knit 2 together, knit 2 (marker thread is between these stitches), slip 1 stitch knitwise, knit 1, pass slipped stitch over stitch worked.

CAST-OFF TIP:
To avoid a tight cast-off edge when casting off, you may use a larger needle. If this still is too tight make 1 yarn over after approx. every 4th stitch while casting off (cast off yarn overs as stitches).

----------------------------------------------------------

START THE PIECE HERE:

----------------------------------------------------------

JUMPER - SHORT OVERVIEW OF THE PIECE:
Work neck edge and yoke in the round on circular needle from mid back, top down. Now divide yoke for body and sleeves. Work body in the round on circular needle, top down. Work sleeves in the round on double pointed needles/a short circular needle, top down.

NECK EDGE:
Cast on 95-100-105-110-115-120 stitches on short circular needle size 4 mm with colour denim blue in DROPS Air. Knit 1 round. Work rib (knit 2/purl 3) for 4 cm. Now decrease 1 stitch in every purl section, decrease by purling 2 together = 76-80-84-88-92-96 stitches. Continue with rib = knit 2/purl 2. Work until rib measures 12 cm in total. Switch to a short circular needle size 5 mm.

YOKE:
Insert 1 marker at beginning of round, measure yoke from this marker! Knit 1 round while increasing 8-16-18-26-28-30 stitches evenly - read INCREASE TIP = 84-96-102-114-120-126 stitches. Now work according to diagram A.1 (= 14-16-17-19-20-21 repetitions of 6 stitches). NOTE: Choose diagram for your size and read KNITTING TIP. REMEMBER THE KNITTING TENSION! When A.1 has been worked vertically, there are 224-256-272-304-320-336 stitches on round. Knit 1 round with colour denim blue while increasing 8-0-0-0-4-8 stitches evenly = 232-256-272-304-324-344 stitches. Continue in denim blue and stocking stitch until piece measures approx. 20-22-23-25-27-29 cm from marker.

Now divide yoke for body and sleeves as follows:
Knit 34-38-40-44-49-53 (= half back piece), slip the next 48-52-56-64-64-66 stitches on 1 thread for sleeve, cast on 6-6-8-8-10-12 new stitches on row (= in the side under sleeve), knit 68-76-80-88-98-106 (= front piece), slip the next 48-52-56-64-64-66 stitches on 1 thread for sleeve, cast on 6-6-8-8-10-12 new stitches on row (= in the side under sleeve) and knit the remaining 34-38-40-44-49-53 stitches (= half back piece). Finish body and sleeves separately. NOW MEASURE THE PIECE FROM HERE!

BODY:
There are now 148-164-176-192-216-236 stitches on round. Continue with stocking stitch and colour denim blue. Work until piece measures approx. 27-27-27-27-27-27 cm from division (or desired length, approx. 4 cm remain until finished measurements). Switch to circular needle size 4 mm and work rib = knit 2/purl 2 in the round. Work rib for 4 cm. Cast off loosely with knit over knit and purl over purl - read CAST-OFF TIP. Jumper measures approx. 54-56-58-60-62-64 cm from shoulder and down.

SLEEVE:
Slip the 48-52-56-64-64-66 stitches from thread in one side of piece on double pointed needles or a short circular needle size 5 mm and pick up 1 stitch in each of the 6-6-8-8-10-12 new stitches cast on under sleeve = 54-58-64-72-74-78 stitches. Insert 1 marker thread mid under sleeve, i.e. in the middle of the 6-6-8-8-10-12 stitches that were cast on under sleeves. Move the marker thread upwards when working; it should be used for decrease mid under sleeve. Begin round at the marker thread and work stocking stitch in the round with denim blue. When sleeve measures 3 cm from division, decrease 2 stitches mid under sleeve - read DECREASE TIP. Decrease like this every 8-6-4-3-2½-2½ cm 5-6-8-11-11-12 times in total = 44-46-48-50-52-54 stitches. Work without decreases until sleeve measures 38-36-36-35-34-32 cm from division (approx. 4 cm remain before finished measurements, try the jumper on and work to desired length). Shorter measurements in the larger sizes because of wider neck and longer yoke Knit 1 round while increasing 4-2-4-2-4-2 stitches evenly = 48-48-52-52-56-56 stitches. Switch to double pointed needles size 4 mm. Work rib in the round = knit 2/purl 2 for 4 cm. Cast off with knit over knit and purl over purl - remember CAST-OFF TIP.
Sleeve measures approx. 42-40-40-39-38-36 cm from division. Work the other sleeve the same way.

ASSEMBLY:
The neck edge can be folded and sewn into a double neck edge or use it as a high collar. If you want a double neck edge do the following: Fold rib at the top of neck down on inside of garment. Fasten rib to get a double neck edge. To avoid a tight neck edge that sticks out it is important to keep the seam elastic.

Diagram

symbols = denim blue
symbols = off white
symbols = between 2 stitches make 1 yarn over, on next round knit yarn over twisted to avoid holes
diagram
diagram

Each of our patterns has specific tutorial videos to help you.

Do you have a question? See a list of frequently asked questions (FAQ)

Knitting tension is what determines the final measurements of your work, and is usually measured per 10 x 10 cm. It is provided like so: number of stitches in width x number of rows in height - eg: 19 stitches x 26 rows = 10 x 10 cm.

The knitting tension is very individual; some people knit/crochet loosely while others work tightly. You adjust the knitting tension with the needle size, which is why the suggested needle size is only meant as a guide! You need to adjust this (up or down) to ensure that YOUR knitting tension matches the knitting tension provided in the pattern. If you work with a different knitting tension than provided you will have a different yarn consumption, and your work will have different measurements than what the pattern suggests.

The knitting tension also determines which yarns can replace each other. As long as you achieve the same knitting tension you can replace one yarn with another.

See DROPS lesson: How to measure your tension/gauge

See DROPS video: How to make a gauge tension swatch

The required amount of yarn is provided in grams, eg: 450 g. To calculate how many balls you’ll need you first need to know how many grams are in 1 ball (25g, 50g or 100g). This information is available if you click on the individual yarn quality on our pages. Divide the amount required with the amount of each ball. For example, if each ball is 50g (the most common amount), the calculation will be as follows: 450 / 50 = 9 balls.

The important thing when changing from one yarn to another is that the knitting/crochet tension remains the same. This is so that the measurements of the finished piece will be the same as on the sketch provided. It is easier to achieve the same knitting tension using yarns from the same yarn group. It is also possible to work with multiple strands of a thinner yarn to achieve the knitting tension of a thicker one. Please try our yarn converter. We recommend you to always work a test swatch.

Please NOTE: when changing yarn the garment might have a different look and feel to the garment in the photo, due to individual properties and qualities of each yarn.

See DROPS lesson: Can I use a different yarn than the one mentioned in the pattern?

All our yarns are categorised into yarn groups (from A to F) according to thickness and knitting tension – group A contains the thinnest yarns and group F the thickest. This makes it easier for you to find alternative yarns to our patterns, should you wish to switch yarn. All yarns within the same group have a similar knitting tension and can easily replace each other. However, different yarn qualities have different structures and properties which will give the finished work a unique look and feel.

Click here for an overview of the yarns in each yarn group

At the top of all our patterns you’ll find a link to our yarn calculator, which is a helpful tool should you wish to use a different yarn than suggested. By filling in the yarn quality you wish to replace, the amount (in your size) and number of strands, the calculator will present good alternative yarns with the same knitting tension. Additionally it will tell you how much you’ll require in the new qualities and whether you’ll need to work with multiple strands. Most skeins are 50g (some are 25g or 100g).

If the pattern is worked with multiple colours, every colour will have to be calculated separately. Similarly, if the pattern is worked with several strands of different yarns (for example 1 strand Alpaca and 1 strand Kid-Silk) you will have to find alternatives for each, individually.

Click here to see our yarn calculator

Since different yarns have different qualities and textures we have chosen to keep the original yarn in our patterns. However, you can easily find options among our available qualities by using our yarn calculator, or simply pick a yarn from the same yarn group.

It is possible that some retailers still have discontinued yarns in stock, or that someone has a few skeins at home that they would like to find patterns for.

The yarn calculator will provide both alternative yarn as well as required amount in the new quality.

If you think it's hard to decide what size to make, it can be a good idea to measure a garment you own already and like the size of. Then you can pick the size by comparing those measures with the ones available in the pattern's size chart.

You'll find the size chart at the bottom of the pattern.

See DROPS lesson: How to read size chart

The needle size provided in the pattern serves only as a guide, the important thing is to follow the knitting tension. And since knitting tension is very individual, you will have to adjust the needle size to ensure that YOUR tension is the same as in the pattern – maybe you’ll have to adjust 1, or even 2 needle sizes, up or down to achieve the correct tension. For this, we recommend that you work test swatches.

Should you work with a different knitting tension than the one provided, the measurements of the finished garment might deviate from the measurement sketch.

See DROPS lesson: How to measure your tension/gauge

See DROPS video: How to make a tension/gauge swatch

Working a garment top-down provides more flexibility and room for personal adjustment. For example it is easier to try the garment on while working, as well as making adjustments to length of yoke and shoulder caps.

The instructions are carefully explaining every step, in the correct order. Diagrams are adjusted to the knitting direction and are worked as usual.

The diagram depicts all rows/rounds, and every stitch seen from the right side. It is read from bottom to top, from right to left. 1 square = 1 stitch.

When working back and forth, every other row is worked from the right side and every other row is worked from the wrong side. When working from the wrong side, the diagram will have to be worked reversed: from left to right, knit stitches are purled, purl stitches are knit etc.

When working in the round every round is worked from the right side and the diagram are worked from right to left on all rounds.

See DROPS lesson: How to read knitting diagrams

The diagram depicts all rows/rounds, and every stitch seen from the right side. It is worked from bottom to top, from right to left.

When working back and forth every other row is worked from the right side: from right to left and every other row is worked from the wrong side: from left to right.

When working in the round, every row in the diagram are worked from the right side, from right to left.

When working a circular diagram you start in the middle and work your way outwards, counter clockwise, row by row.

The rows usually start with a given number of chain stitches (equivalent to the height of the following stitch), this will either be depicted in the diagram or explained in the pattern.

See DROPS lesson: How to read crochet diagrams

Instructions for working several diagrams after each other on the same row/round, will often be written like so: “work A.1, A.2, A.3 a total of 0-0-2-3-4 times". This means you work A.1 once, then A.2 is worked once, and A.3 is repeated (in width) the number of times provided for your size – in this case like so: S = 0 times, M = 0 times, L=2 times, XL= 3 times and XXL = 4 times.

The diagrams are worked as usual: begin with the first row in A.1, then work the first row in A.2 etc.

See DROPS lesson: How to read knitting diagrams

See DROPS lesson: How to read crochet diagrams

The total width of the garment (from wrist-to-wrist) will be larger in the larger sizes, despite the actual sleeves being shorter. The larger sizes have longer sleeve caps and wider shoulders, so there will be a good fit in all sizes.

The measurement sketch/schematic drawing provides information regarding the full length of the garment. If it’s a jumper or a jacket the length is measured from the highest point on the shoulder closest to the neckline, and straight down to the bottom of the garment. It is NOT measured from the tip of shoulder. Similarly, the length of yoke is measured from the highest point on the shoulder and down to where yoke is split into body and sleeves.

On a jacket measures are never taken along bands, unless specifically stated. Always measure inside band stitches when measuring the length.

See DROPS lesson: How to read a schematic drawing

Diagrams are often repeated on the round or in height. 1 repeat is the diagram the way it appears in the pattern. If it says to work 5 repeats of A.1 in the round, then you work A.1 a total of 5 times after/next to each other in the round. If it says to work 2 repeats of A.1 vertically/in height you work the entire diagram once, then begin again at the start and work the entire diagram one more time.

Chain stitches are slightly narrower than other stitches and to avoid working the cast-on edge too tight, we simply chain more stitches to begin with. The stitch count will be adjusted on the following row to fit the pattern and measurement sketch.

The rib edge is more elastic and will contract slightly compared to, for example, stocking stitch. By increasing before the rib edge, you avoid a visible difference in width between the rib edge and the rest of the body.

It’s very easy to cast off too tightly, and by making yarn overs while casting off (and simultaneously casting these off) you avoid a too tight cast off edge.

See DROPS video: How to bind off with yarn overs (yo)

To achieve an even increase (or decrease) you can increase on, for example: every 3rd and 4th row alternately, like so: work 2 rows and increase on the 3rd row, work 3 rows and increase on the 4th. Repeat this until the increase is complete.

See DROPS lesson: Increase or decrease 1 st on every 3rd and 4th row alternately

Should you prefer to work in the round instead of back and forth, you may of course adjust the pattern. You’ll need to add steeks mid-front (usually 5 stitches), and follow the instructions. When you would normally turn and work from the wrong side, simply work across the steek and continue in the round. At the end you’ll cut the piece open, pick up stitches to work bands, and cover the cut edges.

See DROPS video: How to knit steeks and cut open

Should you prefer to work back and forth instead of in the round, you may of course adjust the pattern so you work the pieces separately and then assemble them at the end. Divide the stitches for the body in 2, add 1 edge stitch in each side (for sewing) and work the front and back pieces separately.

See DROPS lesson: Can I adapt a pattern for circular needles into straight needles?

Pattern repeats can vary slightly in the different sizes, in order to get the correct proportions. If you’re not working the exact same size as the garment in the photo, yours might deviate slightly. This has been carefully developed and adjusted so that the complete impression of the garment is the same in all sizes.

Make sure to follow instructions and diagrams for your size!

If you have found a pattern you like which is available in women’s size it’s not very difficult to convert it to men’s size. The biggest difference will be the length of sleeves and body. Start working on the women size that you think would fit across the chest. The additional length will be worked right before you cast off for the armhole/sleeve cap. If the pattern is worked top-down you can add the length right after the armhole or before the first decrease on sleeve.

Regarding additional yarn amount, this will depend on how much length you add, but it is better with a skein too many than too few.

All yarns will have excess fibres (from production) that might come off as lint or shedding. Brushed yarns (ie hairier yarns) have more of these loose, excess fibres, causing more shedding.

Shedding also depends on what is worn under or over the garment, and whether this pulls at the yarn fibres. It’s therefore not possible to guarantee that there will be no shedding

Below are some tips on how to get the best result when working with hairier yarns:

1. When the garment is finished (before you wash it) shake it vigorously so the looser hairs come off. NOTE: do NOT use a lint roller, brush or any method that pulls at the yarn.

2. Place the garment in a plastic bag and put it in your freezer - the temperature will cause the fibres to become less attached to each other, and excess fibres will come off easier.

3. Leave in the freezer for a few hours before taking it out and shaking it again.

4. Wash the garment according to the instructions on the yarn label.

Pilling is a natural process that happens to even the most exclusive of fibers. It's a natural sign of wear and tear that is hard to avoid, and that is most visible in high friction areas of your garment like a sweater's arms and cuffs.

You can make your garment look as new by removing the pilling, using a fabric comb or a pill/lint remover.

Still can't find the answer you need? Then scroll down and leave your question so one of our experts can try to help you. This will be done normally within 5 to 10 working days.
In the meantime, you can read the questions and answers that others have left to this pattern or join the DROPS Workshop on Facebook to get help from fellow knitters/crocheters!

You might also like...

Merry Stars

Zsuzsa, Austria

Merry Stars

@bozena.ganczarska, Poland

Merry Stars

possumneck, United States

Merry Stars

Irina V E, United States

Merry Stars

Wendy, United States

Merry Stars

@aleksa_cull, United Kingdom

Merry Stars

Taffy, Germany

Merry Stars

@maryshel.knitting, Russian Federation

Post a comment to pattern DROPS 228-49

We would love to hear what you have to say about this pattern!

If you want to leave a question, please make sure you select the correct category in the form below, to speed up the answering process. Required fields are marked *.

Comments / Questions (20)

country flag Floriana Olivares wrote:

Hello, where could I find the same pattern but with instructions from bottom to top. I find the method of working top down too confusing for my limited skills? Thank you for your help. I always knit with circular needles.

09.04.2024 - 15:31

DROPS Design answered:

Dear Floriana, unfortunately we do not have the same pattern in a bottom up version, and with many thousands of pattern on our site, we cannot modify them to each individual request. However, HERE you can find a number of our sweaters that are knitted from the bottom up, and with a round yoke, some of them also have stranded patterns. Maybe you will find something you like. Happy Knitting!

09.04.2024 - 16:48

country flag Abby James wrote:

Love this pattern

15.03.2024 - 18:31

country flag Abby James wrote:

How do I get the video instructions on this pattern

26.02.2024 - 18:34

DROPS Design answered:

Dear Abby, we don't have tutorial videos step by step for each pattern, but you can find all relevant videos for making the pattern after the written instructions and the charts. Happy knitting!

26.02.2024 - 21:09

country flag Antje wrote:

Gute Anleitung und die DROPS Air lässt sich super und schnell verarbeiten. Der Pullover war in ca. 4 Wochen fertig. Die Wolle ist sehr leicht, weich und kratzt nicht. Vielen Dank für das tolle Angebot von DROPS. Habe schon mehrere Projekte gehäkelt und gestrickt.

08.12.2023 - 22:42

country flag Rebecca wrote:

Jeg undrer mig over at maskeantallet skal reduceres undervejs i halsrib. Især fordi det foreslås at halskant kan bukkes ind og syes fast. Dermed skulle man tro at det laveste maskeantal var på det stykke der bukkes ind, da det i sagens natur skal have den mindste diameter. Alternativt kan man have en lang hals (12cm). Men på foto kan man se at halsrib når udover kraveben. Igen er det oplagt at forøge antal masker i rib, men i opskrift reduceres. Hvad er årsagen hertil?

23.11.2022 - 14:51

DROPS Design answered:

Hei Rebecca. En vrangbord vil trekke seg godt sammen og ved å starte å strikke 2 rett / 3 vrang i begynnelsen av halsen vil ikke halsen føles stram. For unngå at halskanten strammer og vipper utover om man ønsker en dobbelt halskant, er det viktig at sømmen er elastisk, derfor 2 rett / 3 vrang i begynnelsen. Nederste del av halskanten (2 rett / 2 vrang) strekker seg ut og det økes masker rett etter vrangborden. Det kan da se ut som det er strikket 2 rett / 3 vrang, men det er bare at det strekker seg ut. mvh DROPS Design

28.11.2022 - 11:04

country flag Debora wrote:

Buongiorno, come mai il collo non parte direttamente con le coste 2/2? Grazie mille!

30.01.2022 - 17:27

DROPS Design answered:

Buonasera Debora, il collo parte con 1 giro a diritto e poi le coste. Buon lavoro!

30.01.2022 - 20:01

country flag Margit wrote:

Liebes Drops-Team, warum werden am Kragen, der von oben nach unten gestrickt wird, nach ein paar cm Maschen abgenommen und nicht zugenommen? Die Form des Halses ist ja eher so, dass er in der Mitte oder in der Nähe des Gesichtes schmaler ist, als Richtung Ausschnitt bzw. Richtung Schultern! Liebe Grüße Margit

25.01.2022 - 10:08

DROPS Design answered:

Liebe Margit, ja genauso wird es gestrickt, der Anschlagsrand wird danach doppelt gefaltet und so wird die Naht weniger eng; am Anfang der Passe wird es dann zugenommen (bei der 1. Runde der Passe). Viel Spaß beim stricken!

25.01.2022 - 13:21

country flag Carmen Lenz wrote:

Hallo Ich habe da mal eine Frage Bei den Pullover ist die Strickschrieft unten mit 6 Maschen angegeben muss ich also bis der Stern beginnt die Reihen blau stricken oder? Ist mein erster Pullover

23.01.2022 - 10:09

DROPS Design answered:

Liebe Frau Lenz, ja genau, alle weisse Kästchen stricken Sie mit blau, aber die Zunahmen/Umschläge im Diagram nicht vergessen (z.B. am ende der 2. Reihe in A.1). Hier lesen Sie mehr über Diagramme. Viel Spaß beim stricken!

24.01.2022 - 09:20

country flag Lorna Reid wrote:

I think the yarn quantities for the child’s version has been wrongly put to the adult one! I have had to purchase another 350 g of yarn to make sure I have sufficient. I am knitting the large size. I have to add that I do love the pattern❤️

23.11.2021 - 20:48

DROPS Design answered:

Dear Mrs Reid, thanks for your feedback :) Are you working with DROPS Air or did you use another yarn? If so, did you use the yarn converter to check the new amount of yarn? This lesson explains how to calculate amount of yarn when using an alternative if it can help. Remember to submit your pictures to our gallery afterwards!

24.11.2021 - 07:46

country flag Sabina wrote:

Buongiorno, nella spiegazione del bordo del collo, cosa significa “ diminuire 1 maglia in ogni sezione a rovescio”? Grazie 😊

20.11.2021 - 09:40

DROPS Design answered:

Buongiorno Sabina, in quel punto deve lavorare una diminuzione in tutte le sezioni a rovescio, cioè dove ci sono 3 maglie rovescio devono diventare 2 maglie rovescio. Buon lavoro!

20.11.2021 - 11:27