DROPS Alaska
DROPS Alaska
100% Wool
from 1.90 £ /50g
Get the yarn to make this pattern from 22.80£.

The yarn cost is calculated from the pattern’s smallest size and the yarn’s cheapest product type. Looking for an even better price? You might find it on the DROPS Deals!

DROPS SS24

Vanilla District

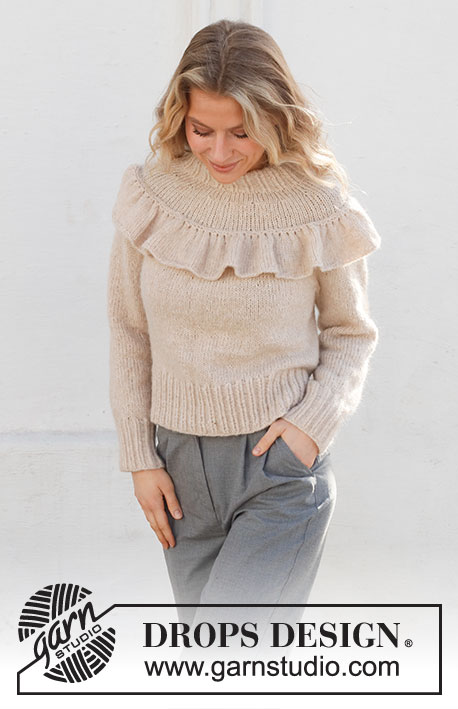
Knitted jumper in DROPS Alaska. Knitted with double neck edge, rib and textured pattern. Size XS – XXXL.

DROPS 227-11
DROPS design: Pattern x-468
Yarn group C or A + A
----------------------------------------------------------

SIZE:
XS/S - M - L - XL - XXL - XXXL

MATERIALS:
DROPS ALASKA from Garnstudio (belongs to yarn group C)
600-650-700-750-850-950 g colour 02, off white

NEEDLES:
DROPS CIRCULAR NEEDLE SIZE 5 mm : Length 40 cm, and 60-80 cm for textured pattern.
DROPS CIRCULAR NEEDLE SIZE 4.5 mm : Length 40 cm, and 60-80 cm for rib.
DROPS DOUBLE POINTED NEEDLES SIZE 5 mm
DROPS DOUBLE POINTED NEEDLES SIZE 4.5 mm
The technique MAGIC LOOP can be used – you then only need circular needle of 80 cm in each size.

KNITTING TENSION:
17 stitches in width and 22 rows vertically in stocking stitch/A.3 = 10 x 10 cm..
NOTE! Remember that needle size is only a suggestion. If you have too many stitches on 10 cm switch to larger needles. If you have too few stitches on 10 cm switch to smaller needles.

-------------------------------------------------------

Alternative Yarn – See how to change yarns here
Yarn Groups A to F – Use the same pattern and change the yarn here
Yarn usage using an alternative yarn – Use our yarn converter here

-------------------------------------------------------

DROPS Alaska
DROPS Alaska
100% Wool
from 1.90 £ /50g
Get the yarn to make this pattern from 22.80£.

The yarn cost is calculated from the pattern’s smallest size and the yarn’s cheapest product type. Looking for an even better price? You might find it on the DROPS Deals!

Pattern instructions

NOTE: This pattern is written in British English. All measurements in charts are in cm. For conversion from cm to inches - click here. There are different terms for crocheting in British and American English. If this pattern includes crochet, click for "crochet terms" here. For this pattern in American English, please click here.
----------------------------------------------------------

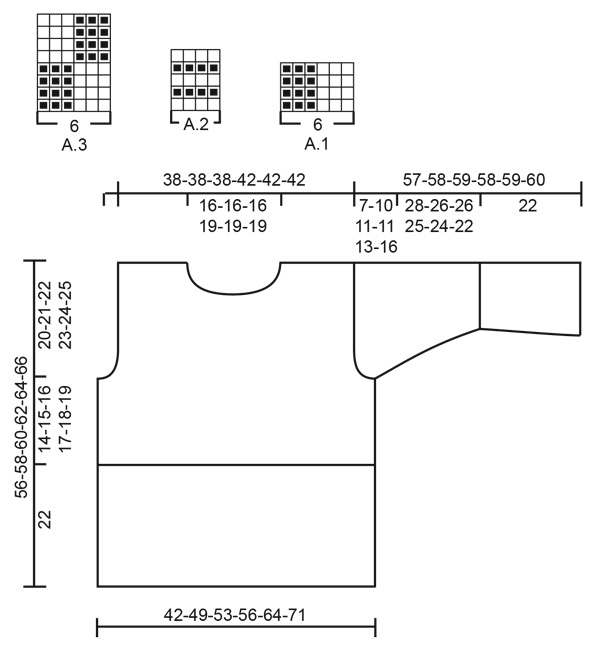
EXPLANATION FOR THE PATTERN:

----------------------------------------------------------

GARTER STITCH (back and forth):
Knit all rows.
1 ridge vertically = knit 2 rows.

PATTERN:
See diagrams A.1 to A.3. Diagrams show all rows in pattern seen from the right side.

INCREASE TIP (applies to mid under sleeves):
Begin before stitch with marker, make 1 yarn over, work stitch with marker as before, make 1 yarn over (= 2 stitches increased). On next round work yarn overs twisted to avoid holes. Then work the new stitches in A.3.

CAST-OFF TIP:
To avoid a tight cast-off edge when casting off, you may use a larger needle. If this still is too tight make 1 yarn over after approx. every 6th stitch while casting off (cast off yarn overs as stitches).

----------------------------------------------------------

START THE PIECE HERE:

----------------------------------------------------------

JUMPER - SHORT OVERVIEW OF THE PIECE:
Work body in the round on circular needle from the bottom and up to armholes. Then finish back piece and front piece back and forth on circular needle separately until finished measurements. Work sleeves in the round on double pointed needles/a short circular needle from the bottom and up to armholes, then work sleeve cap back and forth on circular needle until finished measurements. Sew the piece together as explained in pattern. Finish with a double neck edge in rib, in the round on a short circular needle.

BODY:
Cast on 144-168-180-192-216-240 stitches on circular needle size 5 mm with DROPS Alaska.
Switch to circular needle size 4.5 mm. Purl 1 round and knit 1 round.
Then work A.1 in the round (= 24-28-30-32-36-40 repetitions of 6 stitches).
Insert 1 marker in 2nd stitch on round, and 1 marker in 74th-86th-92nd-98th-110th-122nd stitch on round (= in the sides on body - markers are in 2nd stitch in A.1). Move markers upwards when working.
When piece measures 21 cm, work A.2 in the round. When A.2 has been worked vertically, switch to circular needle size 5 mm. Then work A.3 in the round (= 24-28-30-32-36-40 repetitions of 6 stitches). REMEMBER THE KNITTING TENSION!
When piece measures 36-37-38-39-40-41 cm, cast off for armholes, i.e. work next round as follows: Begin 2-2-3-3-4-4 stitches before stitch with marker, cast off 5-5-7-7-9-9 stitches for armhole (marker is in the middle of these 5-5-7-7-9-9 stitches), work 67-79-83-89-99-111 stitches as before (= front piece), cast off 5-5-7-7-9-9 stitches for armhole, work 67-79-83-89-99-111 stitches as before (= back piece).
Finish back piece and front piece separately.

BACK PIECE:
= 67-79-83-89-99-111 stitches.
Continue A.3 back and forth as before, and cast off for armholes at the beginning of every row in each side as follows: Cast off 3 stitches 0-0-0-0-1-2 times, 2 stitches 0-2-3-3-4-5 times and 1 stitch 1-3-3-3-3-4 times = 65-65-65-71-71-71 stitches remain. Continue with A.3 with 1 edge stitch in GARTER STITCH in each side - read explanation above.
When piece measures 54-56-58-60-62-64 cm, cast off the middle 23-23-23-29-29-29 stitches for neck and finish each shoulder separately. Continue as before and cast off 2 stitches on next row from the neck = 19 stitches remain on shoulder for all sizes.
Continue to work until piece measures 56-58-60-62-64-66 cm. Cast off. Work the other shoulder the same way.

FRONT PIECE:
= 67-79-83-89-99-111 stitches.
Continue A.3 back and forth as before, and cast off for armholes at the beginning of every row in each side as follows: Cast off 3 stitches 0-0-0-0-1-2 times, 2 stitches 0-2-3-3-4-5 times and 1 stitch 1-3-3-3-3-4 times = 65-65-65-71-71-71 stitches remain. Continue A.3 with 1 edge stitch in garter stitch in each side.
When piece measures 48-50-52-53-55-57 cm, slip the middle 9-9-9-15-15-15 stitches on a stitch holder for neck and finish each shoulder separately. Continue as before and cast off for neck at the beginning of every row from neck as follows: Cast off 3 stitches 1 time, 2 stitches 2 times and 1 stitch 2 times = 19 stitches remain on shoulder for all sizes.
Continue to work until piece measures 56-58-60-62-64-66 cm. Cast off. Work the other shoulder the same way.

SLEEVE:
Cast on 56-56-64-64-64-72 stitches on double pointed needles size 5 mm with DROPS Alaska.
Switch to double pointed needles size 4.5 mm. Purl 1 round and knit 1 round.
Work next round as follows: * Knit 3, purl 5 *, repeat from *-* the entire round. Continue rib like this. Insert 1 marker in 2nd stitch on round (= mid under sleeve - marker is in the middle of 3 knit stitches). Move markers upwards when working.
When piece measures 5 cm, decrease all 5 purl stitches to 4 purl stitches by purling 2 together from beginning of every purl section = 49-49-56-56-56-63 stitches. Continue with knit over knit and purl over purl.
When piece measures 18 cm, decrease all 4 purl stitches to 3 purl stitches the same way= 42-42-48-48-48-54 stitches. Continue with knit over knit and purl over purl.
When piece measures 21 cm, work A.2 in the round. When A.2 has been worked vertically, switch to double pointed needles size 5 mm. Then work A.3 in the round (= 7-7-8-8-8-9 repetitions of 6 stitches).
AT THE SAME TIME when piece measures 23-23-22-22-23-23 cm, increase 2 stitches mid under sleeve– read INCREASE TIP. Increase like this every 3-2-3-2-1½-1½ cm 9-12-9-12-15-8 times in total, then only increase in size XXXL every 1 cm 7 times in total = 60-66-66-72-78-84 stitches.
Continue until piece measures 50-48-48-47-46-44 cm (shorter measurements in the larger sizes because of wider shoulders and longer sleeve cap).
Now cast off stitches mid under sleeve, i.e. work next round as follows: Begin 2-2-3-3-4-4 stitches before stitch with marker, cast off 5-5-7-7-9-9 stitches, and work the remaining 55-61-59-65-69-75 stitches as before.
Then work sleeve cap on circular needle size 5 as explained below.
Continue pattern back and forth as before and cast off for sleeve cap at the beginning of every row in each side as follows: Cast off 3 stitches 1 time, 2 stitches 3-3-2-3-3-2 times and 1 stitch 0-3-5-3-5-11 times. Then cast off 2 stitches in each side until piece measures 56-57-58-57-58-59 cm. Cast off 3 stitches 1 time in each side. Then cast off the remaining stitches. Sleeve measures approx. 57-58-59-58-59-60 cm from top and down. Work the other sleeve the same way.

ASSEMBLY:
Sew shoulder seams inside cast-off edge.
Sew in sleeves inside 1 edge stitch in garter on front/back piece.

DOUBLE NECK EDGE:
Begin from right side mid back, and pick up approx. 72-78-78-84-90-90 stitches around the neck (including stitches on stitch holders at the front) on a short circular needle size 4.5 mm - number of stitches should be divisible by with 6.
Begin on 2nd round in A.2, and work A.2 in the round. When A.2 has been worked, work A.1 in the round until neck measures approx. 15-15-15-17-17-17 cm (including A.2). Work 1 round in stocking stitch.
Switch to short circular needle size 5 mm, and cast off by knitting - read CAST-OFF TIP!
Fold the rib down on inside of garment. Fasten rib to get a double neck edge. To avoid a tight neck edge that sticks out it is important to keep the seam elastic.

Diagram

symbols = knit from the right side, purl from the wrong side
symbols = purl from the right side, knit from the wrong side
diagram

Each of our patterns has specific tutorial videos to help you.

Do you have a question? See a list of frequently asked questions (FAQ)

Knitting tension is what determines the final measurements of your work, and is usually measured per 10 x 10 cm. It is provided like so: number of stitches in width x number of rows in height - eg: 19 stitches x 26 rows = 10 x 10 cm.

The knitting tension is very individual; some people knit/crochet loosely while others work tightly. You adjust the knitting tension with the needle size, which is why the suggested needle size is only meant as a guide! You need to adjust this (up or down) to ensure that YOUR knitting tension matches the knitting tension provided in the pattern. If you work with a different knitting tension than provided you will have a different yarn consumption, and your work will have different measurements than what the pattern suggests.

The knitting tension also determines which yarns can replace each other. As long as you achieve the same knitting tension you can replace one yarn with another.

See DROPS lesson: How to measure your tension/gauge

See DROPS video: How to make a gauge tension swatch

The required amount of yarn is provided in grams, eg: 450 g. To calculate how many balls you’ll need you first need to know how many grams are in 1 ball (25g, 50g or 100g). This information is available if you click on the individual yarn quality on our pages. Divide the amount required with the amount of each ball. For example, if each ball is 50g (the most common amount), the calculation will be as follows: 450 / 50 = 9 balls.

The important thing when changing from one yarn to another is that the knitting/crochet tension remains the same. This is so that the measurements of the finished piece will be the same as on the sketch provided. It is easier to achieve the same knitting tension using yarns from the same yarn group. It is also possible to work with multiple strands of a thinner yarn to achieve the knitting tension of a thicker one. Please try our yarn converter. We recommend you to always work a test swatch.

Please NOTE: when changing yarn the garment might have a different look and feel to the garment in the photo, due to individual properties and qualities of each yarn.

See DROPS lesson: Can I use a different yarn than the one mentioned in the pattern?

All our yarns are categorised into yarn groups (from A to F) according to thickness and knitting tension – group A contains the thinnest yarns and group F the thickest. This makes it easier for you to find alternative yarns to our patterns, should you wish to switch yarn. All yarns within the same group have a similar knitting tension and can easily replace each other. However, different yarn qualities have different structures and properties which will give the finished work a unique look and feel.

Click here for an overview of the yarns in each yarn group

At the top of all our patterns you’ll find a link to our yarn calculator, which is a helpful tool should you wish to use a different yarn than suggested. By filling in the yarn quality you wish to replace, the amount (in your size) and number of strands, the calculator will present good alternative yarns with the same knitting tension. Additionally it will tell you how much you’ll require in the new qualities and whether you’ll need to work with multiple strands. Most skeins are 50g (some are 25g or 100g).

If the pattern is worked with multiple colours, every colour will have to be calculated separately. Similarly, if the pattern is worked with several strands of different yarns (for example 1 strand Alpaca and 1 strand Kid-Silk) you will have to find alternatives for each, individually.

Click here to see our yarn calculator

Since different yarns have different qualities and textures we have chosen to keep the original yarn in our patterns. However, you can easily find options among our available qualities by using our yarn calculator, or simply pick a yarn from the same yarn group.

It is possible that some retailers still have discontinued yarns in stock, or that someone has a few skeins at home that they would like to find patterns for.

The yarn calculator will provide both alternative yarn as well as required amount in the new quality.

If you think it's hard to decide what size to make, it can be a good idea to measure a garment you own already and like the size of. Then you can pick the size by comparing those measures with the ones available in the pattern's size chart.

You'll find the size chart at the bottom of the pattern.

See DROPS lesson: How to read size chart

The needle size provided in the pattern serves only as a guide, the important thing is to follow the knitting tension. And since knitting tension is very individual, you will have to adjust the needle size to ensure that YOUR tension is the same as in the pattern – maybe you’ll have to adjust 1, or even 2 needle sizes, up or down to achieve the correct tension. For this, we recommend that you work test swatches.

Should you work with a different knitting tension than the one provided, the measurements of the finished garment might deviate from the measurement sketch.

See DROPS lesson: How to measure your tension/gauge

See DROPS video: How to make a tension/gauge swatch

Working a garment top-down provides more flexibility and room for personal adjustment. For example it is easier to try the garment on while working, as well as making adjustments to length of yoke and shoulder caps.

The instructions are carefully explaining every step, in the correct order. Diagrams are adjusted to the knitting direction and are worked as usual.

The diagram depicts all rows/rounds, and every stitch seen from the right side. It is read from bottom to top, from right to left. 1 square = 1 stitch.

When working back and forth, every other row is worked from the right side and every other row is worked from the wrong side. When working from the wrong side, the diagram will have to be worked reversed: from left to right, knit stitches are purled, purl stitches are knit etc.

When working in the round every round is worked from the right side and the diagram are worked from right to left on all rounds.

See DROPS lesson: How to read knitting diagrams

The diagram depicts all rows/rounds, and every stitch seen from the right side. It is worked from bottom to top, from right to left.

When working back and forth every other row is worked from the right side: from right to left and every other row is worked from the wrong side: from left to right.

When working in the round, every row in the diagram are worked from the right side, from right to left.

When working a circular diagram you start in the middle and work your way outwards, counter clockwise, row by row.

The rows usually start with a given number of chain stitches (equivalent to the height of the following stitch), this will either be depicted in the diagram or explained in the pattern.

See DROPS lesson: How to read crochet diagrams

Instructions for working several diagrams after each other on the same row/round, will often be written like so: “work A.1, A.2, A.3 a total of 0-0-2-3-4 times". This means you work A.1 once, then A.2 is worked once, and A.3 is repeated (in width) the number of times provided for your size – in this case like so: S = 0 times, M = 0 times, L=2 times, XL= 3 times and XXL = 4 times.

The diagrams are worked as usual: begin with the first row in A.1, then work the first row in A.2 etc.

See DROPS lesson: How to read knitting diagrams

See DROPS lesson: How to read crochet diagrams

The total width of the garment (from wrist-to-wrist) will be larger in the larger sizes, despite the actual sleeves being shorter. The larger sizes have longer sleeve caps and wider shoulders, so there will be a good fit in all sizes.

The measurement sketch/schematic drawing provides information regarding the full length of the garment. If it’s a jumper or a jacket the length is measured from the highest point on the shoulder closest to the neckline, and straight down to the bottom of the garment. It is NOT measured from the tip of shoulder. Similarly, the length of yoke is measured from the highest point on the shoulder and down to where yoke is split into body and sleeves.

On a jacket measures are never taken along bands, unless specifically stated. Always measure inside band stitches when measuring the length.

See DROPS lesson: How to read a schematic drawing

Diagrams are often repeated on the round or in height. 1 repeat is the diagram the way it appears in the pattern. If it says to work 5 repeats of A.1 in the round, then you work A.1 a total of 5 times after/next to each other in the round. If it says to work 2 repeats of A.1 vertically/in height you work the entire diagram once, then begin again at the start and work the entire diagram one more time.

Chain stitches are slightly narrower than other stitches and to avoid working the cast-on edge too tight, we simply chain more stitches to begin with. The stitch count will be adjusted on the following row to fit the pattern and measurement sketch.

The rib edge is more elastic and will contract slightly compared to, for example, stocking stitch. By increasing before the rib edge, you avoid a visible difference in width between the rib edge and the rest of the body.

It’s very easy to cast off too tightly, and by making yarn overs while casting off (and simultaneously casting these off) you avoid a too tight cast off edge.

See DROPS video: How to bind off with yarn overs (yo)

To achieve an even increase (or decrease) you can increase on, for example: every 3rd and 4th row alternately, like so: work 2 rows and increase on the 3rd row, work 3 rows and increase on the 4th. Repeat this until the increase is complete.

See DROPS lesson: Increase or decrease 1 st on every 3rd and 4th row alternately

Should you prefer to work in the round instead of back and forth, you may of course adjust the pattern. You’ll need to add steeks mid-front (usually 5 stitches), and follow the instructions. When you would normally turn and work from the wrong side, simply work across the steek and continue in the round. At the end you’ll cut the piece open, pick up stitches to work bands, and cover the cut edges.

See DROPS video: How to knit steeks and cut open

Should you prefer to work back and forth instead of in the round, you may of course adjust the pattern so you work the pieces separately and then assemble them at the end. Divide the stitches for the body in 2, add 1 edge stitch in each side (for sewing) and work the front and back pieces separately.

See DROPS lesson: Can I adapt a pattern for circular needles into straight needles?

Pattern repeats can vary slightly in the different sizes, in order to get the correct proportions. If you’re not working the exact same size as the garment in the photo, yours might deviate slightly. This has been carefully developed and adjusted so that the complete impression of the garment is the same in all sizes.

Make sure to follow instructions and diagrams for your size!

If you have found a pattern you like which is available in women’s size it’s not very difficult to convert it to men’s size. The biggest difference will be the length of sleeves and body. Start working on the women size that you think would fit across the chest. The additional length will be worked right before you cast off for the armhole/sleeve cap. If the pattern is worked top-down you can add the length right after the armhole or before the first decrease on sleeve.

Regarding additional yarn amount, this will depend on how much length you add, but it is better with a skein too many than too few.

All yarns will have excess fibres (from production) that might come off as lint or shedding. Brushed yarns (ie hairier yarns) have more of these loose, excess fibres, causing more shedding.

Shedding also depends on what is worn under or over the garment, and whether this pulls at the yarn fibres. It’s therefore not possible to guarantee that there will be no shedding

Below are some tips on how to get the best result when working with hairier yarns:

1. When the garment is finished (before you wash it) shake it vigorously so the looser hairs come off. NOTE: do NOT use a lint roller, brush or any method that pulls at the yarn.

2. Place the garment in a plastic bag and put it in your freezer - the temperature will cause the fibres to become less attached to each other, and excess fibres will come off easier.

3. Leave in the freezer for a few hours before taking it out and shaking it again.

4. Wash the garment according to the instructions on the yarn label.

Pilling is a natural process that happens to even the most exclusive of fibers. It's a natural sign of wear and tear that is hard to avoid, and that is most visible in high friction areas of your garment like a sweater's arms and cuffs.

You can make your garment look as new by removing the pilling, using a fabric comb or a pill/lint remover.

Still can't find the answer you need? Then scroll down and leave your question so one of our experts can try to help you. This will be done normally within 5 to 10 working days.
In the meantime, you can read the questions and answers that others have left to this pattern or join the DROPS Workshop on Facebook to get help from fellow knitters/crocheters!

You might also like...

Post a comment to pattern DROPS 227-11

We would love to hear what you have to say about this pattern!

If you want to leave a question, please make sure you select the correct category in the form below, to speed up the answering process. Required fields are marked *.

Comments / Questions (25)

country flag Grace Young wrote:

I just have one question about the decrease on the sleeve. I have almost completed it , my question is where it says decrease 2 stitches on each side till the piece measures 58 CMS ( I am knitting the third size) is it decrease 2 stitches at each side on every row or just once? Many thanks

24.09.2023 - 13:06

DROPS Design answered:

Hi Grace Young! You should cast off for sleeve cap 2 stitches at the beginning of every row on each side until the piece measures 58 cm. Happy knitting!

24.09.2023 - 16:52

country flag SandieForeman wrote:

Hi thanks for your response but it didn’t answer my question , the A3 pattern is a 3x3 repeat , as I increase 1 or 2 stitches in a row in either the knit or purl section it is no longer a 3x3 but a 3x4 etc so it throws out the pattern, how do I address that please?

21.04.2023 - 14:13

DROPS Design answered:

Dear Sandie, since they are under the sleeve it doesn't matter if they break the pattern. These stitches will be worked as an incomplete repeat of A.3 (until there is space for one more full repeat of A.3), while you will work over the rest of the stitches as before. Happy knitting!

23.04.2023 - 19:07

country flag Sandie Foreman wrote:

Hi How do I increase on the sleeves in the round and maintain the basketweave pattern ?

20.04.2023 - 17:32

DROPS Design answered:

Hi Sandie, The new stitches are worked into pattern A.3, either as knitted stitches or purled stitches as fits best. Happy knitting!

21.04.2023 - 07:33

country flag Sabine wrote:

Habe das Modell fertig gestellt und viel Freude bei dieser Arbeit gehabt. Die Beschreibung war sehr gut verständlich und der Pullover passt perfekt. Vielen lieben Dank für dieses wunderbare Strickmuster.

03.04.2023 - 16:27

country flag Hélène F wrote:

Bonjour à tous(tes) Bonjour Je tricote en magic loop la manche et le marqueur est placé sur la deuxième maille du début du tour. Lorsque je commencerai à augmenter de part et d’autre de celui-ci est ce qu’il se décalera sur la maille 3,4 et ainsi de suite et que, lorsque j’aurai terminé les augmentations ,le marqueur sera à 13 mailles du début de mon tour.

19.02.2023 - 15:13

DROPS Design answered:

Bonjour Hélène, si vous conservez cette disposition oui, à priori, mais vous pouvez aussi décaler le début de votre tour sur magic loop avant la maille avec le marqueur et augmenter ainsi sur la moitié des mailles avant de tricoter l'autre moitié, ainsi, le nombre de mailles augmentera régulièrement sur les 2 parties du tour/du magic loop. Bon tricot!

20.02.2023 - 10:08

country flag Hélène wrote:

Bonjour Je suis un peu perplexe. On nous mentionne dans le patron qu'il y a un point de blé dans la description du modèle, sauf que, lorsque j’exécute les grilles du motif, il me semble que c'est une alternance de points Jersey et de points mousse. Est-ce que je fais erreur? Bien à vous !

17.02.2023 - 17:17

DROPS Design answered:

Bonjour Hélène, ce modèle appartient à la rubrique des "points de riz" en raison du diagramme A.3 (alternance mailles endroit/mailles envers (= jersey endroit/jersey envers) en largeur et en hauteur, similaire au point de riz). Seul A.2 représente du point mousse (2 côtes mousse en l'occurence). Bon tricot!

20.02.2023 - 08:52

country flag Birgit Kowalczewski wrote:

Bei einer Länge von 36-37-38-39-40-41 cm für die Armausschnitte abketten, d.h. die nächste Runde wie folgt stricken: 2-2-3-3-4-4 Maschen vor der markierten Masche beginnen... Hallo, auf welche der sieben Markierungen bezieht sich das? Die erste Markierung sitzt in der zweiten Masche. Dann wäre ja der Armsausschnitt vorne. Oder lieg ich da falsch? Danke im Voraus für die Antwort!

10.12.2022 - 12:46

DROPS Design answered:

Liebe Frau Kowalczewski, es sind nur 2 Markierungsfaden, der 1. in der 2. Masche der Runde, und der 2. in der 74. Masche (in XS), oder in der 86. Masche (in S), usw. Viel Spaß beim stricken!

12.12.2022 - 09:11

country flag Ingrid wrote:

Hur är storlekarna? Min dotter är normalt storlek S, men här är det dubbelstrl XS/S. Eftersom storlekarna går upp ända till XXXL undrar jag om de är små i storlek så man kanske bör gå upp till storlek M?

14.09.2022 - 23:35

DROPS Design answered:

Hej Ingrid. Det bästa är att mäta en tröja din dotter har och så jämför du det med måtten i måttskissen för att sen välja den storlek som är närmast. Mvh DROPS Design

15.09.2022 - 10:49

country flag Maria wrote:

Buenas noches no entiendo muy bien la espalda, en concreto ,no sé cuántos puntos tengo que disminuir cada fila para las sisas, tengo la talla pequeña. Si tengo 67 puntos u resto 6 no me quedan 65 Gracias

31.03.2022 - 22:30

DROPS Design answered:

Hola Maria, cuando queden 67 puntos en la espalda, para la talla S, solo tienes que disminuir 1 vez 1 punto a cada lado. Por lo tanto, te quedan 65 puntos. El resto de disminuciones es para otras tallas.

06.04.2022 - 20:08

country flag Anne wrote:

Hallo, Ich weiß nicht, wie ich die zugenommenen Maschen beim Ärmel in das Muster 3 re, 3 li einfüge. Das kommt dann doch nicht hin. Können Sie mir eine Erklärung geben?

21.03.2022 - 07:54

DROPS Design answered:

Liebe Anne, am Anfang der Runde stricken Sie die neuen Maschen wie das vorrige Muster (wenn Sie mit rechten Maschen anfangen, dann soll die erste Zunahme links gestrickt werden), und am Ende der Runde stricken Sie die neuen Maschen wie das nächste Muster, dh wenn Sie die Runde mit 3 links stricken, stricken Sie die 3 ersten Zunahmen rechts. So wird sich das Muster in der Breite erweitern (es passt aber nicht mehr beim Übergang der Runden). Viel Spaß beim stricken!

21.03.2022 - 09:29