DROPS Snow
DROPS Snow
100% Wool
from 2.20 € /50g
Get the yarn to make this pattern from 17.60€.

The yarn cost is calculated from the pattern’s smallest size and the yarn’s cheapest product type. Looking for an even better price? You might find it on the DROPS Deals!

DROPS SS24

Winter Trifecta

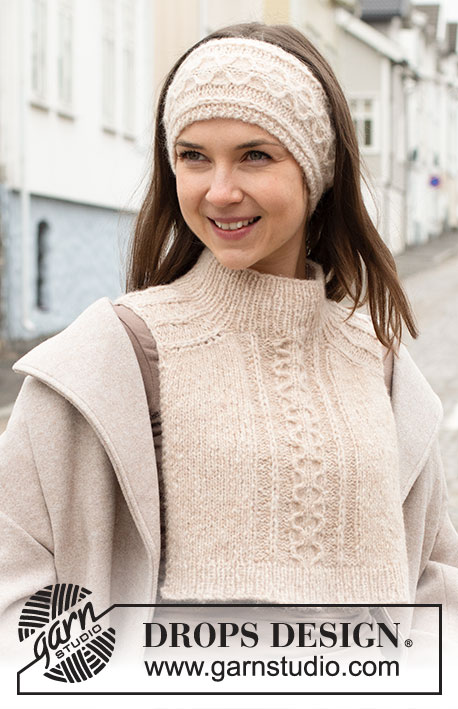
Knitted hat, neck-warmer and wrist warmers in DROPS Snow or DROPS Wish. The piece is worked with rib.

DROPS 225-17
DROPS Design: Pattern no ee-730
Yarn group E or C + C
-------------------------------------------------------

WHOLE SET:

SIZES:
S/M - M/L
Fits head-size: 54/56 cm

MATERIALS:
DROPS SNOW from Garnstudio (belongs to yarn group E)
400-450 g colour 89, clay

Or use:
DROPS WISH from Garnstudio (belongs to yarn group E)
300-300 g colour 15, mauve

HAT:

SIZE:
One-size
Fits head-size: 54/56 cm

MATERIALS:
DROPS SNOW from Garnstudio (belongs to yarn group E)
150 g colour 89, clay

Or use:
DROPS WISH from Garnstudio (belongs to yarn group E)
100 g colour 15, mauve

NEEDLES:
DROPS CIRCULAR NEEDLE SIZE 8 MM: Length 40 cm.
DROPS DOUBLE POINTED NEEDLES SIZE 8 MM.
The technique MAGIC LOOP can be used – you then only need circular needle of 80 cm.

KNITTING TENSION:
11 stitches in width and 15 rows in height with stocking stitch = 10 x 10 cm.
NOTE: Needle size is only a guide. If you get too many stitches on 10 cm, change to a larger needle size. If you get too few stitches on 10 cm, change to a smaller needle size.

NECK WARMER:

SIZES:
S/M - M/L
Measurements: Shoulder-width: approx. 34-36 cm. Height: approx. 28-30 cm (from shoulder down).

MATERIALS:
DROPS SNOW from Garnstudio (belongs to yarn group E)
250-250 g colour 89, clay

Or use:
DROPS WISH from Garnstudio (belongs to yarn group E)
150-200 g colour 15, mauve

NEEDLES:
DROPS CIRCULAR NEEDLE SIZE 9 MM.
DROPS CIRCULAR NEEDLE SIZE 8 MM: Length 40 cm.

KNITTING TENSION:
10 stitches in width and 14 rows in height with stocking stitch = 10 x 10 cm.
NOTE: Needle size is only a guide. If you get too many stitches on 10 cm, change to a larger needle size. If you get too few stitches on 10 cm, change to a smaller needle size.

WRIST-WARMERS:

SIZE:
One-size
Measurements: Circumference approx.: 18 cm. Length approx.: 16 cm.

MATERIALS:
DROPS SNOW from Garnstudio (belongs to yarn group E)
50 g colour 89, clay

Or use:
DROPS WISH from Garnstudio (belongs to yarn group E)
50 g colour 15, mauve

NEEDLES:
DROPS DOUBLE POINTED NEEDLES SIZE 8 MM.

KNITTING TENSION:
11 stitches in width and 15 rows in height with stocking stitch = 10 x 10 cm.
NOTE: Needle size is only a guide. If you get too many stitches on 10 cm, change to a larger needle size. If you get too few stitches on 10 cm, change to a smaller needle size.

-------------------------------------------------------

Alternative Yarn – See how to change yarns here
Yarn Groups A to F – Use the same pattern and change the yarn here
Yarn usage using an alternative yarn – Use our yarn converter here

-------------------------------------------------------

DROPS Snow
DROPS Snow
100% Wool
from 2.20 € /50g
Get the yarn to make this pattern from 17.60€.

The yarn cost is calculated from the pattern’s smallest size and the yarn’s cheapest product type. Looking for an even better price? You might find it on the DROPS Deals!

Pattern instructions

-------------------------------------------------------

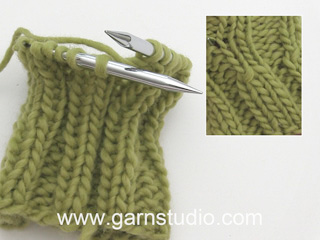
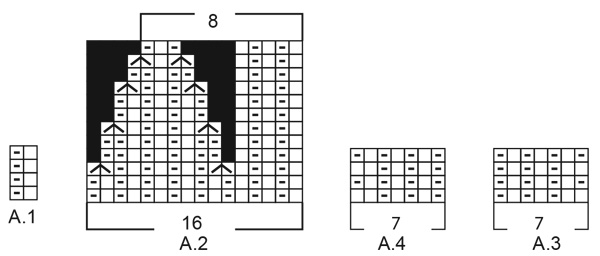
EXPLANATIONS FOR THE PATTERN:

-------------------------------------------------------

RIDGE/GARTER STITCH (worked back and forth):
Knit all rows.
1 ridge = knit 2 rows.

PATTERN:
Hat: See diagrams A.1 and A.2.
Neck-warmer: See diagrams A.1, A.3 and A.4.
Wrist-warmers: See diagram A.1.
The diagrams show all rows in the pattern from the right side.

DECREASE TIP (evenly spaced – for neck-warmer):
To work out how to decrease evenly, count the total number of stitches on the needle (e.g. 29 stitches) and divide by the number of decreases to be made (e.g. 7) = 4.1. 
In this example, decrease by knitting together approx. each 3rd and 4th stitch.

INCREASE TIP (for neck-warmer):
All increases are worked from the right side:
Increase 1 stitch by making 1 yarn over On the next row purl the yarn over twisted to avoid a hole. Then work the new stitch in stocking stitch.

CASTING-OFF TIP:
To avoid the cast-off edge being tight you can cast off with a larger size needle. If the edge is still tight, make 1 yarn over after approx. each 6th stitch at the same time as casting off; the yarn overs are cast off as normal stitches.

-------------------------------------------------------

START THE PIECE HERE:

-------------------------------------------------------

HAT – SHORT OVERVIEW OF THE PIECE:
The piece is worked in the round with circular needle, bottom up. The turn-up is worked from the wrong side, the piece is then turned and the rest of the hat is worked in the opposite direction and from the right side. Change to double pointed needles when necessary.

HAT:
Cast on 64 stitches with short circular needle size 8 mm and DROPS Snow or DROPS Wish. Work pattern in the round according to diagram A.1 for 12 cm.
Now turn the piece, so the rest of the hat is continued in the round but in the opposite direction. When the hat is finished the turn-up will have the same textured pattern as the rest of the hat.
Continue A.1in the round.
REMEMBER THE KNITTING TENSION!
Work until the piece measures 24 cm (including the 10 cm turn-up; there is approx. 8 cm left to finished length – work to desired length).
Continue with A.2 (= 4 repeats of 16 stitches). When the diagram is finished in height, there are 32 stitches. Work 2 rounds with knit 1 / purl 1. Then knit all stitches together 2 and 2 = 16 stitches. Knit 1 round. Knit all stitches together 2 and 2 = 8 stitches.
Cut the strand, pull it through the remaining stitches, tighten and fasten well. The hat measures approx. 35 cm (= 25 cm with 10 cm turn-up).

-------------------------------------------------------

NECK-WARMER – SHORT OVERVIEW OF THE PIECE:
The piece is worked back and forth in 2 sections, with circular needle and is sewn together at the shoulders. A double neck is worked to finish.

FRONT PIECE:
Cast on 43-45 stitches with circular needle size 8 mm and DROPS Snow or DROPS Wish.
Work rib as follows: 1 edge stitch in GARTER STITCH – read description above, A.1 until there are 2 stitches left, work the first stitch in A.1, 1 edge stitch in garter stitch. Continue this pattern back and forth.
When the rib measures 4 cm, work the next row from the right side as follows:
Work A.3 over the first 7 stitches, knit 29-31 and decrease 7 stitches evenly over these stitches – read DECREASE TIP, work A.4 over the last 7 stitches = 36-38 stitches.
Change to circular needle size 9 mm.
Continue with stocking stitch and pattern over the 7 stitches on each side.
REMEMBER THE KNITTING TENSION!
When the piece measures 5 cm, increase 1 stitch on the inside of the 8 stitches on each side – read INCREASE TIP (= 2 stitches increased). Increase like this every 5 cm a total of 3 times on each side = 42-44 stitches.
Continue working until the piece measures 20-22 cm. Now place the middle 8 stitches on a thread for the neck and each shoulder is finished separately.
Left shoulder:
Work the next row from the right side as follows: Work pattern as before until there are 5 stitches left before the neck, knit 2 together, knit 2 and 1 edge stitch in garter stitch. Work 1 row back from the wrong side as before.
Continue back and forth like this, decreasing for the neck on each row from the right side a total of 4 times = 13-14 stitches. Continue working until the piece measures 28-30 cm. Cast off with knit from the right side.
Right shoulder:
Work the next row from the right side as follows: 1 edge stitch in garter stitch, knit 2, slip 1 stitch as if to knit, knit 1 and pass the slipped stitch over (= 1 stitch decreased), work the rest of the row as before. Work 1 row back from the wrong side.
Continue back and forth like this, decreasing for the neck on each row from the right side a total of 4 times = 13-14 stitches. Continue working until the piece measures 28-30 cm. Cast off with knit from the right side

BACK PIECE:
Cast on 43-45 stitches with circular needle size 8 mm and DROPS Snow or DROPS Wish.
Work rib as follows: 1 edge stitch in garter stitch, A.1 until there are 2 stitches left, work the first stitch in A.1, 1 edge stitch in garter stitch. Continue this pattern back and forth.
When the rib measures 4 cm, work the next row from the right side as follows:
Work A.3 over the first 7 stitches, knit 29-31 and decrease 7 stitches evenly over these stitches, work A.4 over the last 7 stitches = 36-38 stitches.
Change to circular needle size 9 mm.
Continue with stocking stitch and pattern over the 7 stitches on each side.
When the piece measures 5 cm, increase 1 stitch inside 8 stitches on each side – remember INCREASE TIP (= 2 stitches increased). Increase like this every 5 cm a total of 3 times on each side = 42-44 stitches.
Continue working until the piece measures 26-28 cm. Now place the middle 14 stitches on a thread for the neck and each shoulder is finished separately.
Continue by casting off 1 stitch for the neck = 13-14 stitches on the shoulder.
Continue working until the piece measures 28-30 cm. Cast off with knit from the right side. Work the other shoulder in the same way.

ASSEMBLY:
Sew the shoulder seams together with grafting stitches, inside the cast-off edge.

DOUBLE NECK:
Knit up approx. 64 stitches around the neck, from the right side and inside the 1 edge stitch, with circular needle size 8 mm and DROPS Snow or DROPS Wish. The number of stitches should be divisible by 2.
Work A.1 in the round. When the neck measures 20 cm, cast off with knit over knit and purl over purl. It is important the edge is not tight – read CASTING-OFF TIP.
Fold the neck double to the inside and sew down. To avoid the neck being tight and the neck rolling outwards, it is important the seam is elastic.

-------------------------------------------------------

WRIST-WARMERS – SHORT OVERVIEW OF THE PIECE:
The piece is worked in the round with double pointed needles.

WRIST-WARMER:
Cast on 24 stitches with double pointed needles size 8 mm and DROPS Snow or DROPS Wish. Knit 1 round. Then work A.1 in the round.
REMEMBER THE KNITTING TENSION. When the piece measures 10 cm, increase 2 stitches as follows: Knit 1 twisted, purl 1, 1 yarn over (= 1 stitch increased), work the next 11 stitches as before, purl 1, 1 yarn over (= 1 stitch increased), work the last 11 stitches as before. You have increased 1 stitch on each side of the piece = 26 stitches (work the yarn overs twisted on the next round and then purl the new stitches).
Continue with knit-twisted over knit-twisted and purl over purl. When the piece measures 16 cm, cast off with knit over knit and purl over purl – read CASTING-OFF TIP.
Work 1 more wrist-warmer in the same way.

Diagram

symbols = knit 1 twisted from right side, purl 1 twisted from wrong side
symbols = purl 1 from right side, knit 1 from wrong side
symbols = purl 2 together
symbols = this square has no stitch as it was decreased earlier; go straight to the next symbol in the diagram
diagram

Each of our patterns has specific tutorial videos to help you.

Do you have a question? See a list of frequently asked questions (FAQ)

Knitting tension is what determines the final measurements of your work, and is usually measured per 10 x 10 cm. It is provided like so: number of stitches in width x number of rows in height - eg: 19 stitches x 26 rows = 10 x 10 cm.

The knitting tension is very individual; some people knit/crochet loosely while others work tightly. You adjust the knitting tension with the needle size, which is why the suggested needle size is only meant as a guide! You need to adjust this (up or down) to ensure that YOUR knitting tension matches the knitting tension provided in the pattern. If you work with a different knitting tension than provided you will have a different yarn consumption, and your work will have different measurements than what the pattern suggests.

The knitting tension also determines which yarns can replace each other. As long as you achieve the same knitting tension you can replace one yarn with another.

See DROPS lesson: How to measure your tension/gauge

See DROPS video: How to make a gauge tension swatch

The required amount of yarn is provided in grams, eg: 450 g. To calculate how many balls you’ll need you first need to know how many grams are in 1 ball (25g, 50g or 100g). This information is available if you click on the individual yarn quality on our pages. Divide the amount required with the amount of each ball. For example, if each ball is 50g (the most common amount), the calculation will be as follows: 450 / 50 = 9 balls.

The important thing when changing from one yarn to another is that the knitting/crochet tension remains the same. This is so that the measurements of the finished piece will be the same as on the sketch provided. It is easier to achieve the same knitting tension using yarns from the same yarn group. It is also possible to work with multiple strands of a thinner yarn to achieve the knitting tension of a thicker one. Please try our yarn converter. We recommend you to always work a test swatch.

Please NOTE: when changing yarn the garment might have a different look and feel to the garment in the photo, due to individual properties and qualities of each yarn.

See DROPS lesson: Can I use a different yarn than the one mentioned in the pattern?

All our yarns are categorised into yarn groups (from A to F) according to thickness and knitting tension – group A contains the thinnest yarns and group F the thickest. This makes it easier for you to find alternative yarns to our patterns, should you wish to switch yarn. All yarns within the same group have a similar knitting tension and can easily replace each other. However, different yarn qualities have different structures and properties which will give the finished work a unique look and feel.

Click here for an overview of the yarns in each yarn group

At the top of all our patterns you’ll find a link to our yarn calculator, which is a helpful tool should you wish to use a different yarn than suggested. By filling in the yarn quality you wish to replace, the amount (in your size) and number of strands, the calculator will present good alternative yarns with the same knitting tension. Additionally it will tell you how much you’ll require in the new qualities and whether you’ll need to work with multiple strands. Most skeins are 50g (some are 25g or 100g).

If the pattern is worked with multiple colours, every colour will have to be calculated separately. Similarly, if the pattern is worked with several strands of different yarns (for example 1 strand Alpaca and 1 strand Kid-Silk) you will have to find alternatives for each, individually.

Click here to see our yarn calculator

Since different yarns have different qualities and textures we have chosen to keep the original yarn in our patterns. However, you can easily find options among our available qualities by using our yarn calculator, or simply pick a yarn from the same yarn group.

It is possible that some retailers still have discontinued yarns in stock, or that someone has a few skeins at home that they would like to find patterns for.

The yarn calculator will provide both alternative yarn as well as required amount in the new quality.

If you think it's hard to decide what size to make, it can be a good idea to measure a garment you own already and like the size of. Then you can pick the size by comparing those measures with the ones available in the pattern's size chart.

You'll find the size chart at the bottom of the pattern.

See DROPS lesson: How to read size chart

The needle size provided in the pattern serves only as a guide, the important thing is to follow the knitting tension. And since knitting tension is very individual, you will have to adjust the needle size to ensure that YOUR tension is the same as in the pattern – maybe you’ll have to adjust 1, or even 2 needle sizes, up or down to achieve the correct tension. For this, we recommend that you work test swatches.

Should you work with a different knitting tension than the one provided, the measurements of the finished garment might deviate from the measurement sketch.

See DROPS lesson: How to measure your tension/gauge

See DROPS video: How to make a tension/gauge swatch

Working a garment top-down provides more flexibility and room for personal adjustment. For example it is easier to try the garment on while working, as well as making adjustments to length of yoke and shoulder caps.

The instructions are carefully explaining every step, in the correct order. Diagrams are adjusted to the knitting direction and are worked as usual.

The diagram depicts all rows/rounds, and every stitch seen from the right side. It is read from bottom to top, from right to left. 1 square = 1 stitch.

When working back and forth, every other row is worked from the right side and every other row is worked from the wrong side. When working from the wrong side, the diagram will have to be worked reversed: from left to right, knit stitches are purled, purl stitches are knit etc.

When working in the round every round is worked from the right side and the diagram are worked from right to left on all rounds.

See DROPS lesson: How to read knitting diagrams

The diagram depicts all rows/rounds, and every stitch seen from the right side. It is worked from bottom to top, from right to left.

When working back and forth every other row is worked from the right side: from right to left and every other row is worked from the wrong side: from left to right.

When working in the round, every row in the diagram are worked from the right side, from right to left.

When working a circular diagram you start in the middle and work your way outwards, counter clockwise, row by row.

The rows usually start with a given number of chain stitches (equivalent to the height of the following stitch), this will either be depicted in the diagram or explained in the pattern.

See DROPS lesson: How to read crochet diagrams

Instructions for working several diagrams after each other on the same row/round, will often be written like so: “work A.1, A.2, A.3 a total of 0-0-2-3-4 times". This means you work A.1 once, then A.2 is worked once, and A.3 is repeated (in width) the number of times provided for your size – in this case like so: S = 0 times, M = 0 times, L=2 times, XL= 3 times and XXL = 4 times.

The diagrams are worked as usual: begin with the first row in A.1, then work the first row in A.2 etc.

See DROPS lesson: How to read knitting diagrams

See DROPS lesson: How to read crochet diagrams

The total width of the garment (from wrist-to-wrist) will be larger in the larger sizes, despite the actual sleeves being shorter. The larger sizes have longer sleeve caps and wider shoulders, so there will be a good fit in all sizes.

The measurement sketch/schematic drawing provides information regarding the full length of the garment. If it’s a jumper or a jacket the length is measured from the highest point on the shoulder closest to the neckline, and straight down to the bottom of the garment. It is NOT measured from the tip of shoulder. Similarly, the length of yoke is measured from the highest point on the shoulder and down to where yoke is split into body and sleeves.

On a jacket measures are never taken along bands, unless specifically stated. Always measure inside band stitches when measuring the length.

See DROPS lesson: How to read a schematic drawing

Diagrams are often repeated on the round or in height. 1 repeat is the diagram the way it appears in the pattern. If it says to work 5 repeats of A.1 in the round, then you work A.1 a total of 5 times after/next to each other in the round. If it says to work 2 repeats of A.1 vertically/in height you work the entire diagram once, then begin again at the start and work the entire diagram one more time.

Chain stitches are slightly narrower than other stitches and to avoid working the cast-on edge too tight, we simply chain more stitches to begin with. The stitch count will be adjusted on the following row to fit the pattern and measurement sketch.

The rib edge is more elastic and will contract slightly compared to, for example, stocking stitch. By increasing before the rib edge, you avoid a visible difference in width between the rib edge and the rest of the body.

It’s very easy to cast off too tightly, and by making yarn overs while casting off (and simultaneously casting these off) you avoid a too tight cast off edge.

See DROPS video: How to bind off with yarn overs (yo)

To achieve an even increase (or decrease) you can increase on, for example: every 3rd and 4th row alternately, like so: work 2 rows and increase on the 3rd row, work 3 rows and increase on the 4th. Repeat this until the increase is complete.

See DROPS lesson: Increase or decrease 1 st on every 3rd and 4th row alternately

Should you prefer to work in the round instead of back and forth, you may of course adjust the pattern. You’ll need to add steeks mid-front (usually 5 stitches), and follow the instructions. When you would normally turn and work from the wrong side, simply work across the steek and continue in the round. At the end you’ll cut the piece open, pick up stitches to work bands, and cover the cut edges.

See DROPS video: How to knit steeks and cut open

Should you prefer to work back and forth instead of in the round, you may of course adjust the pattern so you work the pieces separately and then assemble them at the end. Divide the stitches for the body in 2, add 1 edge stitch in each side (for sewing) and work the front and back pieces separately.

See DROPS lesson: Can I adapt a pattern for circular needles into straight needles?

Pattern repeats can vary slightly in the different sizes, in order to get the correct proportions. If you’re not working the exact same size as the garment in the photo, yours might deviate slightly. This has been carefully developed and adjusted so that the complete impression of the garment is the same in all sizes.

Make sure to follow instructions and diagrams for your size!

If you have found a pattern you like which is available in women’s size it’s not very difficult to convert it to men’s size. The biggest difference will be the length of sleeves and body. Start working on the women size that you think would fit across the chest. The additional length will be worked right before you cast off for the armhole/sleeve cap. If the pattern is worked top-down you can add the length right after the armhole or before the first decrease on sleeve.

Regarding additional yarn amount, this will depend on how much length you add, but it is better with a skein too many than too few.

All yarns will have excess fibres (from production) that might come off as lint or shedding. Brushed yarns (ie hairier yarns) have more of these loose, excess fibres, causing more shedding.

Shedding also depends on what is worn under or over the garment, and whether this pulls at the yarn fibres. It’s therefore not possible to guarantee that there will be no shedding

Below are some tips on how to get the best result when working with hairier yarns:

1. When the garment is finished (before you wash it) shake it vigorously so the looser hairs come off. NOTE: do NOT use a lint roller, brush or any method that pulls at the yarn.

2. Place the garment in a plastic bag and put it in your freezer - the temperature will cause the fibres to become less attached to each other, and excess fibres will come off easier.

3. Leave in the freezer for a few hours before taking it out and shaking it again.

4. Wash the garment according to the instructions on the yarn label.

Pilling is a natural process that happens to even the most exclusive of fibers. It's a natural sign of wear and tear that is hard to avoid, and that is most visible in high friction areas of your garment like a sweater's arms and cuffs.

You can make your garment look as new by removing the pilling, using a fabric comb or a pill/lint remover.

Still can't find the answer you need? Then scroll down and leave your question so one of our experts can try to help you. This will be done normally within 5 to 10 working days.
In the meantime, you can read the questions and answers that others have left to this pattern or join the DROPS Workshop on Facebook to get help from fellow knitters/crocheters!

You might also like...

Post a comment to pattern DROPS 225-17

We would love to hear what you have to say about this pattern!

If you want to leave a question, please make sure you select the correct category in the form below, to speed up the answering process. Required fields are marked *.

Comments / Questions (19)

country flag Shirly wrote:

Hejsa. Jeg har lige færdiggjort huen, men har undret mig over opskriften. Til slut når man strikker 2 masker ret sammen, skulle det ikke have været 2 drejet ret sammen? Mvh.

14.01.2024 - 21:59

DROPS Design answered:

Hej Shirly, det må du gerne gøre, men du kommer ikke til at se det når alle masker er trukket sammen og hæftet :)

16.01.2024 - 14:21

country flag Claudia wrote:

Hallo liebes Team, bei der Zunahme bei den Armstulpen bleiben 10 Maschen nach der 2.Abhahme übrig . ( nicht 11 wie im Text steht)

19.12.2023 - 14:01

country flag Åsa Gustafsson wrote:

Hej! Har börjat sticka halsvärmare Winter Trifecta. Saknar stickor nr 9. Hur kan jag ändra mönstret så att det blir bra med nr8? Öka några maskor och varv tänker jag...\r\nMvh Åsa

26.11.2023 - 01:31

DROPS Design answered:

Hei Åsa. Design avd. har dessverre ikke mulighet til å regne om oppskriften ved å bytte pinne nr. og evnt hva garnmengden vil bli. Men du kan ut fra den oppgitte strikkefastheten og den strikkefastheten du får ved å bruke en mindre pinne str. regne ut hvor mange masker du trenger. Og så følger du bare de cm målene som er oppgitt i oppskriften på høyden. mvh DROPS Design

27.11.2023 - 09:37

country flag Maren wrote:

Hallo liebes Drops-Team, ich stehe etwas auf dem Schlauch bzgl. des Kragenschals. Ich verstehe das mit den 64 Maschen nicht, wenn ich den Kragen stricken, nehme ich die stillgelegten Maschen des Vorderteils und Rückenteils wieder auf und dazwischen nehme ich neu Maschen auf, sodass es insgesamt 64 Maschen ergibt oder was passiert mit den stillgelegten Maschen? Danke für die Hilfe, liebe Grüße, Maren!

16.05.2023 - 11:48

DROPS Design answered:

Liebe Maren, es sind 8 stillgelegten Maschen am Vorderteil + 4 Maschen beidseitig abgekettet + 16 M am Rückenteil + 1 Masche beidseitig + fassen Sie 16 Maschen beidseitig zwichen den Abkettenreihen für Halsausschnitt so haben Sie: 8 + 4 + 4 + 14 + 1 + 1 + 16 + 16 = 64 Maschen. Viel Spaß beim stricken!

16.05.2023 - 14:25

country flag Jeanette Antonsen wrote:

Når jeg har vendt arbeidet etter vrangbord begynner jeg da med en rett maske?

31.01.2023 - 15:02

DROPS Design answered:

Hei Jeanette, Hvis du avsluttet vrangborden med 1 rett maske, blir denne vrang når du snur arbeidet. Hvis du avsluttet med vrang blir den første masken rett. God fornøyelse!

01.02.2023 - 07:17

country flag Tina wrote:

Er det mulig å følge denne oppskriften men strikke "vanlige" istedenfor vridde masker? Vil strikkefastheten da være den samme?

24.11.2022 - 19:39

DROPS Design answered:

Hej Tina, ja bare du holder den strikkefasthed som står i opskriften :)

30.11.2022 - 13:52

country flag Marja Steinhoff wrote:

Tuo "taitereuna" hämmentää. Työn kääntäminen ei vaikuta lopputulokseen mitenkään muuten, kuin että käännöskohtaan jaa reikä. Mikä pn tarkoitus tuolla kääntämisellä? Sama lopputulos, mutta siistimpi, olisi jos työtä vain jatkaisi normaalisti ja kääntäsi sen 10- 12 cm viimeistelyvaiheessa työn päälle. Mikä siis on se 'juju' tässä olevinaan?

22.10.2022 - 16:55

country flag Manuela wrote:

Hallo,\r\nWenn ich bei der Mütze dann innen weiter stricke, dann sehe ich keinen Unterschied, oder muss ich die linken Maschen dann rechts stricken und rechte Maschen links?\r\n\r\nVielen Dank\r\nManuela

06.01.2022 - 15:28

DROPS Design answered:

Liebe Manuela, stricken Sie wie zuvor (= A.1) (die letzte Maschen der Runde war die 1. Masche in A.1, und ist jetzt die 1. Masche der Runde = 1. Masche A.1 = rechts verschränkte Masche). Viel Spaß beim stricken!

06.01.2022 - 16:35

country flag Louise wrote:

Jag ska sticka mössan. Förstår dock inte vad det betyder att ”vända arbetet”. Ska jag ta stickorna och vända dem så den som är den med garnet på blir den som matar? Alltså spegelvända det? Eller ska jag göra något annat med stickorna ? Ska sidan där tråden är bli på andra sidan alltså , genom att vända det?

01.12.2021 - 21:49

DROPS Design answered:

Hej Louise. Du vänder hela arbetet (du viker alltså ner arbetet under stickorna när du vänt det) och börjar sticka tillbaka där du precis har stickat. Mvh DROPS Design

03.12.2021 - 11:26

country flag Sharon wrote:

Hi, how do I avoid a hole when working from the wrong side? Thanks for your response. S

28.11.2021 - 22:50

DROPS Design answered:

Dear Sharon, you can avoid having a hole when turning the piece, if you pull the yarn really thight at the next stitch. If the hole is still there, you can try to a stitch by raising the ladder between two stitches, putting it on the needle twisted and knit together with the first stitch. Happy

28.11.2021 - 23:18