
Popular categories
Looking for a yarn?


|
||||||||||||||||
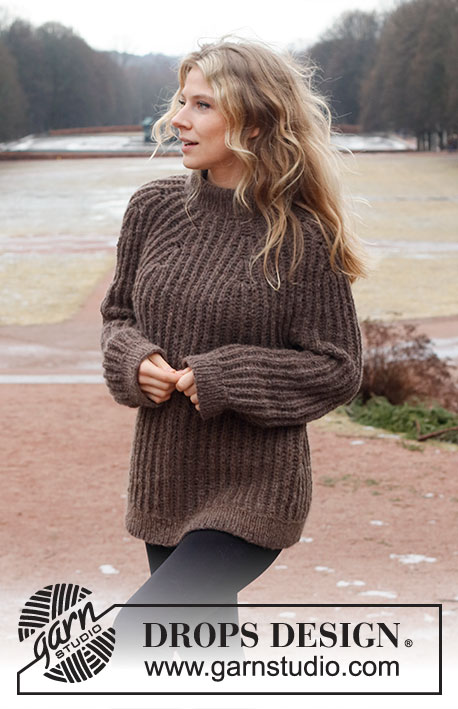
Chocolate Ridge |
||||||||||||||||
 |
 |
|||||||||||||||
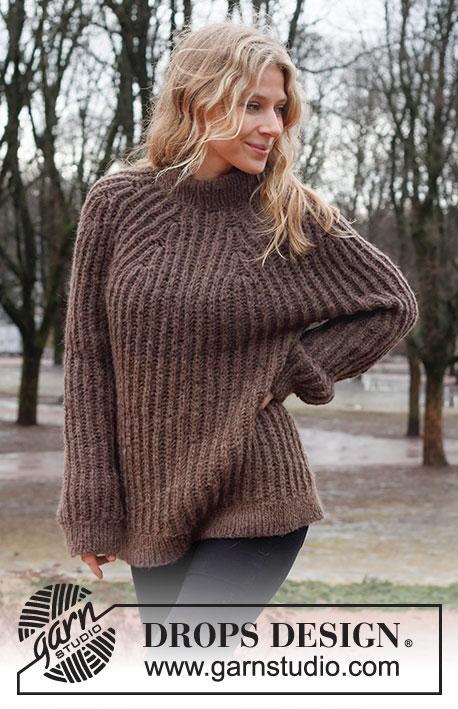
Knitted sweater in DROPS Air. Piece is knitted top down with round yoke, English rib and double neck edge. Size: S - XXXL
DROPS 226-5 |
||||||||||||||||
|
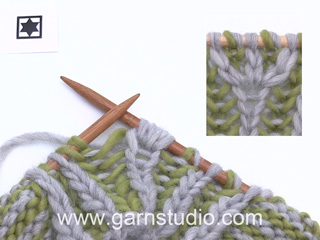
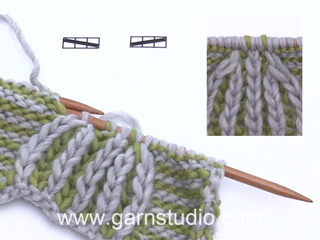
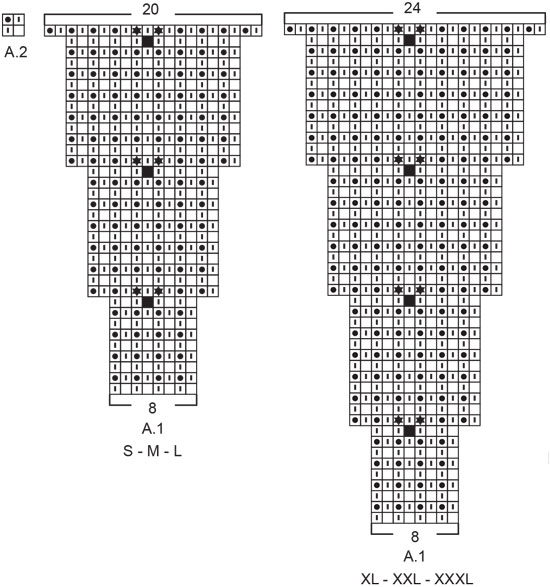
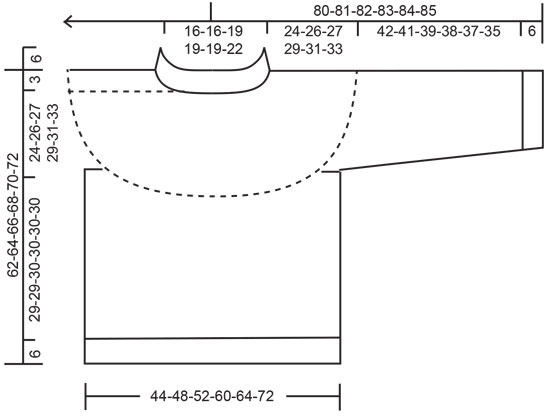
---------------------------------------------------------- EXPLANATION FOR THE PATTERN: ---------------------------------------------------------- PATTERN: See diagrams A.1 and A.2. Choose diagram for your size (applies to A.1). INCREASE/DECREASE TIP (evenly): To calculate how to increase/decrease evenly, use the total number of stitches on row (e.g. 70 stitches) and divide stitches by number of increases/decreases to be done (e.g. 14) = 5. In this example increase by making 1 yarn over after every 5th stitch. On next round work yarn overs twisted to avoid holes. To decrease in this example knit every 4th and 5th stitch together. KNITTING TIP (applies to number of sleeve): When counting the stitches, the yarn overs are not counted as stitches. DECREASE TIP (applies to sleeves, only Size L, XL, XXL and XXXL): Decrease alternately before and after marker thread on round. Decrease 2 stitches at end of round as follows: Work until 4 stitches remain before marker thread, slip first stitch and yarn over loosely on to right needle knitwise, knit the next 2 together (i.e. 1 purl + stitch and yarn over), then pass slipped stitch and yarn over over stitches worked together, purl yarn over and stitch together (= 2 stitches decreased). Decrease 2 stitches at beginning of round as follows: Slip first stitch and yarn over on to right needle knitwise, purl 1, pass slipped stitch and yarn over over purl stitch, slip stitch back on to left needle, slip stitch and yarn over over stitch slipped back on to left needle, slip the remaining stitch on to right needle (= 2 stitches decreased). BIND-OFF TIP: To avoid a tight bind-off edge when binding off, you may use a larger needle. If this still is too tight make 1 yarn over after approx. every 4th stitch while binding off (bind off yarn overs as stitches). ---------------------------------------------------------- START THE PIECE HERE: ---------------------------------------------------------- SWEATER - SHORT OVERVIEW OF THE PIECE: Work double neck edge and yoke in the round on circular needle, top down - beginning of round = mid front. Now divide yoke for body and sleeves. Work body in the round on circular needle top down. Work sleeves in the round on double pointed needles/a short circular needle, top down. The sweater can be worn from both sides and both way so make sure to fasten the strands neatly. DOUBLE NECK EDGE: Cast on 70-70-80-80-80-90 stitches on circular needle size 8 MM = US 11 with DROPS Air. Switch to circular needle size 4.5 MM = US 7 (cast on on a larger needle to avoid a tight cast-on edge). Knit 1 round. Then work rib (= knit 1/purl 1) for 13 cm = 5⅛". The neck edge is later folded double and assembled so that the neck edge is approx. 6 cm = 2⅜". Knit 1 round while decreasing 14-14-16-16-16-18 stitches evenly - read INCREASE/DECREASE TIP = 56-56-64-64-64-72 stitches. Insert 1 marker at beginning of round = mid front. Then work yoke as explained below. NOW MEASURE THE PIECE FROM HERE! YOKE: Switch to circular needle size 8 MM = US 11. Work next round as follows: * Make 1 yarn over on right needle, slip 1 stitch on to right needle purlwise, purl 1 *, work from *-* the entire round. Read KNITTING TIP! Now work English rib as follows: Work A.1 in the round (= 7-7-8-8-8-9 repetitions of 8 stitches). REMEMBER THE KNITTING GAUGE! When A.1 has been worked vertically, there are 140-140-160-192-192-216 stitches on needle. Yoke measures approx. 12-12-12-16-16-16 cm = 4¾"-4¾"-4¾"-6¼"-6¼"-6¼", measured from marker after neck edge. Then work A.2 on the round. Continue this pattern. When yoke measures 24-26-27-29-31-33 cm = 9½"-10¼"-10⅝"-11⅜"-12¼"-13", measure from marker after neck edge, divide piece for body and sleeves as follows: Work the first 20-20-22-28-28-32 stitches as before (= half front piece), slip the next 30-30-36-40-40-44 stitches on 1 thread for sleeve, cast on 4-8-8-4-8-8 new stitches on needle (= in the side under sleeve), work the next 40-40-44-56-56-64 stitches as before (= back piece), slip the next 30-30-36-40-40-44 stitches on 1 thread for sleeve, cast on 4-8-8-4-8-8 new stitches on needle (= in the side under sleeve) and work the remaining 20-20-22-28-28-32 stitches (= half front piece). Finish body and sleeves separately. NOW MEASURE THE PIECE FROM HERE! BODY: = 88-96-104-120-128-144 stitches. Continue according to diagram A.2 - work the 4-8-8-4-8-8 stitches mid under sleeve in pattern, i.e. on first round knit/purl stitches without yarn overs. When piece measures approx. 29-29-30-30-30-30 cm = 11⅜"-11⅜"-11¾"-11¾"-11¾"-11¾" from division (or desired length, approx. 6 cm remain until finished measurements), switch to circular needle size 4.5 MM = US 7 and increase as follows: Yarn overs in English rib pattern are worked together with the stitches they belong to. * Knit 1, 1 yarn over *, work from *-* the entire round = 176-192-208-240-256-288 stitches. Work rib (knit 1/purl 1) for 6 cm = 2⅜". Bind off with knit over knit and purl over purl - read BIND-OFF TIP. Sweater measures approx. 62-64-66-68-70-72 cm = 24⅜"-25¼"-26"-26¾"-27½"-28⅜", measured from shoulder and down. SLEEVE: Slip the 30-30-36-40-40-44 stitches from thread in one side of piece on a short circular needle/double pointed needles size 8 MM = US 11 and pick in addition up 1 stitch in each of the 4-8-8-4-8-8 stitches cast on under sleeve = 34-38-44-44-48-52 stitches. Insert 1 marker thread in the middle of the 4-8-8-4-8-8 stitches under sleeve and move the marker thread upwards when working, it marks the beginning of round and used for decrease later. Continue according to diagram A.2 - work the 4-8-8-4-8-8 stitches mid under sleeve in pattern, i.e. on first round knit/purl stitches without yarn overs. AT THE SAME TIME when piece measures 6 cm = 2⅜", decrease 2 stitches mid under sleeve (only applies to Size L, XL, XXL and XXXL) - read DECREASE TIP. Decrease like this every 2 cm = ¾" 0-0-2-1-2-2 times in total = 34-38-40-42-44-48 stitches. Work until piece measures approx. 42-41-39-38-37-35 cm = 16½"-16⅛"-15¼"-15"-14½"-13¾" from division (or desired length, approx. 6 cm = 2⅜" remain until finished measurements– NB:. Shorter measurements in the larger sizes because of wider neck and longer yoke). Switch to double pointed needles size 4.5 MM = US 7. Knit 1 round while at the same time increasing 6-8-8-8-8-10 stitches evenly (worked yarn overs in English rib pattern together with the stitches they belong to) = 40-46-48-50-52-58 stitches. Work rib (knit 1/purl 1) for 6 cm = 2⅜". Bind off with knit over knit and purl over purl - remember BIND-OFF TIP. Work the other sleeve the same way. ASSEMBLY: Fold rib at the top of neck down on inside of garment. Fasten rib to get a double neck edge. To avoid a tight neck edge that sticks out it is important to keep the seam elastic. |
||||||||||||||||
Diagram explanations |
||||||||||||||||
|
||||||||||||||||
|
||||||||||||||||
|
||||||||||||||||
|
Have you made this or any other of our designs? Tag your pictures in social media with #dropsdesign so we can see them! Do you need help with this pattern?You'll find tutorial videos, a Comments/Questions area and more by visiting the pattern on garnstudio.com. © 1982-2024 DROPS Design A/S. We reserve all rights. This document, including all its sub-sections, has copyrights. Read more about what you can do with our patterns at the bottom of each pattern on our site. |
||||||||||||||||


With over 40 years in knitting and crochet design, DROPS Design offers one of the most extensive collections of free patterns on the internet - translated to 17 languages. As of today we count 304 catalogs and 11422 patterns - 11417 of which are translated into English (US/in).
We work hard to bring you the best knitting and crochet have to offer, inspiration and advice as well as great quality yarns at incredible prices! Would you like to use our patterns for other than personal use? You can read what you are allowed to do in the Copyright text at the bottom of all our patterns. Happy crafting!
Comments / Questions (24)
Hallo, liest man die Diagramme von links nach rechts oder rechts nach links? Intuitiv hätte ich gedacht von links nach rechts, allerdings passt das nicht mit der davor gestrickten Reihe (* 1 Umschlag arbeiten, 1 Masche wie zum Linksstricken abheben, 1 Masche links *). Nur wenn man A1 von rechts nach links liest, beginnt man mit dem zusammen stricken des Umschlages und der Masche. Danke für Ihre Hilfe!
14.01.2024 - 10:55DROPS Design answered:
Liebe Sophie, die Diagramme lesen Sie jede Runde rechts nach links, und von unten nach oben. Viel Spaß beim stricken!
15.01.2024 - 08:20Ved godt, den kan bruges på begge sider - det er smart. Men: Hvorfor er der billeder af sweateren på vrangsiden? Det blev jeg forvirret over.
19.10.2023 - 22:21Is there a mistake in the knitting sample measurements (10 x 10 cm = 10 x 30)? With 10 stitches and a needle 4,5mm I have about 4 cm. I use a different yarn (Nepal), but it's from the same yarn group (C). And I checked the original yarn (Drops Air) and it says: 10 x 10 cm = 17M. x 22R.
28.09.2023 - 14:57DROPS Design answered:
Dear Elli, first, the sample in this work is worked in English rib, so the sample will get contracted. In truth, the sample would be 10x15 (as shown in the parenthesis) because half of the rows in English stitch are simply slipped stitches, which hardly modify the sample measurement. The recommended sample for DROPS Air (17sts x 22 rows =10x10cm) you indicated is for stocking stitch, so it's not valid in this situation. Also, the sample is worked with the same needle as you will use for that texture in the pattern, so you need to make the sample with the 8mm needles and not the 4.5mm ones. Happy knitting!
30.09.2023 - 23:36I økningen 5 masker. Ser ut ikke slik ut på mitt arbeid, som på bilde av genser i oppskrift. På mitt arbeid ser det ut som en til tre rader, men på bilde ser det ut som 1 til to rader.....
12.12.2022 - 12:12DROPS Design answered:
Hei Ann Kristin. Usikker på hva du mener. Her kommer 2 forklaringer. Rader tenkt loddrett: På bildet ser man at det er 5 omganger med rettmasker etter økningen. Disse 5 maskene er den blanke firkanten du ser i diagrammet. Når du strikker patent må du strikke 2 omganger for at det skal se ut som 1 omgang (du strikker jo bare annenhver maske når det strikkes patent). Eller om du mener rader er vannrette: Det økes med 4 masker i den sorte firkanten i diagrammet. Fra vrangmasken det økes i vil det på neste omgang bli 1 rettmaske, 1 vrangmaske, 1 rettmaske og 1 vrangmaske = 4 nye masker + den opprinnelige vrangmasken. mvh DROPS Design
12.12.2022 - 13:47Jeg får ikke maskeantallet til å stemme i A1. Jeg har 64 masker etter galskap. Etter første runde beskrevet 1 kast, en løs av og en vrang får jeg 96 masker. 12 pr rapport. Etter runde 10 har jeg 18 masker. Etter runde 22 har jeg 24 masker. På mønster står det to økinger til. Blir alt for mange masker... hva gjør jeg feil? Ser på bilde at øking ser ut som to rader, jeg får 3... nå har jeg tatt opp to ganger.
09.12.2022 - 01:28DROPS Design answered:
Hei Ann Kristin. Husk at når det strikkes patent tilhører kastet patentmasken (kastet blir ingen egen maske / økning). Les STRIKKETIPS. Så om du har 64 masker etter halskant strikker du A.1 8 ganger (8 x 8= 64 masker). Når du har strikket 8 omganger av A.1 så skal det økes, se sort firkant i diagrammet. Du strikker diagrammet 8 ganger = 8 økninger med 4 masker = 64+32 = 96 masker etter 1. økning. Så strikker du 11 omganger til før det økes: 96+32=128 masker etter 2. økning. Så strikker du 11 omganger til før det økes: 128+32=160 masker etter 3. økning. Når er økningene ferdig i str. L, strikker du XL eller XXL er det enda en økning = 160+32=192 masker. mvh DROPS Design
12.12.2022 - 11:50Bij het minderen voor de boord van de mouw staat dat ik bij maat L 8 steken moet minderen. Het totaal aantal steken dat ik moet overhouden is 48. Ik heb echter 40 steken op de naald staan. Moet ik dan niet tot 32 steken minderen?
11.11.2022 - 20:37DROPS Design answered:
Dag Brenda,
Er was een fout in het patroon geslopen; je moet 8 steken verdeeld meerderen (in plaats van minderen). Het patroon is nu aangepast. Excuses voor de verwarring.
16.11.2022 - 16:47De video voor het breien in de ronte komt niet overeen met het telpatroon. In het telpatroon moet je in de tweede rij de omslag en steek samen afhalen, in de video moet je deze steeds samen breien. Hoe moet ik dat zien?
06.09.2022 - 20:12DROPS Design answered:
Dag Brenda,
Er stond inderdaad een fout in het Nederlandstalig telpatroon. Het 4e symbool van het telpatroon is nu aangepast.
09.09.2022 - 12:51Ben bezig op de pas en heb de meerderingen gedaan. Op de tekening staat boven de meerderingen maar een steek(het blokje met een streepje) geflankeerd door tweeaverechtse steken. Moet ik nu over de meerderingen een omslag en een averechtse steek maken?
12.08.2022 - 16:59DROPS Design answered:
Dag Winnink,
De gemeerderde steken zijn er aan de buitenkant van het telpatroon bij getekend; aan elke kant 2 steken. De middelste steek is nu 1 omslag en 1 steek averecht afhalen, de steek daarvoor en de steek daarna brei je averecht.
14.08.2022 - 19:49Bonjour, J'ai fini de tricoter le col et commence les côtes anglaises. Au 2ème rang du diagramme A1, quand il faut glisser une maille à l'envers, sur mon tricot il s'agit d'une maille endroit. En effet, cette case avec un trait vertical se trouve juste au-dessus d'une case blanche, dans laquelle j'ai précédemment tricoté une maille et un jeté à l'endroit. Ai-je fait une erreur ou puis-je continuer mon tricot ? Merci d'avance !
15.06.2022 - 20:48DROPS Design answered:
Bonjour Madou, avant de tricoter A.1, vous devez tricoter le rang suivant: * Faire 1 jeté sur l'aiguille droite, glisser 1 maille sur l'aiguille droite comme pour la tricoter à l'envers, 1 maille envers*, répéter de *-* tout le tour., ensuite vous tricotez A.1, en commençant par tricoter ensemble à l'endroit la maille et son jeté, puis vous glissez 1 maille suivante (celle que vous aviez tricoté à l'envers) avec le fil devant l'ouvrage pour faire le jeté). Cette vidéo montre comment tricoter des côtes anglaises en rond et pourra sûrement vous aider. Bon tricot!
16.06.2022 - 09:32Good Day, I do not understand how to start the yoke. I don't understand how to do the pattern as where the yoke starts and this is such a beautiful garment. If somebody can explain to me via a video or something.
03.05.2022 - 12:03DROPS Design answered:
Dear Mrs Appelgryn, yoke is worked in English rib in the round - see video, first work the set up round then work A.1 (as in video), increasing at the same time 4 sts in each A.1 (see here. Then work A.2 to the desired length before dividing. Can this help?
03.05.2022 - 16:13