DROPS Air
DROPS Air
65% Alpaca, 28% Polyamide, 7% Wool
from 10.00 BGN /50g
Get the yarn to make this pattern from 120.00BGN.

The yarn cost is calculated from the pattern’s smallest size and the yarn’s cheapest product type. Looking for an even better price? You might find it on the DROPS Deals!

DROPS SS24

Lakeside Trails

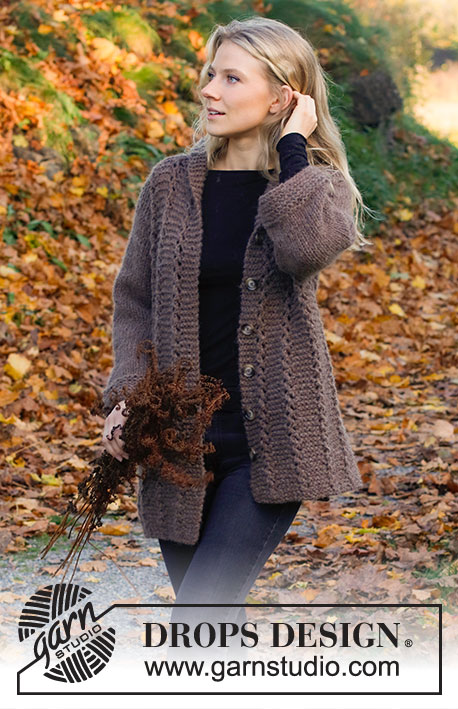
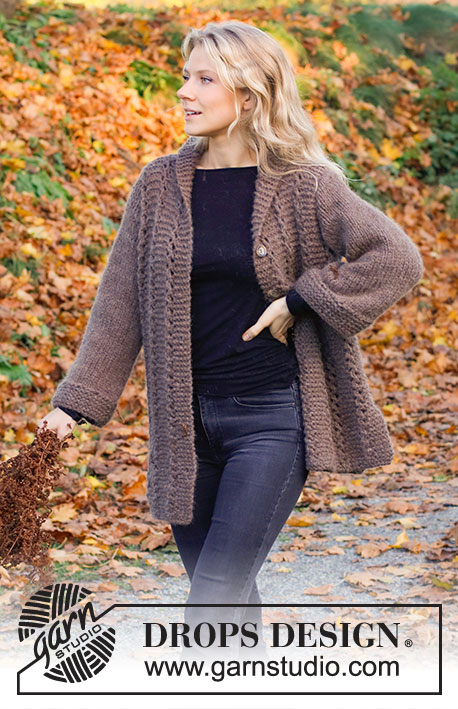
Knitted jacket in 2 strands DROPS Air. The piece is worked with garter stitch, lace pattern and shawl collar. Sizes XS - XXL.

DROPS 226-8
DROPS Design: Pattern no ai-354
Yarn group C + C or E
-------------------------------------------------------

SIZES:
XS - S - M - L - XL - XXL

MATERIALS:
DROPS AIR from Garnstudio (belongs to yarn group C)
600-700-750-800-900-1000 g colour 05, brown

DROPS BUTTONS, Marble NO 630: 6 items in all sizes.

NEEDLES:
DROPS CIRCULAR NEEDLE SIZE 8 MM: Length 40 cm and 60-60-60-80-80-80 cm.
DROPS CIRCULAR NEEDLE SIZE 9 MM: Length 40 cm.
The technique MAGIC LOOP can be used – you then only need circular needle of 80 cm in each size.

KNITTING TENSION:
10 stitches in width and 14 rows in height with stocking stitch and 2 strands = 10 x 10 cm.
10 stitches in width and 21 rows in height with garter stitch and 2 strands = 10 x 10 cm NOTE: Needle size is only a guide. If you get too many stitches on 10 cm, change to a larger needle size. If you get too few stitches on 10 cm, change to a smaller needle size.

-------------------------------------------------------

Alternative Yarn – See how to change yarns here
Yarn Groups A to F – Use the same pattern and change the yarn here
Yarn usage using an alternative yarn – Use our yarn converter here

-------------------------------------------------------

DROPS Air
DROPS Air
65% Alpaca, 28% Polyamide, 7% Wool
from 10.00 BGN /50g
Get the yarn to make this pattern from 120.00BGN.

The yarn cost is calculated from the pattern’s smallest size and the yarn’s cheapest product type. Looking for an even better price? You might find it on the DROPS Deals!

Pattern instructions

-------------------------------------------------------

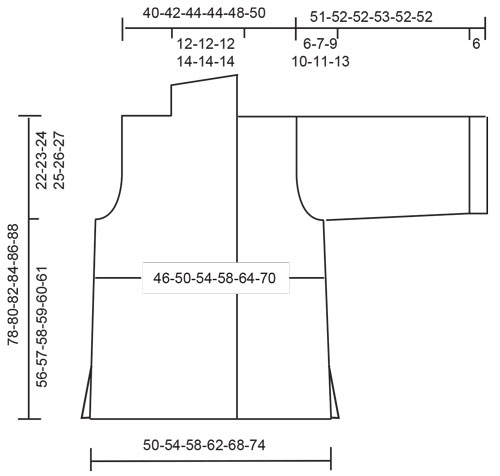
EXPLANATIONS FOR THE PATTERN:

-------------------------------------------------------

RIDGE/GARTER STITCH (worked in the round):
1 ridge in height = 2 rounds; Knit 1 round and purl 1 round.

RIDGE/GARTER STITCH (worked back and forth):
Knit all rows.
1 ridge = knit 2 rows.

PATTERN:
See diagram A.1. The diagram shows all rows in the pattern from the right side.

DECREASE TIP (for sides of body):
Decrease 1 stitch by knitting 2 together.

INCREASE TIP (for sleeves):
Work until there are 2 stitches left before the marker thread, 1 yarn over, knit 4 (marker thread sits between these 4 stitches), 1 yarn over. On the next round knit the yarn overs twisted to avoid holes. Then work the new stitches in stocking stitch

BUTTONHOLES:
Work the buttonholes on the right band. 1 BUTTONHOLE = knit together the 3rd and 4th stitch from the edge, make 1 yarn over. On the next row knit the yarn over to leave a hole.
Work the buttonholes when the piece measures:
XS: 11, 19, 27, 35, 43 and 51 cm
S: 11, 19, 27, 35, 43 and 51 cm
M: 12, 20, 28, 36, 44 and 52 cm
L: 12, 20, 28, 36, 44 and 52 cm
XL: 13, 21, 29, 37, 45 and 53 cm
XXL: 13, 21, 29, 37, 45 and 53 cm

-------------------------------------------------------

START THE PIECE HERE:

-------------------------------------------------------

JACKET – SHORT OVERVIEW OF THE PIECE:
The piece is worked in sections, back and forth, then sewn together. The sleeves are worked in the round with short circular needle.

BACK PIECE:
Cast on 50-54-58-62-68-74 stitches with circular needle size 8 mm and 2 strands DROPS Air – make sure the cast-on edge is not tight.
Work 1 RIDGE – read description above, over all stitches.
Now work pattern as follows: 10-5-7-9-5-8 stitches in garter stitch, A.1 over the next 28-42-42-42-56-56 stitches (= 4-6-6-6-8-8 repeats of 7 stitches), work the first 2 stitches in A.1 and 10-5-7-9-5-8 stitches in garter stitch.
Continue this pattern back and forth. REMEMBER THE KNITTING TENSION!
When the piece measures 10 cm, decrease 1 stitch on each side – read DECREASE TIP. Repeat this decrease when the piece measures 40-41-42-43-44-45 cm = 46-50-54-58-64-70 stitches.
When the piece measures 56-57-58-59-60-61 cm, cast off stitches for the armholes at the beginning of each row as follows: 2-3-4-6-6-7 stitches 1 time, 1 stitch 1-1-1-1-2-3 times on both sides = 40-42-44-44-48-50 stitches.
Now work pattern as follows:
Work 5-6-7-7-2-3 stitches in garter stitch, A.1 over the next 28-28-28-28-42-42 stitches (= 4-4-4-4-6-6 repeats of 7 stitches), work the first 2 stitches in A.1 and 5-6-7-7-2-3 stitches in garter stitch.
When the piece measures 76-78-80-82-84-86 cm, cast off the middle 10-10-10-12-12-12 stitches for the neck and each shoulder is finished separately. Continue by casting off 1 stitch on the next row from the neck = 14-15-16-15-17-18 stitches.
When the piece measures 78-80-82-84-86-88 cm, cast off. Work the other shoulder in the same way.

RIGHT FRONT PIECE:
Cast on 31-33-35-38-41-44 stitches with circular needle size 8 mm and 2 strands DROPS Air – make sure the cast-on edge is not tight.
Work 1 ridge over all stitches.
Now work pattern as follows: 5-5-5-6-6-6 stitches in garter stitch, A.1 over the next 14-21-21-21-28-28 stitches (= 2-3-3-3-4-4 repeats of 7 stitches), work the first 2 stitches in A.1, 10-5-7-9-5-8 stitches in garter stitch.
Continue this pattern back and forth. When the piece measures 10 cm decrease 1 stitch in the side. Repeat this decrease when the piece measures 40-41-42-43-44-45 cm = 29-31-33-36-39-42 stitches.
Continue working until the piece measures 56-57-58-59-60-61 cm. Now cast off stitches for the armhole at the beginning of each row from the wrong side as follows: 2-3-4-6-6-7 stitches 1 time, 1 stitch 1-1-1-1-2-3 times = 26-27-28-29-31-32 stitches.
Continue as follows: 5-5-5-6-6-6 stitches in garter stitch, A.1 over the next 14-14-14-14-21-21 stitches (= 2-2-2-2-3-3 repeats of 7 stitches), work the first 2 stitches in A.1, 5-6-7-7-2-3 stitches in garter stitch.

When the piece measures 78-80-82-84-86-88 cm, work the next row from the wrong side as follows: Cast off the first 14-15-16-15-17-18 stitches, knit to end of row. Then work short rows back and forth over the 12-12-12-14-14-14 stitches for the collar as follows:
ROW 1: Knit the first 6-6-6-7-7-7 stitches, turn.
ROW 2: Knit back.
ROW 3: Knit the first 9-9-9-10-10-10 stitches, turn.
ROW 4: Knit back.
ROW 5: Knit all stitches.
ROW 6: Knit back.
Repeat rows 1–6 until the collar measures 6-6-6-7-7-7 cm on the shortest side. Cast off.

LEFT FRONT PIECE:
Cast on 31-33-35-38-41-44 stitches with circular needle size 8 mm and 2 strands DROPS Air – make sure the cast-on edge is not tight.
Work 1 ridge over all stitches.
Now work pattern as follows: 10-5-7-9-5-8 stitches in garter stitch, A.1 over the next 14-21-21-21-28-28 stitches (= 2-3-3-3-4-4 repeats of 7 stitches), work the first 2 stitches in A.1, 5-5-5-6-6-6 stitches in garter stitch.
Continue this pattern back and forth. When the piece measures 10 cm decrease 1 stitch in the side. Repeat this decrease when the piece measures 40-41-42-43-44-45 cm = 29-31-33-36-39-42 stitches.
Continue working until the piece measures 56-57-58-59-60-61 cm. Now cast off stitches for the armhole at the beginning of each row from the right side as follows: 2-3-4-6-6-7 stitches 1 time, 1 stitch 1-1-1-1-2-3 times = 26-27-28-29-31-32 stitches.
Continue as follows: 5-6-7-7-2-3 stitches in garter stitch, A.1 over the next 14-14-14-14-21-21 stitches (= 2-2-2-2-3-3 repeats of 7 stitches), work the first 2 stitches in A.1, 5-5-5-6-6-6 stitches in garter stitch.

When the piece measures 78-80-82-84-86-88 cm, work the next row from the right side as follows: Cast off the first 14-15-16-15-17-18 stitches, knit to end of row. Then work short rows back and forth over the 12-12-12-14-14-14 stitches for the collar as follows:
ROW 1: Knit the first 6-6-6-7-7-7 stitches, turn.
ROW 2: Knit back.
ROW 3: Knit the first 9-9-9-10-10-10 stitches, turn.
ROW 4: Knit back.
ROW 5: Knit all stitches.
ROW 6: Knit back.
Repeat rows 1–6 until the collar measures 6-6-6-7-7-7 cm on the shortest side. Cast off.

SLEEVES:
Cast on 40-40-42-42-44-44 stitches with short circular needle size 8 mm and 2 strands DROPS Air. Work GARTER STITCH in the round – read description above, for 6 cm.
Change to short circular needle size 9 mm. Insert 1 marker thread at the beginning of the round (= mid-under sleeve). The thread should follow your work onwards; it is used when increasing under the sleeve.
Work stocking stitch. When the sleeve measures 9 cm, increase 0-1-1-1-1-1 stitch on each side of the marker thread – read INCREASE TIP. Increase like this every 0-16-16-15-14-8 cm a total of 0-1-1-2-2-3 times = 40-42-44-46-48-50 stitches. Continue working until the sleeve measures 45-45-43-43-41-39 cm. Now cast off 4-6-8-12-12-14 stitches under the sleeve (= 2-3-4-6-6-7 stitches on each side of the marker thread). Work stocking stitch back and forth for the sleeve cap, casting off at the beginning of each row as follows: 2 stitches 0-2-1-1-1-1 times, 1 stitch 0-0-2-4-5-7 times, 2 stitches 0-2-2-2-2-1 times and 3 stitches 4-1-1-0-0-0 times on both sides = 12-14-14-14-14-14 stitches left. Cast off. The sleeve measures approx. 51-52-52-53-52-52 cm.
Work the other sleeve in the same way.

ASSEMBLY:
Sew the shoulder seams inside the cast-off edge. Sew the side seams in the outermost loop of the outermost stitch, leaving 15 cm for the split at the bottom. Sew the sleeves to the body, inside the 1 edge stitch. Sew the buttons onto the left band.
Sew the collar together mid-back (the seam should turn to the inside when the collar is turned down). Sew the collar to the neck-line on the back piece. 

Diagram

symbols = knit from right side, purl from wrong side
symbols = knit from wrong side
symbols = between 2 stitches make 1 yarn over; on the next row purl the yarn over to leave a hole
symbols = knit 2 together
symbols = slip 1 stitch as if to knit, knit 1 and pass the slipped stitch over
diagram
diagram

Each of our patterns has specific tutorial videos to help you.

Do you have a question? See a list of frequently asked questions (FAQ)

Knitting tension is what determines the final measurements of your work, and is usually measured per 10 x 10 cm. It is provided like so: number of stitches in width x number of rows in height - eg: 19 stitches x 26 rows = 10 x 10 cm.

The knitting tension is very individual; some people knit/crochet loosely while others work tightly. You adjust the knitting tension with the needle size, which is why the suggested needle size is only meant as a guide! You need to adjust this (up or down) to ensure that YOUR knitting tension matches the knitting tension provided in the pattern. If you work with a different knitting tension than provided you will have a different yarn consumption, and your work will have different measurements than what the pattern suggests.

The knitting tension also determines which yarns can replace each other. As long as you achieve the same knitting tension you can replace one yarn with another.

See DROPS lesson: How to measure your tension/gauge

See DROPS video: How to make a gauge tension swatch

The required amount of yarn is provided in grams, eg: 450 g. To calculate how many balls you’ll need you first need to know how many grams are in 1 ball (25g, 50g or 100g). This information is available if you click on the individual yarn quality on our pages. Divide the amount required with the amount of each ball. For example, if each ball is 50g (the most common amount), the calculation will be as follows: 450 / 50 = 9 balls.

The important thing when changing from one yarn to another is that the knitting/crochet tension remains the same. This is so that the measurements of the finished piece will be the same as on the sketch provided. It is easier to achieve the same knitting tension using yarns from the same yarn group. It is also possible to work with multiple strands of a thinner yarn to achieve the knitting tension of a thicker one. Please try our yarn converter. We recommend you to always work a test swatch.

Please NOTE: when changing yarn the garment might have a different look and feel to the garment in the photo, due to individual properties and qualities of each yarn.

See DROPS lesson: Can I use a different yarn than the one mentioned in the pattern?

All our yarns are categorised into yarn groups (from A to F) according to thickness and knitting tension – group A contains the thinnest yarns and group F the thickest. This makes it easier for you to find alternative yarns to our patterns, should you wish to switch yarn. All yarns within the same group have a similar knitting tension and can easily replace each other. However, different yarn qualities have different structures and properties which will give the finished work a unique look and feel.

Click here for an overview of the yarns in each yarn group

At the top of all our patterns you’ll find a link to our yarn calculator, which is a helpful tool should you wish to use a different yarn than suggested. By filling in the yarn quality you wish to replace, the amount (in your size) and number of strands, the calculator will present good alternative yarns with the same knitting tension. Additionally it will tell you how much you’ll require in the new qualities and whether you’ll need to work with multiple strands. Most skeins are 50g (some are 25g or 100g).

If the pattern is worked with multiple colours, every colour will have to be calculated separately. Similarly, if the pattern is worked with several strands of different yarns (for example 1 strand Alpaca and 1 strand Kid-Silk) you will have to find alternatives for each, individually.

Click here to see our yarn calculator

Since different yarns have different qualities and textures we have chosen to keep the original yarn in our patterns. However, you can easily find options among our available qualities by using our yarn calculator, or simply pick a yarn from the same yarn group.

It is possible that some retailers still have discontinued yarns in stock, or that someone has a few skeins at home that they would like to find patterns for.

The yarn calculator will provide both alternative yarn as well as required amount in the new quality.

If you think it's hard to decide what size to make, it can be a good idea to measure a garment you own already and like the size of. Then you can pick the size by comparing those measures with the ones available in the pattern's size chart.

You'll find the size chart at the bottom of the pattern.

See DROPS lesson: How to read size chart

The needle size provided in the pattern serves only as a guide, the important thing is to follow the knitting tension. And since knitting tension is very individual, you will have to adjust the needle size to ensure that YOUR tension is the same as in the pattern – maybe you’ll have to adjust 1, or even 2 needle sizes, up or down to achieve the correct tension. For this, we recommend that you work test swatches.

Should you work with a different knitting tension than the one provided, the measurements of the finished garment might deviate from the measurement sketch.

See DROPS lesson: How to measure your tension/gauge

See DROPS video: How to make a tension/gauge swatch

Working a garment top-down provides more flexibility and room for personal adjustment. For example it is easier to try the garment on while working, as well as making adjustments to length of yoke and shoulder caps.

The instructions are carefully explaining every step, in the correct order. Diagrams are adjusted to the knitting direction and are worked as usual.

The diagram depicts all rows/rounds, and every stitch seen from the right side. It is read from bottom to top, from right to left. 1 square = 1 stitch.

When working back and forth, every other row is worked from the right side and every other row is worked from the wrong side. When working from the wrong side, the diagram will have to be worked reversed: from left to right, knit stitches are purled, purl stitches are knit etc.

When working in the round every round is worked from the right side and the diagram are worked from right to left on all rounds.

See DROPS lesson: How to read knitting diagrams

The diagram depicts all rows/rounds, and every stitch seen from the right side. It is worked from bottom to top, from right to left.

When working back and forth every other row is worked from the right side: from right to left and every other row is worked from the wrong side: from left to right.

When working in the round, every row in the diagram are worked from the right side, from right to left.

When working a circular diagram you start in the middle and work your way outwards, counter clockwise, row by row.

The rows usually start with a given number of chain stitches (equivalent to the height of the following stitch), this will either be depicted in the diagram or explained in the pattern.

See DROPS lesson: How to read crochet diagrams

Instructions for working several diagrams after each other on the same row/round, will often be written like so: “work A.1, A.2, A.3 a total of 0-0-2-3-4 times". This means you work A.1 once, then A.2 is worked once, and A.3 is repeated (in width) the number of times provided for your size – in this case like so: S = 0 times, M = 0 times, L=2 times, XL= 3 times and XXL = 4 times.

The diagrams are worked as usual: begin with the first row in A.1, then work the first row in A.2 etc.

See DROPS lesson: How to read knitting diagrams

See DROPS lesson: How to read crochet diagrams

The total width of the garment (from wrist-to-wrist) will be larger in the larger sizes, despite the actual sleeves being shorter. The larger sizes have longer sleeve caps and wider shoulders, so there will be a good fit in all sizes.

The measurement sketch/schematic drawing provides information regarding the full length of the garment. If it’s a jumper or a jacket the length is measured from the highest point on the shoulder closest to the neckline, and straight down to the bottom of the garment. It is NOT measured from the tip of shoulder. Similarly, the length of yoke is measured from the highest point on the shoulder and down to where yoke is split into body and sleeves.

On a jacket measures are never taken along bands, unless specifically stated. Always measure inside band stitches when measuring the length.

See DROPS lesson: How to read a schematic drawing

Diagrams are often repeated on the round or in height. 1 repeat is the diagram the way it appears in the pattern. If it says to work 5 repeats of A.1 in the round, then you work A.1 a total of 5 times after/next to each other in the round. If it says to work 2 repeats of A.1 vertically/in height you work the entire diagram once, then begin again at the start and work the entire diagram one more time.

Chain stitches are slightly narrower than other stitches and to avoid working the cast-on edge too tight, we simply chain more stitches to begin with. The stitch count will be adjusted on the following row to fit the pattern and measurement sketch.

The rib edge is more elastic and will contract slightly compared to, for example, stocking stitch. By increasing before the rib edge, you avoid a visible difference in width between the rib edge and the rest of the body.

It’s very easy to cast off too tightly, and by making yarn overs while casting off (and simultaneously casting these off) you avoid a too tight cast off edge.

See DROPS video: How to bind off with yarn overs (yo)

To achieve an even increase (or decrease) you can increase on, for example: every 3rd and 4th row alternately, like so: work 2 rows and increase on the 3rd row, work 3 rows and increase on the 4th. Repeat this until the increase is complete.

See DROPS lesson: Increase or decrease 1 st on every 3rd and 4th row alternately

Should you prefer to work in the round instead of back and forth, you may of course adjust the pattern. You’ll need to add steeks mid-front (usually 5 stitches), and follow the instructions. When you would normally turn and work from the wrong side, simply work across the steek and continue in the round. At the end you’ll cut the piece open, pick up stitches to work bands, and cover the cut edges.

See DROPS video: How to knit steeks and cut open

Should you prefer to work back and forth instead of in the round, you may of course adjust the pattern so you work the pieces separately and then assemble them at the end. Divide the stitches for the body in 2, add 1 edge stitch in each side (for sewing) and work the front and back pieces separately.

See DROPS lesson: Can I adapt a pattern for circular needles into straight needles?

Pattern repeats can vary slightly in the different sizes, in order to get the correct proportions. If you’re not working the exact same size as the garment in the photo, yours might deviate slightly. This has been carefully developed and adjusted so that the complete impression of the garment is the same in all sizes.

Make sure to follow instructions and diagrams for your size!

If you have found a pattern you like which is available in women’s size it’s not very difficult to convert it to men’s size. The biggest difference will be the length of sleeves and body. Start working on the women size that you think would fit across the chest. The additional length will be worked right before you cast off for the armhole/sleeve cap. If the pattern is worked top-down you can add the length right after the armhole or before the first decrease on sleeve.

Regarding additional yarn amount, this will depend on how much length you add, but it is better with a skein too many than too few.

All yarns will have excess fibres (from production) that might come off as lint or shedding. Brushed yarns (ie hairier yarns) have more of these loose, excess fibres, causing more shedding.

Shedding also depends on what is worn under or over the garment, and whether this pulls at the yarn fibres. It’s therefore not possible to guarantee that there will be no shedding

Below are some tips on how to get the best result when working with hairier yarns:

1. When the garment is finished (before you wash it) shake it vigorously so the looser hairs come off. NOTE: do NOT use a lint roller, brush or any method that pulls at the yarn.

2. Place the garment in a plastic bag and put it in your freezer - the temperature will cause the fibres to become less attached to each other, and excess fibres will come off easier.

3. Leave in the freezer for a few hours before taking it out and shaking it again.

4. Wash the garment according to the instructions on the yarn label.

Pilling is a natural process that happens to even the most exclusive of fibers. It's a natural sign of wear and tear that is hard to avoid, and that is most visible in high friction areas of your garment like a sweater's arms and cuffs.

You can make your garment look as new by removing the pilling, using a fabric comb or a pill/lint remover.

Still can't find the answer you need? Then scroll down and leave your question so one of our experts can try to help you. This will be done normally within 5 to 10 working days.
In the meantime, you can read the questions and answers that others have left to this pattern or join the DROPS Workshop on Facebook to get help from fellow knitters/crocheters!

You might also like...

Post a comment to pattern DROPS 226-8

We would love to hear what you have to say about this pattern!

If you want to leave a question, please make sure you select the correct category in the form below, to speed up the answering process. Required fields are marked *.

Comments / Questions (16)

country flag Veerle Van Coillie wrote:

U schrijft dat de boord en de manchetten met nld. 4 worden gebreid. Volgens het patroon worden de panden ook met 4 gebreid ? Vandaar mijn vraag, want dan wordt het te smal. Ik heb dat dus niet gedaan, moet dat niet worden aangepast ?

15.03.2024 - 09:16

DROPS Design answered:

Dag Veerle,

Sorry, ik had even niet goed opgelet. De mouwen worden met naald 9 gebreid waarvan de manchetten met naald 8. De rest van het vest wordt met naald 8 gebreid. Het proeflapje in dit geval dus ook met naald 8.

15.03.2024 - 10:28

country flag Veerle Van Coillie wrote:

Dat had ik inmiddels zelf al bedacht, maar als je het patroon leest begin je het achterpand met nld. 8 en dat blijft zo ! Er zitten ook geen boorden aan de panden.

31.01.2024 - 11:04

country flag Veerle Van Coillie wrote:

Ik heb het met naald 9 gemaakt en dat klopte, maar het vest wordt gebreid met naald 8. Ik begrijp het niet.

27.01.2024 - 08:17

country flag Veerle Van Coillie wrote:

Is het proeflapje met nld. 8 of 9 ? En klopt het dat alleen de mouwen met nld. 9 worden gebreid ?

26.01.2024 - 16:15

DROPS Design answered:

Dag Veerle,

Het proeflapje is met de dikste naald gebreid. De dunnere naald wordt voor de boord en manchetten etc. gebruikt.

28.01.2024 - 18:45

country flag Charlotte Ekman wrote:

Hej! Bra om detta tillägg görs. I avsnittet HÖGER FRAMSTYCKE behövs en liten påminnelse om att inte glömma att göra knapphål. 😊

22.08.2023 - 10:11

country flag FRANCINE BARATEAU PELLERIN wrote:

Bonjour Quel point employer sur l’envers svp

17.10.2022 - 16:16

DROPS Design answered:

Bonjour Mme Barateau Pellerin, les diagrammes montrent tous les rangs, ceux sur l'endroit aussi bien que ceux sur l'envers, autrement dit, en commençant de gauche à droite, on va tricoter A.1 ainsi: 5 mailles endroit (= point mousse), 2 mailles envers (le motif ajouré). Bon tricot!

17.10.2022 - 17:07

country flag Babs wrote:

Bonjour, Je n'arrive pas à faire le point.. Je suppose que les 5 mailles sont en fait au point mousse à tous les rangs...il faut bien tricoter uniquement le jeté à l'envers au rang suivant.. mais le reste du rang demeure au point mousse ? je n'arrive vraiment pas à démarrer ce point. Merci de votre aide

05.01.2022 - 11:06

DROPS Design answered:

Bonjour Babs, exactement: les 2 premières mailles de A.1 forment le point ajouré et se tricotent à l'envers sur l'envers, les 5 dernières mailles de A.1 se tricotent au point mousse (= à l'endroit sur l'endroit et à l'endroit sur l'envers). Bon tricot!

05.01.2022 - 17:15

country flag Marina wrote:

Buongiorno, spiegatemi, per favore, cosa vuol dire lavorare le prime 2 maglie di A1 e 8 a legaccio ( sto realizzando la taglia XXL). E poi, ogni quanti cm vanno fatte le diminuzioni laterali? GRAZIE

11.11.2021 - 10:28

DROPS Design answered:

Buonasera Marina, deve proseguire come indicato, lavorando le prime 2 maglie di A.1 e 8 maglie a maglia legaccio. Le diminuzioni laterali si lavorano a 10 cm e a 45 cm. Buon lavoro!

16.11.2021 - 22:32

country flag Anne Vikkelsø Rasmussen wrote:

Selvom den ser lidt svær ud vil jag altså prøve den

09.11.2021 - 06:03

country flag Helga Reisenwebber wrote:

Masala Chai

24.08.2021 - 23:27