DROPS Alpaca
DROPS Alpaca
100% Alpaca
from 3.40 £ /50g
Get the yarn to make this pattern from 13.60£.

The yarn cost is calculated from the pattern’s smallest size and the yarn’s cheapest product type. Looking for an even better price? You might find it on the DROPS Deals!

DROPS Super Sale

Hermine

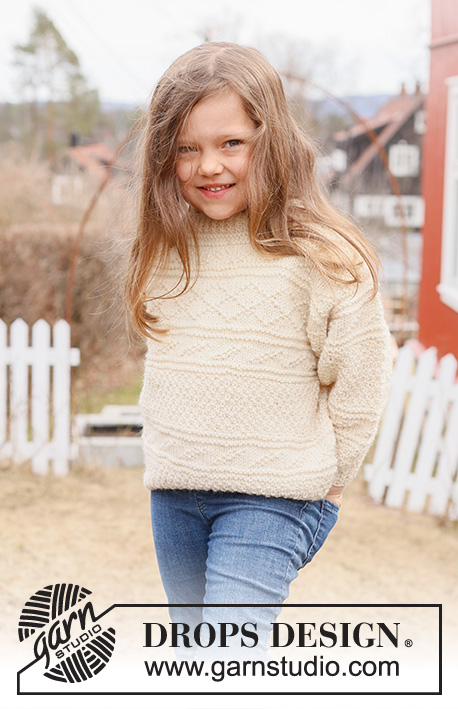
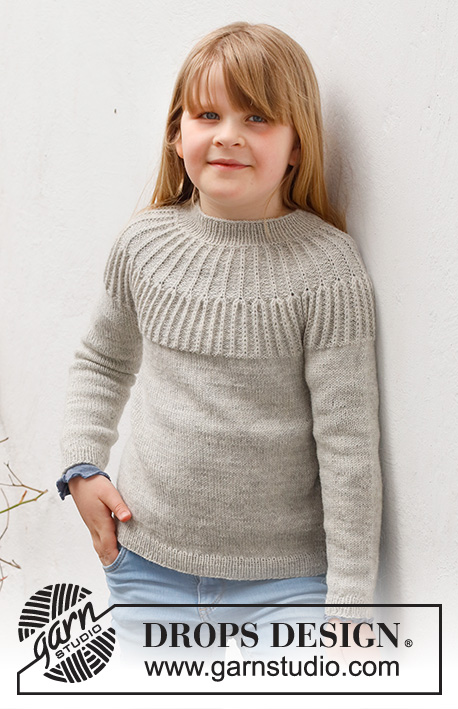
Knitted jumper for children in DROPS Alpaca. The piece is worked top down, with round yoke, textured pattern and Fisherman’s rib on the yoke. Sizes 2 to 12 years.

DROPS Children 41-14
DROPS Design: Pattern no z-051-bn
Yarn group A
-------------------------------------------------------

SIZES:
2 - 3/4 - 5/6 - 7/8 - 9/10 - 11/12 years
Child’s height in cm:
92 - 98/104 - 110/116 - 122/128 - 134/140 - 146/152

MATERIALS:
DROPS ALPACA from Garnstudio (belongs to yarn group A)
200-200-250-300-350-350 g colour 9020, light pearl grey

NEEDLES:
DROPS CIRCULAR NEEDLE SIZE 3 MM: Length 40 cm and 60 cm.
DROPS CIRCULAR NEEDLE SIZE 2.5 MM: Length 40 cm and 60 cm.
DROPS DOUBLE POINTED NEEDLES SIZE 3 MM.
DROPS DOUBLE POINTED NEEDLES SIZE 2.5 MM.
The technique MAGIC LOOP can be used – you then only need circular needle of 80 cm in each size.

KNITTING TENSION:
24 stitches in width and 32 rows in height with stocking stitch = 10 x 10 cm.
NOTE: Needle size is only a guide. If you get too many stitches on 10 cm, change to a larger needle size. If you get too few stitches on 10 cm, change to a smaller needle size.

-------------------------------------------------------

Alternative Yarn – See how to change yarns here
Yarn Groups A to F – Use the same pattern and change the yarn here
Yarn usage using an alternative yarn – Use our yarn converter here

-------------------------------------------------------

DROPS Alpaca
DROPS Alpaca
100% Alpaca
from 3.40 £ /50g
Get the yarn to make this pattern from 13.60£.

The yarn cost is calculated from the pattern’s smallest size and the yarn’s cheapest product type. Looking for an even better price? You might find it on the DROPS Deals!

DROPS Super Sale

SAVE 30% on 6 cotton favourites!
Valid until 12.04.2024

Pattern instructions

NOTE: This pattern is written in British English. All measurements in charts are in cm. For conversion from cm to inches - click here. There are different terms for crocheting in British and American English. If this pattern includes crochet, click for "crochet terms" here. For this pattern in American English, please click here.
-------------------------------------------------------

EXPLANATIONS FOR THE PATTERN:

-------------------------------------------------------

PATTERN:
See diagrams A.1 to A.3.

INCREASE/DECREASE TIP (evenly spaced):
To work out how to increase/decrease evenly, count the total number of stitches on needle (e.g. 92 stitches) and divide by the number of increases/decreases to be made (e.g. 10) = 9.2. In this example, increase by making 1 yarn over after approx. each 9th stitch. On the next round work the yarn overs twisted to avoid holes. When decreasing, knit together approx. each 8th and 9th stitch.

DECREASE TIP (for sleeves): 
Start 3 stitches before the marker thread, knit 2 together, knit 2 (marker thread sits between these 2 stitches), slip 1 stitch as if to knit, knit 1 and pass the slipped stitch over the knitted stitch (2 stitches decreased).

CASTING-OFF TIP:
To avoid the cast-off edge being tight you can cast off with a larger size needle. If the edge is still tight, make 1 yarn over after approx. each 6th stitch at the same time as casting off; the yarn overs are cast off as normal stitches.

-------------------------------------------------------

START THE PIECE HERE:

-------------------------------------------------------

JUMPER – SHORT OVERVIEW OF THE PIECE:
The neck and yoke are worked in the round with circular needle, from mid back and top down. The yoke is divided for body and sleeves and the body is continued in the round with circular needle. The sleeves are worked with double pointed needles, top down.

NECK:
Cast on 88-90-92-96-98-100 stitches with short circular needle size 2.5 mm and DROPS Alpaca.
Knit 1 round. Then work rib in the round (knit 1, purl 1) for 3-3-3-4-4-4 cm.
Insert 1 marker at the beginning of the round (= mid-back); the yoke is measured from this marker!
Purl 2 rounds, increasing 2-6-10-12-16-20 stitches evenly on the first round – read INCREASE/DECREASE TIP = 90-96-102-108-114-120 stitches.

YOKE:
Change to circular needle size 3 mm and work A.1 (= 30-32-34-36-38-40 repeats of 3 stitches).
After round 3 in A.1 there are 120-128-136-144-152-160 stitches.
Complete A.1 then repeat the 2 rounds with a star in A.1 until the piece measures 6-7-7-8-8-9 cm from the marker – finish after a complete repeat in height. REMEMBER THE KNITTING TENSION!
Work A.2 (= 30-32-34-36-38-40 repeats of 4 stitches).
When A.2 has been completed there are 240-256-272-288-304-320 stitches.
Work A.3 (= 60-64-68-72-76-80 repeats of 4 stitches).
Continue this pattern until the piece measures 12-13-14-15-16-17 cm from the marker.
Knit 1 round where you increase 4-4-0-0-0-0 stitches evenly spaced = 244-260-272-288-304-320 stitches.
Continue with stocking stitch until the piece measures 14-15-16-17-18-19 cm from the marker.
On the next round divide for the body and sleeves as follows: Knit 35-38-40-43-45-48 (= ½ back piece), place the next 52-54-56-58-62-64 stitches on a thread for the sleeve, cast on 6 stitches (= in side under sleeve), knit 70-76-80-86-90-96 (= front piece), place the next 52-54-56-58-62-64 stitches on a thread for the sleeve, cast on 6 stitches (= in side under sleeve), knit the last 35-38-40-43-45-48 stitches (= ½ back piece). The body and sleeves are finished separately. THE PIECE IS NOW MEASURED FROM HERE!

BODY:
= 152-164-172-184-192-204 stitches. Continue with stocking stitch in the round for 16-19-22-24-27-29 cm. There is approx. 3-3-3-4-4-4 cm left to finished length; try the jumper on and work to desired length.
To avoid the following rib being tight, knit 1 round where you increase 22-24-26-28-28-30 stitches evenly spaced = 174-188-198-212-220-234 stitches.
Change to circular needle size 2.5 mm and work rib (knit 1, purl 1) for 3-3-3-4-4-4 cm.
Cast off with knit over knit and purl over purl – read CASTING-OFF TIP!
The jumper measures approx. 36-40-44-48-52-55 cm from the shoulder down.

SLEEVES:
Place the 52-54-56-58-62-64 stitches from the thread on the one side of the piece on double pointed needles/short circular needle size 3 mm and knit up 1 stitch in each of the 6 stitches cast on under the sleeve = 58-60-62-64-68-70 stitches. Insert a marker thread in the middle of the 6 stitches under the sleeve. Allow the thread to follow your work onwards; it will be used when decreasing under the sleeve.
Start at the marker thread and work stocking stitch in the round for 2-2-2-3-3-3 cm. Now decrease 2 stitches under the sleeve – read DECREASE TIP. Decrease like this every 2½-3-3½-4½-4½-5 cm a total of 5-5-5-5-6-6 times = 48-50-52-54-56-58 stitches.
Work until the piece measures 18-22-26-29-32-36 cm from the division.
There is approx. 3-3-3-4-4-4 cm left to finished length; try the jumper on and work to desired length.
Knit 1 round where you decrease 6 stitches evenly spaced = 42-44-46-48-50-52 stitches. Change to double pointed needles size 2.5 mm and work rib (knit 1, purl 1) for 3-3-3-4-4-4 cm. Cast off with knit over knit and purl over purl – remember CASTING-OFF TIP!
The sleeve measures approx.21-25-29-33-36-40 cm from the division. Work the other sleeve in the same way.

Diagram

symbols = purl
symbols = knit
symbols = knit 1 in stitch below this stitch (Fisherman’s rib stitch)
symbols = Increase 4 stitches by working 5 stitches in the Fisherman’s rib stitch as follows: Knit 1 in the stitch below this stitch, but do not slip the stitch from the left needle, * make 1 yarn over, knit 1 in the same stitch but do not slip the stitch from the left needle *, work from *-* 1 more time, then slip the stitch from the left needle = 4 stitches increased.
symbols = between 2 stitches make 1 yarn over, on the next round work the yarn over twisted to avoid a hole
symbols = 1 repeat in height
diagram

Each of our patterns has specific tutorial videos to help you.

Do you have a question? See a list of frequently asked questions (FAQ)

Knitting tension is what determines the final measurements of your work, and is usually measured per 10 x 10 cm. It is provided like so: number of stitches in width x number of rows in height - eg: 19 stitches x 26 rows = 10 x 10 cm.

The knitting tension is very individual; some people knit/crochet loosely while others work tightly. You adjust the knitting tension with the needle size, which is why the suggested needle size is only meant as a guide! You need to adjust this (up or down) to ensure that YOUR knitting tension matches the knitting tension provided in the pattern. If you work with a different knitting tension than provided you will have a different yarn consumption, and your work will have different measurements than what the pattern suggests.

The knitting tension also determines which yarns can replace each other. As long as you achieve the same knitting tension you can replace one yarn with another.

See DROPS lesson: How to measure your tension/gauge

See DROPS video: How to make a gauge tension swatch

The required amount of yarn is provided in grams, eg: 450 g. To calculate how many balls you’ll need you first need to know how many grams are in 1 ball (25g, 50g or 100g). This information is available if you click on the individual yarn quality on our pages. Divide the amount required with the amount of each ball. For example, if each ball is 50g (the most common amount), the calculation will be as follows: 450 / 50 = 9 balls.

The important thing when changing from one yarn to another is that the knitting/crochet tension remains the same. This is so that the measurements of the finished piece will be the same as on the sketch provided. It is easier to achieve the same knitting tension using yarns from the same yarn group. It is also possible to work with multiple strands of a thinner yarn to achieve the knitting tension of a thicker one. Please try our yarn converter. We recommend you to always work a test swatch.

Please NOTE: when changing yarn the garment might have a different look and feel to the garment in the photo, due to individual properties and qualities of each yarn.

See DROPS lesson: Can I use a different yarn than the one mentioned in the pattern?

All our yarns are categorised into yarn groups (from A to F) according to thickness and knitting tension – group A contains the thinnest yarns and group F the thickest. This makes it easier for you to find alternative yarns to our patterns, should you wish to switch yarn. All yarns within the same group have a similar knitting tension and can easily replace each other. However, different yarn qualities have different structures and properties which will give the finished work a unique look and feel.

Click here for an overview of the yarns in each yarn group

At the top of all our patterns you’ll find a link to our yarn calculator, which is a helpful tool should you wish to use a different yarn than suggested. By filling in the yarn quality you wish to replace, the amount (in your size) and number of strands, the calculator will present good alternative yarns with the same knitting tension. Additionally it will tell you how much you’ll require in the new qualities and whether you’ll need to work with multiple strands. Most skeins are 50g (some are 25g or 100g).

If the pattern is worked with multiple colours, every colour will have to be calculated separately. Similarly, if the pattern is worked with several strands of different yarns (for example 1 strand Alpaca and 1 strand Kid-Silk) you will have to find alternatives for each, individually.

Click here to see our yarn calculator

Since different yarns have different qualities and textures we have chosen to keep the original yarn in our patterns. However, you can easily find options among our available qualities by using our yarn calculator, or simply pick a yarn from the same yarn group.

It is possible that some retailers still have discontinued yarns in stock, or that someone has a few skeins at home that they would like to find patterns for.

The yarn calculator will provide both alternative yarn as well as required amount in the new quality.

If you think it's hard to decide what size to make, it can be a good idea to measure a garment you own already and like the size of. Then you can pick the size by comparing those measures with the ones available in the pattern's size chart.

You'll find the size chart at the bottom of the pattern.

See DROPS lesson: How to read size chart

The needle size provided in the pattern serves only as a guide, the important thing is to follow the knitting tension. And since knitting tension is very individual, you will have to adjust the needle size to ensure that YOUR tension is the same as in the pattern – maybe you’ll have to adjust 1, or even 2 needle sizes, up or down to achieve the correct tension. For this, we recommend that you work test swatches.

Should you work with a different knitting tension than the one provided, the measurements of the finished garment might deviate from the measurement sketch.

See DROPS lesson: How to measure your tension/gauge

See DROPS video: How to make a tension/gauge swatch

Working a garment top-down provides more flexibility and room for personal adjustment. For example it is easier to try the garment on while working, as well as making adjustments to length of yoke and shoulder caps.

The instructions are carefully explaining every step, in the correct order. Diagrams are adjusted to the knitting direction and are worked as usual.

The diagram depicts all rows/rounds, and every stitch seen from the right side. It is read from bottom to top, from right to left. 1 square = 1 stitch.

When working back and forth, every other row is worked from the right side and every other row is worked from the wrong side. When working from the wrong side, the diagram will have to be worked reversed: from left to right, knit stitches are purled, purl stitches are knit etc.

When working in the round every round is worked from the right side and the diagram are worked from right to left on all rounds.

See DROPS lesson: How to read knitting diagrams

The diagram depicts all rows/rounds, and every stitch seen from the right side. It is worked from bottom to top, from right to left.

When working back and forth every other row is worked from the right side: from right to left and every other row is worked from the wrong side: from left to right.

When working in the round, every row in the diagram are worked from the right side, from right to left.

When working a circular diagram you start in the middle and work your way outwards, counter clockwise, row by row.

The rows usually start with a given number of chain stitches (equivalent to the height of the following stitch), this will either be depicted in the diagram or explained in the pattern.

See DROPS lesson: How to read crochet diagrams

Instructions for working several diagrams after each other on the same row/round, will often be written like so: “work A.1, A.2, A.3 a total of 0-0-2-3-4 times". This means you work A.1 once, then A.2 is worked once, and A.3 is repeated (in width) the number of times provided for your size – in this case like so: S = 0 times, M = 0 times, L=2 times, XL= 3 times and XXL = 4 times.

The diagrams are worked as usual: begin with the first row in A.1, then work the first row in A.2 etc.

See DROPS lesson: How to read knitting diagrams

See DROPS lesson: How to read crochet diagrams

The total width of the garment (from wrist-to-wrist) will be larger in the larger sizes, despite the actual sleeves being shorter. The larger sizes have longer sleeve caps and wider shoulders, so there will be a good fit in all sizes.

The measurement sketch/schematic drawing provides information regarding the full length of the garment. If it’s a jumper or a jacket the length is measured from the highest point on the shoulder closest to the neckline, and straight down to the bottom of the garment. It is NOT measured from the tip of shoulder. Similarly, the length of yoke is measured from the highest point on the shoulder and down to where yoke is split into body and sleeves.

On a jacket measures are never taken along bands, unless specifically stated. Always measure inside band stitches when measuring the length.

See DROPS lesson: How to read a schematic drawing

Diagrams are often repeated on the round or in height. 1 repeat is the diagram the way it appears in the pattern. If it says to work 5 repeats of A.1 in the round, then you work A.1 a total of 5 times after/next to each other in the round. If it says to work 2 repeats of A.1 vertically/in height you work the entire diagram once, then begin again at the start and work the entire diagram one more time.

Chain stitches are slightly narrower than other stitches and to avoid working the cast-on edge too tight, we simply chain more stitches to begin with. The stitch count will be adjusted on the following row to fit the pattern and measurement sketch.

The rib edge is more elastic and will contract slightly compared to, for example, stocking stitch. By increasing before the rib edge, you avoid a visible difference in width between the rib edge and the rest of the body.

It’s very easy to cast off too tightly, and by making yarn overs while casting off (and simultaneously casting these off) you avoid a too tight cast off edge.

See DROPS video: How to bind off with yarn overs (yo)

To achieve an even increase (or decrease) you can increase on, for example: every 3rd and 4th row alternately, like so: work 2 rows and increase on the 3rd row, work 3 rows and increase on the 4th. Repeat this until the increase is complete.

See DROPS lesson: Increase or decrease 1 st on every 3rd and 4th row alternately

Should you prefer to work in the round instead of back and forth, you may of course adjust the pattern. You’ll need to add steeks mid-front (usually 5 stitches), and follow the instructions. When you would normally turn and work from the wrong side, simply work across the steek and continue in the round. At the end you’ll cut the piece open, pick up stitches to work bands, and cover the cut edges.

See DROPS video: How to knit steeks and cut open

Should you prefer to work back and forth instead of in the round, you may of course adjust the pattern so you work the pieces separately and then assemble them at the end. Divide the stitches for the body in 2, add 1 edge stitch in each side (for sewing) and work the front and back pieces separately.

See DROPS lesson: Can I adapt a pattern for circular needles into straight needles?

Pattern repeats can vary slightly in the different sizes, in order to get the correct proportions. If you’re not working the exact same size as the garment in the photo, yours might deviate slightly. This has been carefully developed and adjusted so that the complete impression of the garment is the same in all sizes.

Make sure to follow instructions and diagrams for your size!

If you have found a pattern you like which is available in women’s size it’s not very difficult to convert it to men’s size. The biggest difference will be the length of sleeves and body. Start working on the women size that you think would fit across the chest. The additional length will be worked right before you cast off for the armhole/sleeve cap. If the pattern is worked top-down you can add the length right after the armhole or before the first decrease on sleeve.

Regarding additional yarn amount, this will depend on how much length you add, but it is better with a skein too many than too few.

All yarns will have excess fibres (from production) that might come off as lint or shedding. Brushed yarns (ie hairier yarns) have more of these loose, excess fibres, causing more shedding.

Shedding also depends on what is worn under or over the garment, and whether this pulls at the yarn fibres. It’s therefore not possible to guarantee that there will be no shedding

Below are some tips on how to get the best result when working with hairier yarns:

1. When the garment is finished (before you wash it) shake it vigorously so the looser hairs come off. NOTE: do NOT use a lint roller, brush or any method that pulls at the yarn.

2. Place the garment in a plastic bag and put it in your freezer - the temperature will cause the fibres to become less attached to each other, and excess fibres will come off easier.

3. Leave in the freezer for a few hours before taking it out and shaking it again.

4. Wash the garment according to the instructions on the yarn label.

Pilling is a natural process that happens to even the most exclusive of fibers. It's a natural sign of wear and tear that is hard to avoid, and that is most visible in high friction areas of your garment like a sweater's arms and cuffs.

You can make your garment look as new by removing the pilling, using a fabric comb or a pill/lint remover.

Still can't find the answer you need? Then scroll down and leave your question so one of our experts can try to help you. This will be done normally within 5 to 10 working days.
In the meantime, you can read the questions and answers that others have left to this pattern or join the DROPS Workshop on Facebook to get help from fellow knitters/crocheters!

You might also like...

Hermine

Enredadaenmisovillos, Spain

Hermine Sweater

Elke, Netherlands

Hermine

Yuliya, Russian Federation

Post a comment to pattern DROPS Children 41-14

We would love to hear what you have to say about this pattern!

If you want to leave a question, please make sure you select the correct category in the form below, to speed up the answering process. Required fields are marked *.

Comments / Questions (9)

country flag Mamen wrote:

Hola. Querría saber si existe una versión para mujer de este patrón (lo estoy tejiendo para mi hija y quiero uno a juego para mí). Gracias.

05.11.2023 - 17:04

DROPS Design answered:

Hola Mamen, puedes buscar patrones en punto inglés para mujer (como este: https://www.garnstudio.com/pattern.php?id=11046&cid=23) y trabajar el que prefieras. También puedes buscar cualquier jersey con canesú redondo para mujer y aplicar el patrón utilizado en el canesú para el patrón de niños en el de mujer, con diferente número de repeticiones del patrón.

05.11.2023 - 19:56

country flag Nell Di Francesco wrote:

Bonjour! C'est le premier pull que je fais et la seconde fois que je suis un modèle. Je ne comprends pas le 4ème tour de A1. On passe de 1 maille endroit et 3 mailles envers à 1 maille double et 2 mailles envers avec 1 jeté entre. Dans ce cas-là, comment obtenir le même résultat que sur la photo ? Faire ce motif comme indiqué sur 3 mailles décale ma ligne de "tresses".

30.08.2023 - 00:13

DROPS Design answered:

Bonjour Mme Di Francesco, au 3ème tour de A.1, vous tricotez: 1 m côtes anglaises, 1 m env, 1 jeté, 1 m env. Au 4ème tour de A.1, vous allez tricoter: 1 m end, 1 m env, tricotez le jeté torse à l'envers, 1 m env=> vous avez maintenant 3 mailles envers entre les mailles en côtes anglaises. Bon tricot!

30.08.2023 - 09:03

country flag Sara wrote:

Hi, I wanna make the 10 years pattern but with 20 sts for 10 cm gauge. So how should I adjust the pattern?!

03.05.2023 - 15:46

DROPS Design answered:

Dear Sara, you can take inspiration from another pattern with the same tension to adjust number of stitches - see all our jumpers for children with tension 22-20 here. Happy knitting!

04.05.2023 - 07:48

country flag Aline Houle wrote:

Je trouve votre pull très beau et intéressant. Peut-il être fait en modèle robe? Si oui comment faire pour qu'il soit bien ajusté (plus étroit au corps) Je cherche vraiment un modèle avec manches raglan style étroit pour fille ¢ a 5 ans. Merci beaucoup a l'avance.. Super beau pull...

05.09.2022 - 13:47

DROPS Design answered:

Bonjour Mme Houle, nous ne sommes malheureusement pas en mesure de pouvoir adapter chacun de nos modèles à chaque demande, mais vous pourrez découvrir ici tous nos modèles de robes en 5 ans, vous y trouverez sans doute l'inspiration. Bon tricot!

05.09.2022 - 13:53

country flag Marie Andreani wrote:

Bravo pour les modeles et pour les explications Une fan de drops

29.08.2022 - 00:31

country flag Anja Banach wrote:

Hallo, im Rumpfteil müssen 22 Maschen zugenommen werden. Muss ich das auf Brusthöhe oder unten am Bund machen?

15.01.2022 - 18:29

DROPS Design answered:

Liebe Frau Banach, die 22 Maschen nehmen Sie in die 1. Größe wenn der Rumpfteil 16 cm (ab Verteilung) misst, und in der ganzen Runde, nicht nur über das Vorderteil - diese Lektion kann Ihnen damit helfen. Viel Spaß beim stricken!

17.01.2022 - 08:23

country flag Chantal Bouchet wrote:

Bonjour je voudrais savoir comment faire apres un pull commencé par le col que les cotés restent bien droit? que cela ne part pas évasé merci chantal

09.12.2021 - 06:56

DROPS Design answered:

Bonjour Mme Bouchet, je ne suis pas bien sûre de comprendre votre question, de quels côtés parlez-vous? Est-ce que cette leçon pourrait vous aider à visualiser?

09.12.2021 - 07:44

country flag Rennie Koonstra wrote:

Ik snap patroon A1 van breipatroon z-051-bn niet De ie nld moet ik 3 st av, 1 st r Dan de 2e ndl 3 st av en dan recht breien in de steek eronder, die gaat dan naar de rechternld, 1 omslag wat doe ik met die bovenste st, doe ik die ongebreid naar de rechternld? Dan past nld 3, niet meer met 3 av, 1 recht

14.11.2021 - 21:38

DROPS Design answered:

Dag Rennie,

Je leest het telpatroon van onder naar boven en van rechts naar links, dus je breit eerst het hokje rechts onder in het telpatroon, dan het hokje wat er links naast staat, etc.

17.11.2021 - 16:40

country flag Sylvia Gilbert wrote:

I have purchased 6 balls (I think 50g balls) of Drops Alpacca wool to knit a jumper for a 5 - 6 year old. My wool has arrived and it appears much finer ply than I thought it would be. I see the pattern above 'Hermine' which I like and would like to do this or if you have another pattern for just a plain raglan or set in sleeve jumper? Have I enough wool for either?

12.11.2021 - 01:07

DROPS Design answered:

Dear Mrs Gilbert, you will find all patterns for children worked with a yarn group A - such as Alpaca here - what about this one? Use our converter to get the new amount in Alpaca. Happy knitting!

12.11.2021 - 07:46