
Popular categories
Looking for a yarn?


|
||||||||||||||||||||||
Snowy Trails |
||||||||||||||||||||||
 |
 |
|||||||||||||||||||||
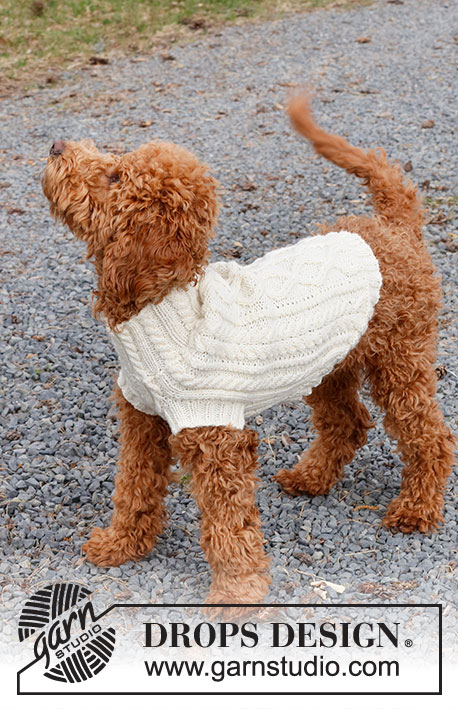
Knitted jumper for dogs with cables in DROPS Karisma. Sizes XS - M.
DROPS 228-52 |
||||||||||||||||||||||
|
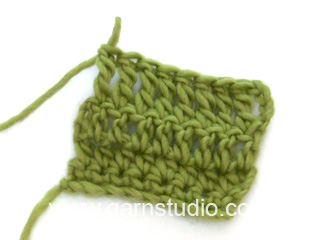
------------------------------------------------------- EXPLANATIONS FOR THE PATTERN: ------------------------------------------------------- RIDGE/GARTER STITCH (worked back and forth): Knit all rows. 1 ridge = knit 2 rows. PATTERN: See diagrams A.1 to A.5. The diagrams show all rows in the pattern from the right side. INCREASE TIP (evenly spaced): To work out how to increase evenly, count the total number of stitches on the needle (e.g. 82 stitches) and divide by the number of increases to be made (e.g. 12) = 6.8. In this example, increase by making 1 yarn over after approx. each 7th stitch. On the next row work the yarn overs twisted to avoid holes. CASTING-OFF TIP: To avoid the cast-off edge being tight you can cast off with a larger size needle. If the edge is still tight, make 1 yarn over after approx. each 4th stitch at the same time as casting off; the yarn overs are cast off as normal stitches. ------------------------------------------------------- START THE PIECE HERE: ------------------------------------------------------- JUMPER FOR DOGS – SHORT OVERVIEW OF THE PIECE: The jumper is worked back and forth, top down with an opening underneath which is sewn together to finish. The piece is then divided to make holes for the front legs. The sections are joined again and continued back and forth. Edges are worked around the holes for the legs and around the opening (= bottom of front and back pieces). The jumper is sewn together underneath to finish. NECK: Cast on 72-82-92 stitches with circular needle size 3 mm and DROPS Karisma. Purl 1 row from the wrong side, then work as follows from the right side: 1 edge stitch in GARTER STITCH – read description above, A.1 over the next 70-80-90 stitches (= 7-8-9 repeats of 10 stitches), 1 edge stitch in garter stitch. Continue this pattern for 8 cm. Knit 1 row from the right side where you increase 12-20-26 stitches evenly spaced – read INCREASE TIP in explanations above = 84-102-118 stitches. Knit 1 row from the wrong side. Change to circular needle size 4 mm. Insert a marker at the beginning of the row; the piece is measured from here. YOKE: Continue the different sizes as follows: XS: From the right side: A.2 (= 20 stitches), A.3 over the next 12 stitches (= 2 repeats of 6 stitches), A.5 (= 20 stitches), A.3 over the next 12 stitches, A.6 (= 20 stitches). S: From the right side: A.2 (= 20 stitches), A.3 (= 6 stitches), A.4 (= 9 stitches), A.3, A.5 (= 20 stitches), A.3 (= 6 stitches), A.4 (= 9 stitches), A.3, A.6 (= 20 stitches). M: From the right side: A.2 (= 20 stitches), A.3 (= 6 stitches), A.7 (= 4 stitches), A.4 (= 9 stitches), A.8 (= 4 stitches), A.3, A.5 (= 20 stitches), A.3, A.7, A.4, A.8, A.3, A.6 (= 20 stitches). Work this pattern back and forth until the piece measures 2-4-7 cm from the marker – adjust so the next row is worked from the wrong side and as follows: Work pattern as before over the first 11-11-15 stitches and place these stitches on a thread (= front piece-2), work as before over the next 62-80-88 and place them on a thread (= back piece), work the last 11-11-15 stitches (= front piece-1). Each piece is continued separately: FRONT PIECE-1: Start from the right side, working as before and cast on 1 stitch at the end of the first row from the right side (edge stitch worked in garter stitch) = 12-12-16 stitches. Continue the pattern until the piece measures 9-11-13 cm from the division – finish with a row from the wrong side where you cast off the edge stitch at the beginning of this row (opening for the leg) = 11-11-15 stitches. Cut the strand and lay the piece to one side. FRONT PIECE-2: Place the stitches back on needle size 4 mm. Start from the right side, working pattern as before, and cast on 1 edge stitch at the end of the first row from the wrong side (edge stitch worked in garter stitch) = 12-12-16 stitches. Work pattern until the piece measures 9-11-13 cm from the division – finish on the same row as the other front piece and cast off the edge stitch (towards the opening for the leg) at the beginning of the next-to-last row = 11-11-15 stitches. Cut the strand and lay the piece to one side. BACK PIECE: Place the stitches back on needle size 4 mm. Start from the right side, continue the pattern and cast on 1 edge stitch at the end of the first 2 rows (edge stitches worked in garter stitch) = 64-82-90 stitches. Work until the piece measures 9-11-13 cm from the division – finish after the same row as the front pieces and cast off the edge stitches at the beginning of the last 2 rows. BODY: Place the front and back pieces on the same needle = 84-102-118 stitches. Work the first row from the right side and continue the pattern until the piece measures 14-19-28 cm from the marker. There is approx. 3 cm left under the tummy and 10-12-12 cm along the back. Try the jumper on and work to desired length. Continue the pattern. AT THE SAME TIME cast off at the beginning of each row as follows: 11-11-15 stitches 1 time, 3 stitches 1 time, 2 stitches 2-3-3 times, 1 stitch 3 times, 2 stitches 2-3-3 times and 3 stitches 1 time on each side = 28-38-46 stitches. Cast off the last 28-38-54 stitches on the next row. The piece measures approx. 21-29-37 cm from the marker. EDGING AROUND THE LEGS: With double pointed needles size 3 mm, knit up 48 to 68 stitches around the front leg opening, inside the 1 edge stitch. The number of stitches should be divisible by 4. Work rib (knit 2, purl 2) in the round for 3 cm. Cast off with knit over knit and purl over purl - read CASTING-OFF TIP. Work around the other leg in the same way. EDGING AROUND THE BODY: Work an edge along the sides underneath the body. Start from the right side, using circular needle size 3 mm and knit up 98 to 122 stitches. The number of stitches should be divisible by 4 + 2. Knit 1 row from the wrong side. Work rib from the right side as follows: 2 edge stitches in garter stitch, * knit 2, purl 2 *, work from *-* until there are 2 stitches left, 2 edge stitches in garter stitch. Work garter stitch over garter stitch, knit over knit and purl over purl for 3 cm. Cast off with knit over knit and purl over purl – remember CASTING-OFF TIP. ASSEMBLY: Sew the jumper together underneath, sewing in the outermost loop of the outermost stitch so the seam is flat. |
||||||||||||||||||||||
Diagram explanations |
||||||||||||||||||||||
|
||||||||||||||||||||||

|
||||||||||||||||||||||

|
||||||||||||||||||||||

|
||||||||||||||||||||||
|
Have you made this or any other of our designs? Tag your pictures in social media with #dropsdesign so we can see them! Do you need help with this pattern?You'll find tutorial videos, a Comments/Questions area and more by visiting the pattern on garnstudio.com. © 1982-2024 DROPS Design A/S. We reserve all rights. This document, including all its sub-sections, has copyrights. Read more about what you can do with our patterns at the bottom of each pattern on our site. |
||||||||||||||||||||||


With over 40 years in knitting and crochet design, DROPS Design offers one of the most extensive collections of free patterns on the internet - translated to 17 languages. As of today we count 304 catalogues and 11422 patterns - 11422 of which are translated into English (UK/cm).
We work hard to bring you the best knitting and crochet have to offer, inspiration and advice as well as great quality yarns at incredible prices! Would you like to use our patterns for other than personal use? You can read what you are allowed to do in the Copyright text at the bottom of all our patterns. Happy crafting!
Comments / Questions (15)
Hei, hva er årsaken til at denne genseren strikkes fram og tilbake? Vil møsteret ‘vri seg’ ved å strikke rundt? Jeg liker ikke å sy sammen deler, fordi jeg ikke liker sømmer på strikkeplagg…
10.11.2023 - 12:38DROPS Design answered:
Hei Gry. Vi forsøker å tilpasse oppskriftene våre til alle våre brukere, noen liker å strikke rundt andre frem og tilbake (for så å sy delene sammen). Du kan fint tilpasse oppskriften slik at du kan strikke den rundt om du ønsker det. God Fornøyelse! mvh DROPS Design
13.11.2023 - 13:06Hej, jeg er ved at lave en af j’ers opskrift på hunde Sweater. Og er meget forvirret over hvordan jeg lige skal gør. Det er Snowy Trails sweater. Den hvide. Mig sprøgsmål gå på hvordan man skal lave den tre rakke i diagrammet A5 håber i kan hjælp mig vider
20.10.2023 - 20:04DROPS Design answered:
Hej Micka, 3. række i diagram A.5 strikker du således over de 20 m: sæt 2 masker på hj.p foran arb, 1 vr, 2r fra hj.p, 4 vr, sæt 1 m på hj.p bag arb, 2r, 1v fra hj.p, sæt 2 m på hj.p foran arb, 1vr, 2r fra hj.p, 4 vr, sæt 1 m på hj,.p bag arb, 2r, 1vr fra hj.p
24.10.2023 - 08:33I seem to have gone wrong somewhere. In the Body section, I had 102 stitches. Then I followed the different cast-off instructions for the different rows. But instead of 38 stitches, I’m left with 67! What do I do??
29.06.2023 - 02:48DROPS Design answered:
Dear Jessica, you have to cast off 11 stitches at the beg of next 2 rows (= at the beginning of rows from RS and from WS = 11 sts x 1 time on each side), ie cast off 3 sts at the beg of next 2 rows (3 sts on each side), 2 sts at the beg of next 6 rows (2 sts 3 times on each side), then 1 st at the beg of next 6 rows (1 st 3 times on each side), then 2 sts at the beg of next 6 rows (2 sts 3 times on each side) and 3 sts at the beg of next 2 rows (3 sts on each side) = (11x2)+(3x2)+(2x3x2)+(1x3x2)+(2x3x2)+(3x2)=64 sts decreased from 102 sts = 38 sts remain. Happy knitting!
29.06.2023 - 12:54Can you please explain the second part of the BODY section? when i start binding off stitches, do i bind off 11 at the start of the 1st row, then 3 on the 2nd row, then 2 stitches for rows 3-5 and so on?
21.06.2023 - 02:47DROPS Design answered:
Dear Jessica, you first cast off 11 sts at the beginning of first row, and then you will now work in rows (back and forth on needle), and cast off 3 sts at the beginning of next 2 rows (3 sts on each side), 2 sts at the beinning of next 4-6 rows (size = 2 or 3 times 2 sts on each side), etc.. Happy knitting!
21.06.2023 - 08:12Je ne comprends pas la légende diagramme (s) A3 barre oblique en gras ? A5 ? Merci de m'expliquer Cordialement
09.02.2023 - 16:44DROPS Design answered:
Bonjour Mme Gris, dans A.3, on fait une torsade sur 2 mailles: comme la 1ère des 2 torsades de cette vidéo; Pour A.5 vous devez croiser les mailles soit sur 3 m (4ème et 5ème symbole) vous sur 4 m (3ème symbole). Bon tricot!
10.02.2023 - 09:19Hi, I would like to know how can I scale this pattern for bigger dogs. I have a Border Collie and la Labrador and I’d love to knit one of this sweaters for each one of them.
22.06.2022 - 21:15DROPS Design answered:
Dear Cris, we are unfortunately not able to adjust every pattern to every single request . You can request help from your Yarn store or any knitting forum. Thanks for your comprehension. Happy knitting!
23.06.2022 - 08:37Cuando se habla de punto orillo entiendo que es al principio de la labor, pero entonces me sobra un punto. Por ejemplo en el gráfico A1 tengo 92 puntos y hay que hacer 9 repeticiones de 10 puntos (90 puntos) un punto orillo y que hago con el otro?
22.03.2022 - 17:57DROPS Design answered:
Hola Paola, se trabaja 1 punto orillo al principio y 1 punto orillo al final de la fila. Por lo tanto obtienes 92 puntos.
26.03.2022 - 19:17Hi, I simply love this pattern but have never seen one produced in this way and don’t understand it at all. It would be helpful to see the other questions in English asthis may have helped. I am truly disappointed as I would have loved this pattern for my Shih Tzu and the wools look great.
24.02.2022 - 10:35DROPS Design answered:
Dear Mrs Johnson, this jumper is worked first in the round from the neck , you will divide piece for legs and work separately back piece and bottom pice for legs openings, then work in the round again for some cm then cast off sts on mid front/bottom and on each side to the end. You then pick up sts around opening /legs for the ribbing edge. Read more about diagrams here. Happy knitting!
24.02.2022 - 10:51Hello! Why does the pattern say to switch to 4mm needles for Front Piece 2 and the Back Piece when Front Piece 1 is knitted on 3mm needles?
03.12.2021 - 00:09DROPS Design answered:
Hi Lucy, you are right, Front Piece 1, Front Piece 2 and Back piece should be knitted on 4 mm needles. Happy knitting!
06.12.2021 - 09:18Hei, jeg vil bare si i fra om at det ikke er beskrevet når man skal gå over til pinne nr 4 ( har selv gått over etter rett på vrang avslutningen på halsen, før bilen begynner. Det er også en feil i A5 rapporten. Den slutter med en rett pinne og begynner med en rett pinne, så her må man velge om man skal legge til eller trekke fra en runde med rette og vrange masker. Bortsett fra det så blir denne genseren helt nydelig når den er ferdig strikket!
27.10.2021 - 18:16