DROPS Brushed Alpaca Silk
77% Alpaca, 23% Silk
from 3.95 $ /25g
Get the yarn to make this pattern from 43.45$.

The yarn cost is calculated from the pattern’s smallest size and the yarn’s cheapest product type. Looking for an even better price? You might find it on the DROPS Deals!

DROPS SS24

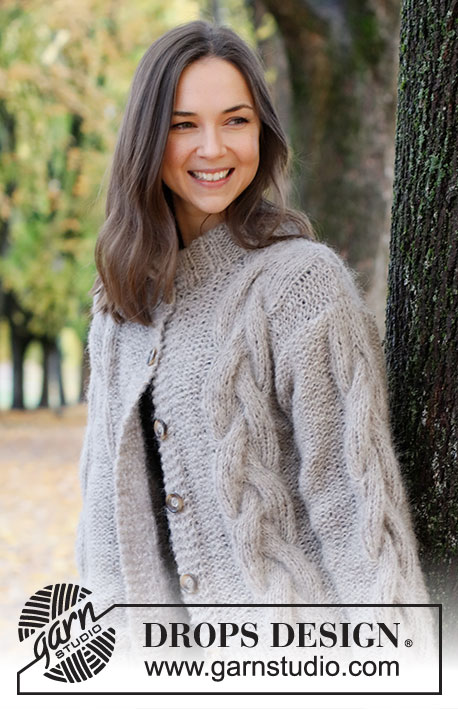
Evening Fires Sweater

Knitted sweater in 2 strands DROPS Brushed Alpaca Silk or 1 strand DROPS Wish. Piece is knitted with cables and double neck edge. Size: S - XXXL

DROPS 226-40
DROPS design: Pattern as-158
Yarn group C + C or E
----------------------------------------------------------

SIZE:
S - M - L - XL - XXL – XXXL

Finished measurements:
Chest measurements: 98-106-112-120-128-134 cm = 38½"-41¾"-44"-47¼"-50⅜"-52¾"
Full length: 52-54-56-58-60-62 cm = 20½"-21¼"-22"-22¾"-23⅝"-24⅜"
All measurements in charts are in cm.

MATERIALS:
DROPS BRUSHED ALPACA SILK from Garnstudio (belongs to yarn group C)
275-300-325-350-375-425 g color 04, light beige

Or use;
DROPS WISH from Garnstudio (belongs to yarn group E)
550-600-650-700-750-850g color 08, grey beige

NEEDLES:
DROPS CIRCULAR NEEDLE SIZE 8 MM = US 11 : Length 40 and 80 cm = 16" and 32".
DROPS CIRCULAR NEEDLE SIZE 6 MM = US 10: Length 40 and 80 cm = 16" and 32"
DROPS DOUBLE POINTED NEEDLES SIZE 8 MM = US 11
DROPS DOUBLE POINTED NEEDLES SIZE 6 MM = US 10
DROPS CABLE NEEDLE - for cables.
The technique MAGIC LOOP can be used – you then only need circular needle of 80 cm = 32" in each size.

KNITTING GAUGE:
11 stitches in width and 15 rows vertically in stockinette stitch and 2 strands DROPS Brushed Alpaca Silk or 1 strand DROPS Wish = 10 x 10 cm = 4" x 4".
NOTE! Remember that needle size is only a suggestion. If you have too many stitches on 10 cm = 4" switch to larger needles. If you have too few stitches on 10 cm = 4" switch to smaller needles.

-------------------------------------------------------

Alternative Yarn – See how to change yarns here
Yarn Groups A to F – Use the same pattern and change the yarn here
Yarn usage using an alternative yarn – Use our yarn converter here

-------------------------------------------------------

DROPS Brushed Alpaca Silk
77% Alpaca, 23% Silk
from 3.95 $ /25g
Get the yarn to make this pattern from 43.45$.

The yarn cost is calculated from the pattern’s smallest size and the yarn’s cheapest product type. Looking for an even better price? You might find it on the DROPS Deals!

Pattern instructions

NOTE: This pattern is written in American English. All measurements in charts are in cm. For conversion from inches to cm - click here. There are different terms for crocheting in American and British English. If this pattern includes crochet, click for "crochet terms" here. For this pattern in British English, please click here.
----------------------------------------------------------

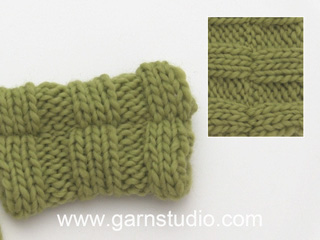
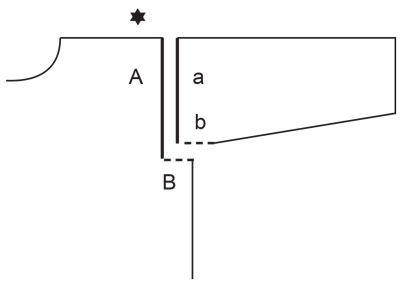
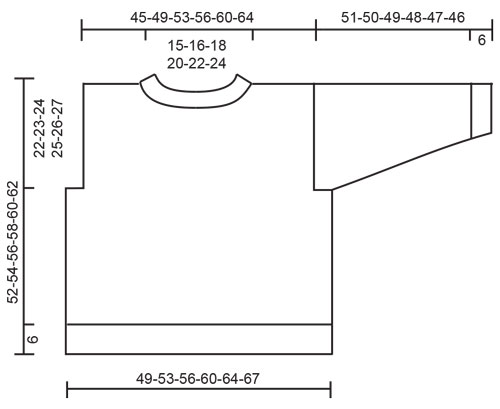
EXPLANATION FOR THE PATTERN:

----------------------------------------------------------

PATTERN:
See diagrams A.1 and A.2. Diagrams show all rows in pattern seen from the right side.

INCREASE TIP:
Work until 2 stitches remain before marker thread, make 1 yarn over, knit 4 (marker thread is in the middle of these 2 stitches), make 1 yarn over. On next round purl yarn overs twisted to avoid holes = 2 stitches increased. Then purl the new stitches.

----------------------------------------------------------

START THE PIECE HERE:

----------------------------------------------------------

SWEATER - SHORT OVERVIEW OF THE PIECE:
Piece is worked in the round on circular needle, from the bottom and up to armholes, then divide the piece and finish front piece and back piece separately. Work sleeves in the round on a short circular needle/double pointed needles, bottom up.
BODY:
Cast on 112-120-128-136-144-152 stitches on circular needle size 6 MM = US 10 with 2 strands DROPS Brushed Alpaca Silk or 1 strand DROPS Wish. Knit 1 round, then work rib as follows:
SIZE S-L-XXL: Knit 1, * purl 2, knit 2 *, work from *-* until 3 stitches remain, purl 2 and knit 1.
SIZE M-XL-XXXL: Purl 1, * knit 2, purl 2 *, work from *-* until 3 stitches remain, knit 2 and purl 1.
Continue with rib until piece measures 6 cm = 2⅜", switch to circular needle size 8 MM = US 11.
Continue as follows: Purl the first 7-9-11-13-15-17 stitches, at the same time decrease 1 stitch over these stitches, A.1 (= 10 stitches that are increased to 15 stitches), purl 6, A.1, purl 6, A.1, purl the next 14-18-22-26-30-34 stitches, at the same time decrease 2 stitches over these stitches, A.1, purl 6, A.1, purl 6, A.1, purl the last 7-9-11-13-15-17 stitches, at the same time decrease 1 stitch over these stitches. When A.1 has been worked 1 time vertically, there are 138-146-154-162-170-178 stitches on needle. Continue with A.2 (= 15 stitches) over every A.1, work the remaining stitches as before. Continue pattern like this. REMEMBER THE KNITTING GAUGE! When piece measures 30-31-32-33-34-35 cm = 11¾"-12¼"-12½"-13"-13⅜"-13¾", divide the piece for front piece and back piece. Work next round as follows: Bind off the first 2 stitches on round for armhole, work 65-69-73-77-81-85 stitches (= front piece), bind off 4 stitches for armhole, work 65-69-73-77-81-85, bind off the last 2 stitches on needle for armhole. Cut the yarn. Each part is worked separately back and forth on needle. Slip the first 65-69-73-77-81-85 stitches on a stitch holder, and then work over the 65-69-73-77-81-85 stitches on back piece.

BACK PIECE:
= 65-69-73-77-81-85 stitches. Work as follows - from right side: Purl 4-6-8-10-12-14, A.2, purl 6, A.2, purl 6, A.2, purl 4-6-8-10-12-14. When piece measures 49-51-53-55-57-59 cm = 19¼"-20"-21"-21⅝"-22½"-23¼", decrease 5 stitches over middle repetition of A.2, on next row bind off the middle 14-16-18-20-22-24 stitches for neck, and finish each shoulder separately. Then bind off 1 stitch on next row from neck = 22-23-24-25-26-27 stitches. Work the stitches in A.2 in stockinette stitch, decrease at the same time 5 stitches evenly over these stitches = 17-18-19-20-21-22 stitches. Bind off when piece measures 52-54-56-58-60-62 cm = 20½"-21¼"-22"-22¾"-23⅝"-24⅜" (= 22-23-24-25-26-27 cm = 8¾"-9"-9½"-9¾"-10¼"-10⅝" from division for armholes). Work the other shoulder the same way.


FRONT PIECE:
= 65-69-73-77-81-85 stitches. Work as follows - from right side: Purl 4-6-8-10-12-14, A.2, purl 6, A.2, purl 6, A.2, purl 4-6-8-10-12-14. When piece measures 46-48-50-52-54-56 cm = 18"-19"-19¾"-20½"-21¼"-22", decrease 5 stitches over the middle repetition of A.2, on next row slip the middle 8-10-12-14-16-18 stitches on a stitch holder for neck, and finish each shoulder separately. Then bind off stitches on every row from neck as follows: Bind off 2 stitches 1 time and 1 stitch 2 times = 22-23-24-25-26-27 stitches. Work the stitches in A.2 in stockinette stitch, decrease at the same time 5 stitches evenly over these stitches. Bind off when piece measures 52-54-56-58-60-62 cm = 20½"-21¼"-22"-22¾"-23⅝"-24⅜" (= 22-23-24-25-26-27 cm = 8¾"-9"-9½"-9¾"-10¼"-10⅝" from division for armholes). Work the other shoulder the same way.

SLEEVE:
Work sleeves in the round on double pointed needles/a short circular needle bottom up.
Cast on 32-32-36-36-40-40 stitches on double pointed needles size 6 MM = US 10 with 2 strands Brushed Alpaca Silk or 1 strand DROPS Wish. Knit 1 round, then work rib as follows:

SIZE S-M-XXL-XXXL:
Knit 1, * purl 2, knit 2 *, work from *-* over the next 30-30-38-38 stitches, finish with knit 1.

SIZE L-XL:
Purl 1, * knit 2, purl 2 *, work from *-* over the next 34-34 stitches, finish with purl 1.

Work rib for 6 cm = 2⅜", switch double pointed needles size 8 MM = US 11. Work next round as follows: Purl the first 11-11-13-13-15-15 stitches, at the same time increase 3-4-3-4-3-4 stitches evenly over these stitches, A.1, purl the last 11-11-13-13-15-15 stitches, at the same time increase 3-4-3-4-3-4 stitches evenly over these stitches.
When A.1 has been worked 1 time vertically and the increases have been done evenly, there are 43-45-47-49-51-53 stitches on needle. Continue with A.2 over stitches in A.1 and purl as before. Insert a marker thread at beginning of round = mid under sleeve. When piece measures 8 cm = 3⅛", increase 1 stitch on each side of marker thread - read INCREASE TIP. Increase every 9-9-9-8-8-8 cm = 3½"-3½"-3½"-3⅛"-3⅛"-3⅛" 5 times in total in every size = 53-55-57-59-61-63 stitches. When sleeve measures 49-48-47-46-45-44 cm = 19¼"-19"-18½"-18"-17¾"-17¼", work sleeve cap back and forth (from mid under sleeve) on circular needle until finished measurements. When piece measures 50-49-48-47-46-45 cm = 19¾"-19¼"-19"-18½"-18"-17¾", decrease 5 stitches evenly over stitches in A.2. Work until sleeve measures approx. 51-50-49-48-47-46 cm = 20"-19¾"-19¼"-19"-18½"-18", i.e. there is a vent of 2 cm = ¾" at the top of sleeve. Work another sleeve the same way.

ASSEMBLY:
Sew the shoulder seams. Sew sleeve cap to armhole. Then sew vent at the top of sleeve to bottom of armhole - see chart.


NECK EDGE:
Begin from right side at one shoulder seam and pick up approx. 44-60 stitches around the neck, including stitches from stitch holder at the front (number of stitches should be divisible by 4) on a short circular needle size 6 MM = US 10 with 2 strands Brushed Alpaca Silk or 1 strand DROPS Wish. Work rib (= knit 2/purl 2) for 12 cm = 4¾". Bind off stitches with knit over knit and purl over purl. Fold rib at the top of neck down on inside of garment. Fasten rib to get a double neck edge. To avoid a tight neck edge that sticks out it is important to keep the seam elastic.

Diagram

All measurements in charts are in cm.

symbols = knit from the right side, purl from the wrong side
symbols = between 2 stitches make 1 yarn over, on next row work yarn over twisted to avoid holes
symbols = slip 5 stitches on cable needle in front of piece, knit 5, knit 5 from cable needle
symbols = slip 5 stitches on cable needle behind piece, knit 5, knit 5 from cable needle
symbols = sew sleeve cap to armhole as follows: Sew a against A and b against B.
diagram
diagram
diagram

Each of our patterns has specific tutorial videos to help you.

Do you have a question? See a list of frequently asked questions (FAQ)

Knitting tension is what determines the final measurements of your work, and is usually measured per 10 x 10 cm. It is provided like so: number of stitches in width x number of rows in height - eg: 19 stitches x 26 rows = 10 x 10 cm.

The knitting tension is very individual; some people knit/crochet loosely while others work tightly. You adjust the knitting tension with the needle size, which is why the suggested needle size only serve as a guide! You need to adjust this (up or down) to ensure that YOUR knitting tension matches the knitting tension provided in the pattern. If you work with a different knitting tension than provided you will have a different yarn consumption, and your work will have different measurements than what the pattern suggests.

The knitting tension also determines which yarns can replace each other. As long as you achieve the same knitting tension you can replace one yarn with another.

See DROPS lesson: How to measure your tension/gauge

See DROPS video: How to make a gauge tension swatch

The required amount of yarn is provided in grams, eg: 450 g. To calculate how many balls you’ll need you first need to know how many grams are in 1 ball (25g, 50g or 100g). This information is available if you click on the individual yarn quality on our pages. Divide the amount required with the amount of each ball. For example, if each ball is 50g (the most common amount), the calculation will be as follows: 450 / 50 = 9 balls.

The important thing when changing from one yarn to another is that the knitting/crochet tension remains the same. This is so that the measurements of the finished piece will be the same as on the sketch provided. It is easier to achieve the same knitting tension using yarns from the same yarn group. It is also possible to work with multiple strands of a thinner yarn to achieve the knitting tension of a thicker one. Please try our yarn converter. We recommend you to always work a test swatch.

Please NOTE: when changing yarn the garment might have a different look and feel to the garment in the photo, due to individual properties and qualities of each yarn.

See DROPS lesson: Can I use a different yarn than the one mentioned in the pattern?

All our yarns are categorised into yarn groups (from A to F) according to thickness and knitting tension – group A contains the thinnest yarns and group F the thickest. This makes it easier for you to find alternative yarns to our patterns, should you wish to switch yarn. All yarns within the same group have a similar knitting tension and can easily replace each other. However, different yarn qualities have different structures and properties which will give the finished work a unique look and feel.

Click here for an overview of the yarns in each yarn group

At the top of all our patterns you’ll find a link to our yarn converter, which is a helpful tool should you wish to use a different yarn than suggested. By filling in the yarn quality you wish to replace, the amount (in your size) and number of strands, the converter will present good alternative yarns with the same knitting tension. Additionally it will tell you how much you’ll require in the new qualities and whether you’ll need to work with multiple strands. Most skeins are 50g (some are 25g or 100g).

If the pattern is worked with multiple colours, every colour will have to be converted separately. Similarly, if the pattern is worked with several strands of different yarns (for example 1 strand Alpaca and 1 strand Kid-Silk) you will have to find alternatives for each, individually.

Click here to see our yarn converter

Since different yarns have different qualities and textures we have chosen to keep the original yarn in our patterns. However, you can easily find options among our available qualities by using our yarn converter, or simply pick a yarn from the same yarn group.

It is possible that some retailers still have discontinued yarns in stock, or that someone has a few skeins at home that they would like to find patterns for.

The yarn converter will provide both alternative yarn as well as required amount in the new quality.

If you think it's hard to decide what size to make, it can be a good idea to measure a garment you own already and like the size of. Then you can pick the size by comparing those measures with the ones available in the pattern's size chart.

You'll find the size chart at the bottom of the pattern.

See DROPS lesson: How to read size chart

The needle size provided in the pattern serves only as a guide, the important thing is to follow the knitting tension. And since knitting tension is very individual, you will have to adjust the needle size to ensure that YOUR tension is the same as in the pattern – maybe you’ll have to adjust 1, or even 2 needle sizes, up or down to achieve the correct tension. For this, we recommend that you work test swatches.

Should you work with a different knitting tension than the one provided, the measurements of the finished garment might deviate from the measurement sketch.

See DROPS lesson: How to measure your tension/gauge

See DROPS video: How to make a gauge tension swatch

Working a garment top-down provides more flexibility and room for personal adjustment. For example it is easier to try the garment on while working, as well as making adjustments to length of yoke and shoulder caps.

The instructions are carefully explaining every step, in the correct order. Diagrams are adjusted to the knitting direction and are worked as usual.

The diagram depicts all rows/rounds, and every stitch seen from the right side. It is read from bottom to top, from right to left. 1 square = 1 stitch.

When working back and forth, every other row is worked from the right side and every other row is worked from the wrong side. When working from the wrong side, the diagram will have to be worked reversed: from left to right, knit stitches are purled, purl stitches are knit etc.

When working in the round every round is worked from the right side and the diagram are worked from right to left on all rounds.

See DROPS lesson: How to read knitting diagrams

The diagram depicts all rows/rounds, and every stitch seen from the right side. It is worked from bottom to top, from right to left.

When working back and forth every other row is worked from the right side: from right to left and every other row is worked from the wrong side: from left to right.

When working in the round, every row in the diagram are worked from the right side, from right to left.

When working a circular diagram you start in the middle and work your way outwards, counter clockwise, row by row.

The rows usually start with a given number of chain stitches (equivalent to the height of the following stitch), this will either be depicted in the diagram or explained in the pattern.

See DROPS lesson: How to read crochet diagrams

Instructions for working several diagrams after each other on the same row/round, will often be written like so: “work A.1, A.2, A.3 a total of 0-0-2-3-4 times". This means you work A.1 once, then A.2 is worked once, and A.3 is repeated (in width) the number of times provided for your size – in this case like so: S = 0 times, M = 0 times, L=2 times, XL= 3 times and XXL = 4 times.

The diagrams are worked as usual: begin with the first row in A.1, then work the first row in A.2 etc.

See DROPS lesson: How to read knitting diagrams

See DROPS lesson: How to read crochet diagrams

The total width of the garment (from wrist-to-wrist) will be larger in the larger sizes, despite the actual sleeves being shorter. The larger sizes have longer sleeve caps and wider shoulders, so there will be a good fit in all sizes.

The measurement sketch/schematic drawing provides information regarding the full length of the garment. If it’s a jumper or a jacket the length is measured from the highest point on the shoulder (usually closest to the neckline), and straight down to the bottom of the garment. It is NOT measured from the tip of shoulder. Similarly, the length of yoke is measured from the highest point on the shoulder and down to where yoke is split into body and sleeves.

See DROPS lesson: How to read a schematic drawing

Diagrams are often repeated on the round or in height. 1 repeat is the diagram the way it appears in the pattern. If it says to work 5 repeats of A.1 in the round, then you work A.1 a total of 5 times after/next to each other in the round. If it says to work 2 repeats of A.1 vertically/in height you work the entire diagram once, then begin again at the start and work the entire diagram one more time.

Chain stitches are slightly narrower than other stitches and to avoid working the cast-on edge too tight, we simply chain more stitches to begin with. The stitch count will be adjusted on the following row to fit the pattern and measurement sketch.

The rib edge is more elastic and will contract slightly compared to, for example, stocking stitch. By increasing before the rib edge, you avoid a visible difference in width between the rib edge and the rest of the body.

It’s very easy to cast off too tightly, and by making yarn overs while casting off (and simultaneously casting these off) you avoid a too tight cast off edge.

See DROPS video: How to bind off with yarn overs (yo)

To achieve an even increase (or decrease) you can increase on, for example: every 3rd and 4th row alternately, like so: work 2 rows and increase on the 3rd row, work 3 rows and increase on the 4th. Repeat this until the increase is complete.

See DROPS lesson: Increase or decrease 1 st on every 3rd and 4th row alternately

Should you prefer to work in the round instead of back and forth, you may of course adjust the pattern. You’ll need to add steeks mid-front (usually 5 stitches), and follow the instructions. When you would normally turn and work from the wrong side, simply work across the steek and continue in the round. At the end you’ll cut the piece open, pick up stitches to work bands, and cover the cut edges.

See DROPS video: How to knit steeks and cut open

Should you prefer to work back and forth instead of in the round, you may of course adjust the pattern so you work the pieces separately and then assemble them at the end. Divide the stitches for the body in 2, add 1 edge stitch in each side (for sewing) and work the front and back pieces separately.

See DROPS lesson: Can I adapt a pattern for circular needles into straight needles?

Pattern repeats can vary slightly in the different sizes, in order to get the correct proportions. If you’re not working the exact same size as the garment in the photo, yours might deviate slightly. This has been carefully developed and adjusted so that the complete impression of the garment is the same in all sizes.

Make sure to follow instructions and diagrams for your size!

If you have found a pattern you like which is available in women’s size it’s not very difficult to convert it to men’s size. The biggest difference will be the length of sleeves and body. Start working on the women size that you think would fit across the chest. The additional length will be worked right before you cast off for the armhole/sleeve cap. If the pattern is worked top-down you can add the length right after the armhole or before the first decrease on sleeve.

Regarding additional yarn amount, this will depend on how much length you add, but it is better with a skein too many than too few.

All yarns will have excess fibres (from production) that might come off as lint or shedding. Brushed yarns (ie hairier yarns) have more of these loose, excess fibres, causing more shedding.

Shedding also depends on what is worn under or over the garment, and whether this pulls at the yarn fibres. It’s therefore not possible to guarantee that there will be no shedding

Below are some tips on how to get the best result when working with hairier yarns:

1. When the garment is finished (before you wash it) shake it vigorously so the looser hairs come off. NOTE: do NOT use a lint roller, brush or any method that pulls at the yarn.

2. Place the garment in a plastic bag and put it in your freezer - the temperature will cause the fibres to become less attached to each other, and excess fibres will come off easier.

3. Leave in the freezer for a few hours before taking it out and shaking it again.

4. Wash the garment according to the instructions on the yarn label.

Pilling is a natural process that happens to even the most exclusive of fibers. It's a natural sign of wear and tear that is hard to avoid, and that is most visible in high friction areas of your garment like a sweater's arms and cuffs.

You can make your garment look as new by removing the pilling, using a fabric comb or a pill/lint remover.

Still can't find the answer you need? Then scroll down and leave your question so one of our experts can try to help you. This will be done normally within 5 to 10 working days.
In the meantime, you can read the questions and answers that others have left to this pattern or join the DROPS Workshop on Facebook to get help from fellow knitters/crocheters!

You might also like...

Post a comment to pattern DROPS 226-40

We would love to hear what you have to say about this pattern!

If you want to leave a question, please make sure you select the correct category in the form below, to speed up the answering process. Required fields are marked *.

Comments / Questions (15)

country flag Nisa Pahladsingh wrote:

Kan ik de sweater, en andere sweaters ook trouwens, zonder de dubbele kraag maken? Alvast bedankt!

02.08.2023 - 23:24

DROPS Design answered:

Dag Nisa,

Ja dat kan! Je breit de hals dan gewoon de helft minder hoog.

03.08.2023 - 21:06

country flag Eva wrote:

Thank you the lovely desig which I just started knitting in size XXL, I have read the instructions over and over but I cannot understand one thing. I am knitting the rib section ans I have 144 sts as per pattern, reading the following sections how is it we need to Decrease and still have more sts on our needles? ie: 170 sts where did we get the extra 26 sts if no increases needed. I appreciate your reply thank you. (I am knitting it for somebody else si it will have to be perfect). xxx Eva

13.06.2023 - 15:23

DROPS Design answered:

Dear Eva, note that when working 1st row in A.1 you will increase 5 stitches in each A.1 (see the 5 yarn overs), so that you will work as follows: Purl 15 sts decreasing 1 (= 14 sts), A.1 (= 10 sts increased to 15 sts), purl 6, A.1 (10 sts increased to 15 sts), purl 6, A.1 (10 sts increased to 15 sts), purl 30 sts decreasing 2 sts (= 28 sts), A.1 (10 sts increased to 15), purl 6, A.1 (10 sts increased to 15), purl 6, A.1 (10 sts increased to 15), purl 15 sts decreasing 1 st (= 14 sts) = 14+15+6+15+6+15+28+15+6+15+6+15+14=170 stitches. Happy knitting!

13.06.2023 - 16:11

country flag Nina wrote:

Hallo! Auf einem der Beispielfotos ist ein blauer Pullover zu sehen. Welche Wolle wurde dafür verwendet und welche Anleitung? Ich würde gerne beide stricken aber finden den blauen nirgendwo. Liebe Grüße

23.11.2022 - 10:28

DROPS Design answered:

Liebe Nina, der blaue Pullover wird mit Flora und Kid-Silk gestrickt, den finden Sie hier. Viel Spaß beim stricken!

23.11.2022 - 15:41

country flag Alena Jonáková wrote:

Dobrý den, jestě jsem se vás ptala na spotřebu příze. Potřebuji na svetr 15 klubíček 50 g Alasky? Děkuji.

21.04.2022 - 13:50

DROPS Design answered:

Dobrý den, Aleno, podle našeho převodníku budete potřebovat 1500g příze Alaska. Pokud máte obavu z pletení dvojitou přízí, můžete přízi DROPS Brushed Alpaca Silk nahradit také naší báječnou přízí DROPS Melody nebo DROPS Wish. Ať se daří!

23.04.2022 - 08:06

country flag Alena Jonáková wrote:

Dobrý den, psala jsem vám dva vzkazy 24.3. a zatím neznám odpovědi. Můžu ještě doufat, že mi odpovíte? Děkuji. Alena

09.04.2022 - 19:25

country flag Alena Jonáková wrote:

Dobrý den, moc ráda bych si upletla svetr Evening Fires, ale ještě mi není jasný vzor F1. Ten malý nákres. Mohla bych k tomu dostat podrobnější vysvětlení? Děkuji. Alena

24.03.2022 - 19:57

DROPS Design answered:

Dobrý den, Aleno, vzor A.1 čtete zprava doleva a zdola nahoru; tj. upletete 2 oka hladce, 1x nahodit, 1x hladce, 1x nahodit, 2x hladce, 1x nahodit, 2x hladce, 1x nahodit, 1x hladce, 1x nahodit, 2x hladce. V následující řadě upletete nahozená oka za zadní nit, aby se netvořily dírky. Potom postupujete dále podle návodu. Hodně zdaru!

23.04.2022 - 07:43

country flag Alena Jonáková wrote:

Dobrý den, chtěla bych vědět jestli můžu nahradit při pletení svetru Evening Fires vlnu Alpaka Silk vlnou Alaska? U té první vlny se plete dvojitě a také vzor je copánkový, myslim si, že by se to špatně pletlo. Je správná spotřeba 30 klubíček 50 gramové Alasky? Děkuji. Alena

24.03.2022 - 12:55

DROPS Design answered:

Dobrý den, Aleno, ano, přízi nahradit můžete, ale počítejte s tím, že výsledný vzhled bude trochu jiný - svetr bude hutnější a bude působit rustikálnějším dojmem.

21.04.2022 - 12:34

country flag Alena wrote:

Dobrý den ještě bych chtěla vědět, jestli mi opravdu stačí na svetr Evening Fires pro velikost XXL příze DROPS ALPAKA SILK 15, barvy sv. tyrkysové - příze C, 375 g i když ji použiji dvojitou? Děkuji. Alena

21.03.2022 - 16:03

DROPS Design answered:

Dobrý den, Aleno, ano, tato spotřeba by měla být dostačující. Příze DROPS Brushed Alpaca Silk je lehoučká a dodáváme ji v klubíčkách po 25 g s návinem 140 m - 15 klubíček by vám tedy mělo stačit i při pletení dvojitou přízí. Hodně zdaru! Hana

23.03.2022 - 18:19

country flag Alena wrote:

Dobrý den, u návodu na svetr Evening Fires mi není jasné ujimání 5 ok prostřední sekvence vzoru A2? Mohla bych k tomu dostat nějaké podrobnější vysvětlení. Děkuji. Alena

21.03.2022 - 15:40

DROPS Design answered:

Dobrý den, Aleno, při tvarování průkrčníku potřebujeme ujmout uprostřed dílu 5 ok. Uprostřed dílu ale leží silný copánek a kdybychom ujmuli všech 5 ok vedle sebe, vznikla by nevzhledná "kapsa", proto je lepší ujímání rozložit nad celou sekvenci, např. takto: 1 oko upleteme, 2 oka spleteme, 1 upleteme, 2 spleteme, atd. Hodně zdaru! Hana

23.03.2022 - 18:42

country flag Erin wrote:

What size knitting needles are used for the gauge?

08.03.2022 - 01:44

DROPS Design answered:

Hei Erin, The size 8 mm needles are used for the guage. Happy knitting!

08.03.2022 - 06:58