
Popular categories
Looking for a yarn?


|
||||||||||||||||||||||||||||||||||
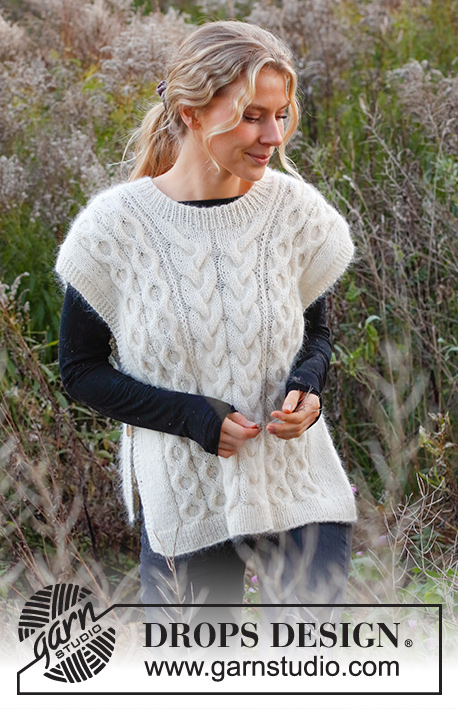
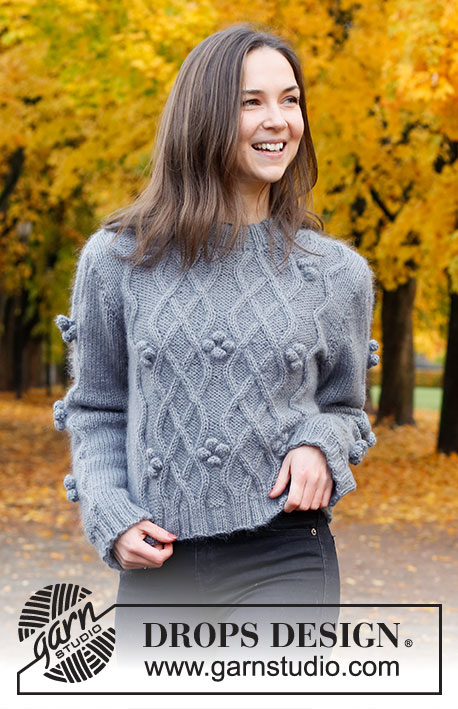
Frosted Fruit Sweater |
||||||||||||||||||||||||||||||||||
 |
 |
|||||||||||||||||||||||||||||||||
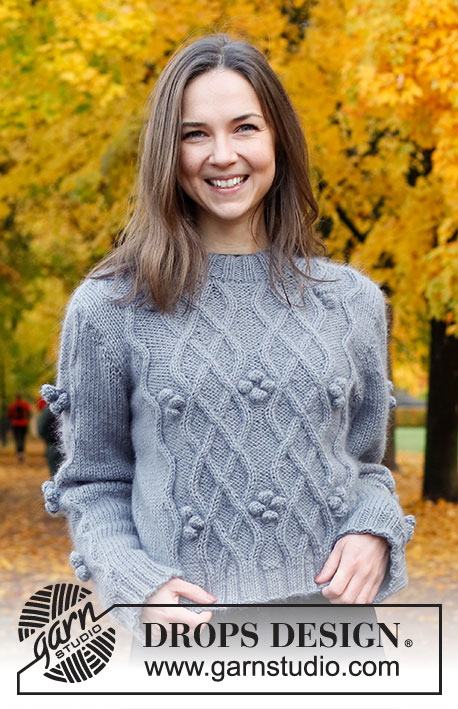
Knitted sweater in DROPS Lima and DROPS Kid-Silk. Piece is knitted top down with cables, bobbles and double neck edge. Size: S - XXXL
DROPS 226-23 |
||||||||||||||||||||||||||||||||||
|
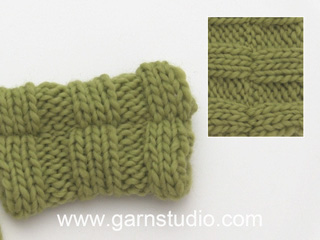
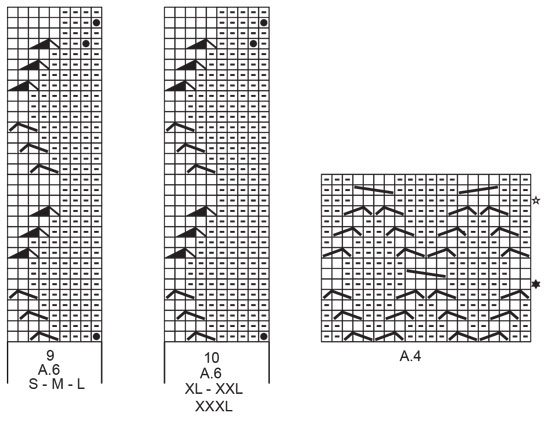
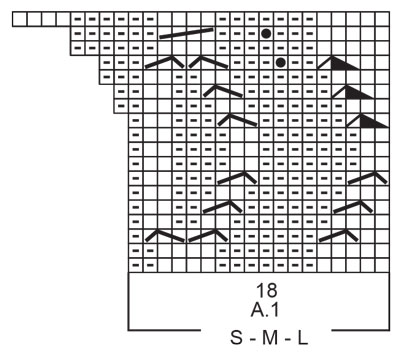
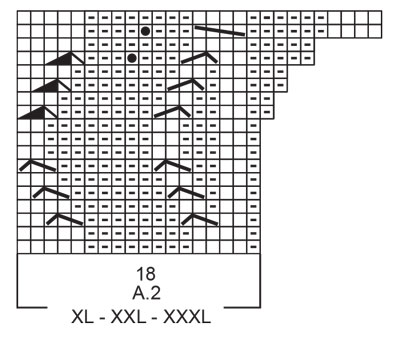
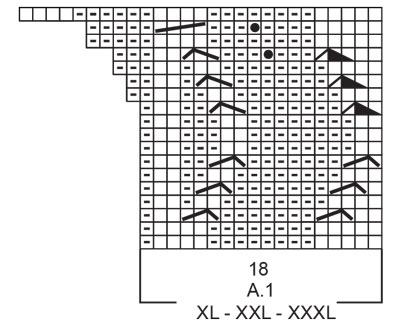
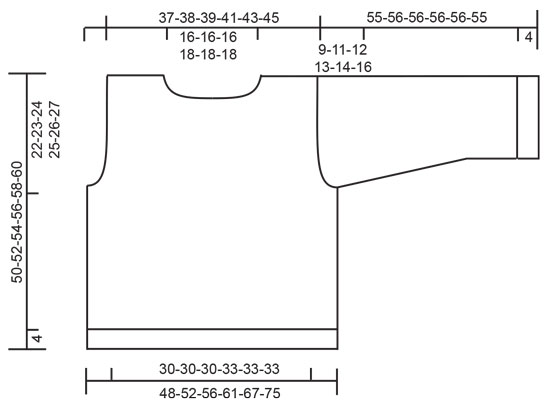
---------------------------------------------------------- EXPLANATION FOR THE PATTERN: ---------------------------------------------------------- GARTER STITCH (back and forth): Knit all rows. 1 ridge vertically = knit 2 rows. PATTERN: See diagrams A.1 to A.6. Choose diagram for your size. Diagrams show all rows in pattern seen from the right side. INCREASE TIP (evenly): To calculate how to increase evenly, use the total number of stitches on row (e.g. 17 stitches), minus edge stitches (e.g. 2 stitches) , and divide the remaining stitches by number of increases to be done (e.g. 6) = 2.5. In this example increase by making 1 yarn over after alternately approx. every 2nd and 3rd stitch and do not increase over edge stitches. On next row work yarn overs twisted to avoid holes. DECREASE TIP (applies to mid under sleeves): Decrease 1 stitch on each side of marker thread as follows: Work until 3 stitches remain before marker thread, knit 2 together, knit 2 stitches (marker thread is between these 2 stitches), slip 1 stitch knitwise, knit 1, pass slipped stitch over stitch worked (= 2 stitches decreased). BIND-OFF TIP: To avoid a tight bind-off edge when binding off, you may use a larger needle. If this still is too tight make 1 yarn over after approx. every 4th stitch while binding off (bind off yarn overs as stitches). ---------------------------------------------------------- START THE PIECE HERE: ---------------------------------------------------------- SWEATER - SHORT OVERVIEW OF THE PIECE: Worked top down. Work front and back piece back and forth on circular needle separately. Work sleeves first back and forth until sleeve cap is done, then work in the round on a short circular needle/double pointed needles. When all parts are done, assemble the piece by sewing the parts together. Finish with a double neck edge in the round on a short circular needle. FRONT PIECE: Right shoulder: Cast on 17-18-19-18-20-22 stitches on circular needle size 5 MM = US 8 with 1 strand of each quality (= 2 strands). Purl 1 row from wrong side while increasing 6 stitches evenly - read INCREASE TIP = 23-24-25-24-26-28 stitches. Now work pattern as follows: Work 1 edge stitch in GARTER STITCH - read explanation above, work 4-5-6-5-7-9 stitches in stockinette stitch, work A.1 (choose diagram for your size) over the next 18 stitches. Continue back and forth like this. When you have worked up to 11th row in A.1, cast on stitches at the end of every row from right side as follows: Cast on 1 stitch 2 times, 2 stitches 1 time and 4-4-4-5-5-5 stitches 1 time (8-8-8-9-9-9 stitches cast on for neck) = 31-32-33-33-35-37 stitches. When 1 row remains in A.1 put piece aside. Work left shoulder. Left shoulder: Cast on 17-18-19-18-20-22 stitches on circular needle size 5 MM = US 8 with 1 strand of each quality (= 2 strands). Purl 1 row from wrong side while at the same time increasing 6 stitches evenly = 23-24-25-24-26-28 stitches. Now work pattern as follows: Work A.1 (choose diagram for your size) over the first 18 stitches, work 4-5-6-5-7-9 stitches in stockinette stitch, work 1 edge stitch in garter stitch. Continue back and forth like this. When you have worked up to 10th row in A.2, cast on stitches at the end of every row from wrong side as follows: Cast on 1 stitch 2 times, 2 stitches 1 time and 4-4-4-5-5-5 stitches 1 time (8-8-8-9-9-9 stitches cast on for neck) = 31-32-33-33-35-37 stitches. Work last row in A.2 from wrong side and cast on 9-9-9-11-11-11 stitches on row for neck, work last row in A.1 over stitches on right shoulder = 71-73-75-77-81-85 stitches. Now work pattern as follows: Work 1 edge stitch in garter stitch, work 4-5-6-5-7-9 stitches in stockinette stitch, work A.3 (choose diagram for your size) over the next 9-9-9-10-10-10 stitches, work A.4 over the next 20 stitches, work A.5 (choose diagram for your size) over the next 3-3-3-5-5-5 stitches – purl over middle stitch instead of bobble on first row, work A.4 over the next 20 stitches, work A.6 (choose diagram for your size) over the next 9-9-9-10-10-10 stitches, work 4-5-6-5-7-9 stitches in stockinette stitch and finish with 1 edge stitch in garter stitch. Continue pattern back and forth like this. REMEMBER THE KNITTING GAUGE! When piece measures 16 cm = 6¼" from cast-on edge for shoulder, cast on stitches for armholes at the end of every row in each side as follows: Cast on 1 stitch 4-4-4-4-4-4 times, 2 stitches 1-2-3-4-5-6 times and 4-5-5-5-6-7 stitches 1 time (= 10-13-15-17-20-23 stitches increased in total in each side for armhole) = 91-99-105-111-121-131 stitches. Work the increased stitches in stockinette stitch with 1 edge stitch in garter stitch towards the side. Continue back and forth with pattern over the middle 61-61-61-65-65-65 stitches, 1 edge stitch in garter stitch in each side and stockinette stitch over the remaining stitches (= 14-18-21-22-27-32 stitches in stockinette stitch in each side between pattern and edge stitch in garter stitch). Continue like this until piece measures approx. 46-48-50-52-54-56 cm = 18"-19"-19¾"-20½"-21¼"-22" – adjust to finish after row marked with black or white star in A.4 and to increase on this row 3-3-4-3-6-5 stitches evenly in each side over the 14-18-21-22-27-32 stitches in stockinette stitch (work yarn overs twisted on next row) = 97-105-113-117-133-141 stitches. Switch to circular needle size 4 MM = US 6. Now work rib as follows from right side. If the pattern was finished on row with white star, work rib-1 and if it was finished on row with black star, work rib-2. RIB-1 (used when finishing on row with white star in A.4 - this is the rib shown on photo): Work first row as follows from right side: 1 edge stitch in garter stitch, (knit 2/purl 2) over the next 20-24-28-28-36-40 stitches, knit 2, purl 3-3-3-4-4-4, knit 2, purl 2, knit 4, purl 2, knit 2, purl 2, knit 4, purl 3-3-3-4-4-4, knit 3 (these are middle stitches on row), purl 3-3-3-4-4-4, knit 4, purl 2, knit 2, purl 2, knit 4, purl 2, knit 2, purl 3-3-3-4-4-4, (knit 2/purl 2) over the next 20-24-28-28-36-40 stitches, knit 2, 1 edge stitch in garter stitch. Continue rib back and forth like this for 4 cm = 1½". Bind off with knit over knit and purl over purl - read BIND-OFF TIP. Front piece measures approx. 50-52-54-56-58-60 cm = 19¾"-20½"-21¼"-22"-22¾"-23⅝" from shoulder and down. RIB-2 (used when finishing on row with black star in A.4): Work first row as follows from right side: 1 edge stitch in garter stitch, (knit 2/purl 2) over the next 12-16-20-20-28-32 stitches, (knit 2/purl 3) over the next 10-10-10-15-15-15 stitches, (knit 2/purl 2) over the next 12-12-12-8-8-8 stitches, knit 4, (purl 2/knit 2) over the next 8 stitches, purl 3-3-3-5-5-5 (these are the middle stitches on row), (knit 2/purl 2) over the next 8 stitches, knit 4, (purl 2/knit 2) over the next 12-12-12-8-8-8 stitches, (purl 3/knit 2) over the next 10-10-10-15-15-15 stitches, (purl 2/knit 2) over the next 12-16-20-20-28-32 stitches, 1 edge stitch in garter stitch. Continue rib back and forth like this for 4 cm = 1½". Bind off with knit over knit and purl over purl - read BIND-OFF TIP. Front piece measures approx. 50-52-54-56-58-60 cm = 19¾"-20½"-21¼"-22"-22¾"-23⅝" from shoulder and down. BACK PIECE: Left shoulder: Cast on 17-18-19-18-20-22 stitches on circular needle size 5 MM = US 8 with 1 strand of each quality (= 2 strands). Purl 1 row from wrong side while increasing 6 stitches evenly - remember INCREASE TIP = 23-24-25-24-26-28 stitches. Now work pattern as follows: Work 1 edge stitch in garter stitch, work 4-5-6-5-7-9 stitches in stockinette stitch, work A.1 (choose diagram for your size) over the next 18 stitches. Continue back and forth like this. When you have worked up to 5th row in A.3, cast on 1 stitch at the end of last row from right side for neck = 24-25-26-25-27-29 stitches. Put piece aside and work the right shoulder. Right shoulder: Cast on 17-18-19-18-20-22 stitches on circular needle size 5 MM = US 8 with 1 strand of each quality (= 2 strands). Purl 1 row from wrong side while at the same time increasing 6 stitches evenly = 23-24-25-24-26-28 stitches. Now work pattern as follows: Work A.1 (choose diagram for your size) over the first 18 stitches, work 4-5-6-5-7-9 stitches in stockinette stitch, work 1 edge stitch in garter stitch. Continue back and forth like this until 4th row has been worked. At the end of this row (from wrong side), cast on 1 new stitch for neck = 24-25-26-25-27-29 stitches. Purl this stitch and what was previously edge stitch in garter stitch towards the neck from right side and knit them from wrong side. Work 2 more rows with pattern as before, cast on 23-23-23-27-27-27 stitches at the end of row from wrong side for neck, work from wrong side over stitch on left shoulder as follows: Knit 1, work 6th row in A.1 and continue pattern as before the rest of row = 71-73-75-77-81-85 stitches. Now work pattern as follows: Work pattern as before over the first 24-25-26-25-27-29 stitches, purl 3-3-3-4-4-4, knit 4, purl 9-9-9-11-11-11, knit 4, purl 3-3-3-4-4-4, work pattern as before over the last 24-25-26-25-27-29 stitches. Continue pattern like this and work knit over knit and purl over purl over the 23-23-23-27-27-27 stitches between A.1 and A.2. When A.1 and A.2 have been worked vertically, continue pattern as follows: Work 1 edge stitch in garter stitch, work 4-5-6-5-7-9 stitches in stockinette stitch, work A.3 (choose diagram for your size) over the next 9-9-9-10-10-10 stitches, work A.4 over the next 20 stitches, work A.5 (choose diagram for your size) over the next 3-3-3-5-5-5 stitches – purl over middle stitch instead of bobble on first row, work A.4 over the next 20 stitches, work A.6 (choose diagram for your size) over the next 9-9-9-10-10-10 stitches, work 4-5-6-5-7-9 stitches in stockinette stitch and finish with 1 edge stitch in garter stitch. Continue pattern back and forth like this. When piece measures 16 cm = 6¼" from cast-on edge on shoulder, cast on stitches for armhole at the end of every row in each side the same way as on front piece (= 10-13-15-17-20-23 stitches increased in total in each side for armholes) = 91-99-105-111-121-131 stitches. Work the increased stitches in stockinette stitch with 1 edge stitch in garter stitch towards the side. Work the rest of back piece the same way as front piece. SLEEVES: Cast on 21-23-23-25-27-29 stitches on circular needle size 5 MM = US 8 with 1 strand of each quality (= 2 strands). OVERVIEW OF NEXT SECTION: Work pattern at the same time cast on stitches for sleeve cap - read the entire next section: PATTERN: Work pattern back and forth as follows: Work 2-3-3-4-5-6 stitches in stockinette stitch, work the first 7 stitches in A.3, purl 3 (purl stitch from right side and knit from wrong side), work the last 7 stitches in A.6, work 2-3-3-4-5-6 stitches in stockinette stitch. Continue pattern back and forth like this. When you have worked up to 13th row/round in A.3 and A.6, work a group of bobbles over the middle 3-3-3-5-5-5 purl stitches on sleeve - work bobbles as shown on the last 4 rows and the first row in A.5 (i.e. work the last 4 rows in A.5 over the middle 3-3-3-5-5-5 stitches, then work the first row in A.5, to get a group of 4 bobbles in the middle of sleeve). Repeat this every 32nd row. SLEEVE CAP: At the same time cast on new stitches at the end of every row for sleeve cap as follows: Cast on 2 stitches 4-3-3-3-3-2 times, 1 stitch 1-5-5-6-8-12 times and 2 stitches 4-3-4-4-3-2 times in each side. On next row from right side, cast on 8-10-10-10-12-14 stitches = 63-67-71-75-79-83 stitches. Insert a marker thread in the middle of the 8-10-10-10-12-14 new stitches that were cast on (= mid under sleeve). Move marker thread upwards when working. Use it later when decreasing under sleeve. NOW MEASURE THE PIECE FROM HERE. Continue in the round with pattern as before over the middle 17 stitches on top of sleeve and work in stockinette stitch over the remaining stitches on row. When sleeve measures 4 cm = 1½" from where sleeve cap was finished, decrease 1 stitch on each side of marker thread - read DECREASE TIP. Decrease like this every 4-3½-3-2½-2-2 cm = 1½"-1¼"-1⅛"-1"-¾"-¾" 9-10-12-13-14-15 times in total = 45-47-47-49-51-53 stitches. Work until sleeve measures 42-41-40-39-38-35 cm = 16½"-16⅛"-15¾"-15¼"-15"-13¾" from where sleeve cap was finished (shorter measurements in the larger sizes because of wider shoulders – Approx. 4 cm = 1½" remain until finished measurements, try the sweater on and work to desired length. Knit 1 round while increasing 7-5-9-7-9-7 stitches evenly = 52-52-56-56-60-60 stitches. Switch to double pointed needles size 4 MM = US 6. Work rib in the round = knit 2/purl 2 for 4 cm = 1½". Bind off with knit over knit and purl over purl - remember BIND-OFF TIP. Sleeve measures 55-56-56-56-56-55 cm = 21⅝"-22"-22"-22"-22"-21⅝" from cast-on edge. Work the other sleeve the same way. ASSEMBLY: Sew shoulder seams inside cast-on edges. Sew sleeves in body inside 1 edge stitch in garter stitch on body and inside cast-on edge on sleeves. Sew sleeve seam from armhole and down inside 1 edge stitch in garter stitch. Repeat in the other side. DOUBLE NECK EDGE: Begin from right side with circular needle size 4 MM = US 6 with 1 strand in each quality (= 2 strands). Pick up approx. 80 to 88 stitches inside 1 stitch around the neck edge. Number of stitches must be divisible by 4. Work rib (= knit 2/purl 2) in the round for 8 to 9 cm = 3⅛" to 3½". Bind off with knit over knit and purl over purl - remember BIND-OFF TIP. Fold rib at the top of neck down on inside of garment. Fasten rib to get a double neck edge. To avoid a tight neck edge that sticks out it is important to keep the seam elastic. |
||||||||||||||||||||||||||||||||||
Diagram explanations |
||||||||||||||||||||||||||||||||||
|
||||||||||||||||||||||||||||||||||
|
||||||||||||||||||||||||||||||||||

|
||||||||||||||||||||||||||||||||||

|
||||||||||||||||||||||||||||||||||
|
||||||||||||||||||||||||||||||||||
|
||||||||||||||||||||||||||||||||||
|
||||||||||||||||||||||||||||||||||
|
||||||||||||||||||||||||||||||||||
|
Have you made this or any other of our designs? Tag your pictures in social media with #dropsdesign so we can see them! Do you need help with this pattern?You'll find tutorial videos, a Comments/Questions area and more by visiting the pattern on garnstudio.com. © 1982-2024 DROPS Design A/S. We reserve all rights. This document, including all its sub-sections, has copyrights. Read more about what you can do with our patterns at the bottom of each pattern on our site. |
||||||||||||||||||||||||||||||||||


With over 40 years in knitting and crochet design, DROPS Design offers one of the most extensive collections of free patterns on the internet - translated to 17 languages. As of today we count 304 catalogs and 11422 patterns - 11417 of which are translated into English (US/in).
We work hard to bring you the best knitting and crochet have to offer, inspiration and advice as well as great quality yarns at incredible prices! Would you like to use our patterns for other than personal use? You can read what you are allowed to do in the Copyright text at the bottom of all our patterns. Happy crafting!
Comments / Questions (5)
Olvidé decir que en el elástico 2, en la primera hilera después del punto orillo, 16 puntos, los 10 puntos siguientes son 2 derechos y 3 reveses. Cabe destacar que en la espalda de la chaqueta (226/24) la descripción es correcta.
17.08.2022 - 19:45En el hombro izq de la espalda dice: "cuando se haya trabajado la 5ª fila en A3,... Y también en la espalda para ambos hombros hace referencia sólo al diagrama A1. Igualmente sus modelos son buenísimos y siempre miro vuestra página. Gracias
09.08.2022 - 18:38Folklore
24.08.2021 - 16:07Mountain Ash, it looks like its berries on the sweater.
16.08.2021 - 10:21Naam : bosbessen
05.08.2021 - 15:23