
Popular categories
Looking for a yarn?


|
|||||||
Sugar Glaze Vest |
|||||||
 |
 |
||||||
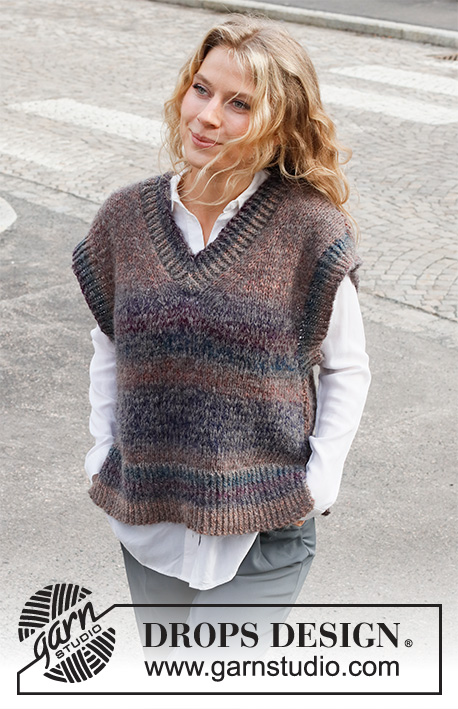
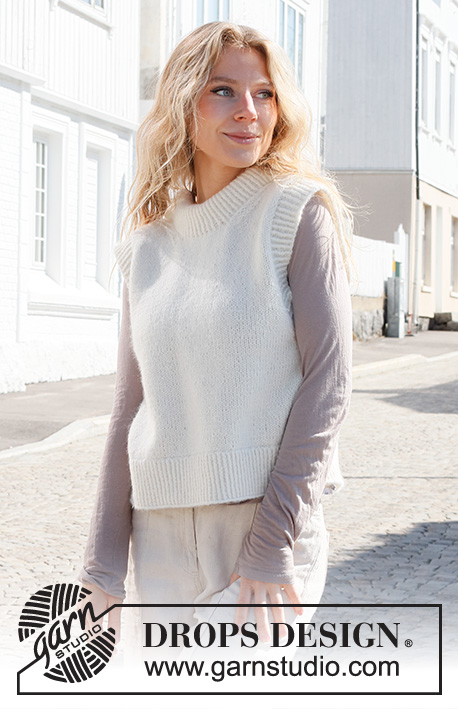
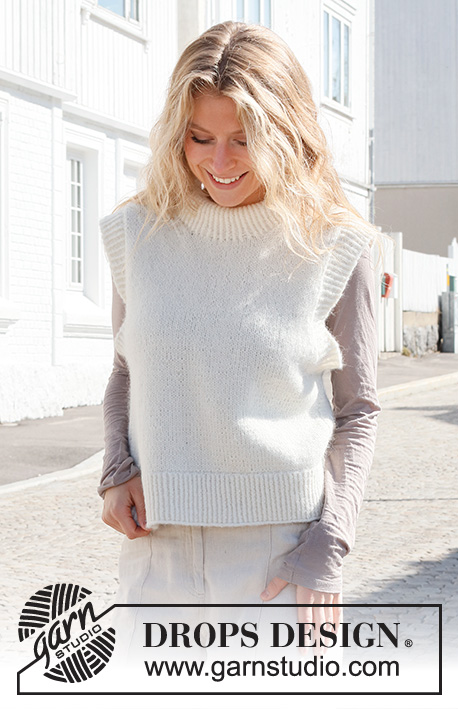
Knitted vest with double neck in DROPS Air. Sizes S - XXXL.
DROPS 227-41 |
|||||||
|
------------------------------------------------------- EXPLANATIONS FOR THE PATTERN: ------------------------------------------------------- RIDGE/GARTER STITCH (worked back and forth): Knit all rows. 1 ridge = knit 2 rows. PATTERN: See diagram A.1. The diagram shows all rows in the pattern from the right side. DECREASE TIP-1 (evenly spaced): To work out how to decrease evenly, count the total number of stitches on needle (e.g. 112 stitches) minus the edge stitches (e.g. 2 stitches) and divide the remaining stitches by the number of decreases to be made (e.g. 32) = 3.4. In this example decrease by knitting together alternately each 2nd and 3rd stitch and each 3rd and 4th stitch (approx.). DECREASE TIP-2 (armholes and neck): All decreases are worked from the right side! DECREASE AT THE BEGINNING OF THE ROW: Work 1 edge stitch in garter stitch, knit 2, slip 1 stitch as if to knit, knit 1 and pass the slipped stitch over the knitted stitch (= 1 stitch decreased). DECREASE AT THE END OF THE ROW: Work until there are 5 stitches left, knit 2 together (= 1 stitch decreased), knit 2 and 1 edge stitch in garter stitch. CASTING-OFF TIP: To avoid the cast-off edge being tight you can cast off with a larger size needle. If the edge is still tight, make 1 yarn over after approx. each 4th stitch at the same time as casting off; the yarn overs are cast off as normal stitches. ------------------------------------------------------- START THE PIECE HERE: ------------------------------------------------------- VEST – SHORT OVERVIEW OF THE PIECE: The back and front pieces are worked separately, back and forth, then sewn together. Ribbed edges are worked around the neck and the armholes to finish. BACK PIECE: Cast on 112-120-132-142-156-170 stitches (including 1 edge stitch on each side) with needle size 3 mm and DROPS Air. Purl 1 row from the wrong side. Then work rib as follows: 1 edge stitch in GARTER STITCH – read description above, work A.1 until there is 1 stitch left, 1 edge stitch in garter stitch. Continue this rib back and forth for 8 cm – adjust so the next row is from the right side. Knit 1 row where you decrease 32-34-38-40-44-48 stitches evenly spaced – read DECREASE TIP-1 = 80-86-94-102-112-122 stitches. Change to needle size 5 mm. Purl 1 row with 1 edge stitch in garter stitch on each side. Continue with stocking stitch and 1 edge stitch in garter stitch on each side. REMEMBER THE KNITTING TENSION! When the piece measures 22-23-24-25-26-27 cm, cast off 4-4-5-5-6-7 stitches for the armholes at the beginning of the next 2 rows = 72-78-84-92-100-108 stitches. On the next row from the right side decrease 1 stitch on each side for the armholes – read DECREASE TIP-2. Decrease like this every 2nd row (each row from the right side) a total of 2-3-3-5-7-8 times, then every 4th row (every other row from the right side) 6-6-7-8-8-9 times = 56-60-64-66-70-74 stitches. When the piece measures 48-50-52-54-56-58 cm, cast off the middle 30-32-34-34-36-36 stitches for the neck from the right side and finish each shoulder separately. LEFT SHOULDER (when the garment is worn): Continue with stocking stitch and 1 edge stitch in garter stitch on each side. AT THE SAME TIME on the next row from the right side decrease 1 stitch at the beginning of the row – remember DECREASE TIP-2 = 12-13-14-15-16-18 stitches. Continue until the piece measures 50-52-54-56-58-60 cm. Loosely cast off with knit from the right side. RIGHT SHOULDER: Continue with stocking stitch and 1 edge stitch in garter stitch on each side. AT THE SAME TIME on the next row from the right side decrease 1 stitch at the end of the row – remember DECREASE TIP-2 = 12-13-14-15-16-18 stitches. Continue until the piece measures 50-52-54-56-58-60 cm. Loosely cast off with knit from the right side. FRONT PIECE: Cast on 112-120-132-142-156-170 stitches (including 1 edge stitch on each side) with needle size 3 mm and DROPS Air. Purl 1 row from the wrong side. Then work rib as follows: 1 edge stitch in garter stitch, work A.1 until there is 1 stitch left, 1 edge stitch in garter stitch. Continue this rib back and forth for 8 cm – adjust so the next row is from the right side. Knit 1 row where you decrease 32-34-38-40-44-48 stitches evenly spaced – remember DECREASE TIP-1 = 80-86-94-102-112-122 stitches. Change to needle size 5 mm. Purl 1 row with 1 edge stitch in garter stitch on each side. Continue with stocking stitch and 1 edge stitch in garter stitch on each side. When the piece measures 22-23-24-25-26-27 cm, cast off 4-4-5-5-6-7 stitches for the armholes at the beginning of the next 2 rows = 72-78-84-92-100-108 stitches. On the next row from the right side decrease 1 stitch on each side for the armholes. Decrease like this every 2nd row (each row from the right side) a total of 2-3-3-5-7-8 times, then every 4th row (every other row from the right side) 6-6-7-8-8-9 times = 56-60-64-66-70-74 stitches. When the piece measures 41-43-44-46-47-49 cm, place the middle 16-18-20-20-22-22 stitches on a thread for the neck, working from the right side, and finish each shoulder separately. RIGHT SHOULDER (when the garment is worn): Continue with stocking stitch and 1 edge stitch in garter stitch on each side. AT THE SAME TIME on the next row from the right side decrease 1 stitch at the beginning of the row. Decrease like this every 2nd row (every row from the right side) a total of 8 times = 12-13-14-15-16-18 stitches. Continue until the piece measures 50-52-54-56-58-60 cm. Loosely cast off with knit from the right side. LEFT SHOULDER: Continue with stocking stitch and 1 edge stitch in garter stitch on each side. AT THE SAME TIME on the next row from the right side decrease 1 stitch at the end of the row. Decrease like this every 2nd row (every row from the right side) a total of 8 times = 12-13-14-15-16-18 stitches. Continue until the piece measures 50-52-54-56-58-60 cm. Loosely cast off with knit from the right side. ASSEMBLY: Sew the shoulder seams inside the cast-off edge. Sew the side seams from the armhole down, inside the 1 edge stitch. DOUBLE NECK: Using circular needle size 3 mm and starting from the right side on the one shoulder, knit up 100-104-112-112-118-118 stitches (including the stitches from the thread) around the neck, inside the 1 edge stitch. The number of stitches should be divisible by 2. Work A.1 in the round for 9-9-9-10-10-10 cm. Cast off with knit over knit and purl over purl – read CASTING-OFF TIP!. Fold the neck double to the inside and sew down. To avoid the neck being tight, it is important that the seam is elastic. SLEEVE-EDGES: Use circular needle size 3 mm and DROPS Air. Start from the right side at the bottom of the armhole and knit up 118-122-126-130-134-138 stitches around the armhole inside the 1 edge stitch. The number of stitches should be divisible by 2. Work A.1 in the round for 4 cm. Cast off with knit over knit and purl over purl – remember CASTING-OFF TIP!. Work the other sleeve-edge in the same way. |
|||||||
Diagram explanations |
|||||||
|
|||||||

|
|||||||
|
Have you made this or any other of our designs? Tag your pictures in social media with #dropsdesign so we can see them! Do you need help with this pattern?You'll find tutorial videos, a Comments/Questions area and more by visiting the pattern on garnstudio.com. © 1982-2024 DROPS Design A/S. We reserve all rights. This document, including all its sub-sections, has copyrights. Read more about what you can do with our patterns at the bottom of each pattern on our site. |
|||||||


With over 40 years in knitting and crochet design, DROPS Design offers one of the most extensive collections of free patterns on the internet - translated to 17 languages. As of today we count 304 catalogues and 11422 patterns - 11422 of which are translated into English (UK/cm).
We work hard to bring you the best knitting and crochet have to offer, inspiration and advice as well as great quality yarns at incredible prices! Would you like to use our patterns for other than personal use? You can read what you are allowed to do in the Copyright text at the bottom of all our patterns. Happy crafting!
Comments / Questions (14)
Er strikkefastheden i opskriften ud fra pinde str. 3 eller 5?
02.05.2023 - 17:26DROPS Design answered:
Hej Lisa, strikkefastheden er i glatstrik og vi bruger pind 5 :)
03.05.2023 - 07:51Hallo! Ich bin verwirrt. Beim Rückenteil: Muss man nach der Abnahme für die Ärmel (auf bei mir von 78 zu 60 Maschen) einfach normal weiterstricken? Weil ich bin jetzt erst bei 38cm und nicht bei 50cm.🤔 Danke für eine rasche Antwort!
20.01.2023 - 17:18DROPS Design answered:
Liebe Frau Luclaso, wenn alle Maschen für den Ärmelauschnitt abgekettet sind, stricken Sie weiter bis die Arbeit 50 cm (2. Größe) ab der Anschlagskante, dann ketten Sie die mittleren Maschen für den Halsausschnitt und stricken Sie beide Schulter separat zur Ende. Viel Spaß beim stricken!
23.01.2023 - 08:28Hi, I'm a little confused by the decreases on the shoulders of the back piece, as it says 'when the garment is worn'. Is this the point of view of the wearer, or observer?! Are both the decreases (left and right shoulder) done at the centre part of the piece or the edges? Many thanks.
11.04.2022 - 14:07DROPS Design answered:
Dear Jo, when you say "when the garment is worn", the point of view is that from the viewer. These decreases are for the neck, so they are worked towards the neck. Happy knitting!
11.04.2022 - 23:04Se il campione di 17 maglie misura 10 cm, 120 maglia diventano 70 cm non 49. Non mi ritrovo con le misure, potete aiutarmi? Grazie
10.02.2022 - 19:42DROPS Design answered:
Buonasera Michela, quel campione corrisponde alla tensione sul corpo del gilet, quindi deve considerare più o meno il numero delle maglie a partire dalla fine del bordo a coste. Buon lavoro!
10.02.2022 - 19:50Bonjour c'est bien le schéma qui est le même pour le devant et le dos je vous remercie de votre réponse bonne journée cordialement
02.02.2022 - 08:07DROPS Design answered:
Merci pour votre retour, et si vous avez d'autres questions, n'hésitez pas. Bon tricot!
02.02.2022 - 08:18Bonsoir merci pour votre réponse je me suis trompé c'est au sujet du patron je vois le patron du devant mais pas celui du dos c'est le modèle pull sans manche avec col doublé en drops air modèle ai-358 je vous remercie cordialement
01.02.2022 - 17:30DROPS Design answered:
Bonjour Mme Decourtieux, vous pensez au schéma avec les mesures? Il n'y a pas de schéma spécifique pour le dos, c'est le même schéma pour le dos et le devant. Ou bien je comprends encore mal votre question et dans ce cas, je m'en excuse.
02.02.2022 - 07:36Bonsoir j'ai commandé la laine Drops AIR pour le pull sans manches 227-41 j'ai le diagramme du devant je ne vois pas pour le dos je suis perdu pour les diminutions dans l attente d une réponse cordialement
31.01.2022 - 19:39DROPS Design answered:
Bonjour Mme Decourtieux, il n'y a qu'un seul diagramme: A.1 tricoté pour les côtes du bas du dos, du devant, bordure des emmanchures et col. En bas de page, vous retrouvez également le schéma des mesures pour toutes les tailles. À quel diagramme pensez-vous? Pouvez-vous préciser votre pensée? Merci!
01.02.2022 - 08:54Hallo! Ich bin neu dabei mit Kraus-Maschen. Haben Sie irgendwo eine genauere Erklärung wie man A1 versteht, oder wie bei Rück und Hin-Masche in rechts ein vertikales Rippenmusster entsteht?
22.11.2021 - 22:04DROPS Design answered:
Liebe Pina, A.1 besteht aus Rippenmuster 1 Masche rechts verschränkt/1 Masche links, dh bei Hinreihen stricken Sie: *1 Masche rechts verschränkt, 1 Masche links*, von *bis* wiederholen und Reihe mit 1 Masche rechts verschränkt enden (= 1. M in A.1); Rückreihe = 1 Masche links verschränkt, *1 Masche rechts, 1 Masche links verschränkt*, von *-* wiederholen. Viel Spaß beim stricken!
23.11.2021 - 08:27Beautiful and easy help. Knit instructions according to the instructions! And Drops Air
22.10.2021 - 09:06Simplicity slipover
17.08.2021 - 02:01