
Popular categories
Looking for a yarn?


|
||||||||||||||||||||||||||||||||||||||||
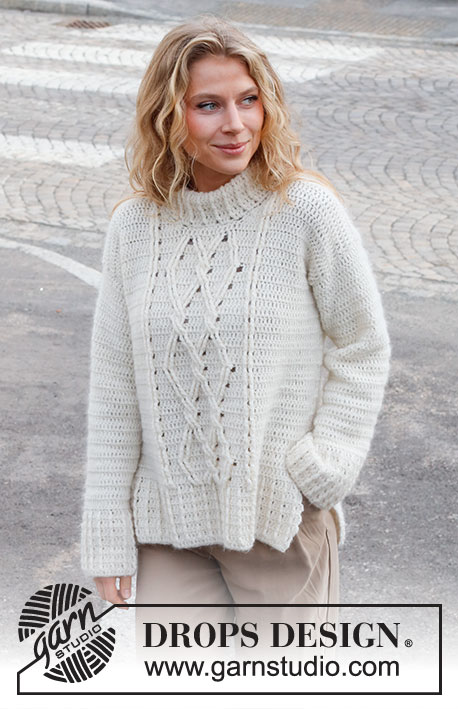
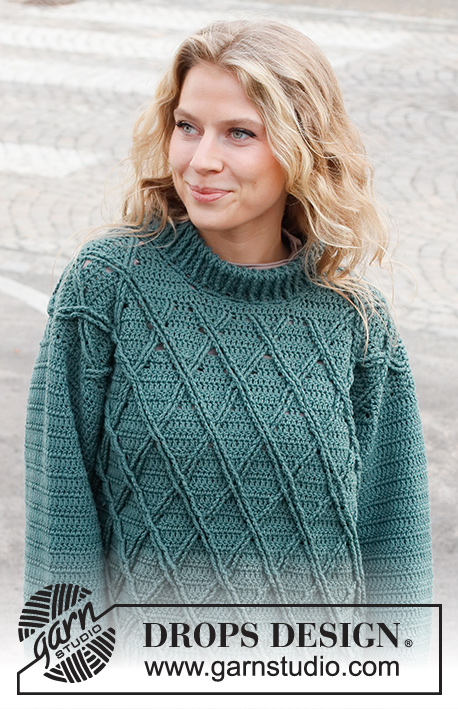
Teal Crossover |
||||||||||||||||||||||||||||||||||||||||
 |
 |
|||||||||||||||||||||||||||||||||||||||
Crocheted jacket in DROPS Merino Extra Fine. The piece is worked with cables, relief-stitches and collar. Sizes S - XXXL.
DROPS 227-30 |
||||||||||||||||||||||||||||||||||||||||
|
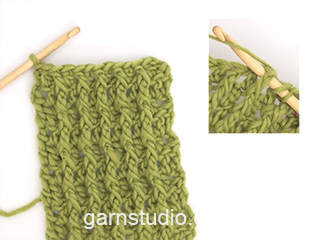
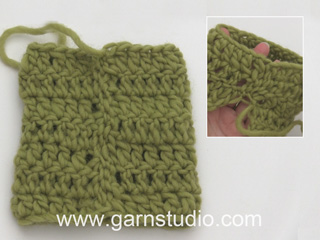
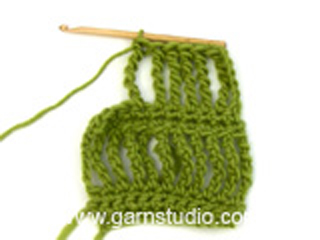
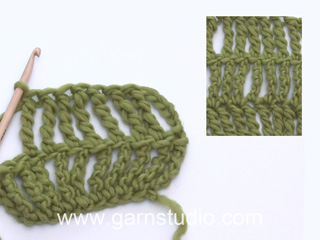
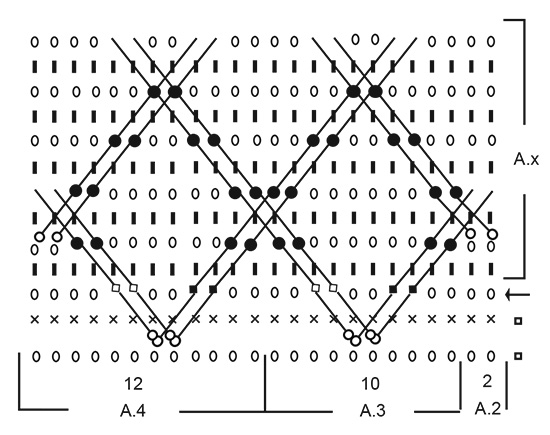
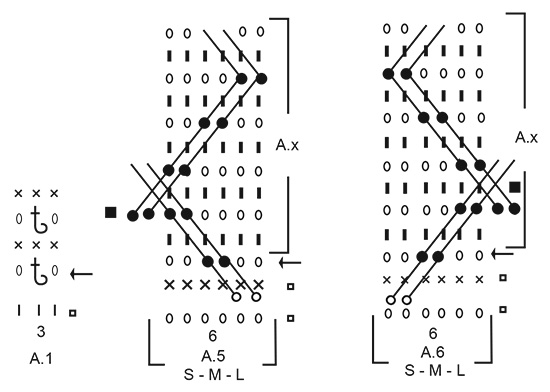
------------------------------------------------------- EXPLANATIONS FOR THE PATTERN: ------------------------------------------------------- CHAIN STITCH: If you work outermost on the hook the chain stitch will often be too tight; 1 chain stitch should be as long as 1 single/double crochet is wide. CROCHET INFORMATION: When working back and forth. At the beginning of each row of double crochets work 3 chain stitches, which do not replace the first double crochet but are worked in addition. At the beginning of each row of single crochets work 1 chain stitch, which does not replace the first single crochet but is worked in addition. When working in the round: At the beginning of each round of double crochets work 3 chain stitches, which do not replace the first double crochet but are worked in addition. Finish the round with 1 slip stitch in the 3rd chain stitch from the beginning of the round. PATTERN: See diagrams A.1 to A.6. Choose diagram for your size (applies to A.5 and A.6). TIP FOR RELIEF-STITCHES: When working the relief-pattern it is important that the relief-stitches are neither too tight nor too loose. If the stitches are too tight when working relief-triple-treble crochets, work relief-quadruple-treble crochets instead. If the stitches are too loose, work relief-double-treble crochets instead. DECREASE TIP: Decrease 1 single crochet by working 2 single crochets together: Insert the hook through the first stitch and pick up the strand, insert the hook through the next stitch and pick up the strand (= 3 loops on hook), make 1 yarn over and pull it through all 3 loops (1 stitch decreased). Decrease 1 double crochet by working 2 double crochets together: * Make 1 yarn over, insert the hook through the next stitch, pick up the strand, 1 yarn over and pull it through the first 2 loops on the hook *, work from *-* 1 more time, make 1 yarn over and pull it through all 3 loops on the hook (1 stitch decreased). INCREASE TIP (sleeves): Work 2 double crochets in the 3rd stitch on the round, work until there are 3 stitches left and work 2 double crochets in the next stitch (= 2 stitches increased). ------------------------------------------------------- START THE PIECE HERE: ------------------------------------------------------- JACKET – SHORT OVERVIEW OF THE PIECE: The front and back pieces are worked separately, back and forth. Relief-pattern is worked on the front and back pieces – read TIP FOR RELIEF-PATTERN. The sleeves are worked in the round, turning after each round so the texture matches the body. The pieces are sewn together and the collar worked to finish. BACK PIECE: Work 84-87-96-105-114-123 chain stitches – read CHAIN STITCH, with hook size 4.5 MM = US 7 and DROPS Merino Extra Fine. Turn and work 1 double crochet in the 4th chain stitch from the hook, work 1 double crochet in each of the other 80-83-92-101-110-119 chain stitches = 81-84-93-102-111-120 double crochets + 3 chain stitches to turn. Now work as follows: 3 chain stitches – read CROCHET INFORMATION, A.1 to end of the row. Continue this pattern back and forth for 8 cm = 3⅛" – adjust so the last row is a row of single crochets from the wrong side, and decrease 1-0-1-0-1-0 single crochets on this row – read DECREASE TIP = 80-84-92-102-110-120 single crochets + 1 chain stitch to turn. Work from the right side as follows: 1 double crochet in each of the first 3-5-9-9-13-18 stitches, A.2 over the next 2 stitches, A.3 over the next 60-60-60-70-70-70 stitches (= 6-6-6-7-7-7 repeats of 10 stitches), A.4 over the next 12 stitches, 1 double crochet in each of the last 3-5-9-9-13-18 stitches. Continue this pattern. REMEMBER THE CROCHET GAUGE! When the diagrams are finished in height, repeat A.X onwards. When the piece measures 38-39-40-41-42-43 cm = 15"-15¼"-15¾"-16⅛"-16½"-17", bind off for the armholes as follows: Work 1 slip stitch in each of the first 2-3-5-7-8-10 stitches, pattern as before over the next 76-78-82-88-94-100 stitches (2-3-5-7-8-10 stitches left), turn. Sizes S, M and L go to ALL SIZES below. Sizes XL, XXL and XXXL continue back and forth with pattern and decrease 1 double crochet on each side by working 2 double crochets together – read DECREASE TIP. Decrease like this each row (both from the right and wrong side) a total of 1-2-4 times. ALL SIZES: = 76-78-82-86-90-92 stitches. Continue with pattern over the middle 74-74-74-84-84-84 stitches and 1 double crochet in each of the 1-2-4-1-3-4 stitches on each side. When the piece measures 54-56-58-60-62-64 cm = 21¼"-22"-22¾"-23⅝"-24⅜"-25¼", work the next row as follows: Pattern as before over the first 28-29-31-32-34-35 stitches, work 2 double crochets together = 29-30-32-33-35-36 stitches on the shoulder. Turn and work back from the wrong side. Cut the strand. The piece measures approx. 56-58-60-62-64-66 cm = 22"-22¾"-23⅝"-24⅜"-25¼"-26". Skip the middle 16-16-16-18-18-18 stitches (= neck). Continue from the right side as follows: Work 2 double crochets together and work as before to the end of the row = 29-30-32-33-35-36 stitches on the shoulder. Turn and work back from the wrong side. Cut the strand. The piece measures approx. 56-58-60-62-64-66 cm = 22"-22¾"-23⅝"-24⅜"-25¼"-26". RIGHT FRONT PIECE: Work 48-50-54-60-64-70 chain stitches – remember CHAIN STITCH, with hook size 4.5 MM = US 7 and DROPS Merino Extra Fine. Turn and work 1 double crochet in the 4th chain stitch from the hook, then 1 double crochet in each of the other 44-46-50-56-60-66 chain stitches = 45-47-51-57-61-67 double crochets + 3 chain stitches to turn. Now work as follows: 3 chain stitches, work A.1 to the end of the row. Continue this pattern back and forth for 8 cm = 3⅛" – adjust so the last row is a row of single crochets from the wrong side and decrease 0-0-0-0-0-1 single crochet on this row = 45-47-51-57-61-66 single crochets + 1 chain stitch to turn. Work from the right side as follows: 1 double crochet in each of the first 4 stitches (= band), work A.5 (choose diagram for your size) over the next 6-6-6-12-12-12 stitches, A.3 over the next 20 stitches (= 2 repeats of 10 stitches), A.4 over the next 12 stitches, 1 double crochet in each of the last 3-5-9-9-13-18 stitches. Continue this pattern. When the diagrams are finished in height, repeat A.X onwards. When the piece measures 38-39-40-41-42-43 cm = 15"-15¼"-15¾"-16⅛"-16½"-17", bind off for the armhole on the next row from the wrong side as follows: Work 1 slip stitch in each of the first 2-3-5-7-8-10 stitches, then work as before to the end of the row = 43-44-46-50-53-56 stitches. Sizes S, M and L go to ALL SIZES below. Sizes XL, XXL and XXXL continue back and forth with pattern and decrease 1 double crochet by the armhole by working 2 double crochets together. Decrease like this each row (both from the right and wrong side) a total of 1-2-4 times. ALL SIZES: = 43-44-46-49-51-52 stitches. Continue the pattern, with 1 double crochet in each of the 1-2-4-1-3-4 stitches by the armhole. When the piece measures 49-51-53-54-56-58 cm = 19¼"-20"-21"-21¼"-22"-22¾", continue with as much of the pattern as there is room for – the other stitches are worked with double crochets. Work as follows from the right side: 1 slip stitch in each of the first 8-8-8-10-10-10 stitches (= band and neck), work 2 and 2 double crochets together over the next 4 stitches and pattern as before to the end of the row. Turn and work pattern until there are 4 stitches left and work 2 and 2 double crochets together over these 4 stitches. Turn and work 2 and 2 double crochets together over the first 4 stitches and pattern to the end of the row = 29-30-32-33-35-36 stitches on the shoulder. Continue working until the piece measures 56-58-60-62-64-66 cm = 22"-22¾"-23⅝"-24⅜"-25¼"-26". Cut the strand. LEFT FRONT PIECE: Work 48-50-54-60-64-70 chain stitches – remember CHAIN STITCH, with hook size 4.5 MM = US 7 and DROPS Merino Extra Fine. Turn and work 1 double crochet in the 4th chain stitch from the hook, then 1 double crochet in each of the other 44-46-50-56-60-66 chain stitches = 45-47-51-57-61-67 double crochets + 3 chain stitches to turn. Now work as follows: 3 chain stitches, work A.1. Continue this pattern back and forth for 8 cm = 3⅛" – adjust so the last row is a row of single crochets from the wrong side and decrease 0-0-0-0-0-1 single crochet on this row = 45-47-51-57-61-66 single crochets + 1 chain stitch to turn. Work from the right side as follows: 1 double crochet in each of the first 3-5-9-9-13-18 stitches, work A.2 over the next 2 stitches, A.3 over the next 30 stitches (= 3 repeats of 10 stitches), A.6 (choose diagram for your size) over the next 6-6-6-12-12-12 stitches, 1 double crochet in each of the last 4 stitches (= band). Continue this pattern. When the diagrams are finished in height, repeat A.X onwards. When the piece measures 38-39-40-41-42-43 cm = 15"-15¼"-15¾"-16⅛"-16½"-17", bind off for the armhole on the next row from the right side as follows: Work 1 slip stitch in each of the first 2-3-5-7-8-10 stitches, then work as before to the end of the row = 43-44-46-50-53-56 stitches. Sizes S, M and L go to ALL SIZES below. Sizes XL, XXL and XXXL continue back and forth with pattern and decrease 1 double crochet by the armhole by working 2 double crochets together. Decrease like this each row (both from the right and wrong side) a total of 1-2-4 times. ALL SIZES: = 43-44-46-49-51-52 stitches. Continue the pattern, with 1 double crochet in each of the 1-2-4-1-3-4 stitches by the armhole. When the piece measures 49-51-53-54-56-58 cm = 19¼"-20"-21"-21¼"-22"-22¾", continue with as much of the pattern as there is room for – the other stitches are worked with double crochets. Work as follows from the right side: Work until there are 12-12-12-14-14-14 stitches left on the row, work 2 and 2 double crochets together over the next 4 stitches (8-8-8-10-10-10 stitches left = band and neck). Turn and work back as follows: Work 2 and 2 double crochets together over the next 4 stitches and pattern as before to the end of the row. Turn and work pattern until there are 4 stitches left and work 2 and 2 double crochets together over these 4 stitches = 29-30-32-33-35-36 stitches on the shoulder. Continue working until the piece measures 56-58-60-62-64-66 cm = 22"-22¾"-23⅝"-24⅜"-25¼"-26". Cut the strand. SLEEVES: Work 52-55-55-58-58-61 chain stitches – remember CHAIN STITCH, with hook size 4.5 MM = US 7 and DROPS Merino Extra Fine. Form them into a ring with 1 slip stitch in the first chain stitch worked. Work 3 chain stitches, then 1 double crochet in each chain stitch, finish the round with 1 slip stitch in the 3rd chain stitch at the beginning of the round = 51-54-54-57-57-60 double crochets + 3 chain stitches to turn. Work A.1 in the round – turning after each round so you work alternately from the right and wrong side. The relief-stitches are always worked from the right side. Repeat the last 4 rows in the diagram until the piece measures 11 cm = 4⅜". Continue with double crochets. When the piece measures 19-20-20-20-20-20 cm = 7½"-8"-8"-8"-8"-8", increase 2 double crochets under the sleeve – read INCREASE TIP. Increase like this every 12-10½-5-4½-3-2½ cm = 4¾"-4⅛"-2"-1⅝"-1⅛"-1" a total of 3-3-5-5-7-7 times = 57-60-64-67-71-74 double crochets. When the sleeve measures 47-45-45-43-42-39 cm = 18½"-17¾"-17¾"-17"-16½"-15¼" work the sleeve cap back and forth to finished length as follows in the different sizes: SIZES S, M AND L: Continue working for 1-3-3 cm = ⅜"-1⅛"-1⅛". SIZES XL, XXL AND XXXL: Continue working for 4-5-8 cm = 1½"-2"-3⅛". The next row is worked as follows: Decrease 1-2-4 stitches by working 2 and 2 double crochets together over the first 2-4-8 stitches, work 1 double crochet in each stitch until there are 2-4-8 stitches left, work 2 and 2 double crochets together over the last 2-4-8 stitches = 65-67-66 stitches. ALL SIZES: The sleeve measures approx. 48 cm = 19" in all sizes, with a split of approx 1-3-3-5-6-9 cm = ⅜"-1⅛"-1⅛"-2"-2⅜"-3½" at the top. Cut and fasten the strand. Work the other sleeve in the same way. ASSEMBLY: Sew the shoulder seams together in each and every stitch. Sew the sleeve cap to the armhole, then sew the split to the bottom of the armhole – see sketch. Sew the side seams, inside the outermost stitch, from the armholes down. Sew the buttons to the left band as follows: The top button approx. 2 cm = ¾" from the neck and the bottom button 8 cm = 3⅛" from the bottom edge. Divide the other 3-3-4-4-4-4 buttons evenly with approx. 9½-10-8½-9-9-9½ cm = 3 5/9"-4"-3¼"-3½"-3½"-3 5/9" between each one. The buttons are buttoned between 2 double crochets on the right band. COLLAR: Start from the right side on the right band as follows: Skip the 4 band stitches, fasten the strand with 1 single crochet in the next stitch, * work 2 chain stitches, skip 1 cm = ⅜", work 1 single crochet *, work from *-* 6-6-6-7-7-7 times up to the shoulder seam, continue with 7-7-7-8-8-8 chain-spaces to the next shoulder seam and 6-6-6-7-7-7 chain-spaces down the left front piece, leaving the last 4 stitches (= band) = 19-19-19-22-22-22 chain-spaces. The next row is worked as follows: 3 chain stitches – remember CROCHET INFORMATION, work 1 double crochet in the first stitch, 3 double crochets around each of the next 19-19-19-22-22-22 chain-spaces and 1 double crochet in the last stitch = 59-59-59-68-68-68 double crochets + 3 chain stitches to turn. Work 1 row with 1 double crochet in each stitch. Now work as follows: ROW 1: 1 double crochet in each of the first 3-3-3-3-3-3 stitches, 2 double crochets in the next stitch (= 1 stitch increased), * 1 double crochet in each of the next 3 stitches, 2 double crochets in the next stitch (= 1 stitch increased)*, work from *-* a total of 13-13-13-15-15-15 times (= 13-13-13-15-15-15 stitches increased), work 1 double crochet in each of the last 3-3-3-4-4-4 stitches = 73-73-73-84-84-84 stitches. ROW 2: Work 1 double crochet in each stitch. ROW 3: Work 1 double crochet in each of the first 3-3-3-4-4-4 stitches, 2 double crochets in the next stitch (= 1 stitch increased), * 1 double crochet in each of the next 4 stitches, 2 double crochets in the next stitch*, work from *-* a total of 13-13-13-15-15-15 times (= 13-13-13-15-15-15 stitches increased), work 1 double crochet in each of the last 4-4-4-4-4-4 stitches = 87-87-87-100-100-100 stitches. ROW 4: Work 1 double crochet in each stitch. ROW 5: Work 1 double crochet in each of the first 4-4-4-4-4-4 stitches, 2 double crochets in the next stitch (= 1 stitch increased), * 1 double crochet in each of the next 5 stitches, 2 double crochets in the next stitch*, work from *-* 13-13-13-15-15-15 times (= 13-13-13-15-15-15 stitches increased), work 1 double crochet in each of the last 4-4-4-5-5-5 stitches = 101-101-101-116-116-116 stitches. ROW 6: Work 1 double crochet in each stitch. The collar measures approx. 7 cm = 2¾". Cut and fasten the strand. |
||||||||||||||||||||||||||||||||||||||||
Diagram explanations |
||||||||||||||||||||||||||||||||||||||||
|
||||||||||||||||||||||||||||||||||||||||
|
||||||||||||||||||||||||||||||||||||||||
|
||||||||||||||||||||||||||||||||||||||||

|
||||||||||||||||||||||||||||||||||||||||

|
||||||||||||||||||||||||||||||||||||||||

|
||||||||||||||||||||||||||||||||||||||||
|
Have you made this or any other of our designs? Tag your pictures in social media with #dropsdesign so we can see them! Do you need help with this pattern?You'll find tutorial videos, a Comments/Questions area and more by visiting the pattern on garnstudio.com. © 1982-2024 DROPS Design A/S. We reserve all rights. This document, including all its sub-sections, has copyrights. Read more about what you can do with our patterns at the bottom of each pattern on our site. |
||||||||||||||||||||||||||||||||||||||||


With over 40 years in knitting and crochet design, DROPS Design offers one of the most extensive collections of free patterns on the internet - translated to 17 languages. As of today we count 304 catalogs and 11422 patterns - 11417 of which are translated into English (US/in).
We work hard to bring you the best knitting and crochet have to offer, inspiration and advice as well as great quality yarns at incredible prices! Would you like to use our patterns for other than personal use? You can read what you are allowed to do in the Copyright text at the bottom of all our patterns. Happy crafting!
Comments / Questions (8)
I am just at the beginning the the pattern. Working the back piece...I did the 84 chain stitches then I worked a double crochet in the 4th chain and in the rest of the chains for a total of 81 double crochet's and then added 3 chain stitches and turned. My question is the next sentence says 3 chain stitches.. read crochet information. So I'm confused. This would be a total of 6 chain stitches..by the A.1 diagram it shows we are on the wrong side doing double crochet's across. Thanks
12.09.2023 - 02:42DROPS Design answered:
Dear Jackie, you only crochet 3 chains to begin a new row, this means at the end of the first row, turn and now crochet 3 chains (as explained under CROCHET INFO, these 3 chains do not replace the first stitch on row) and now work A.1. The first row in A.1 is worked from the right side, read from the right towards the left as shown with the arrow. Happy crocheting!
12.09.2023 - 09:40Do you have a video that shows exact where the stitches go for A.3 and A4? It is a bit confusing, reading the instructions.
15.08.2023 - 03:37DROPS Design answered:
Dear Denise, we only have diagram to this pattern; just follow the instructions step by step to be able to work each stitch just as explained around the correct stitch. Happy crocheting!
15.08.2023 - 09:21You have so many beautiful crochet patterns. I wish I could make some of them, but I don’t understand graphs. I want to make this cardigan so bad. Do you by any chance sell a written pattern?
14.07.2023 - 10:34Bonjour Je ne comprend pas le diagramme A quel moment faire les triplés bridés, les quadruple je m’y perd ? Sur le rang envers c’est en maille serré ou en bride ? Cordialement
22.05.2023 - 21:33DROPS Design answered:
Bonjour Mme Fabre, les torsades se font sur les rangs crochetés sur l'endroit seulement, suivez bien les symboles de la légende pour savoir quelle bride/triple- ou quadruple bride faire (début de la ligne) et autour de quelle maille (extrémité en forme de rond noir, losange noir, losange blanc ou étoile). Au 2ème rang de A.3 (flèche), crochetez par exemple 1 quadruple-bride en relief autour de la maille indiquée 2 rangs plus bas + 1 bride crochetées ensemble et ce 2 fois de suite au début puis 2 fois de suite après 2 brides. Bon crochet!
23.05.2023 - 08:42Hei! Jeg hekler størrelse S men sliter med å få riktig bredde på bakstykke. Står i diagrammet at den vil bli 49cm bred, men jeg klarer ikke få noe mindre enn 55cm. Har prøvd å justere heklefastheten og gått ned til pinne 3,5. Leser jeg diagrammet feil eller skal det være så bredt i starten?
16.04.2022 - 21:43DROPS Design answered:
Hei Marte. Du skal hekle over 80 masker og det hekles slik: Hekle 1 stav i hver av de første 3 fastmaskene, A.2 over de neste 2 fastmaskene, A.3 over de neste 60 fastmaskene (= 6 rapporter á 10 masker), A.4 over de neste 12 fastmaskene, 1 stav i hver av de siste 3 fastmaskene = 3+2+60+12+3= 80 masker. Har du flere enn 80 masker?
19.04.2022 - 14:25What a beautiful pattern! I'm going to give it a go but I was hoping you could help me with the measurements. Based on my bust size (92cm), I was going to follow the M size pattern since I still want the piece to fit loosely. However, I have quite broad shoulders. Will the M become to snug on the shoulders then? Should I oversize to L? Thank you in advance.
27.02.2022 - 12:11DROPS Design answered:
Dear Pandora, for size M you have around 19 cm for each shoulder. If this is still too small in your case, you may need to size up. Take into account that these are not drop sleeves; they are glued sleeves. If you want to have broader shoulders, you can work a drop sleeve; you don't cast off for the armhole. Happy crocheting!
27.02.2022 - 16:41Ho una domanda riguardo al colore di questo modello. Dalle foto sembra blu petrolio ma dalle spiegazioni è il n. 37 che è un colore molto diverso. È corretta questa indicazione?
08.10.2021 - 15:04DROPS Design answered:
Buongiorno Adelina, abbiamo inoltrato la sua segnalazione al settore design: se ci dovessero essere delle correzioni le potrà trovare direttamente sul sito. Buon lavoro!
09.10.2021 - 13:16Love the cable design
30.09.2021 - 23:22