
Popular categories
Looking for a yarn?


|
|||||||
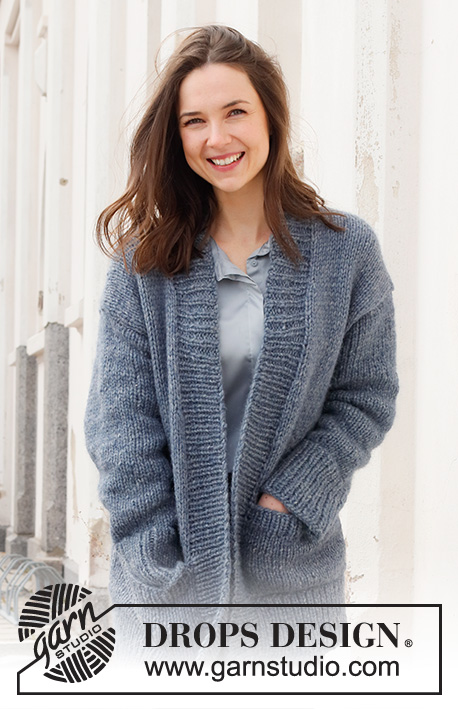
Sailor Blues Jacket |
|||||||
 |
 |
||||||
Knitted jacket in 1 strand DROPS Wish or 2 strands DROPS Air. The piece is worked top down with round yoke and high neck. Sizes XS - XXL.
DROPS 228-33 |
|||||||
|
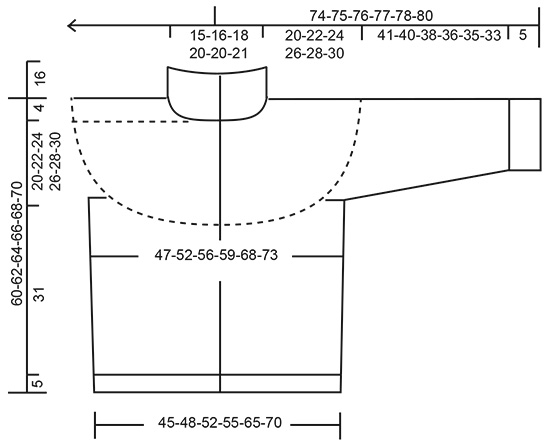
------------------------------------------------------- EXPLANATIONS FOR THE PATTERN: ------------------------------------------------------- RIDGE/GARTER STITCH (worked back and forth): Knit all rows. 1 ridge = knit 2 rows. PATTERN: See diagrams A.1 to A.3. Choose diagram for your size (applies to A.3 in sizes M, L, XL and XXL). The diagrams show all rows in the pattern from the right side. INCREASE TIP (evenly spaced): To work out how to increase evenly, count the total number of stitches on the needle (e.g. 64 stitches) minus the bands (e.g. 10 stitches) and divide the remaining stitches by the number of increases to be made (e.g. 13) = 4.1. In this example, increase by making 1 yarn over after approx. each 4th stitch. Do not increase over the bands. On the next row work the yarn overs twisted to avoid holes. DECREASE TIP (for body and sleeves): Decrease 1 stitch on either side of the marker thread as follows: Work until there are 3 stitches left before the marker thread, knit 2 together, knit 2 (marker thread sits between these 2 stitches), slip 1 stitch as if to knit, knit 1 and pass the slipped stitch over the knitted stitch. BUTTONHOLES: Work buttonholes on the right band (when the garment is worn). Work from the right side when there are 3 stitches left on the row as follows: Make 1 yarn over, knit 2 together and knit 1. On the next row (wrong side), knit the yarn over to leave a hole. The first buttonhole is worked after the neck. The other 6-6-6-7-7-7 buttonholes are worked with approx. 8½-8½-9-8-8½-8½ cm between each one. CASTING-OFF TIP: To avoid the cast-off edge being tight you can cast off with a larger size needle. If the edge is still tight, make 1 yarn over after approx. each 6th stitch at the same time as casting off; the yarn overs are cast off as normal stitches. ------------------------------------------------------- START THE PIECE HERE: ------------------------------------------------------- JACKET – SHORT OVERVIEW OF THE PIECE. The neck and yoke are worked back and forth with circular needle, from mid front and top down. The yoke is divided for body and sleeves and the body continued back and forth with circular needle. The sleeves are worked in the round with double pointed needles/short circular needle, top down. HIGH NECK: Cast on 64-68-72-76-76-80 stitches (including 5 band stitches on each side towards mid-front) with circular needle size 6 mm and 1 strand DROPS Wish or 2 strands DROPS Air. Purl 1 row (= wrong side). The next row is worked as follows from the right side: 5 band stitches in GARTER STITCH – read description above, * knit 2, purl 2 *, work from *-* until there are 7 stitches left, knit 2 and 5 band stitches in garter stitch. Work this rib for 16 cm. Knit 1 row from the right side where you increase 15-16-17-18-28-29 stitches evenly spaced – read INCREASE TIP = 79-84-89-94-104-109 stitches. Remember the BUTTONHOLES on the right band – read description above. Purl 1 row from the wrong side (yarn overs purled twisted and bands knitted). Insert 1 marker after the band at the beginning of the row; the yoke is measured from this marker! YOKE: Change to circular needle size 8 mm. Work stocking stitch with 5 band stitches in garter stitch on each side. REMEMBER THE KNITTING TENSION! When the yoke measures 4 cm from the marker increase as follows: INCREASE 1: 5 band stitches in garter stitch, 2 stitches in stocking stitch, A.1 until there are 7 stitches left (= 13-14-15-16-18-19 repeats of 5 stitches), 2 stitches in stocking stitch, 5 band stitches in garter stitch. When A.1 has been completed you have increased 26-28-30-32-36-38 stitches = 105-112-119-126-140-147 stitches. Continue with stocking stitch and 5 band stitches on each side until the yoke measures 9-10-10-11-12-13 cm from the marker. INCREASE 2: 5 band stitches in garter stitch, 3-3-4-4-5-3 stitches in stocking stitch, A.2 until there are 6-7-7-8-10-6 stitches left (= 15-16-17-18-20-22 repeats of 6 stitches), 2-3-3-4-5-2 stitches in stocking stitch, 5 band stitches in garter stitch. When A.2 has been completed you have increased 30-32-34-36-40-44 stitches = 135-144-153-162-180-191 stitches. Continue with stocking stitch and 5 band stitches on each side until the yoke measures 14-16-17-19-20-22 cm from the marker. Now continue the different sizes as follows: XS and S: 5 band stitches in garter stitch, 3-4 stitches in stocking stitch, A.2 until there are 7-9 stitches left (= 20-21 repeats of 6 stitches), 2-4 stitches in stocking stitch, 5 band stitches in garter stitch. When A.2 has been completed you have increased 40-42 stitches = 175-186 stitches. M and L: 5 band stitches in garter stitch, 2-3 stitches in stocking stitch, A.3 – choose diagram for your size, until there are 6-7 stitches left (= 20-21 repeats of 7 stitches), 1-2 stitches in stocking stitch, 5 band stitches in garter stitch. When A.3 has been completed you have increased 40-42 stitches = 193-204 stitches. XL and XXL: 5 band stitches in garter stitch, 5-3 stitches in stocking stitch, A.3 – choose diagram for your size, until there are 10-7 stitches left (= 20-22 repeats of 8 stitches), 5-2 stitches in stocking stitch, 5 band stitches in garter stitch. When A.3 has been completed you have increased 40-44 stitches = 220-235 stitches ALL SIZES: = 175-186-193-204-220-235 stitches. Continue with stocking stitch and 5 band stitches on each side until the piece measures 20-22-24-26-28-30 cm from the marker and the next row is from the wrong side. Now divide for the body and sleeves as follows: Work the first 29-30-32-33-37-40 stitches (= right front piece), place the next 35-37-38-40-40-42 stitches on 1 thread for the sleeve, cast on 4-6-8-8-10-10 stitches (= in side under sleeve), work 47-52-53-58-66-71 stitches (= back piece), place the next 35-37-38-40-40-42 stitches on 1 thread for the sleeve, cast on 4-6-8-8-10-10 stitches (= in side under sleeve), work the remaining 29-30-32-33-37-40 stitches (= left front piece). The body and sleeves are finished separately. THE PIECE IS MEASURED FROM HERE! BODY: = 113-124-133-140-160-171 stitches. Insert a marker thread in the middle of the 4-6-8-8-10-10 stitches cast on under each sleeve (= 2-3-4-4-5-5 new stitches on each side). Allow the threads to follow your work onwards; they will be used when decreasing. Work in stocking stitch with 5 band stitches in garter stitch on each side. When the piece measures 4 cm, decrease 1 stitch on each side of both marker threads – read DECREASE TIP. The decreases in XS are finished. Repeat the decrease in S, M, L, XL and XXL when the piece measures 15 cm from the division = 109-116-125-132-152-163 stitches. Continue with stocking stitch and 5 band stitches in garter stitch on each side until the piece measures 31 cm from the division. Try the jacket on and work to desired length; there is 5 cm left to finished length. To avoid the following rib being tight, increase 23-24-27-28-32-33 stitches evenly spaced = 132-140-152-160-184-196 stitches. Change to circular needle size 6 mm and work rib as follows: 5 band stitches in garter stitch, * knit 2, purl 2 *, work from *-* until there are 7 stitches left, knit 2 and 5 band stitches in garter stitch. Continue this rib for 5 cm. Cast off with knit over knit and purl over purl – read CASTING-OFF TIP. The jacket measures approx. 60-62-64-66-68-70 cm from the shoulder down. SLEEVES: Place the 35-37-38-40-40-42 stitches from the thread on the one side of the piece on double pointed needles/short circular needle size 8 mm and knit up 1 stitch in each of the 4-6-8-8-10-10 stitches cast on under the sleeve = 39-43-46-48-50-52 stitches. Insert a marker thread in the middle of the new stitches under the sleeve. Allow the thread to follow your work onwards; it will be used when decreasing. Start at the marker thread and work stocking stitch in the round for 4 cm. Now decrease 2 stitches under the sleeve – read DECREASE TIP. Decrease like this every 6-5-4-3-3-3 cm a total of 6-7-8-9-9-10 times = 27-29-30-30-32-32 stitches. Work until the sleeve measures 41-40-38-36-35-33 cm (shorter measurements in larger sizes due to wider neck and longer yoke). Try the jacket on and work to desired length; there is 5 cm left to finished length. Increase 5-7-6-10-8-8 stitches evenly spaced = 32-36-36-40-40-40 stitches. Change to double pointed needles size 6 mm. Work rib (knit 2, purl 2) for 5 cm. Cast off with knit over knit and purl over purl – remember CASTING-OFF TIP. The sleeve measures approx. 46-45-43-41-40-38 cm from the division. Work the other sleeve in the same way. ASSEMBLY: Sew the buttons onto the left band. |
|||||||
Diagram explanations |
|||||||
|
|||||||

|
|||||||
|
|||||||
|
Have you made this or any other of our designs? Tag your pictures in social media with #dropsdesign so we can see them! Do you need help with this pattern?You'll find tutorial videos, a Comments/Questions area and more by visiting the pattern on garnstudio.com. © 1982-2024 DROPS Design A/S. We reserve all rights. This document, including all its sub-sections, has copyrights. Read more about what you can do with our patterns at the bottom of each pattern on our site. |
|||||||


With over 40 years in knitting and crochet design, DROPS Design offers one of the most extensive collections of free patterns on the internet - translated to 17 languages. As of today we count 304 catalogues and 11422 patterns - 11422 of which are translated into English (UK/cm).
We work hard to bring you the best knitting and crochet have to offer, inspiration and advice as well as great quality yarns at incredible prices! Would you like to use our patterns for other than personal use? You can read what you are allowed to do in the Copyright text at the bottom of all our patterns. Happy crafting!
Comments / Questions (32)
Jeg lurer på hvilken str modellen har? Den jeg skal strikke til er ganske rund.
09.02.2024 - 18:20DROPS Design answered:
Hei Lisbeth, Du finner en målskisse på bunnen av oppskriften, med målene til alle størrelsene. Hvis du velger riktige mål får du den fasongen på jakka som er vist i bildet. God fornøyelse!
12.02.2024 - 08:21La boutonnière est du mauvais côté sur la photo?
08.11.2023 - 19:59Hello, so how do I join this yarn? Any tips? I usually join with two pull up knots. But I find it way too chunky. Please, help!
04.10.2023 - 17:40DROPS Design answered:
Dear Lina, there are different way to join a yarn, you can use the russian join technique for example. Happy knitting!
05.10.2023 - 08:28Eine Strickjacke die man von unten nach oben strickt und einfach nur eine normale Armkugel strickt
26.09.2023 - 22:57Hallo Sehr schöne Strickjacke aber warum immer so .Kann man nicht eine Strickjacke mit Armkugel mal machen.Oder was mich auch etwas ärgert immer Raglanärmel.Wo man von unten nach oben strickt.
26.09.2023 - 22:54Laat maar ik ben eruit!
13.09.2023 - 20:27Ik heb hulp nodig! Maat M: 72st opgezet, hals gebreid en 17st gemeerderd: 89st. Tricot gebreid voor 4 cm. Dan kom ik bij meerdering1: 5st bies 2 tricot A1 tot 7st over zijn 2st tricot en 5st bies. Dat betekend dat ik A1 over 75st (89-14=75) brei maar dan kom ik op 28 meerderingen ipv 30 wat doe ik verkeerd?
13.09.2023 - 19:52DROPS Design answered:
Dag Klaudia,
Je breit 15 herhalingen van A.1. In A.1 zitten 2 meerderingen in de vorm van omslagen, dus dan kom je op 30 meerderingen.
20.09.2023 - 19:21As you begin the neck, the instructions are to knit two stitches next to both bands. The bands are made of five knit stitches. So doesn’t that actually make the band seven stitches wide?? I’m a beginner knitter but I’m looking at my work and I don’t see any ribs developing. Please explain.
23.08.2023 - 06:45DROPS Design answered:
Dear Mrs Zieske, the front band stitches are 5 sts in garter stitch, then you will work rib K2, P2, so that the 2 sts inside (after/before) the 5 sts will be knitted from the right side but purled from the wrong side. Happy knitting!
23.08.2023 - 09:54Je ne pense pas pouvoir tricoter ce pull car je ne comprends pas assez l’anglais.Que puis je faire ? Pouvez-vous m’aider ? Merci beaucoup.
04.08.2023 - 21:32DROPS Design answered:
Bonjour Mme Dellicour, cliquez simplement sur le menu déroulant sous la photo pour pouvoir changer la langue et ainsi accéder aux explications de ce modèle en français mais également à notre site entier en français. Bon tricot!
07.08.2023 - 09:31Guten Tag, Bei dem Drops-Modell 228-33 gibt es in der Anleitung einen Korrekturhinweis: die Jacke wird von oben nach unten mit Blenden und Taschen gestrickt. Eine Anleitung für die Taschen habe ich aber nicht gefunden. Können Sie mir weiterhelfen? Mit freundlichen Grüssen Marlis Sill
04.07.2023 - 16:07DROPS Design answered:
Liebe Frau Sill, es sieht wie einen Fehler von uns aus, es gibt für diese Jacke keine Tasche - das wird so bald wie möglich korrigiert, danke für den Hinweis. Viel Spaß beim stricken!
05.07.2023 - 07:40