DROPS Kid-Silk uni colour 75% Mohair, 25% Silk |
4.60 £ /25g |
Order |
Clicking the ORDER button will redirect you to Wool Warehouse Direct Ltd website
The yarn cost is calculated from the pattern’s smallest size and the yarn’s cheapest product type. Looking for an even better price? You might find it on the DROPS Deals!
-------------------------------------------------------
Alternative Yarn – See how to change yarns here
Yarn Groups A to F – Use the same pattern and change the yarn here
Yarn usage using an alternative yarn – Use our yarn converter here
-------------------------------------------------------
DROPS Kid-Silk uni colour 75% Mohair, 25% Silk 4.60 £ /25g Order |
Clicking the ORDER button will redirect you to Wool Warehouse Direct Ltd website
The yarn cost is calculated from the pattern’s smallest size and the yarn’s cheapest product type. Looking for an even better price? You might find it on the DROPS Deals!
This pattern has been corrected. Click here to see the correction/s.
= knit from the right side, purl from the wrong side | |
= purl from the right side, knit from the wrong side |
Each of our patterns has specific tutorial videos to help you.
These step-by-step tutorials might also help you:
Why is the knitting/crochet tension so important?
Knitting tension is what determines the final measurements of your work, and is usually measured per 10 x 10 cm. It is provided like so: number of stitches in width x number of rows in height - eg: 19 stitches x 26 rows = 10 x 10 cm.
The knitting tension is very individual; some people knit/crochet loosely while others work tightly. You adjust the knitting tension with the needle size, which is why the suggested needle size is only meant as a guide! You need to adjust this (up or down) to ensure that YOUR knitting tension matches the knitting tension provided in the pattern. If you work with a different knitting tension than provided you will have a different yarn consumption, and your work will have different measurements than what the pattern suggests.
The knitting tension also determines which yarns can replace each other. As long as you achieve the same knitting tension you can replace one yarn with another.
See DROPS lesson: How to measure your tension/gauge
See DROPS video: How to make a gauge tension swatch
How do I know how many balls of yarn I need?
The required amount of yarn is provided in grams, eg: 450 g. To calculate how many balls you’ll need you first need to know how many grams are in 1 ball (25g, 50g or 100g). This information is available if you click on the individual yarn quality on our pages. Divide the amount required with the amount of each ball. For example, if each ball is 50g (the most common amount), the calculation will be as follows: 450 / 50 = 9 balls.
Can I use a different yarn than what the pattern suggests?
The important thing when changing from one yarn to another is that the knitting/crochet tension remains the same. This is so that the measurements of the finished piece will be the same as on the sketch provided. It is easier to achieve the same knitting tension using yarns from the same yarn group. It is also possible to work with multiple strands of a thinner yarn to achieve the knitting tension of a thicker one. Please try our yarn converter. We recommend you to always work a test swatch.
Please NOTE: when changing yarn the garment might have a different look and feel to the garment in the photo, due to individual properties and qualities of each yarn.
See DROPS lesson: Can I use a different yarn than the one mentioned in the pattern?
What are the yarn groups?
All our yarns are categorised into yarn groups (from A to F) according to thickness and knitting tension – group A contains the thinnest yarns and group F the thickest. This makes it easier for you to find alternative yarns to our patterns, should you wish to switch yarn. All yarns within the same group have a similar knitting tension and can easily replace each other. However, different yarn qualities have different structures and properties which will give the finished work a unique look and feel.
How do I use the yarn calculator?
At the top of all our patterns you’ll find a link to our yarn calculator, which is a helpful tool should you wish to use a different yarn than suggested. By filling in the yarn quality you wish to replace, the amount (in your size) and number of strands, the calculator will present good alternative yarns with the same knitting tension. Additionally it will tell you how much you’ll require in the new qualities and whether you’ll need to work with multiple strands. Most skeins are 50g (some are 25g or 100g).
If the pattern is worked with multiple colours, every colour will have to be calculated separately. Similarly, if the pattern is worked with several strands of different yarns (for example 1 strand Alpaca and 1 strand Kid-Silk) you will have to find alternatives for each, individually.
Why do you show discontinued yarns in the patterns?
Since different yarns have different qualities and textures we have chosen to keep the original yarn in our patterns. However, you can easily find options among our available qualities by using our yarn calculator, or simply pick a yarn from the same yarn group.
It is possible that some retailers still have discontinued yarns in stock, or that someone has a few skeins at home that they would like to find patterns for.
The yarn calculator will provide both alternative yarn as well as required amount in the new quality.
What size should I knit?
If you think it's hard to decide what size to make, it can be a good idea to measure a garment you own already and like the size of. Then you can pick the size by comparing those measures with the ones available in the pattern's size chart.
You'll find the size chart at the bottom of the pattern.
See DROPS lesson: How to read size chart
Why do I get the wrong knitting tension with the suggested needle size?
The needle size provided in the pattern serves only as a guide, the important thing is to follow the knitting tension. And since knitting tension is very individual, you will have to adjust the needle size to ensure that YOUR tension is the same as in the pattern – maybe you’ll have to adjust 1, or even 2 needle sizes, up or down to achieve the correct tension. For this, we recommend that you work test swatches.
Should you work with a different knitting tension than the one provided, the measurements of the finished garment might deviate from the measurement sketch.
See DROPS lesson: How to measure your tension/gauge
See DROPS video: How to make a tension/gauge swatch
Why is the pattern worked top-down?
Working a garment top-down provides more flexibility and room for personal adjustment. For example it is easier to try the garment on while working, as well as making adjustments to length of yoke and shoulder caps.
The instructions are carefully explaining every step, in the correct order. Diagrams are adjusted to the knitting direction and are worked as usual.
How do I work according to a knitting diagram?
The diagram depicts all rows/rounds, and every stitch seen from the right side. It is read from bottom to top, from right to left. 1 square = 1 stitch.
When working back and forth, every other row is worked from the right side and every other row is worked from the wrong side. When working from the wrong side, the diagram will have to be worked reversed: from left to right, knit stitches are purled, purl stitches are knit etc.
When working in the round every round is worked from the right side and the diagram are worked from right to left on all rounds.
See DROPS lesson: How to read knitting diagrams
How do I work according to a crochet diagram?
The diagram depicts all rows/rounds, and every stitch seen from the right side. It is worked from bottom to top, from right to left.
When working back and forth every other row is worked from the right side: from right to left and every other row is worked from the wrong side: from left to right.
When working in the round, every row in the diagram are worked from the right side, from right to left.
When working a circular diagram you start in the middle and work your way outwards, counter clockwise, row by row.
The rows usually start with a given number of chain stitches (equivalent to the height of the following stitch), this will either be depicted in the diagram or explained in the pattern.
See DROPS lesson: How to read crochet diagrams
How do I work several diagrams simultaneously on the same row/round?
Instructions for working several diagrams after each other on the same row/round, will often be written like so: “work A.1, A.2, A.3 a total of 0-0-2-3-4 times". This means you work A.1 once, then A.2 is worked once, and A.3 is repeated (in width) the number of times provided for your size – in this case like so: S = 0 times, M = 0 times, L=2 times, XL= 3 times and XXL = 4 times.
The diagrams are worked as usual: begin with the first row in A.1, then work the first row in A.2 etc.
See DROPS lesson: How to read knitting diagrams
See DROPS lesson: How to read crochet diagrams
Why are the sleeves shorter in larger sizes?
The total width of the garment (from wrist-to-wrist) will be larger in the larger sizes, despite the actual sleeves being shorter. The larger sizes have longer sleeve caps and wider shoulders, so there will be a good fit in all sizes.
Where on the garment is the length measured?
The measurement sketch/schematic drawing provides information regarding the full length of the garment. If it’s a jumper or a jacket the length is measured from the highest point on the shoulder closest to the neckline, and straight down to the bottom of the garment. It is NOT measured from the tip of shoulder. Similarly, the length of yoke is measured from the highest point on the shoulder and down to where yoke is split into body and sleeves.
On a jacket measures are never taken along bands, unless specifically stated. Always measure inside band stitches when measuring the length.
See DROPS lesson: How to read a schematic drawing
What is a repeat?
Diagrams are often repeated on the round or in height. 1 repeat is the diagram the way it appears in the pattern. If it says to work 5 repeats of A.1 in the round, then you work A.1 a total of 5 times after/next to each other in the round. If it says to work 2 repeats of A.1 vertically/in height you work the entire diagram once, then begin again at the start and work the entire diagram one more time.
Why does the piece start with more chain stitches than it’s worked with?
Chain stitches are slightly narrower than other stitches and to avoid working the cast-on edge too tight, we simply chain more stitches to begin with. The stitch count will be adjusted on the following row to fit the pattern and measurement sketch.
Why increase before the rib edge when the piece is worked top-down?
The rib edge is more elastic and will contract slightly compared to, for example, stocking stitch. By increasing before the rib edge, you avoid a visible difference in width between the rib edge and the rest of the body.
Why increase in the cast-off edge?
It’s very easy to cast off too tightly, and by making yarn overs while casting off (and simultaneously casting these off) you avoid a too tight cast off edge.
See DROPS video: How to bind off with yarn overs (yo)
How do I increase/decrease on every 3rd and 4th row/round alternately?
To achieve an even increase (or decrease) you can increase on, for example: every 3rd and 4th row alternately, like so: work 2 rows and increase on the 3rd row, work 3 rows and increase on the 4th. Repeat this until the increase is complete.
See DROPS lesson: Increase or decrease 1 st on every 3rd and 4th row alternately
How can I work a jacket in the round instead of back and forth?
Should you prefer to work in the round instead of back and forth, you may of course adjust the pattern. You’ll need to add steeks mid-front (usually 5 stitches), and follow the instructions. When you would normally turn and work from the wrong side, simply work across the steek and continue in the round. At the end you’ll cut the piece open, pick up stitches to work bands, and cover the cut edges.
See DROPS video: How to knit steeks and cut open
Can I work a jumper back and forth instead of in the round?
Should you prefer to work back and forth instead of in the round, you may of course adjust the pattern so you work the pieces separately and then assemble them at the end. Divide the stitches for the body in 2, add 1 edge stitch in each side (for sewing) and work the front and back pieces separately.
See DROPS lesson: Can I adapt a pattern for circular needles into straight needles?
Why is the pattern slightly different than what I see in the photo?
Pattern repeats can vary slightly in the different sizes, in order to get the correct proportions. If you’re not working the exact same size as the garment in the photo, yours might deviate slightly. This has been carefully developed and adjusted so that the complete impression of the garment is the same in all sizes.
Make sure to follow instructions and diagrams for your size!
How do I make a women’s size garment into a men’s size one?
If you have found a pattern you like which is available in women’s size it’s not very difficult to convert it to men’s size. The biggest difference will be the length of sleeves and body. Start working on the women size that you think would fit across the chest. The additional length will be worked right before you cast off for the armhole/sleeve cap. If the pattern is worked top-down you can add the length right after the armhole or before the first decrease on sleeve.
Regarding additional yarn amount, this will depend on how much length you add, but it is better with a skein too many than too few.
How do I prevent a hairy garment from shedding?
All yarns will have excess fibres (from production) that might come off as lint or shedding. Brushed yarns (ie hairier yarns) have more of these loose, excess fibres, causing more shedding.
Shedding also depends on what is worn under or over the garment, and whether this pulls at the yarn fibres. It’s therefore not possible to guarantee that there will be no shedding
Below are some tips on how to get the best result when working with hairier yarns:
1. When the garment is finished (before you wash it) shake it vigorously so the looser hairs come off. NOTE: do NOT use a lint roller, brush or any method that pulls at the yarn.
2. Place the garment in a plastic bag and put it in your freezer - the temperature will cause the fibres to become less attached to each other, and excess fibres will come off easier.
3. Leave in the freezer for a few hours before taking it out and shaking it again.
4. Wash the garment according to the instructions on the yarn label.
Why does my garment pill?
Pilling is a natural process that happens to even the most exclusive of fibers. It's a natural sign of wear and tear that is hard to avoid, and that is most visible in high friction areas of your garment like a sweater's arms and cuffs.
You can make your garment look as new by removing the pilling, using a fabric comb or a pill/lint remover.
Chasing Moonlight |
|||||||
|
|
||||||
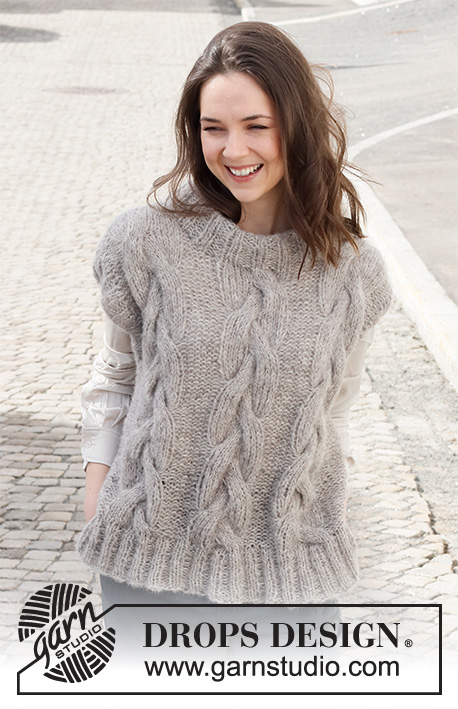
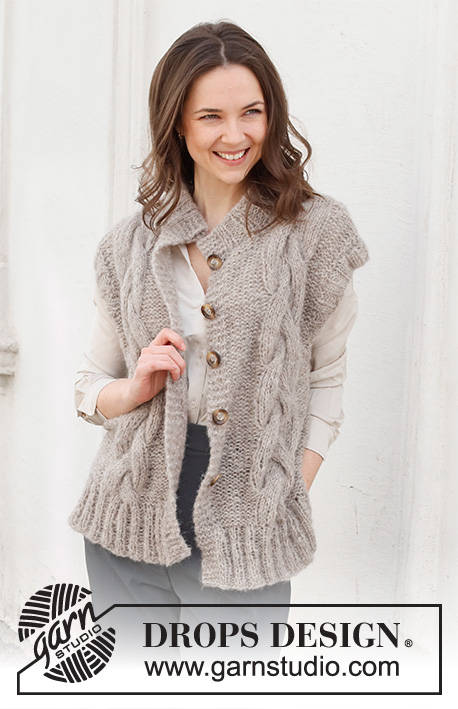
Knitted jacket in DROPS Nord and DROPS Kid-Silk or DROPS Flora and DROPS Kid-Silk. Piece is knitted bottom up with textured pattern. Size: S - XXXL
DROPS 228-30 |
|||||||
---------------------------------------------------------- EXPLANATION FOR THE PATTERN: ---------------------------------------------------------- GARTER STITCH (back and forth): Knit all rows. 1 ridge vertically = knit 2 rows. PATTERN: See diagram A.1. Diagrams show all rows in pattern seen from the right side. DECREASE TIP-1 (evenly): To calculate how to decrease evenly, use the total number of stitches on needle (e.g. 122 stitches) and divide stitches by number of decreases to be done (e.g. 46) = 2,7. In this example work alternately approx. every 1st and 2nd stitch and every 2nd and 3rd stitch together. DECREASE TIP-2: Decrease for neck inside 3 stitches towards mid front: Decrease as follows at the end of row from right side: Work until 4 stitches remain before neck, knit the next 2 stitches together, work 1 stitch in stocking stitch and 1stitch in garter stitch. Decrease at beginning of row as follows from right side: Work 1 stitch in garter stitch, knit 1, slip next stitch knitwise, knit next stitch, pass slipped stitch over stitch worked, work rest of row as before. Continue with 1 stitch in garter stitch and 2 stitches in stocking stitch towards mid front until shoulder has been worked. Continue the remaining stitches in pattern as before. BUTTONHOLES: Decrease for buttonholes on right band. 1 BUTTONHOLE = knit third and fourth stitch from edge together and make 1 yarn over. On next row knit yarn over to make hole. Decrease for buttonholes when piece measures: S: 21, 28, 35, 42, 49 and 57 cm M: 21, 28, 35, 43, 51 and 59 cm L: 21, 29, 37, 45, 53 and 61 cm XL: 21, 28, 35, 42, 49, 56 and 63 cm XXL: 21, 28, 35, 42, 49, 57 and 65 cm XXXL: 21, 28, 35, 43, 51, 59 and 67 cm INCREASE TIP (applies to sleeves): Begin 1 stitch before marker thread, make 1 yarn over, work 2 stitches (marker thread is in the middle of these 2 stitches), make 1 yarn over. On next round knit yarns over twisted to avoid holes. CAST-OFF TIP: To avoid a tight cast-off edge when casting off, you may use a larger needle. If this still is too tight make 1 yarn over after approx. every 4th stitch while casting off (cast off yarn overs as stitches). ---------------------------------------------------------- START THE PIECE HERE: ---------------------------------------------------------- JACKET - SHORT OVERVIEW OF THE PIECE: Work back piece and front piece back and forth on needle, bottom up. Sew the piece together as explained in pattern. Work sleeves in the round on double pointed needles/circular needle. Finish with a neck edge. BACK PIECE: Cast on 122-134-142-154-174-186 stitches on circular needle size 4.5 mm with 1 strand DROPS Nord and 1 strand DROPS Kid-Silk (= 2 strands), or 1 strand DROPS Flora and 1 strand DROPS Kid-Silk (= 2 strands). Purl 1 row from wrong side. Then work as follows from right side: 2 edge stitches in GARTER STITCH - read explanation above - * knit 2, purl 2 *, work from *-* until 4 stitches remain, knit 2 and finish with 2 stitches in garter stitch. Continue until piece measures approx. 20 cm in all sizes. Switch to circular needle size 5.5 mm. Knit 1 row from right side while decreasing 46-50-54-58-66-70 stitches evenly - READ DECREASE TIP-1 = 76-84-88-96-108-116 stitches. Purl 1 row from wrong side. Then work as follows from right side: 1 edge stitch in garter stitch, A.1 until 3 stitches remain, work the 2 first stitches in A.1 so that pattern begins and ends the same, and finish with 1 edge stitch in garter stitch. Continue pattern like this. REMEMBER THE KNITTING TENSION! When piece measures 47-48-49-50-51-52 cm, cast off for armholes in each side. Cast off at beginning of every row in each side: Cast off 3 stitches 1-1-1-1-1-1 time, 2 stitches 1-1-1-1-1-1 time and 1 stitch 0-1-1-1-2-2 times = 66-72-76-84-94-102 stitches. Continue with A.1 until piece measures 64-66-68-70-72-74 cm. Now cast off the middle 26-26-26-34-34-34 stitches for neck, and finish each shoulder separately. Decrease 1 stitch on next row from neck = 19-22-24-24-29-33 stitches on needle on the shoulder. Continue until piece measures 66-68-70-72-74-76 cm, and cast off. Work the other shoulder the same way. RIGHT FRONT PIECE: Cast on 81-89-93-97-105-113 stitches (including 5 band stitches towards mid front) on circular needle size 4.5 mm with 1 strand of each quality (= 2 strands). Purl 1 row from wrong side, then work as follows from right side: 5 band stitches in garter stitch, * knit 2, purl 2 *, repeat from *-* until 4 stitches remain, knit 2 and 2 stitches in garter stitch. Continue like this until piece measures 20 cm. Switch to circular needle size 5.5 mm. Knit 1 row from right side while decreasing 37-41-43-43-45-49 stitches evenly = 44-48-50-54-60-64 stitches. Purl 1 row from wrong side. Then work A.1 with 5 band stitches towards mid front and 1 edge stitch in garter stitch towards the side. When piece measures 47-48-49-50-51-52 cm, cast off for armhole in the side. Cast off at beginning of row from the side: Cast off 3 stitches 1-1-1-1-1-1 time, 2 stitches 1-1-1-1-1-1 time and 1 stitch 0-1-1-1-2-2 times = 39-42-44-48-53-57 stitches. Continue with A.1 and 5 band stitches in garter stitch until piece measures 59-61-63-65-67-69 cm. Now slip the outermost 16-16-16-20-20-20 stitches towards mid front on a stitch holder for neck. Then decrease stitches on every row from neck - read DECREASE TIP-2 – decrease 1 stitch 4 times = 19-22-24-24-29-33 stitches remain on shoulder. Continue until piece measures 66-68-70-72-74-76 cm. Cast off. LEFT FRONT PIECE: Cast on 81-89-93-97-105-113 stitches (including 5 band stitches towards mid front) on circular needle size 4.5 mm with 1 strand of each quality (= 2 strands). Purl 1 row from wrong side, then work as follows from right side: 2 stitches in garter stitch, * knit 2, purl 2 *, work from *-* until 7 stitches remain, knit 2 and 5 band stitches in garter stitch. Continue like this until piece measures 20 cm. Switch to circular needle size 5.5 mm. Knit 1 row from right side while decreasing 37-41-43-43-45-49 stitches evenly = 44-48-50-54-60-64 stitches. Purl 1 row from wrong side. Then work A.1 with 5 band stitches towards mid front and 1 edge stitch in garter stitch towards the side. When piece measures 47-48-49-50-51-52 cm, cast off for armhole in the side. Cast off at beginning of row from the side: Cast off 3 stitches 1-1-1-1-1-1 time, 2 stitches 1-1-1-1-1-1 time and 1 stitch 0-1-1-1-2-2 times = 39-42-44-48-53-57 stitches. Continue with A.1 and 5 band stitches in garter stitch until piece measures 59-61-63-65-67-69 cm. Now slip the outermost 16-16-16-20-20-20 stitches towards mid front on a stitch holder for neck. Then decrease on every row towards neck as follows: decrease 1 stitch 4 times = 19-22-24-24-29-33 stitches remain on shoulder. Continue until piece measures 66-68-70-72-74-76 cm. Cast off. SLEEVE: Work sleeves in the round bottom up on double pointed needles/a short circular needle. Divide piece when decreasing for sleeve cap and work back and forth. Cast on 48-48-52-52-56-56 stitches on double pointed needles 4.5 mm with 1 strand of each yarn(= 2 strands). Knit 1 round, then work rib (= knit 2/purl 2). When piece measures 14 cm, switch to double pointed needles size 5.5 mm. Knit 1 round while decreasing 2-0-2-0-0-0 stitches evenly = 46-48-50-52-56-56 stitches. Insert a marker thread at beginning of round = mid under sleeve. Then work in stocking stitch while AT THE SAME TIME when piece measures 16 cm, increasing 1 stitch on each side of marker thread - read INCREASE TIP. Increase every 5-4½-4-3½-3½-3 cm 7-8-9-9-9-10 times in total = 60-64-68-70-74-76 stitches. When piece measures 50-49-49-48-45-44 cm, cast off 3 stitches on each side of marker thread (= 6 stitches decreased mid under sleeve), now work sleeve back and forth. Cast off for sleeve cap at beginning of every row in each side as follows: 2 stitches 1 time, 3 stitches 1 time, then cast off the remaining stitches = 44-48-52-54-58-60 stitches. Sleeve measures 53-52-52-51-48-47 cm in total. Work another sleeve the same way. ASSEMBLY: Sew the shoulder seams. Sew in sleeves. Sew side seams inside 1 edge stitch until 20 cm remain at the bottom = vent. Sew the buttons on to left front piece. NECK EDGE: Begin mid front and from right side, and pick up approx. 104-124 stitches with circular needle size 4.5 mm around the neck (including stitches on stitch holders and adjust so that the total number of stitches is divisible by 4). Begin mid front and from wrong side, and work rib as follows: 5 band stitches in garter stitch, * purl 2, knit 2 *, repeat from *-* until 7 stitches remain, purl 2 and 5 band stitches in garter stitch. Work rib for 8 cm. Then cast off with knit over knit and purl over purl - read CAST-OFF TIP. Fold rib at the top of neck down on inside of garment. Fasten rib to get a double neck edge. To avoid a tight neck edge that sticks out it is important to keep the seam elastic. |
|||||||
Diagram explanations |
|||||||
|
|||||||
Have you made this or any other of our designs? Tag your pictures in social media with #dropsdesign so we can see them! Do you need help with this pattern?You'll find tutorial videos, a Comments/Questions area and more by visiting the pattern on garnstudio.com. © 1982-2024 DROPS Design A/S. We reserve all rights. This document, including all its sub-sections, has copyrights. Read more about what you can do with our patterns at the bottom of each pattern on our site. |
With over 40 years in knitting and crochet design, DROPS Design offers one of the most extensive collections of free patterns on the internet - translated to 17 languages. As of today we count 304 catalogues and 11422 patterns - 11422 of which are translated into English (UK/cm).
We work hard to bring you the best knitting and crochet have to offer, inspiration and advice as well as great quality yarns at incredible prices! Would you like to use our patterns for other than personal use? You can read what you are allowed to do in the Copyright text at the bottom of all our patterns. Happy crafting!
Comments / Questions (27)
Anna wrote:
Hej igen! :) Om jag använder "DROPS Air" och storlek M. Hur mycket går det åt då? Tack för hjälpen! MVH Anna
10.01.2024 - 19:45DROPS Design answered:
Hej Anna, du behöver 600 g DROPS Air till storlek M. Du måste hålla stickfastheten i mönstret för att få måtten, som du hittar i måttskissen nederst i mönstret - lycka till :)
11.01.2024 - 14:04Anna wrote:
Hej igen! :) Om jag använder "DROPS Air" och storlek M. Hur mycket går det åt då? Tack för hjälpen! MVH Anna
08.01.2024 - 18:21Anna wrote:
Hej! Om jag vill bara använda ett garn istället för två, vad kan jag ta istället?
07.01.2024 - 19:16DROPS Design answered:
Hej Anna, så kan du bruge en af kvaliteterne fra garngruppe C. Skriv hvilken kvalitet du vil bruge og hvilken størrelse, så kan vi hjælpe dig med at regne garnforbruget om :)
08.01.2024 - 14:04Elke wrote:
Die angegebenen Maße in der Skizze stimmen nicht mit der Maschenanzahl überein. Bei der größten Größe würde ich für Vorder/Rückenteil jeweils 116cm (sehr viel) anschlagen. Ist das wirklich korrekt?
06.01.2024 - 17:50DROPS Design answered:
LIebe Elke, nach dem Bündchen sind es 116 Maschen zu stricken, minus 2 Randmaschen = 114 Maschen, mit 16 Maschen = 10 cm, sind diese 114 Maschen ca 71 Maschen. Beachten Sie, daß man viel mehr Maschen für das Bündchen mit den kleineren Nadeln als für das Muster mit den grösseren Nadeln braucht. Viel Spaß beim stricken!
08.01.2024 - 10:20Fabienne Cluts wrote:
Est ce normal qu'il y a plus de maille sur les 2 côtés avant que la dos car le dos 186 mailles et les 2 côtés avant ensemble 226 mailles ? Merci
05.10.2023 - 15:20DROPS Design answered:
Bonjour Mme Cluts, le nombre de mailles est juste ainsi, tricotez les côtes du devant puis, diminuez à 64 mailles (soit approximativement la moitié de 116 (après les diminutions des côtes en bas du dos)+ la bordure du devant). Bon tricot!
06.10.2023 - 08:50Marika Hardt wrote:
Hallo Zusammen, kann es sein, dass bei dieser Anleitung 228/30 die Beschreinung zum Stricken der Armkugel fehlt????? Komme so wie das beschrieben ist nicht zurecht Lg. Marika
29.09.2023 - 16:59Lise wrote:
Hvordan er det mulig at strikkefasthet stemmer og man legger opp og strikker størrelse L men ender opp med en størrelse S? Garnet er Flora og Kid silk.
07.09.2023 - 12:41DROPS Design answered:
Hej Lise, Hvis du har 16 masker på 10 cm, så vil bredden på rygstykket blive 88/16= 55 cm
08.09.2023 - 15:32Marlies wrote:
Worden de minderingen in de panden in één naald gedaan of verdeeld over meerdere naalden?
03.07.2023 - 21:00DROPS Design answered:
Dag Marlies,
Nadat je de boord hebt gebreid minder je verdeeld over de naald het aangegeven aantal steken. Dus dit doe je in één naald.
06.07.2023 - 21:11Marlies wrote:
Er moet bij het achterpand, rechtervoorpand en linkervoorpand geminderd worden. Na het breien van het boord moet er een naald recht gebreid worden en in de volgende naald geminderd. Is het de bedoeling dat hoeveelheid steken in één naald worden geminderd of verdeeld over meerdere naalden?
03.07.2023 - 20:58Nancy Somerled wrote:
Can I use 1 thread Safran instead of 1 Flora and 1 Silk Mohair without making trouble??
24.06.2023 - 09:42DROPS Design answered:
Dear Nancy, no, you can't. Because Safran is also a Group A yarn, so you would need to combine it with another group A yarn to have the same gauge . (Flora and Silk Mohair = A+A; Safran is only A) You can substitute them for a single thread of a Group C yarn (C= A+A), such as Paris. You can read more about this in the following lesson: https://www.garnstudio.com/lesson.php?id=14&cid=19. Happy knitting!
25.06.2023 - 13:49