
Popular categories
Looking for a yarn?


|
|||||||||||||
Campers Comfort |
|||||||||||||
 |
 |
||||||||||||
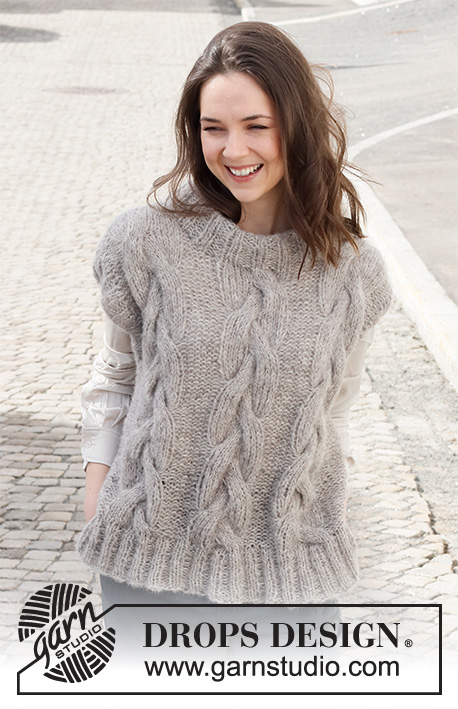
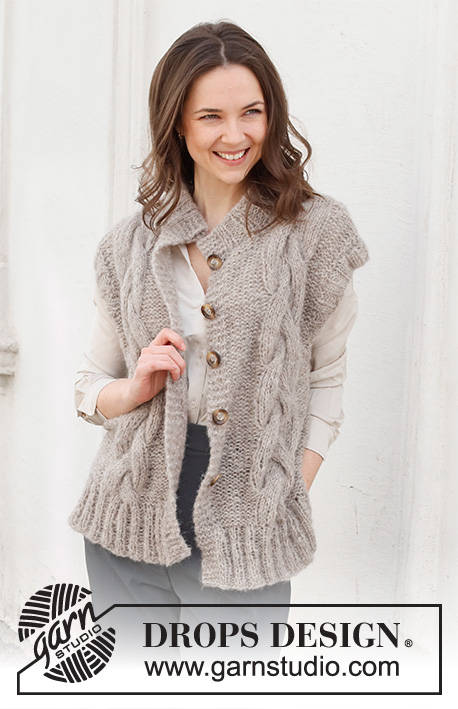
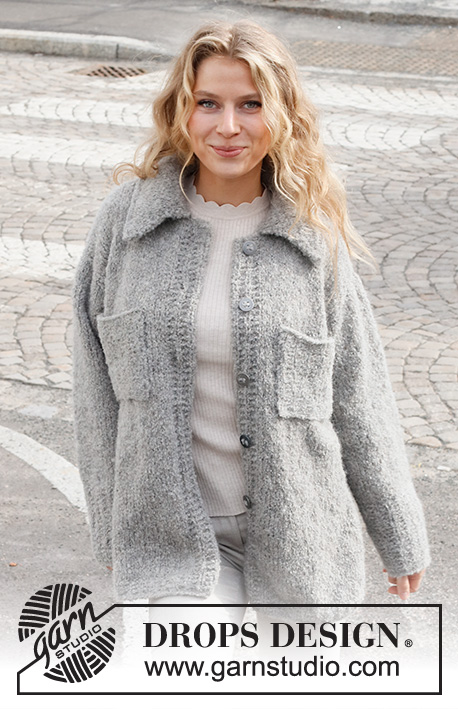
Knitted jacket in DROPS Alpaca Bouclé and DROPS Brushed Alpaca Silk. Piece is knitted with collar, pockets and vents in the sides. Size: S - XXXL
DROPS 228-39 |
|||||||||||||
|
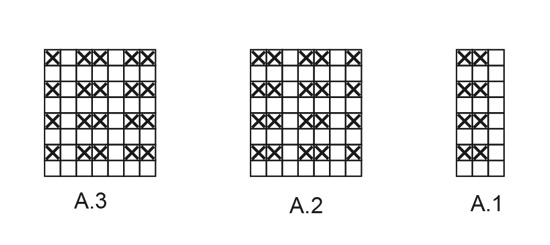
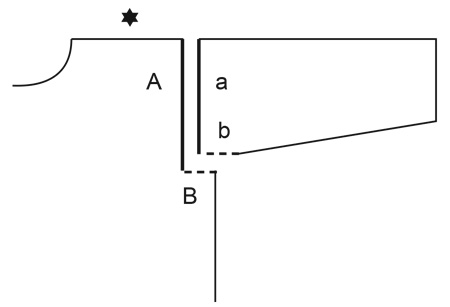
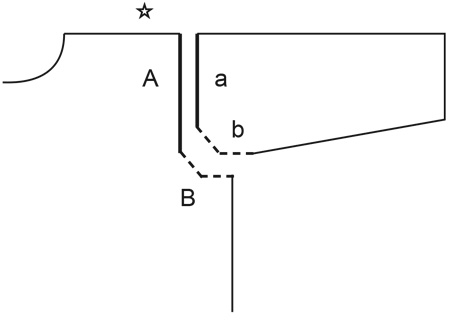
---------------------------------------------------------- EXPLANATION FOR THE PATTERN: ---------------------------------------------------------- GARTER STITCH (back and forth): Knit all rows. 1 ridge vertically = knit 2 rows. PATTERN: See diagrams A.1 to A.3. Diagrams show all rows in pattern seen from the right side. DECREASE/INCREASE TIP (evenly): To calculate how to decrease/increase evenly, use the total number of stitches to be decreased/increased over (e.g. 61 stitches) , and divide stitches by number of decreases/increases to be done (e.g. 7) = 8.7. In this example make 1 yarn over after alternately approx. every 8th and 9th stitch. On next row work yarn over twisted to avoid holes If decreasing knit in this example approx. alternately every 7th and 8th stitch and every 8th and 9th stitch together. INCREASE TIP-1 (applies to under sleeves): Increase 1 stitch inside 1 edge stitch in garter stitch in each side by making 1 yarn over. On next row (wrong side) purl yarn over twisted to avoid holes. INCREASE TIP-2 (applies to collar): Work until 1 stitch remains before marker thread, make 1 yarn over, knit 2, make 1 yarn over (= 2 stitches increased). Repeat at the next marker thread. On next row (wrong side) purl yarn over twisted to avoid holes. BUTTONHOLES: Decrease for buttonholes on right band. 1 BUTTONHOLE = knit fourth and fifth stitch from edge together and make 1 yarn over. On next row knit yarn over to make hole. Decrease for buttonholes when piece measures: S: 16, 26, 36, 46 and 56 cm = 6 1/4", 10 1/4", 14 1/4", 18" and 22" M: 18, 28, 38, 48 and 58 cm = 7", 11", 15", 19" and 22 3/4" L: 20, 30, 40, 50 and 60 cm = 8", 11 3/4", 15 3/4", 19 3/4" and 23 5/8" XL: 20, 30, 41, 51 and 62 cm = 8", 11 3/4", 16 1/8", 20" and 24 3/8" XXL: 21, 32, 42, 52 and 63 cm = 8 1/4", 12 1/2", 16 1/2", 20 1/2" and 24 3/4" XXXL: 22, 33, 44, 54 and 65 cm = 8 3/4", 13", 17 1/4", 21 1/4" and 25 1/2" ---------------------------------------------------------- START THE PIECE HERE: ---------------------------------------------------------- JACKET - SHORT OVERVIEW OF THE PIECE: Worked back and forth on circular needle in parts and sewn together when finished. BACK PIECE: Cast on 69-75-78-87-96-102 stitches on circular needle size 6 MM = US 10 with 1 strand of each color (= 2 strands). Purl 1 row from wrong side. Then work an edge as follows (first row = right side): Work 1 edge stitch in GARTER STITCH – read explanation above, A.1 until 2 stitches remain, work first stitch in A.1 so that the pattern is the same in each side, work 1 edge stitch in garter stitch. Continue back and forth until 6 rows with pattern have been worked. Now work next row from right side as follows: Work 1 edge stitch in garter stitch, A.1 over the next 3 stitches, knit the next 61-67-70-79-88-94 stitches and decrease at the same time 7-7-6-7-8-8 stitches evenly – read DECREASE/INCREASE TIP, work the first 3 stitches in A.1, 1 edge stitch in garter stitch = 62-68-72-80-88-94 stitches. Work 1 row from wrong side with pattern as before over the 4 stitches in each side, and purl the remaining stitches. REMEMBER THE KNITTING GAUGE! Continue back and forth with pattern over the 4 stitches in each side and work in stockinette stitch over the remaining stitch until piece measures 21 cm = 8 1/4", at the same time on the last 2 rows cast on 1 stitch at the end of each row (= edge stitches) = 64-70-74-82-90-96 stitches. Now work in stockinette stitch with 1 edge stitch in garter stitch in each side. When piece measures 47-48-49-50-51-52 cm = 18 1/2"-19"-19 1/4"-19 3/4"-20"-20 1/2", bind off 4-5-6-6-6-7 stitches for armholes at the beginning of the next 2 rows = 56-60-62-70-78-82 stitches. In sizes S, M and L continue to work from ALL SIZES below, and in sizes XL, XXL and XXXL work as follows: Work pattern as before, at the same time bind off stitches for armholes at beginning of every row in each side as follows: Bind off 2 stitches 1-2-2 times = 66-70-74 stitches. ALL SIZES: Continue with stockinette stitch and 1 edge stitch in garter stitch in each side. When piece measures 63-65-67-69-71-73 cm = 24 3/4"-25 1/2"-26 3/8"-27 1/8"-28"-28 3/4", bind off the middle 12-12-14-14-14-16 stitches for neck and finish each shoulder separately. Then bind off 1 stitch on next row from the neck = 21-23-23-25-27-28 stitches remain for shoulder. When piece measures 65-67-69-71-73-75 cm = 25 1/2"-26 3/8"-27 1/8"-28"-28 3/4"-29 1/2", bind off. Work the other shoulder the same way. RIGHT FRONT PIECE: Cast on 42-45-48-51-57-60 stitches on circular needle size 6 MM = US 10 with 1 strand of each color (= 2 strands). Purl 1 row from wrong side. Then work an edge as follows (first row = right side): Work A.2 over the first 7 stitches (= band), work A.1 until 2 stitches remain, work first stitch in A.1 so that the pattern is the same in each side, work 1 edge stitch in garter stitch. Continue back and forth until 6 rows with pattern have been worked. Now work next row from right side as follows: Work A.2 over the first 7 stitches (= band), knit the next 31-34-37-40-46-49 stitches while at the same time decreasing 4-4-5-4-6-6 stitches evenly, work the last 4 stitches as before = 38-41-43-47-51-54 stitches. Work 1 row from wrong side with pattern as before over the outermost 4 stitches towards the side and the 7 stitches for band. Continue back and forth with A.2 over the first 7 stitches and pattern as before over the last 4 stitches and work in stockinette stitch over the remaining stitches on row. REMEMBER BUTTONHOLES - read explanation above. When piece measures 21 cm = 8 1/4", cast on 1 stitch at the end of next row from right side (= edge stitch) = 39-42-44-48-52-55 stitches. Now work in stockinette stitch with 1 edge stitch in garter stitch towards the side and A.2 as before over the 7 stitches for band. When piece measures 47-48-49-50-51-52 cm = 18 1/2"-19"-19 1/4"-19 3/4"-20"-20 1/2", bind off 4-5-6-6-6-7 stitches at the beginning of next row from wrong side = 35-37-38-42-46-48 stitches. In sizes S, M and L continue to work from ALL SIZES below, and in sizes XL, XXL and XXXL work as follows: Work pattern as before, at the same time bind off stitches for armholes at beginning of every row from wrong side as follows: Bind off 2 stitches 1-2-2 times = 40-42-44 stitches. ALL SIZES: Continue to work until piece measures 58-60-62-64-65-67 cm = 22 3/4"-23 5/8"-24 3/8"-25 1/4"-25 1/2"-26 3/8". Now work next row from right side as follows: Bind off the first 7 stitches for neck, then continue back and forth while at the same time binding off stitches for next on every row from the neck: Bind off 2 stitches 3-3-4-4-4-4 times and 1 stitch 1-1-0-0-0-1 time = 21-23-23-25-27-28 stitches remain for shoulder. Bind off when piece measures 65-67-69-71-73-75 cm = 25 1/2"-26 3/8"-27 1/8"-28"-28 3/4"-29 1/2". LEFT FRONT PIECE: Cast on 42-45-48-51-57-60 stitches on circular needle size 6 MM = US 10 with 1 strand of each color (= 2 strands). Purl 1 row from wrong side. Then work an edge as follows (first row = right side): Work 1 edge stitch in garter stitch, A.1 until 8 stitches remain, work first stitch in A.1 so that the pattern is the same in each side, work A.3 over the last 7 stitches (= band). Continue back and forth until 6 rows with pattern have been worked. Now work next row from right side as follows: Work pattern as before over the first 4 stitches, knit the next 31-34-37-40-46-49 stitches while at the same time decreasing 4-4-5-4-6-6 stitches evenly, work A.3 over the last 7 stitches = 38-41-43-47-51-54 stitches. Purl 1 row with pattern as before over the 7 stitches for band and over the 4 stitches towards the side. Continue back and forth with pattern over the first 4 stitches and the last 7 stitches and work in stockinette stitch over the remaining stitches on row. When piece measures 21 cm = 8 1/4", cast on 1 stitch at the end of next row from wrong side (= edge stitch) = 39-42-44-48-52-55 stitches. Now work in stockinette stitch with 1 edge stitch in garter stitch towards the side and A.3 as before over the 7 stitches for band. When piece measures 47-48-49-50-51-52 cm = 18 1/2"-19"-19 1/4"-19 3/4"-20"-20 1/2”, bind off 4-5-6-6-6-7 stitches at the beginning of next row from right side = 35-37-38-42-46-48 stitches. In sizes S, M and L continue to work from ALL SIZES below, and in sizes XL, XXL and XXXL work as follows: Work pattern as before, at the same time bind off stitches for armholes at beginning of every row from right side as follows: Bind off 2 stitches 1-2-2 times = 40-42-44 stitches. ALL SIZES: Continue to work until piece measures 58-60-62-64-65-67 cm = 22 3/4"-23 5/8"-24 3/8"-25 1/4"-25 1/2"-26 3/8". Now work next row from wrong side as follows: Bind off the first 7 stitches for neck, then continue back and forth while at the same time binding off stitches for next on every row from the neck: Bind off 2 stitches 3-3-4-4-4-4 times and 1 stitch 1-1-0-0-0-1 time = 21-23-23-25-27-28 stitches remain for shoulder. Bind off when piece measures 65-67-69-71-73-75 cm = 25 1/2"-26 3/8"-27 1/8"-28"-28 3/4"-29 1/2". SLEEVES: Cast on 41-44-44-44-47-47 stitches on circular needle size 6 MM = US 10 with 1 strand of each color (= 2 strands). Purl 1 row from wrong side. Then work pattern as follows (first row = right side): Work 1 edge stitch in garter stitch, A.1 until 1 stitch remains, work 1 edge stitch in garter stitch. Continue back and forth like this until sleeve measures 14 cm = 5 1/2". Work in stockinette stitch back and forth with 1 edge stitch in garter stitch in each side. When sleeve measures 16-15-15-15-15-15 cm = 6 1/4"-6"-6"-6"-6"-6", increase 1 stitch in each side – read INCREASE TIP-1. Increase like this approx. every 9-9-6½-6½-6-4½ cm = 3 1/2"-3 1/2"-2 1/2"-2 1/2"-2 3/8"-1 5/8" 4-4-5-5-5-6 times in total = 49-52-54-54-57-59 stitches. Continue to work until sleeve measures 47-46-45-43-41-40 cm = 18 1/2"-18"-17 3/4"-17"-16 1/8"-15 3/4". Now insert a marker in each side of sleeve. Use the marker later when fastening the sleeve to body. Work as follows in the different sizes: SIZE S, M AND L: Work until sleeve measures 50-50-50 cm = 19 3/4"-19 3/4"-19 3/4" in total. Bind off. SIZE XL, XXL AND XXXL: Work until sleeve measures 48-47-46 cm = 19"-18 1/2"-18". Now bind off 2 stitches at the beginning of every row 1-2-2 times in total in each side of sleeve = 50-49-51 stitches. Bind off the remaining stitches. Sleeve measures approx. 49-49-48 cm = 19 1/4"-19 1/4"-19". ALL SIZES: Work another sleeve the same way. ASSEMBLY: Sew shoulder seams with grafting/kitchener stitches inside bind-off edge. Sew sleeve cap to armhole inside 1 edge stitch in garter stitches. Then sew top part of sleeve to bottom of armhole - see chart. Seam under sleeves and then down the side seam until vent inside 1 edge stitch in garter stitch (= 21 cm = 8 1/4" vent in each side). POCKETS: Cast on 21 stitches on circular needle size 6 MM = US 10 with 1 strand in each quality (= 2 strands). Purl 1 row from wrong side. Then work rib from right side as follows: Work 1 edge stitch in garter stitch, A.1 until 2 stitches remain, work first stitch in A.1 so that the pattern is the same in each side, work 1 edge stitch in garter stitch. Continue back and forth like this until pocket measures 14 cm = 5 1/2". Bind off. Knit another pocket the same way. Place a pocket on each front piece. Place the pocket with top edge of pocket on a line with where stitches were bind off for armhole and approx. 8 to 12 cm = 3 1/8" to 4 3/4" from edge stitch on band - fasten the pockets with needles and try the garment on before fastening. Sew with neat little stitches along the side and bottom edge of pocket. NECK EDGE: Pick up from right side around neck follows: Skip the 7 stitches on band that were bind off, pick up 36-36-38-38-40-45 stitches around the neck on circular needle size 6 MM = US 10 and 1 strand DROPS Alpaca Bouclé and 1 strand DROPS Brushed Alpaca Silk (= 2 strands) until the 7 stitches bind off on band. Knit 1 row from wrong side while increasing 12-12-13-13-13-15 stitches evenly - remember INCREASE/DECREASE TIP = 48-48-51-51-53-60 stitches. Knit 1 row from right side, purl 1 row from wrong side, purl 1 row from right side (= folding edge), purl 1 row from wrong side, knit 1 row from right side. Bind off. Fold the neck edge double towards the wrong side and fasten with neat stitches. COLLAR: Begin from right side with circular needle size 6 MM = US 10 and 1 strand of each quality (= 2 strands), and pick up 1 stitch in every purl stitch where neck edge was folded = 48-48-51-51-53-60 stitches. Switch to circular needle size 8 MM = US 11. Then work with 2 strands DROPS Alpaca Bouclé + 2 strands DROPS Brushed Alpaca Silk (= 4 strands). Knit 1 row and decrease at the same time 8-8-9-9-9-10 stitches evenly = 40-40-42-42-44-50 stitches – this becomes right side on collar and this side will face outwards when collar is done and folded down. Insert 1 marker thread 10-10-11-11-11-13 stitches in from each side (= 20-20-20-20-22-24 stitches between the 2 marker threads) Move marker threads upwards when working. Continue as follows: ROW 1 (= wrong side): Work 1 edge stitch in garter stitch, purl until 1 stitch remains, 1 edge stitch in garter stitch. ROW 2 (= right side): Work 1 edge stitch in garter stitch, knit 1, make 1 yarn over, knit until 2 stitches remain, make 1 yarn over, knit 1, 1 edge stitch in garter stitch (on next row purl yarn over twisted to avoid holes). Continue back and forth until 4 increases have been done in each side. Now continue the same way with increase in each side 3 more times (= 7 times in total in each side), AT THE SAME TIME increase 1 stitch on each side of the 2 marker threads - read INCREASE TIP-2. Increase like this every other row 2 times in total. When all increases are done there are 62-62-64-64-66-72 stitches on row. Work until collar measures 12 cm = 4 3/4" in total. Bind off. Make sure that the bind-off edge is not too tight. Now crochet a finishing edge to stiffen the collar. Crochet along bind-off edge on collar and from right side as follows - work with 1 strand of each quality on hook size 8 MM = US 11: Fasten strand in edge stitch on bind-off edge. Work 1 double crochet in every stitch along the bind-off edge. Cut and fasten the yarn. Shaping: Make the collar wet and carefully press the water out. Shape the collar so that bind-off edge and double crochet row lays flat and does not roll inwards. Leave to dry. This is done every time it is washed. |
|||||||||||||
Diagram explanations |
|||||||||||||
|
|||||||||||||
|
|||||||||||||

|
|||||||||||||
|
|||||||||||||
|
|||||||||||||
|
Have you made this or any other of our designs? Tag your pictures in social media with #dropsdesign so we can see them! Do you need help with this pattern?You'll find tutorial videos, a Comments/Questions area and more by visiting the pattern on garnstudio.com. © 1982-2024 DROPS Design A/S. We reserve all rights. This document, including all its sub-sections, has copyrights. Read more about what you can do with our patterns at the bottom of each pattern on our site. |
|||||||||||||


With over 40 years in knitting and crochet design, DROPS Design offers one of the most extensive collections of free patterns on the internet - translated to 17 languages. As of today we count 304 catalogs and 11422 patterns - 11417 of which are translated into English (US/in).
We work hard to bring you the best knitting and crochet have to offer, inspiration and advice as well as great quality yarns at incredible prices! Would you like to use our patterns for other than personal use? You can read what you are allowed to do in the Copyright text at the bottom of all our patterns. Happy crafting!
Comments / Questions (6)
Wann wird bei den einzelnen Strickteilen (Vorder-, Rückenteil, Ärmel) die Nadel von 6 auf 8 gewechselt? Der Wechsel wird nur beim Kragen erwähnt.
08.10.2022 - 09:59DROPS Design answered:
Liebe Frau Bogel, Nadel 8 wird für den Kragen benutzt - die ganze Jacke wird sonst mit Nadel 6 gestrickt. Viel Spaß beim stricken!
10.10.2022 - 08:30Mit dem Stricken selbst habe ich keine Probleme, da ich schon viele Jahre dabei bin. Die Übersetzung der einzelne Schritte ist jedoch sehr irritierend. Sehr hilfreich wäre es, wenn die einzelnen Strickreihen in den Muster nummeriert wären und sich diese Nummerierung im Text wiederfinden würde.
07.10.2022 - 15:47Je ne comprends pas le point fantaisie avec le diagramme : Rang 1 : toutes les mailles à l'endroit Rang 2 : 1 maille endroit 2 mailles envers Rang 3 : toutes les mailles à l'endroit Rang 4 : rang 1 Est ce exact ? Merci pour votre aide
12.01.2022 - 19:54DROPS Design answered:
Bonjour Sadazur, les lignes blanches sont des mailles tricotées en jersey (à l'endroit sur l'endroit, à l'envers sur l'envers), celles avec case blanche/une croix se tricotent au point mousse (à l'endroit sur l'endroit et sur l'envers); autrement dit, A.1 par ex se tricote ainsi sur l'endroit: 3 m end, sur l'envers (on lit de gauche à droite): 2 m end, 1 m env . Bon tricot!
13.01.2022 - 08:38Very beautiful, wowwww
24.08.2021 - 16:05En populär modell som jag gillar bra höst och vårjacka
05.08.2021 - 16:55Navn: Trondheimsjakke
04.08.2021 - 21:33