
Popular categories
Looking for a yarn?


|
||||
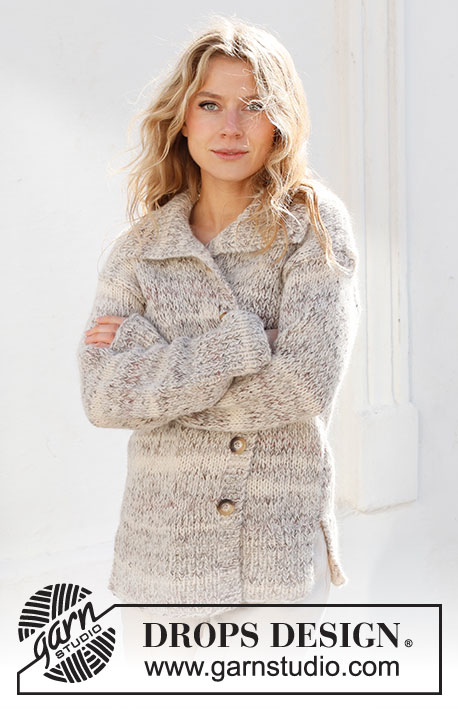
Habitat Cardigan |
||||
 |
 |
|||
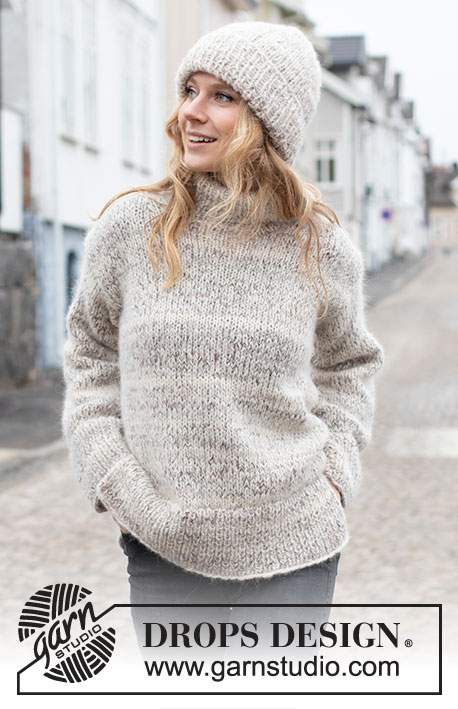
Knitted jacket with collar, in 1 strand DROPS Fabel and 2 strands DROPS Brushed Alpaca Silk. Sizes S - XXXL.
DROPS 227-15 |
||||
|
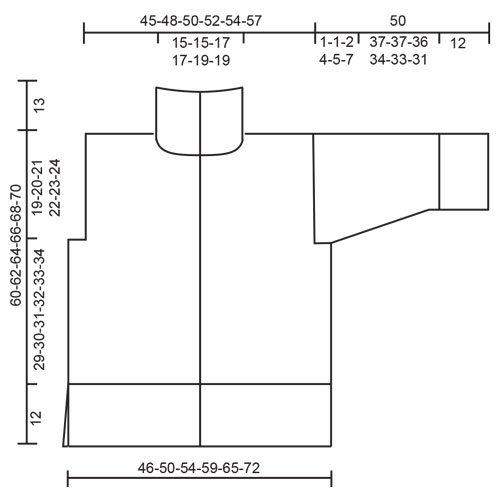
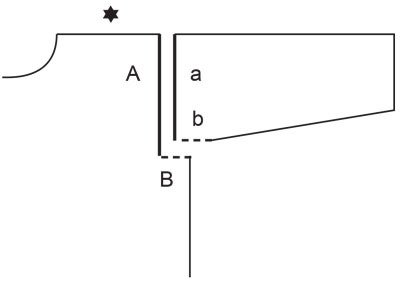
------------------------------------------------------- EXPLANATIONS FOR THE PATTERN: ------------------------------------------------------- RIDGE/GARTER STITCH (worked back and forth): Knit all rows. 1 ridge = knit 2 rows. DECREASE TIP (evenly spaced): To work out how to decrease evenly, count the total number of stitches on needle (e.g. 75 stitches) minus the edge stitches (e.g. 2 stitches) and divide the remaining stitches by the number of decreases to be made (e.g. 20) = 3.7. In this example decrease by knitting together alternately each 2nd and 3rd stitch and each 3rd and 4th stitch (approx.). Do not decrease the edge stitches. INCREASE TIP (for sleeves): All increases are worked from the right side! Work 1 edge stitch, 1 yarn over, work until there is 1 stitch left, 1 yarn over and 1 edge stitch. On the next row purl the yarn overs twisted to avoid holes. CASTING-OFF TIP: To avoid the cast-off edge being tight you can cast off with a larger size needle. If the edge is still tight, make 1 yarn over after approx. each 4th stitch at the same time as casting off; the yarn overs are cast off as normal stitches. BUTTONHOLES (bottom up): Work the buttonholes on the right band. 1 BUTTONHOLE = knit together the 3rd and 4th stitch from the edge and make 1 yarn over. On the next row knit the yarn over to leave a hole. Work buttonholes when the piece measures: S: 15, 24, 33, 42 and 50 cm. M: 16, 25, 34, 43 and 52 cm. L: 14, 22, 30, 38, 45 and 52 cm. XL: 14, 22, 30, 38, 46 and 54 cm. XXL: 14, 22, 30, 38, 46 and 54 cm. XXXL: 14, 23, 32, 40, 48 and 56 cm. ------------------------------------------------------- START THE PIECE HERE: ------------------------------------------------------- JACKET – SHORT OVERVIEW OF THE PIECE: The piece is worked back and forth in sections, bottom up and then sewn together. The collar is worked to finish. BACK PIECE: Cast on 69-75-81-87-97-107 stitches with circular needle size 6 mm and 1 strand DROPS Fabel and 2 strands DROPS Brushed Alpaca Silk (= 3 strands). Purl 1 row from the wrong side, then work as follows: 1 edge stitch in GARTER STITCH – read description above, rib (knit 1, purl 1) until there are 2 stitches left, knit 1 and 1 edge stitch in garter stitch. Continue this rib back and forth for 12 cm. Knit 1 row from the right side where you decrease 18-20-22-22-26-28 stitches evenly spaced – read DECREASE TIP, and cast on 1 new stitch at the end of the row = 52-56-60-66-72-80 stitches. Change to circular needle size 8 mm. Purl 1 row from the wrong side and cast on 1 new stitch at the end of the row = 53-57-61-67-73-81 stitches. Continue with stocking stitch and 1 edge stitch in garter stitch on each side. REMEMBER THE KNITTING TENSION! When the piece measures 41-42-43-44-45-46 cm, cast off 1-1-2-4-6-8 stitches at the beginning of the next 2 rows for the armholes = 51-55-57-59-61-65 stitches. Continue with stocking stitch and 1 edge stitch in garter stitch on each side. When the piece measures 58-60-62-64-66-68 cm, cast off the middle 15-15-17-17-19-19 stitches for the neck and each shoulder is finished separately. Continue with stocking stitch and 1 edge stitch in garter stitch on each side, and cast off 1 stitch on the next row from the neck = 17-19-19-20-20-22 stitches on the shoulder. Continue working until the piece measures 60-62-64-66-68-70 cm. Cast off with knit from the right side. Work the other shoulder in the same way. RIGHT FRONT PIECE: Cast on 39-43-45-49-53-59 stitches (including 5 band stitches towards mid-front), with circular needle size 6 mm and 1 strand DROPS Fabel and 2 strands DROPS Brushed Alpaca Silk (= 3 strands). Purl 1 row from the wrong side, then work as follows from the right side: 5 band stitches in garter stitch, rib (knit 1, purl 1) until there are 2 stitches left, knit 1 and 1 edge stitch in garter stitch. Continue this rib back and forth for 12 cm. Knit 1 row from the right side where you decrease 9-11-11-12-13-15 stitches evenly spaced – remember DECREASE TIP, and cast on 1 new stitch at the end of the row = 31-33-35-38-41-45 stitches. Change to circular needle size 8 mm. Purl 1 row from the wrong side (band and edge stitches in garter stitch). Continue with stocking stitch, the 5 band stitches towards mid-front and 1 edge stitch in garter stitch towards the side. Remember the BUTTONHOLES on the band – read description above. When the piece measures 41-42-43-44-45-46 cm, cast off 1-1-2-4-6-8 stitches for the armhole at the beginning of the next row from the wrong side = 30-32-33-34-35-37 stitches. When the piece measures 52-54-54-56-56-58 cm and the next row is from the right side, place the first 9-9-10-10-11-11 stitches on a thread for the neck, working the stitches first to avoid having to cut the strand. Then cast off at the beginning of each row from the neck as follows: 1 stitch 4 times = 17-19-19-20-20-22 stitches on the shoulder. Continue working until the piece measures 60-62-64-66-68-70 cm. Cast off with knit from the right side. LEFT FRONT PIECE: Cast on 39-43-45-49-53-59 stitches (including 5 band stitches towards mid-front), with circular needle size 6 mm and 1 strand DROPS Fabel and 2 strands DROPS Brushed Alpaca Silk (= 3 strands). Purl 1 row from the wrong side, then work as follows from the right side: 1 edge stitch in garter stitch, rib (knit 1, purl 1) until there are 6 stitches left, knit 1 and 5 band stitches in garter stitch. Continue this rib back and forth for 12 cm. Knit 1 row from the right side where you decrease 9-11-11-12-13-15 stitches evenly spaced = 30-32-34-37-40-44 stitches. Change to circular needle size 8 mm. Purl 1 row from the wrong side (band in garter stitch) and cast on 1 stitch at the end of the row = 31-33-35-38-41-45 stitches. Continue with stocking stitch and the 5 band stitches towards mid-front and 1 edge stitch in garter stitch towards the side. When the piece measures 41-42-43-44-45-46 cm, cast off 1-1-2-4-6-8 stitches for the armhole at the beginning of the next row from the right side = 30-32-33-34-35-37 stitches. When the piece measures 52-54-54-56-56-58 cm and the next row is from the right side, work until there are 9-9-10-10-11-11 stitches left and place these stitches on a thread for the neck. Then cast off at the beginning of each row from the neck as follows: 1 stitch 4 times = 17-19-19-20-20-22 stitches on the shoulder. Continue working until the piece measures 60-62-64-66-68-70 cm. Cast off with knit from the right side. SLEEVES: Cast on 44-44-46-46-50-50 stitches with circular needle size 6 mm and 1 strand DROPS Fabel and 2 strands DROPS Brushed Alpaca Silk (= 3 strands). Purl 1 row from the wrong side, then work as follows from the right side: 1 edge stitch in garter stitch, rib (knit 1, purl 1) until there is 1 stitch left, 1 edge stitch in garter stitch. When the rib measures 12 cm, knit 1 row from the right side where you decrease 10-10-10-10-12-12 stitches evenly spaced = 34-34-36-36-38-38 stitches. Change to circular needle size 8 mm. Continue with stocking stitch and 1 edge stitch in garter stitch on each side. When the sleeve measures 14 cm, increase 1 stitch on each side – read INCREASE TIP. Increase like this every 8-6½-6-5-4½-3½ cm a total of 5-6-6-7-7-8 times = 44-46-48-50-52-54 stitches. Continue working until the sleeve measures 49-49-48-46-45-43 cm, or to desired length (approx. 1-1-2-4-5-7 cm left for the sleeve cap). Insert 1 marker on each side – they mark the bottom of the armhole and are used when sewing the sleeves to the body. Continue working until the sleeve measures 50 cm in all sizes. Cast off with knit from the right side. Work the other sleeve in the same way. ASSEMBLY: Sew the shoulder seams inside the cast-off edge. Sew in the sleeves, inside the 1 edge stitch along the armholes and the cast-off edge on the sleeve cap. Sew together the bottoms of the armholes – the markers on the sleeve should match the sides of the body – see sketch. Sew the sleeve and side seams in one go inside the 1 edge stitch, leaving a 12 cm split at the bottom of each side seam. COLLAR: Start from the right side with circular needle size 6 mm and 1 strand DROPS Fabel and 2 strands DROPS Brushed Alpaca Silk (= 3 strands). Place the 9-9-10-10-11-11 stitches from the thread on the right front piece on the needle, knit up 77-77-83-83-89-89 stitches inside the 1 edge stitch around the neck and place the 9-9-10-10-11-11 stitches from the left front piece on the needle = 95-95-103-103-111-111 stitches. Work rib from the wrong side as follows: 1 edge stitch in garter stitch, rib (purl 1 knit 1) until there are 2 stitches left, purl 1 and 1 edge stitch in garter stitch. Continue this rib back and forth for 4 cm. Work the next row from the right side as follows: Work the first 27 stitches as before, then work 3 stitches in the next knitted stitch as follows: Knit 1 but do not slip it from the left needle, make 1 yarn over, knit 1 in the same stitch and slip the stitch from the left needle (= 2 stitches increased), * work the next 7 stitches, work 3 stitches in the next knitted stitch (in the same way as before) *, work from *-* until there are 27 stitches left and work these stitches as before = 107-107-117-117-127-127 stitches. On the next row work the yarn overs twisted and into the rib. Continue the new rib until the collar measures 13 cm. Cast off with knit over knit and purl over purl – read CASTING-OFF TIP. |
||||
Diagram explanations |
||||
|
||||
|
||||
|
||||
|
Have you made this or any other of our designs? Tag your pictures in social media with #dropsdesign so we can see them! Do you need help with this pattern?You'll find tutorial videos, a Comments/Questions area and more by visiting the pattern on garnstudio.com. © 1982-2024 DROPS Design A/S. We reserve all rights. This document, including all its sub-sections, has copyrights. Read more about what you can do with our patterns at the bottom of each pattern on our site. |
||||


With over 40 years in knitting and crochet design, DROPS Design offers one of the most extensive collections of free patterns on the internet - translated to 17 languages. As of today we count 304 catalogues and 11422 patterns - 11422 of which are translated into English (UK/cm).
We work hard to bring you the best knitting and crochet have to offer, inspiration and advice as well as great quality yarns at incredible prices! Would you like to use our patterns for other than personal use? You can read what you are allowed to do in the Copyright text at the bottom of all our patterns. Happy crafting!
Comments / Questions (37)
Hallo zusammen, ich verstehe nicht, wie ich für den Kragen in Gr. XXL so viele Maschen aufnehmen soll. Bei mir werden es höchsten 70 Maschen. Ich müsste dann zum Beispiel im rückwertigen Ausschnitt aus jeder Masche, 2 Maschen für den Kragen herausarbeiten. Soll das so sein? Lg Regine
11.02.2024 - 15:16DROPS Design answered:
Liebe Regine, der Kragen wird mit den kleineren Nadeln gestrickt, so wird man mehr Maschen aufnehmen, daß es Maschen mit den grösseren Nadeln gestrickt wurden, verteilen Sie diese Maschen so, daß sie regelmäßig verteilt am Halsausschnitt aufgefassen werden. Viel Spaß beim stricken!
12.02.2024 - 07:54Bonjour, modèle DROPS 227-15 Est-ce que je dois comprendre qu'il faille utiliser les fils DROPS Fabel et 2 fils DROPS Brushed Alpaca ensemble pour obtenir que le même résultat ? Dans ce cas la veste ne pourra pas être lavée à la machine ! Si tel est le cas pouvez-vous me recommander un fil traité superwash pour tricoter avec le fil Fabel qui me permettrait d'obtenir le même résultat que sur la photo du modèle ? Je vous remercie pour votre réponse éventuelle. Cordialement.
04.12.2023 - 18:34DROPS Design answered:
Bonjour Mme Ribault, effectivement, Brushed Alpaca Silk n'est pas traitée Superwash; vous pouvez utiliser le convertisseur pour voir les alternatives proposées mais dans ce type de laine, nous n'en avons aucune traitée superwash. Votre magasin saura vous conseiller, même par mail ou téléphone, la meilleure alternative adaptée à vos besoins et envie. Bon tricot!
05.12.2023 - 08:47How are 11 stitches supposed to measure 4 inches?? I already moved up my needle size twice and I can't get anywhere near 4 inches with 11 stiches?? I'm using the exact same yarn noted but can't seem to get the gage to where the pattern states it should be. I started with 8mm needles instead of 6mm and the gausge is still too small?
20.10.2023 - 20:57DROPS Design answered:
Dear Arlene, the gauge is calculated with the main needle, the one used for the stocking stitch pattern. That is, the 8mm needle in this case. Take into account that, the 2 threads of Brushed Alpaca Silk would be equal to an E group yarn, with a gauge of 10x 14 = 4" with a 9mm needle. Since you have a Fabel thread as well, the gauge should be close enough to the one indicated in the pattern. Also, take into account that this work is quite spongy, so there should be some space between the stitches when working the gauge. Happy knitting!
22.10.2023 - 23:51Hallo drops team, waarom werkt de functie "garen vervangen" niet? Als ik nu klik op die functie kan ik geen wol soort invullen... help..
05.10.2023 - 17:36DROPS Design answered:
Dag Marian,
Dag garenvervanger heeft er even uit gelegen, maar als het goed is doet hij het nu weer.
11.10.2023 - 19:14In de voorpanden wordt gesproken over het breien van voorbiessteken (richting midden voor). Helaas kan ik nergens terugvinden hoe ik deze voorbiessteken moet breien. Kunt u dit uitleggen?
10.04.2023 - 12:37DROPS Design answered:
Dag Mariëlle,
De 5 voorbiessteken brei je in ribbelsteek, dus recht aan de goede kant en recht aan de verkeerde kant.
11.04.2023 - 20:51I love the pattern ,can i use the 4 ply (4 strands) yarn to make it . i have worsted yarn . if i make a sm how big will it be when finished Thank you for your help
04.02.2023 - 16:06DROPS Design answered:
Dear Jean, the measurements for the jacket are indicated in the schematic after the pattern instructions. If you work following the gauge indicated and the amount of stitches for the selected size, you should get the correct measurements. Check with your selected yarn and needles if you can obtain the correct gauge and follow the pattern. The yarn indicated for this pattern is a 50g=50m yardage yarn but you may try others of similar weight or a combination of several threads of lighter yarns to obtain the correct gauge. Happy knitting!
05.02.2023 - 23:15Can i use worsted 4 sply (4 strands) with this pattern . I love the pattern
04.02.2023 - 16:01J'ai eu beaucoup de plaisir à tricoter votre modèle et je veux qu'il reste beau après le lavage. J'aimerais donc que vous me donniez le nom d'une lessive spéciale laine avec lavage à la main qui sera la plus adaptée à vos laines pour me permettre d'en profiter le plus longtemps possible.
10.12.2022 - 12:54DROPS Design answered:
Bonjour Mme Aubry, il en existe différentes toutes aussi efficaces les unes que les autres; votre magasin en propose peut-être, sinon, n'hésitez pas à lui demander conseil, et pensez surtout à bien respecter les consignes d'entretien sur l'étiquette et sur le nuancier; retrouvez d'autres conseils supplémentaires ici. Bon tricot!
12.12.2022 - 09:07Beste al beginnende breister zie ik in de informatie niet hoeveel bollen wol ik van beide garen moet aankopen nog met welke breinaaldnummer ik dat zou moeten breien kan u me concreet informatie geven zodat ik een bestelling kan plaatsen alvast bedankt mvg Caroline Daems
01.10.2022 - 13:17DROPS Design answered:
Dag Caroline,
Bovenaan het patroon staat aangegeven welke materialen je nodig hebt. De reeks getallen correspondeert met de maten, dus het eerste getal geldt voor maat S, het tweede getal voor maat M, enzovoorts. De hoeveelheid garen wordt in grammen aangegeven. Meestal is 1 bol 50 gram. Bij de materialen staat ook aangegeven welke pendikte je nodig hebt. (LET OP: maak altijd een proeflapje en pas eventueel de pendikte aan.)
01.10.2022 - 17:37Pourriez vous preciser dans vos modeles si le tricot est en aller retour ou en circulaire. Ici je suppose que les manches se tricotent a plat mais je ne suis pas sure...
17.02.2022 - 14:55DROPS Design answered:
Bonjour Mme Lamboley, dans les modèles les plus récents, vous pouvez retrouver sous PETIT APERÇU DE L'OUVRAGE quelques infos sur la construction de l'ouvrage; ici, on tricote toutes les pièces en allers et retours sur aiguille circulaire pour avoir suffisamment de place pour y loger toutes les mailles, vous pouvez ainsi utiliser des aiguilles droites. Retrouvez encore plus d'infos dans cette leçon. Bon tricot!
17.02.2022 - 16:14