
Popular categories
Looking for a yarn?


|
|
River Hill |
|
 |
 |
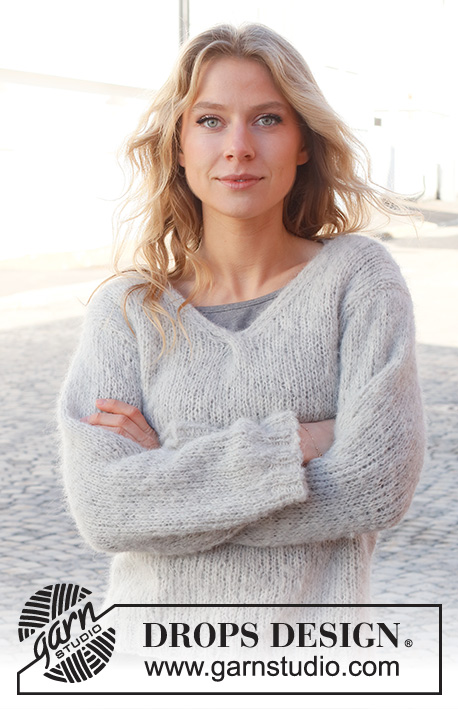
Knitted wrap-around jacket in DROPS Melody. Sizes S - XXXL.
DROPS 228-21 |
|
|
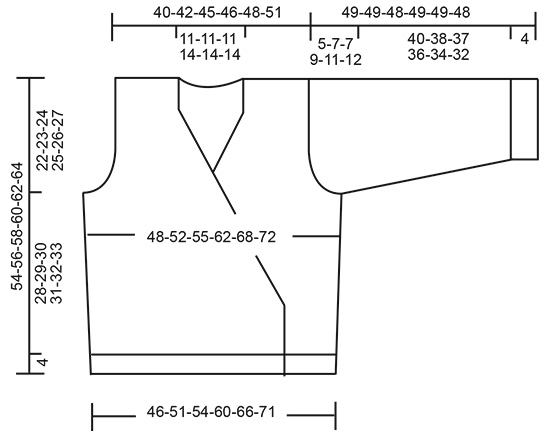
------------------------------------------------------- EXPLANATIONS FOR THE PATTERN: ------------------------------------------------------- RIDGE/GARTER STITCH (worked back and forth): Knit all rows. 1 ridge = knit 2 rows. DECREASE TIP (evenly spaced): To work out how to decrease evenly, count the total number of stitches on the needle (e.g. 72 stitches) minus the edge stitches (e.g. 2 stitches) and divide the remaining stitches by the number of decreases to be made (e.g. 10) = 7. In this example decrease by knitting together each 6th and 7th stitch. INCREASE TIP (for sides and sleeves): Increase 1 stitch by making 1 yarn over. On the next row work the yarn overs twisted to avoid holes. The new stitches are worked in stocking stitch. ------------------------------------------------------- START THE PIECE HERE: ------------------------------------------------------- JACKET – SHORT OVERVIEW OF THE PIECE: The front and back pieces are worked separately, back and forth with circular needle and bottom up. The sleeves are worked back and forth with circular needle, bottom up. The pieces are sewn together. Then 2 ties are worked and sewn on to finish. BACK PIECE: Cast on 72-80-84-92-104-112 stitches (including 1 edge stitch on each side) with circular needle size 5.5 mm and DROPS Melody. Purl 1 row from the wrong side. Then work rib from the right side as follows: 1 edge stitch in GARTER STITCH – read description above, * purl 2, knit 2 *, work from *-* until there are 3 stitches left, purl 2 and 1 edge stitch in garter stitch. Continue this rib for 4 cm. Knit 1 row from the right side where you decrease 10-12-12-12-16-18 stitches evenly spaced – read DECREASE TIP = 62-68-72-80-88-94 stitches. Change to circular needle size 7 mm. Purl 1 row (edge stitches are knitted). Continue with stocking stitch and 1 edge stitch in garter stitch on each side. REMEMBER THE KNITTING TENSION! When the piece measures 16-17-18-19-20-21 cm, increase 1 stitch on each side by making 1 yarn over inside each edge stitch – read INCREASE TIP = 64-70-74-82-90-96 stitches. When the piece measures 32-33-34-35-36-37 cm, cast off for the armholes at the beginning of each row as follows: 3-4-4-5-6-7 stitches 1 time, 2 stitches 1-1-1-2-3-3 times and 1 stitch 1-2-2-2-2-2 times on each side = 52-54-58-60-62-66 stitches. Continue with stocking stitch and 1 edge stitch in garter stitch on each side. When the piece measures 49-51-53-55-57-59 cm, work rib over the middle 22-22-22-26-26-26 stitches as follows: Work the first 15-16-18-17-18-20 stitches as before, * purl 2, knit 2 *, work from *-* over the next 20-20-20-24-24-24 stitches, purl 2 and work the last 15-16-18-17-18-20 stitches as before. Continue this pattern until the piece measures 52-54-56-58-60-62 cm. Now cast off the middle 14-14-14-18-18-18 stitches for the neck and finish each shoulder separately = 19-20-22-21-22-24 stitches on each shoulder. Continue pattern as before, i.e work 2 knit stitches towards the neck and 2 purl stitches inside these stitches, the remaining stitches are worked in stocking stitch (seen from the right side). When the piece measures 54-56-58-60-62-64 cm, cast off with knit over knit, purl over purl and garter stitch over garter stitch. Work the other shoulder in the same way. RIGHT FRONT PIECE: Cast on 57-61-65-73-81-85 stitches (including 1 edge stitch and 6 stitches for the rolled-edge) with circular needle size 5.5 mm and DROPS Melody. Purl 1 row from the wrong side. Then work rib from the right side as follows: Purl 6 (= rolled-edge, purled from the right side and knitted from the wrong side), * knit 2, purl 2 *, work from *-* until there are 3 stitches left, knit 2 and 1 edge stitch in garter stitch. Continue this rib for 4 cm. The next row is worked as follows from the right side: Purl 6, knit 50-54-58-66-74-78 and decrease 7-6-7-8-10-10 stitches evenly over these stitches – remember DECREASE TIP, 1 edge stitch in garter stitch = 50-55-58-65-71-75 stitches. Change to circular needle size 7 mm. Purl 1 row (edge stitch and the 6 rolled-edge stitches are knitted). Continue with stocking stitch, the 6 rolled-edge stitches and the 1 edge stitch in the side as before. OVERVIEW OF THE NEXT SECTION: You now decrease for the wrap-around at the same time as increasing in the side and casting off for the armhole – therefore, read the next section before continuing. WRAP-AROUND: When the piece measures 10-10-10-9-8-8 cm, start to decrease for the wrap-around. Decrease inside the 6 purled stitches (= rolled-edge) by slipping 1 stitch as if to knit, knitting 1 and passing the slipped stitch over the knitted stitch (= 1 stitch decreased). Decrease like this every 4th row 1-1-1-1-1-2 times, every 2nd row 22-24-25-30-32-32 times and every 4th row 1-1-1-1-1-1 time (= 24-26-27-32-34-35 stitches decreased). INCREASE IN THE SIDE: When the piece measures 16-17-18-19-20-21 cm, increase 1 stitch in the side by making 1 yarn over inside the edge stitch – remember INCREASE TIP. ARMHOLE: When the piece measures 32-33-34-35-36-37 cm, cast off for the armhole at the beginning of each row from the side as follows: 3-4-4-5-6-7 stitches 1 time, 2 stitches 1-1-1-2-3-3 times and 1 stitch 1-2-2-2-2-2 times (= 6-8-8-11-14-15 stitches cast off). When all the decreases for the wrap-around and the armhole are finished there are 21-22-24-23-24-26 stitches on the shoulder. There are 2 more stitches on the front shoulder than on the back; these are sewn into the shoulder seams later so the rolled-edge stays rolled from the shoulder down. Continue working until the piece measures 54-56-58-60-62-64 cm. Cast off with knit over knit and purl over purl. LEFT FRONT PIECE: Cast on 57-61-65-73-81-85 stitches (including 1 edge stitch and 6 stitches for the rolled-edge) with circular needle size 5.5 mm and DROPS Melody. Purl 1 row from the wrong side. Then work rib from the right side as follows: 1 edge stitch in garter stitch, * knit 2, purl 2 *, work from *-* until there are 8 stitches, knit 2 and purl 6 (= rolled-edge, purled from the right side and knitted from the wrong side). Continue this rib for 4 cm. The next row is worked as follows from the right side: 1 edge stitch in garter stitch, knit 50-54-58-66-74-78 and decrease 7-6-7-8-10-10 stitches evenly over these stitches, purl 6 = 50-55-58-65-71-75 stitches. Change to circular needle size 7 mm. Purl 1 row (edge stitch and the 6 rolled-edge stitches are knitted). Continue with stocking stitch, the 6 rolled-edge stitches and 1 edge stitch in the side worked as before. OVERVIEW OF THE NEXT SECTION: You now decrease for the wrap-around at the same time as increasing in the side and casting off for the armhole – therefore read the next section before continuing. WRAP-AROUND: When the piece measures 10-10-10-9-8-8 cm, start to decrease for the wrap-around. Decrease inside the 6 purled stitches (= rolled-edge) by knitting 2 together (= 1 stitch decreased). Decrease like this every 4th row 1-1-1-1-1-2 times, every 2nd row 22-24-25-30-32-32 times and every 4th row 1-1-1-1-1-1 time (= 24-26-27-32-34-35 stitches decreased). INCREASE IN THE SIDE: When the piece measures 16-17-18-19-20-21 cm, increase 1 stitch in the side by making 1 yarn over inside the 1 edge stitch. ARMHOLE: When the piece measures 32-33-34-35-36-37 cm, cast off for the armhole at the beginning of each row from the side as follows: 3-4-4-5-6-7 stitches 1 time, 2 stitches 1-1-1-2-3-3 times and 1 stitch 1-2-2-2-2-2 times (= 6-8-8-11-14-15 stitches cast off). When all the decreases for the wrap-around and the armhole are finished there are 21-22-24-23-24-26 stitches on the shoulder. There are 2 more stitches on the front shoulder than on the back; these are sewn into the shoulder seams later, so the rolled-edge stays rolled from the shoulder down. Continue working until the piece measures 54-56-58-60-62-64 cm. Cast off with knit over knit and purl over purl. SLEEVES: Cast on 42-46-46-50-50-54 stitches (including 1 edge stitch on each side) with circular needle size 5.5 mm and DROPS Melody. Purl 1 row from the wrong side. Then work rib from the right side as follows: 1 edge stitch in garter stitch, * knit 2, purl 2 *, work from *-* until there is 1 stitch left, 1 edge stitch in garter stitch. Continue this rib for 4 cm. Knit 1 row from the right side where you decrease 0-3-3-5-3-6 stitches evenly spaced = 42-43-43-45-47-48 stitches. Change to circular needle size 7 mm. Purl 1 row (edge stitches knitted). Continue with stocking stitch and 1 edge stitch in garter stitch on each side. When the sleeve measures 26-21-21-21-18-18 cm, increase 1 stitch inside both edge stitches – remember INCREASE TIP. Increase like this every 3-3-2-2-2-1½ cm a total of 6-7-9-9-10-11 times = 54-57-61-63-67-70 stitches. Continue working until the sleeve measures 44-42-41-40-38-36 cm (shorter measurements in larger sizes due to wider shoulders and longer sleeve cap). Now work stocking stitch back and forth for the sleeve cap, casting off at the beginning of each row as follows: 3-4-4-5-6-7 stitches 1 time, 1 stitch 0-0-0-2-4-6 times, 2 stitches 0-3-2-4-3-2 times and 3 stitches 3-1-2-0-0-0 times on both sides = 30-31-33-33-35-36 stitches. Cast off. The sleeve measures approx. 49-49-48-49-49-48 cm. Work the other sleeve in the same way. ASSEMBLY: Sew the shoulder seams as follows: Fold the 2 extra stitches on the front pieces to the right side (leaving 2 purled stitches before the stocking stitch begins on the front piece). Sew the shoulder seams inside the cast-off edge – making sure the 2 folded stitches are sewn into the shoulder seam. Sew the sleeves to the body, inside the cast-off edge on the sleeve and the 1 edge stitch on the body. Sew the side seams inside the edge stitch from the armholes down, leaving an opening of approx. 3 cm for the tie on the right side, 10 cm up from the bottom edge. TIES: Cast on 6 stitches with needle size 5.5 mm and DROPS Melody. Work stocking stitch back and forth for 120 to 150 cm – or to desired length. The tie will roll. Cast off. Work the other tie in the same way. Fasten each tie to the wrong side on the front pieces, in the transition from the rolled-edge, 10 cm up from the bottom edge. |
|
|
|
|
Have you made this or any other of our designs? Tag your pictures in social media with #dropsdesign so we can see them! Do you need help with this pattern?You'll find tutorial videos, a Comments/Questions area and more by visiting the pattern on garnstudio.com. © 1982-2024 DROPS Design A/S. We reserve all rights. This document, including all its sub-sections, has copyrights. Read more about what you can do with our patterns at the bottom of each pattern on our site. |
|


With over 40 years in knitting and crochet design, DROPS Design offers one of the most extensive collections of free patterns on the internet - translated to 17 languages. As of today we count 304 catalogues and 11422 patterns - 11422 of which are translated into English (UK/cm).
We work hard to bring you the best knitting and crochet have to offer, inspiration and advice as well as great quality yarns at incredible prices! Would you like to use our patterns for other than personal use? You can read what you are allowed to do in the Copyright text at the bottom of all our patterns. Happy crafting!
Comments / Questions (6)
"Wie zuvor über die ersten 15-16-18-17-18-20 Maschen stricken, * 2 Maschen links, 2 Maschen rechts *, von *-* über die nächsten 20-20-20-24-24-24 Maschen stricken, 2 Maschen links, wie zuvor über die letzten 15-16-18-17-18-20 Maschen stricken. " Kann mir bitte dies einer erklären? Ich verstehe nicht was das *-* bedeutet und wie ich das stricken soll. Wie soll das aussehen? Hinten Rückenteil Kragen verzweifelte Grüße soraya
06.11.2021 - 08:47DROPS Design answered:
Liebe Soraya, *-* bezeichnet die Wiederholung, die gestrickt werden soll. Beispiel: für die kleinste Größe werden 20 Maschen benötigt. Diese sollen durch Wiederholung von 2x Links und 2x Rechts gestrickt werden - also 5 Wiederholungen. Viel Spaß beim Stricken!
06.11.2021 - 19:08I love this cosy wrap, cannot wait to start.
24.08.2021 - 17:21Cuddly hug
10.08.2021 - 01:23Wow
05.08.2021 - 08:08Soft wrap sweater
04.08.2021 - 09:28Matin cocooning
03.08.2021 - 17:19