DROPS Alaska
DROPS Alaska
100% Wool
from 2.60 $ /50g
Get the yarn to make this pattern from 44.20$.

The yarn cost is calculated from the pattern’s smallest size and the yarn’s cheapest product type. Looking for an even better price? You might find it on the DROPS Deals!

DROPS SS24

Atlanterhavsveien

Knitted sweater for men in DROPS Alaska. The piece is worked top down, with double neck, round yoke and Nordic pattern on the yoke. Sizes S - XXXL.

DROPS 224-9
DROPS Design: Pattern no x-474
Yarn group C or A + A
-------------------------------------------------------

SIZES:
S - M - L - XL - XXL – XXXL

Finished measurements:
Chest measurements: 96-104-112-122-132-146 cm = 37¾"-41"-44"-48"-52"-57⅜"
Full length: 62-64-66-68-70-72 cm = 24⅜"-25¼"-26"-26¾"-27½"-28⅜"
All measurements in charts are in cm.

MATERIALS:
DROPS ALASKA from Garnstudio (belongs to yarn group C)
750-800-900-950-1050-1150 g color 03, light grey
100-100-100-100-100-100 g color 02, off white

NEEDLES:
DROPS CIRCULAR NEEDLE SIZE 5 MM = US 8: Length 40 cm = 16" and 80 cm = 32".
DROPS CIRCULAR NEEDLE SIZE 4 MM = US 6: Length 40 cm = 16" and 80 cm = 32".
DROPS DOUBLE POINTED NEEDLES SIZE 5 MM = US 8.
DROPS DOUBLE POINTED NEEDLES SIZE 4 MM = US 6.
The technique MAGIC LOOP can be used – you then only need circular needle of 80 cm = 32" in each size.

KNITTING GAUGE:
17 stitches in width and 22 rows in height with stockinette stitch/Nordic pattern = 10 x 10 cm = 4" x 4".
NOTE: Needle size is only a guide. If you get too many stitches on 10 cm = 4", change to a larger needle size. If you get too few stitches on 10 cm = 4", change to a smaller needle size.

-------------------------------------------------------

Alternative Yarn – See how to change yarns here
Yarn Groups A to F – Use the same pattern and change the yarn here
Yarn usage using an alternative yarn – Use our yarn converter here

-------------------------------------------------------

DROPS Alaska
DROPS Alaska
100% Wool
from 2.60 $ /50g
Get the yarn to make this pattern from 44.20$.

The yarn cost is calculated from the pattern’s smallest size and the yarn’s cheapest product type. Looking for an even better price? You might find it on the DROPS Deals!

Pattern instructions

NOTE: This pattern is written in American English. All measurements in charts are in cm. For conversion from inches to cm - click here. There are different terms for crocheting in American and British English. If this pattern includes crochet, click for "crochet terms" here. For this pattern in British English, please click here.
-------------------------------------------------------

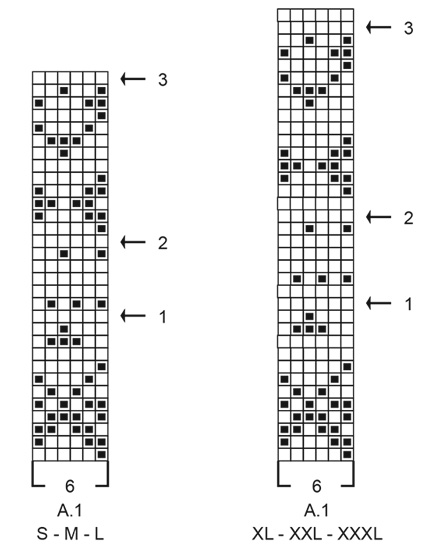
EXPLANATIONS FOR THE PATTERN:

-------------------------------------------------------

INCREASE TIP (evenly spaced):
To work out how to increase evenly, count the total number of stitches on the needle (e.g. 84 stitches) and divide by the number of increases to be made (e.g. 28) = 3.
In this example, increase by making 1 yarn over after each 3rd stitch. On the next round work the yarn overs twisted to avoid holes.

PATTERN:
See diagram A.1. Choose diagram for your size. The pattern is worked in stockinette stitch.

KNITTING TIP:
To avoid the knitting gauge becoming tighter when working pattern, it is important that the strands at the back are not tight. Use a larger size needle when working pattern if this is a problem.

DECREASE TIP (for sides of body and sleeves):
Start 3 stitches before the marker thread, knit 2 together, knit 2 (marker thread sits between these 2 stitches), slip 1 stitch as if to knit, knit 1 and pass the slipped stitch over the knitted stitch (2 stitches decreased).
BINDING-OFF TIP:
To avoid the bind-off edge being tight you can bind off with a larger size needle. If the edge is still tight, make 1 yarn over after each 6th stitch at the same time as binding off; the yarn overs are bind off as normal stitches.

-------------------------------------------------------

START THE PIECE HERE:

-------------------------------------------------------

SWEATER – SHORT OVERVIEW OF THE PIECE:
The neck and yoke are worked in the round with circular needle, from mid back and top down. The yoke is divided for body and sleeves and the body is continued in the round with circular needle. The sleeves are worked with short circular needle/double pointed needles, top down.

DOUBLE NECK:
Cast on 84-88-92-96-100-104 stitches with short circular needle size 5 MM = US 8 and light grey DROPS Alaska. Knit 1 round. Change to short circular needle size 4 MM = US 6.
Work rib in the round (knit 2, purl 2) for 9-9-9-11-11-11 cm = 3½"-3½"-3½"-4⅜"-4⅜"-4⅜". The neck is folded double later. Knit 1 round where you increase 28-30-30-32-34-34 stitches evenly spaced – read INCREASE TIP = 112-118-122-128-134-138 stitches.
Insert a marker at the beginning of the round (= in the transition between back piece and right sleeve). The yoke is measured from this marker.

YOKE:
Change back to circular needle size 5 MM = US 8 and work stockinette stitch in the round.
When the piece measures 3-3-4-4-4-4 cm = 1⅛"-1⅛"-1½"-1½"-1½"-1½", increase 36-38-42-46-46-50 stitches evenly spaced – remember INCREASE TIP = 148-156-164-174-180-188 stitches.
When the piece measures 6-6-7-7-8-8 cm = 2⅜"-2⅜"-2¾"-2¾"-3⅛"-3⅛", increase 32-36-40-42-42-46 stitches evenly spaced = 180-192-204-216-222-234 stitches.
When the piece measures 7-7-8-8-9-9 cm = 2¾"-2¾"-3⅛"-3⅛"-3½"-3½", work A.1 in the round (= 30-32-34-36-37-39 repeats of 6 stitches).
AT THE SAME TIME on each round with an arrow in A.1 increase as described below. Read KNITTING TIP and REMEMBER THE KNITTING GAUGE!

Arrow-1: Increase 42-48-54-54-60-66 stitches evenly spaced = 222-240-258-270-282-300 stitches (there is now room for 37-40-43-45-47-50 repeats of A.1).
Arrow-2: Increase 24-30-36-36-36-42 stitches evenly spaced = 246-270-294-306-318-342 stitches (there is now room for 41-45-49-51-53-57 repeats of A.1).
Arrow-3: Increase 10-10-10-18-22-30 stitches evenly spaced = 256-280-304-324-340-372 stitches.

Continue with stockinette stitch, light grey and without further increases until the piece measures 22-24-26-26-28-30 cm = 8¾"-9½"-10¼"-10¼"-11"-11¾" from the marker.
On the next round divide for the body and sleeves as follows:
Place the first 52-58-64-66-68-72 stitches on a thread for the sleeve, cast on 6-6-8-8-10-10 stitches (= in side under sleeve), work 76-82-88-96-102-114 stitches in stockinette stitch (= front piece), place the next 52-58-64-66-68-72 stitches on a thread for the sleeve, cast on 6-6-8-8-10-10 stitches (= in side under sleeve), work the last 76-82-88-96-102-114 stitches in stockinette stitch (= back piece). The body and sleeves are finished separately. THE PIECE IS NOW MEASURED FROM HERE!

BODY:
= 164-176-192-208-224-248 stitches. Insert 1 marker thread in the middle of the 6-6-8-8-10-10 stitches cast on under each sleeve = 82-88-96-104-112-124 stitches between threads. Allow the threads to follow your work onwards; they are used when decreasing in the sides.
Work stockinette stitch with light grey as far as the first marker thread; the round now starts from here. Continue with stockinette stitch in the round.
When the piece measures 6-6-6-7-7-7 cm = 2⅜"-2⅜"-2⅜"-2¾"-2¾"-2¾" from the division, decrease 1 stitch on each side of both marker threads – read DECREASE TIP (= 4 stitches decreased).
Decrease like this every 6-6-6-7-7-7 cm = 2⅜"-2⅜"-2⅜"-2¾"-2¾"-2¾" a total of 4-4-4-3-3-3 times on each side = 148-160-176-196-212-236 stitches.
Work until the piece measures 30 cm = 11¾" from the division in all sizes.
There is approx. 6-6-6-7-7-7 cm = 2⅜"-2⅜"-2⅜"-2¾"-2¾"-2¾" left to finished length; try the sweater on and work to desired length.
To avoid the following rib being tight, knit 1 round where you increase 28-32-36-40-44-48 stitches evenly spaced = 176-192-212-236-256-284 stitches. Change to circular needle size 4 MM = US 6 and work rib (knit 2, purl 2) for 6-6-6-7-7-7 cm = 2⅜"-2⅜"-2⅜"-2¾"-2¾"-2¾". Bind off with knit over knit and purl over purl – read BINDING-OFF TIP!
The sweater measures approx. 62-64-66-68-70-72 cm = 24⅜"-25¼"-26"-26¾"-27½"-28⅜" from the shoulder down.

SLEEVES:
Place the 52-58-64-66-68-72 stitches from the thread on the one side of the piece on double pointed needles/short circular needle size 5 MM = US 8 and knit up 1 stitch in each of the 6-6-8-8-10-10 stitches cast on under the sleeve, using light grey = 58-64-72-74-78-82 stitches. Insert a marker thread in the middle of the 6-6-8-8-10-10 stitches under the sleeve. Allow the thread to follow your work onwards; it will be used when decreasing under the sleeve.
Start at the marker thread and work stockinette stitch in the round with light grey for 3-3-2-2-2-2 cm = 1⅛"-1⅛"-¾"-¾"-¾"-¾". On the next round decrease 2 stitches under the sleeve – remember DECREASE TIP. Decrease like this every 4-3-2½-2½-2-2 cm = 1½"-1⅛"-1"-1"-¾"-¾" a total of 9-11-14-14-15-16 times = 40-42-44-46-48-50 stitches.
Continue working until the sleeve measures 39-38-36-35-34-32 cm = 15¼"-15"-14¼"-13¾"-13⅜"-12½" from the division. There is approx. 6-6-6-7-7-7 cm = 2⅜"-2⅜"-2⅜"-2¾"-2¾"-2¾" left to finished length; try the sweater on and work to desired length.
Knit 1 round where you increase 8-10-8-10-12-10 stitches evenly spaced = 48-52-52-56-60-60 stitches.
Change to double pointed needles size 4 MM = US 6 and work rib (knit 2, purl 2) for 6-6-6-7-7-7 cm = 2⅜"-2⅜"-2⅜"-2¾"-2¾"-2¾". Bind off with knit over knit and purl over purl – remember BINDING-OFF TIP!
The sleeve measures approx. 45-44-42-42-41-39 cm = 17¾"-17¼"-16½"-16½"-16⅛"-15¼" from the division. Work the other sleeve in the same way.

ASSEMBLY:
Fold the neck double to the inside and sew down. To avoid the neck being tight and rolling outwards, it is important that the seam is elastic.

Diagram

All measurements in charts are in cm.

symbols = light grey
symbols = off white
symbols = increase-round
diagram
diagram

Each of our patterns has specific tutorial videos to help you.

Do you have a question? See a list of frequently asked questions (FAQ)

Knitting tension is what determines the final measurements of your work, and is usually measured per 10 x 10 cm. It is provided like so: number of stitches in width x number of rows in height - eg: 19 stitches x 26 rows = 10 x 10 cm.

The knitting tension is very individual; some people knit/crochet loosely while others work tightly. You adjust the knitting tension with the needle size, which is why the suggested needle size only serve as a guide! You need to adjust this (up or down) to ensure that YOUR knitting tension matches the knitting tension provided in the pattern. If you work with a different knitting tension than provided you will have a different yarn consumption, and your work will have different measurements than what the pattern suggests.

The knitting tension also determines which yarns can replace each other. As long as you achieve the same knitting tension you can replace one yarn with another.

See DROPS lesson: How to measure your tension/gauge

See DROPS video: How to make a gauge tension swatch

The required amount of yarn is provided in grams, eg: 450 g. To calculate how many balls you’ll need you first need to know how many grams are in 1 ball (25g, 50g or 100g). This information is available if you click on the individual yarn quality on our pages. Divide the amount required with the amount of each ball. For example, if each ball is 50g (the most common amount), the calculation will be as follows: 450 / 50 = 9 balls.

The important thing when changing from one yarn to another is that the knitting/crochet tension remains the same. This is so that the measurements of the finished piece will be the same as on the sketch provided. It is easier to achieve the same knitting tension using yarns from the same yarn group. It is also possible to work with multiple strands of a thinner yarn to achieve the knitting tension of a thicker one. Please try our yarn converter. We recommend you to always work a test swatch.

Please NOTE: when changing yarn the garment might have a different look and feel to the garment in the photo, due to individual properties and qualities of each yarn.

See DROPS lesson: Can I use a different yarn than the one mentioned in the pattern?

All our yarns are categorised into yarn groups (from A to F) according to thickness and knitting tension – group A contains the thinnest yarns and group F the thickest. This makes it easier for you to find alternative yarns to our patterns, should you wish to switch yarn. All yarns within the same group have a similar knitting tension and can easily replace each other. However, different yarn qualities have different structures and properties which will give the finished work a unique look and feel.

Click here for an overview of the yarns in each yarn group

At the top of all our patterns you’ll find a link to our yarn converter, which is a helpful tool should you wish to use a different yarn than suggested. By filling in the yarn quality you wish to replace, the amount (in your size) and number of strands, the converter will present good alternative yarns with the same knitting tension. Additionally it will tell you how much you’ll require in the new qualities and whether you’ll need to work with multiple strands. Most skeins are 50g (some are 25g or 100g).

If the pattern is worked with multiple colours, every colour will have to be converted separately. Similarly, if the pattern is worked with several strands of different yarns (for example 1 strand Alpaca and 1 strand Kid-Silk) you will have to find alternatives for each, individually.

Click here to see our yarn converter

Since different yarns have different qualities and textures we have chosen to keep the original yarn in our patterns. However, you can easily find options among our available qualities by using our yarn converter, or simply pick a yarn from the same yarn group.

It is possible that some retailers still have discontinued yarns in stock, or that someone has a few skeins at home that they would like to find patterns for.

The yarn converter will provide both alternative yarn as well as required amount in the new quality.

If you think it's hard to decide what size to make, it can be a good idea to measure a garment you own already and like the size of. Then you can pick the size by comparing those measures with the ones available in the pattern's size chart.

You'll find the size chart at the bottom of the pattern.

See DROPS lesson: How to read size chart

The needle size provided in the pattern serves only as a guide, the important thing is to follow the knitting tension. And since knitting tension is very individual, you will have to adjust the needle size to ensure that YOUR tension is the same as in the pattern – maybe you’ll have to adjust 1, or even 2 needle sizes, up or down to achieve the correct tension. For this, we recommend that you work test swatches.

Should you work with a different knitting tension than the one provided, the measurements of the finished garment might deviate from the measurement sketch.

See DROPS lesson: How to measure your tension/gauge

See DROPS video: How to make a gauge tension swatch

Working a garment top-down provides more flexibility and room for personal adjustment. For example it is easier to try the garment on while working, as well as making adjustments to length of yoke and shoulder caps.

The instructions are carefully explaining every step, in the correct order. Diagrams are adjusted to the knitting direction and are worked as usual.

The diagram depicts all rows/rounds, and every stitch seen from the right side. It is read from bottom to top, from right to left. 1 square = 1 stitch.

When working back and forth, every other row is worked from the right side and every other row is worked from the wrong side. When working from the wrong side, the diagram will have to be worked reversed: from left to right, knit stitches are purled, purl stitches are knit etc.

When working in the round every round is worked from the right side and the diagram are worked from right to left on all rounds.

See DROPS lesson: How to read knitting diagrams

The diagram depicts all rows/rounds, and every stitch seen from the right side. It is worked from bottom to top, from right to left.

When working back and forth every other row is worked from the right side: from right to left and every other row is worked from the wrong side: from left to right.

When working in the round, every row in the diagram are worked from the right side, from right to left.

When working a circular diagram you start in the middle and work your way outwards, counter clockwise, row by row.

The rows usually start with a given number of chain stitches (equivalent to the height of the following stitch), this will either be depicted in the diagram or explained in the pattern.

See DROPS lesson: How to read crochet diagrams

Instructions for working several diagrams after each other on the same row/round, will often be written like so: “work A.1, A.2, A.3 a total of 0-0-2-3-4 times". This means you work A.1 once, then A.2 is worked once, and A.3 is repeated (in width) the number of times provided for your size – in this case like so: S = 0 times, M = 0 times, L=2 times, XL= 3 times and XXL = 4 times.

The diagrams are worked as usual: begin with the first row in A.1, then work the first row in A.2 etc.

See DROPS lesson: How to read knitting diagrams

See DROPS lesson: How to read crochet diagrams

The total width of the garment (from wrist-to-wrist) will be larger in the larger sizes, despite the actual sleeves being shorter. The larger sizes have longer sleeve caps and wider shoulders, so there will be a good fit in all sizes.

The measurement sketch/schematic drawing provides information regarding the full length of the garment. If it’s a jumper or a jacket the length is measured from the highest point on the shoulder (usually closest to the neckline), and straight down to the bottom of the garment. It is NOT measured from the tip of shoulder. Similarly, the length of yoke is measured from the highest point on the shoulder and down to where yoke is split into body and sleeves.

See DROPS lesson: How to read a schematic drawing

Diagrams are often repeated on the round or in height. 1 repeat is the diagram the way it appears in the pattern. If it says to work 5 repeats of A.1 in the round, then you work A.1 a total of 5 times after/next to each other in the round. If it says to work 2 repeats of A.1 vertically/in height you work the entire diagram once, then begin again at the start and work the entire diagram one more time.

Chain stitches are slightly narrower than other stitches and to avoid working the cast-on edge too tight, we simply chain more stitches to begin with. The stitch count will be adjusted on the following row to fit the pattern and measurement sketch.

The rib edge is more elastic and will contract slightly compared to, for example, stocking stitch. By increasing before the rib edge, you avoid a visible difference in width between the rib edge and the rest of the body.

It’s very easy to cast off too tightly, and by making yarn overs while casting off (and simultaneously casting these off) you avoid a too tight cast off edge.

See DROPS video: How to bind off with yarn overs (yo)

To achieve an even increase (or decrease) you can increase on, for example: every 3rd and 4th row alternately, like so: work 2 rows and increase on the 3rd row, work 3 rows and increase on the 4th. Repeat this until the increase is complete.

See DROPS lesson: Increase or decrease 1 st on every 3rd and 4th row alternately

Should you prefer to work in the round instead of back and forth, you may of course adjust the pattern. You’ll need to add steeks mid-front (usually 5 stitches), and follow the instructions. When you would normally turn and work from the wrong side, simply work across the steek and continue in the round. At the end you’ll cut the piece open, pick up stitches to work bands, and cover the cut edges.

See DROPS video: How to knit steeks and cut open

Should you prefer to work back and forth instead of in the round, you may of course adjust the pattern so you work the pieces separately and then assemble them at the end. Divide the stitches for the body in 2, add 1 edge stitch in each side (for sewing) and work the front and back pieces separately.

See DROPS lesson: Can I adapt a pattern for circular needles into straight needles?

Pattern repeats can vary slightly in the different sizes, in order to get the correct proportions. If you’re not working the exact same size as the garment in the photo, yours might deviate slightly. This has been carefully developed and adjusted so that the complete impression of the garment is the same in all sizes.

Make sure to follow instructions and diagrams for your size!

If you have found a pattern you like which is available in women’s size it’s not very difficult to convert it to men’s size. The biggest difference will be the length of sleeves and body. Start working on the women size that you think would fit across the chest. The additional length will be worked right before you cast off for the armhole/sleeve cap. If the pattern is worked top-down you can add the length right after the armhole or before the first decrease on sleeve.

Regarding additional yarn amount, this will depend on how much length you add, but it is better with a skein too many than too few.

All yarns will have excess fibres (from production) that might come off as lint or shedding. Brushed yarns (ie hairier yarns) have more of these loose, excess fibres, causing more shedding.

Shedding also depends on what is worn under or over the garment, and whether this pulls at the yarn fibres. It’s therefore not possible to guarantee that there will be no shedding

Below are some tips on how to get the best result when working with hairier yarns:

1. When the garment is finished (before you wash it) shake it vigorously so the looser hairs come off. NOTE: do NOT use a lint roller, brush or any method that pulls at the yarn.

2. Place the garment in a plastic bag and put it in your freezer - the temperature will cause the fibres to become less attached to each other, and excess fibres will come off easier.

3. Leave in the freezer for a few hours before taking it out and shaking it again.

4. Wash the garment according to the instructions on the yarn label.

Pilling is a natural process that happens to even the most exclusive of fibers. It's a natural sign of wear and tear that is hard to avoid, and that is most visible in high friction areas of your garment like a sweater's arms and cuffs.

You can make your garment look as new by removing the pilling, using a fabric comb or a pill/lint remover.

Still can't find the answer you need? Then scroll down and leave your question so one of our experts can try to help you. This will be done normally within 5 to 10 working days.
In the meantime, you can read the questions and answers that others have left to this pattern or join the DROPS Workshop on Facebook to get help from fellow knitters/crocheters!

You might also like...

Post a comment to pattern DROPS 224-9

We would love to hear what you have to say about this pattern!

If you want to leave a question, please make sure you select the correct category in the form below, to speed up the answering process. Required fields are marked *.

Comments / Questions (14)

country flag Justin wrote:

I’m confused as to why there are no short rows to help with shaping. Even in the photo, the neckline looks extremely awkward and uncomfortable. Could you please inform of how short rows can be added to help with this problem? I would love to make this sweater with the recommended yarns and materials, but would need guidance on how to fix the problem with the neck first. Thank you!

03.02.2024 - 03:42

DROPS Design answered:

Dear Justin, our patterns are made for different knitting levels. As short rows isn't a beginner friendly technique, we try to make some patterns without short rows so that they are easier for beginners. You could use the neckline or double neck + neckline in the following pattern, which has an elevation for the back of the neck and apply it to this pattern: https://www.garnstudio.com/pattern.php?id=11017&cid=19. Happy knitting!

04.02.2024 - 22:51

country flag Quratulain Qamar wrote:

Is this pattern available children sizes

19.11.2023 - 15:40

DROPS Design answered:

Hi Quratulain, We do not have exactly this jumper in children's sizes, but you could adjust the colour and use the adult pattern on one of our other children's jumpers. All our childrens jumpers are found under Free Patterns at the top of the pattern or use the search symbol (top right) and search for children's jumpers. Happy crafting!

20.11.2023 - 06:50

country flag Dariusz wrote:

Jaka jest cena tego swetra błękitnego? I gdzie można go kupić?

23.09.2023 - 02:24

DROPS Design answered:

Witaj Dariuszu, nie sprzedajemy swetrów, sprzedajemy materiały na nie, w szczególności włóczkę. Wzory na ubranie prezentowane na naszej stronie są darmowe. Jeśli marzysz o tym swetrze, ktoś musiałby go dla Ciebie ręcznie wykonać. Pozdrawiamy!

25.09.2023 - 08:13

country flag Miep wrote:

Bij patroon224/10 staat dat er gemeerderd wordt bij de raglan. Hier moet toch minderen staan

03.04.2023 - 13:54

country flag Miriam S wrote:

Ich habe diesen Pullover für meinen Mann in L gestrickt. Die Anleitung war gut verständlich und das Ergebnis sieht toll aus. Die vorgeschlagene Wolle lässt sich toll verstricken. Ich werde allerdings an den Ärmeln und am Bund noch 10-15 cm dran stricken müssen damit es passt. Trotz Maschenprobe sieht er aus wie zu heiß gewaschen. Trotzdem eine tolle Anleitung und mit der groben Wolle sicherlich zügig machbar. Hatte das gleiche Problem bereits bei einer anderen Anleitung.

24.03.2023 - 09:41

country flag Eveline wrote:

Hallo, ik brei deze trui in maat L met Drops big Merino omdat deze wol niet prikt. Maar dan moet ik met naalden 6 en 5 breien voor de stekenverhouding. De trui wordt daardoor heel ‘los’ gebreid. Kan ik ook de maat XL aanhouden en dan dit model met dunnere naalden breien? Alvast hartelijk dank voor je antwoord.

11.01.2023 - 13:36

DROPS Design answered:

Dag Eveline,

Dat is ook een optie. Je zou dit om kunnen rekenen op basis van je proeflapje. Je moet dan wel de hoogtematen van maat L aanhouden (en de breedtematen van maat XL of andere grotere maat die aansluit op je stekenverhouding).

12.01.2023 - 19:55

country flag Barbara wrote:

Buongiorno, vorrei fare questo maglione con 1 fili DROPS deligh e 1 filo di Fabel, per taglia L che quantità mi consigliate? grazie

25.10.2022 - 10:31

DROPS Design answered:

Buonasera Barbara, può leggere a questo link le indicazioni per cambiare filato. Buon lavoro!

25.10.2022 - 19:24

country flag Susanne Månskans wrote:

Jag har just stickat hals kanten och undrar varför ni inte valt att vika ner den och sticka fast den i sista varvet resår? Det måste ju bli enklare än att sy fast den senare, och snyggare...

23.03.2022 - 10:09

DROPS Design answered:

Hei Susanne. På den genseren er det blir valgt å brette vrangborden øverst i halsen ned på innsiden av plagget og så sy vrangborden fast slik at det blir en dobbel halskan. Men du kan fint gjøre det du selv ønsker, for å få det slik du mener blir penest. mvh DROPS Design

28.03.2022 - 11:19

country flag Helene Levesque wrote:

Échantillon : mes17 mailles x 22 rangs me donne 10 cm de largeur mais seulement 6.5 cm de hauteur ? Comment corriger ceci ? Merci beaucoup !

15.02.2022 - 13:17

DROPS Design answered:

Bonjour Mme Levesque, vous tricotez bien en DROPS Alaska? Essayez de laver votre échantillon (pensez à bien vérifier les consignes d'entretien) pour vérifier si ça change quelque chose mais à priori, vous tricotez trop serré, essayez avec des aiguilles plus grosses jusqu'à ce que vous ayez les bonnes mesures - cf faq. Bon tricot!

15.02.2022 - 17:01

country flag Es Den Nie wrote:

Bij het breien van de mouwen (het begin) krijg ik onder elke mouw twee gaatjes namelijk aan weerszijden van de opgezette steken. Hoe kan ik dit voorkomen? Hoe kan ik de gaatjes die er nu al zijn mooi wegwerken? Bij voorbaat dank voor uw antwoord.

31.01.2022 - 00:22

DROPS Design answered:

Dag Es,

Wat ik soms wel doe is een extra steek opnemen en deze in de volgende naald samen breien. Je kan die gaatjes ook aan het eind dichtstoppen met een draad en stopnaald.

02.02.2022 - 09:19