
Popular categories
Looking for a yarn?


|
|||||||
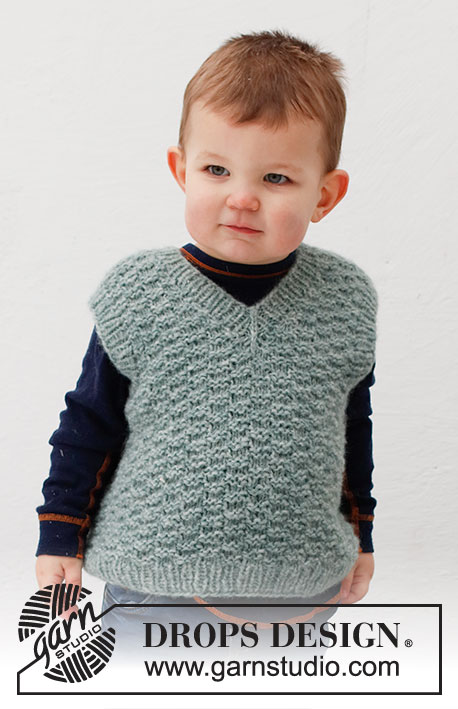
Green River Vest |
|||||||
 |
 |
||||||
Knitted vest / slipover for children in DROPS Air. The piece is worked with textured pattern, V-neck and ribbed edging. Sizes 2-12 years.
DROPS Children 40-15 |
|||||||
|
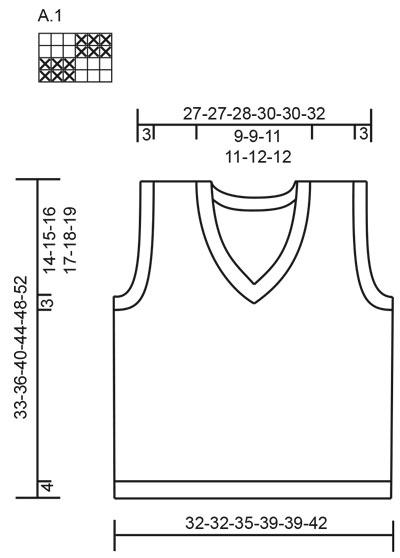
------------------------------------------------------- EXPLANATIONS FOR THE PATTERN: ------------------------------------------------------- PATTERN: See diagram A.1. The diagram shows all rows in the pattern from the right side. RIDGE/GARTER STITCH (worked back and forth): Knit all rows. 1 ridge = knit 2 rows. CASTING-OFF TIP: To avoid the cast-off edge being tight you can cast off with a larger size needle. If the edge is still tight, make 1 yarn over after approx. each 4th stitch at the same time as casting off; the yarn overs are cast off as normal stitches. ------------------------------------------------------- START THE PIECE HERE: ------------------------------------------------------- VEST – SHORT OVERVIEW OF THE PIECE: The piece is worked in the round with circular needle, bottom up as far as the armholes. Then the back and front pieces are finished separately, back and forth with circular needle and the V-neck is worked on the front piece. Ribbed edges are worked around the armholes and neck to finish. BODY: Cast on 108-108-120-132-132-144 stitches with circular needle size 4 mm and DROPS Air. Knit 1 round, then work rib in the round (knit 1, purl 1) for 4 cm. Change to circular needle size 5 mm. Work A.1 over all stitches (= 18-18-20-22-22-24 repeats of 6 stitches). REMEMBER THE KNITTING TENSION! When the piece measures16-18-21-24-27-30 cm, cast off for the armholes as follows: Cast off the first 3 stitches, work the next 48-48-54-60-60-66 stitches with pattern as before, cast off the next 6 stitches, work the next 48-48-54-60-60-66 stitches and cast off the last 3 stitches = 48-48-54-60-60-66 stitches on the back and front pieces. Each piece is finished separately. BACK PIECE: = 48-48-54-60-60-66 stitches. Start from the wrong side and continue A.1, casting off for the armholes at the beginning of each row as follows: 2 stitches 2 times and 1 stitch 2-2-4-6-6-7 times on each side = 36-36-38-40-40-44 stitches. Continue working until the piece measures 31-34-38-42-46-50 cm. On the next row cast off the middle 14-14-16-16-18-18 stitches for the neck and each shoulder is finished separately. Continue with A.1, casting off 1 stitch on the next row from the neck = 10-10-10-11-10-12 stitches on the shoulder. Continue working until the piece measures 33-36-40-44-48-52 cm. Cast off. Work the other shoulder in the same way. FRONT PIECE: = 48-48-54-60-60-66 stitches. Start from the wrong side and continue A.1, casting off for the armholes at the beginning of each row as follows: 2 stitches 2 times and 1 stitch 2-2-4-6-6-7 times on each side. AT THE SAME TIME, when the piece measures 17-19-22-25-28-31 cm, begin to work the V-neck as follows: Insert 1 marker in the middle of the row, with an equal number of stitches on each side. Start from the right side and work until there are 3 stitches left before the marker, knit 2 together and work 1 edge stitch in GARTER STITCH – read description above. Place the last stitches on a thread without working them. Finish each shoulder separately; do not cut the strand and continue the left shoulder from the wrong side. LEFT SHOULDER: Continue with A.1 and 1 edge stitch in garter stitch by the neck, decreasing for the neck by knitting 2 together inside this edge stitch at the end of each row from the right side. Decrease every 1½-1½-1½-1½-2-2 cm 7-7-8-8-9-9 more times (a total of 8-8-9-9-10-10 decreases as the first decrease was worked when the V-neck was started) = 10-10-10-11-10-12 stitches on the shoulder. Continue with A.1 and 1 edge stitch in garter stitch by the neck until the piece measures 33-36-40-44-48-52 cm. Cast off with knit from the right side. RIGHT SHOULDER: Place the stitches from the thread back on the needle. Continue with A.1 and 1 edge stitch in garter stitch by the neck (the first row is from the right side). Decrease for the neck inside 1 edge stitch in garter stitch at the beginning of each row from right side, decrease by slipping 1 stitch, knitting 1 and passing the slipped stitch over the knitted stitch. Decrease every 1½-1½-1½-1½-2-2 cm 7-7-8-8-9-9 more times = 10-10-10-11-10-12 stitches on the shoulder. Continue with A.1 and 1 edge stitch in garter stitch by the neck until the piece measures 33-36-40-44-48-52 cm. Cast off with knit from the right side. ASSEMBLY: Sew the shoulder seams inside the cast-off edge. ARMHOLE-EDGES: Start from the right side at the bottom of the armhole and knit up 58 to 74 stitches around the armhole, using small circular needle size 4 mm and DROPS Air (the number of stitches should be divisible by 2). Work rib in the round (knit 1, purl 1) for 2½ cm. Loosely cast off with knit over knit and purl over purl – read CASTING-OFF TIP! Work the other armhole-edge in the same way. NECK: Start from the right side by the shoulder seam and knit up 74 to 100 stitches around the neck, using small circular needle size 4 mm and DROPS Air (the number of stitches should be divisible by 2). Work rib in the round (knit 1, purl 1) making sure you have a knitted stitch mid-front. AT THE SAME TIME, every 2nd round, decrease 2 stitches mid-front as follows: Work until there is 1 stitch left before the knitted stitch mid-front, slip 2 stitches as if to knit together, knit 1 and pass the slipped stitches over the knitted stitch (= 2 stitches decreased). This gives you a neat V-neck, with the knitted stitch forming a straight line upwards. Cast off with knit over knit and purl over purl when the rib measures 2½ cm – remember CASTING-OFF TIP! |
|||||||
Diagram explanations |
|||||||
|
|||||||
|
|||||||
|
Have you made this or any other of our designs? Tag your pictures in social media with #dropsdesign so we can see them! Do you need help with this pattern?You'll find tutorial videos, a Comments/Questions area and more by visiting the pattern on garnstudio.com. © 1982-2024 DROPS Design A/S. We reserve all rights. This document, including all its sub-sections, has copyrights. Read more about what you can do with our patterns at the bottom of each pattern on our site. |
|||||||


With over 40 years in knitting and crochet design, DROPS Design offers one of the most extensive collections of free patterns on the internet - translated to 17 languages. As of today we count 304 catalogues and 11422 patterns - 11422 of which are translated into English (UK/cm).
We work hard to bring you the best knitting and crochet have to offer, inspiration and advice as well as great quality yarns at incredible prices! Would you like to use our patterns for other than personal use? You can read what you are allowed to do in the Copyright text at the bottom of all our patterns. Happy crafting!
Comments / Questions (3)
Io non so usare i ferri circolari, ho provato ma non ci riesco. C'è qualche gilet per un bimbo di due o tre anni che io posso usare, altrimenti come posso lavorare questo con i ferri al diritto? Grazie mille 😘
19.11.2023 - 18:43DROPS Design answered:
Buonasera Angela, questo modello è lavorato in tondo: se vuole lavorarlo in piano deve adattare il motivo alla lavorazione in piano aggiungendo 1 maglia di vivagno per lato per la cucitura. Per un aiuto più personalizzato può rivolgersi al suo rivenditore DROPS di fiducia. Buon lavoro!
19.11.2023 - 19:08Buona sera mi serve aiuto dal punto in cui devo passare a lavorare separatamente il dietro da davanti . Ho fatto i primi intrecci per gli scalfi. Ora mi trovo che non riesco ad andare avanti. Devo rompere il filo e proseguire il lavoro con altro filo lavorando separatamente? Perché non saprei cos'altro fare. ... scusate è il mio primo lavoro
12.11.2021 - 21:57DROPS Design answered:
Buonasera Francesca, a quel punto prosegue la lavorazione separatamente del davanti e del dietro: può lavorare la parte che preferisce per prima. Buon lavoro!
16.11.2021 - 22:28Hallo Meine Frage gilt dem Rumpfteil. Man soll bis 16cm Stricken aber es steht nicht wo ich messen soll, nach den 4 cm oder ab Anfang? Viele Grüße Christin
24.09.2021 - 08:58DROPS Design answered:
Liebe Christin, die Arbeit wird von der Anschlagskante/von Anfang gemessen, Viel Spaß beim stricken!
27.09.2021 - 09:09