
Popular categories
Looking for a yarn?


|
|||||||
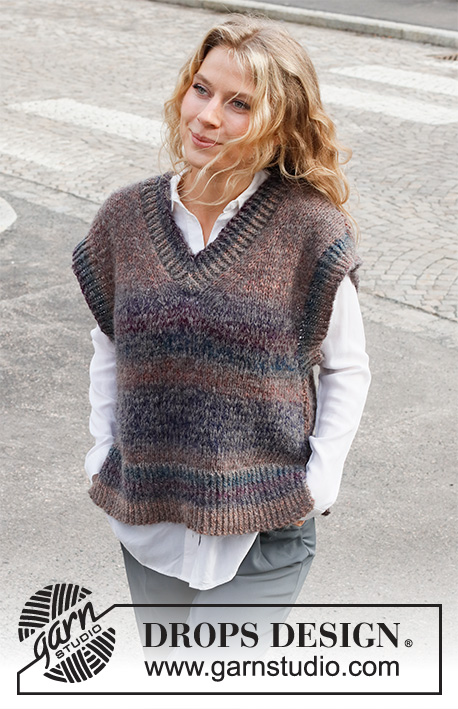
Memories of Monaco |
|||||||
 |
 |
||||||
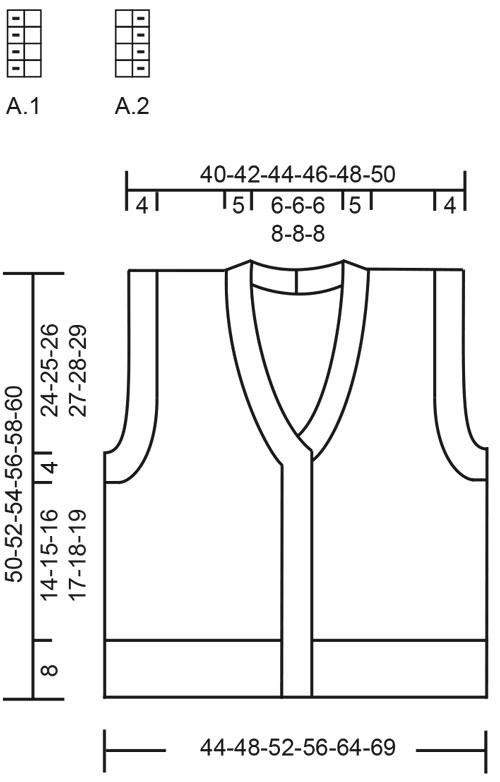
Knitted vest in DROPS Air. The piece is worked with V-neck and ribbed edges. Sizes S - XXXL.
DROPS 227-42 |
|||||||
|
------------------------------------------------------- EXPLANATIONS FOR THE PATTERN: ------------------------------------------------------- RIDGE/GARTER STITCH (worked back and forth): Knit all rows. 1 ridge = knit 2 rows. PATTERN: See diagrams A.1 and A.2. The diagrams show all rows in the pattern from the right side. DECREASE TIP-1 (evenly spaced): To work out how to decrease evenly, count the total number of stitches on needle (e.g. 107 stitches), minus the edge stitches (e.g. 2 stitches) and divide the remaining stitches by the number of decreases to be made (e.g. 31) = 3.4. In this example decrease by knitting together alternately each 2nd and 3rd stitch and each 3rd and 4th stitch (approx.). Do not decrease the edge stitches. DECREASE TIP-2 (for armholes and V-neck): All decreases are worked from the right side! DECREASE AT THE BEGINNING OF THE ROW: 1 edge stitch in garter stitch, knit 2, slip 1 stitch as if to knit, knit 1 and pass the slipped stitch over the knitted stitch (= 1 stitch decreased). DECREASE AT THE END OF THE ROW: Work until there are 5 stitches left, knit 2 together (= 1 stitch decreased), knit 2 and 1 edge stitch in garter stitch. CASTING-OFF TIP: To avoid the cast-off edge being tight you can cast off with a larger size needle. If the edge is still tight, make 1 yarn over after approx. each 4th stitch at the same time as casting off; the yarn overs are cast off as normal stitches. ------------------------------------------------------- START THE PIECE HERE: ------------------------------------------------------- VEST – SHORT OVERVIEW OF THE PIECE: The back and front pieces are worked back and forth separately, then sewn together. Stitches are knitted up for the sleeve-edges and bands. The sleeve-edges are worked in the round and the bands are worked back and forth. BACK PIECE: Cast on 107-117-125-137-153-167 stitches (including 1 edge stitch on each side) with needle size 3 mm and DROPS Air. Purl 1 row from the wrong side. The next row is worked as follows from the right side: 1 edge stitch in GARTER STITCH – read description above, work A.1 until there are 2 stitches left, work the first stitch in A.1 so the pattern is symmetrical and 1 edge stitch in garter stitch. Continue this rib for 8 cm – adjust so the next row is from the right side. Knit 1 row where you decrease 31-33-35-39-43-47 stitches evenly spaced – read DECREASE TIP-1 = 76-84-90-98-110-120 stitches. Change to needle size 5 mm. Purl 1 row with 1 edge stitch in garter stitch on each side. Continue with stocking stitch and 1 edge stitch in garter stitch on each side. REMEMBER THE KNITTING TENSION! When the piece measures 22-23-24-25-26-27 cm, cast off 4-4-5-5-6-7 stitches at the beginning of the next 2 rows for the armholes = 68-76-80-88-98-106 stitches. On the next row from the right side decrease 1 stitch on each side for the armholes – read DECREASE TIP-2. Decrease like this every 2nd row (each row from the right side) a total of 0-2-2-3-6-6 times, then every 4th row 6-6-6-8-8-10 times = 56-60-64-66-70-74 stitches. When the piece measures 48-50-52-54-56-58 cm, cast off the middle 26-26-26-28-28-28 stitches from the right side for the neck and finish each shoulder separately. LEFT SHOULDER (when the garment is worn): Continue with stocking stitch and 1 edge stitch in garter stitch on each side. AT THE SAME TIME on the next row from the right side decrease 1 stitch for the neck at the beginning of the row – remember DECREASE TIP-2 = 14-16-18-18-20-22 stitches. When the piece measures 50-52-54-56-58-60 cm from the cast-on edge, cast off loosely with knit from the right side. RIGHT SHOULDER (when the garment is worn): Continue with stocking stitch and 1 edge stitch in garter stitch on each side. AT THE SAME TIME on the next row from the right side decrease 1 stitch for the neck at the end of the row – remember DECREASE TIP-2 = 14-16-18-18-20-22 stitches. When the piece measures 50-52-54-56-58-60 cm from the cast-on edge, cast off loosely with knit from the right side. RIGHT FRONT PIECE (when the garment is worn): Cast on 48-54-58-64-72-80 stitches (including 1 edge stitch on each side) with needle size 3 mm and DROPS Air. Purl 1 row from the wrong side. The next row is worked as follows from the right side: 1 edge stitch in garter stitch, work A.1 until there is 1 stitch left and 1 edge stitch in garter stitch. Continue this pattern for 8 cm – adjust so the next row is from the right side. Knit 1 row where you decrease 13-15-16-18-20-23 stitches evenly spaced – remember DECREASE TIP-1 = 35-39-42-46-52-57 stitches. Change to needle size 5 mm. Purl 1 row with 1 edge stitch in garter stitch on each side. Continue with stocking stitch and 1 edge stitch in garter stitch on each side. OVERVIEW OF THE NEXT SECTION: When the piece measures 22-23-24-25-26-27 cm, cast off stitches for the armhole. As you decrease for the armhole you also decrease for the V-neck. Read ARMHOLE and V-NECK before continuing. ARMHOLE: Cast off 4-4-5-5-6-7 at the beginning of the next row from the wrong side = 31-35-37-41-46-50 stitches. On the next row decrease 1 stitch at the end of the row – remember DECREASE TIP-2. Decrease like this every 2nd row (each row from the right side) a total of 0-2-2-3-6-6 times then every 4th row 6-6-6-8-8-10 times. V-NECK: When the piece measures 24-25-26-27-28-29 cm, decrease 1 stitch for the neck at the beginning of the next row from the right side – remember DECREASE TIP-2. Decrease like this every 4th row 1 time, every 2nd row 4 times, every 4th row 2 times and every 6th row 4-4-4-5-5-5 times. After all the decreases to armhole and neck there are 14-16-18-18-20-22 stitches on the shoulder. When the piece measures 50-52-54-56-58-60 cm from the cast-on edge, cast off loosely with knit from the right side. LEFT FRONT PIECE (when the garment is worn): Cast on 48-54-58-64-72-80 stitches (including 1 edge stitch on each side) with needle size 3 mm and DROPS Air. Purl 1 row from the wrong side. The next row is worked as follows from the right side: 1 edge stitch in garter stitch, work A.2 until there is 1 stitch left and 1 edge stitch in garter stitch. Continue this pattern for 8 cm – adjust so the next row is from the right side. Knit 1 row where you decrease 13-15-16-18-20-23 stitches evenly spaced = 35-39-42-46-52-57 stitches. Change to needle size 5 mm. Purl 1 row with 1 edge stitch in garter stitch on each side. Continue with stocking stitch and 1 edge stitch in garter stitch on each side. OVERVIEW OF THE NEXT SECTION: When the piece measures 22-23-24-25-26-27 cm, cast off stitches for the armhole. As you decrease for the armhole you also decrease for the V-neck. Read ARMHOLE and V-NECK before continuing. ARMHOLE: Cast off 4-4-5-5-6-7 at the beginning of the next row from the right side = 31-35-37-41-46-50 stitches. Purl 1 row from the wrong side with 1 edge stitch in garter stitch on each side On the next row decrease 1 stitch at the beginning of the row – remember DECREASE TIP-2. Decrease like this every 2nd row (each row from the right side) a total of 0-2-2-3-6-6 times then every 4th row 6-6-6-8-8-10 times. V-NECK: When the piece measures 24-25-26-27-28-29 cm, decrease 1 stitch for the neck at the end of the next row from the right side – remember DECREASE TIP-2. Decrease like this every 4th row 1 time, every 2nd row 4 times, every 4th row 2 times and every 6th row 4-4-4-5-5-5 times. After all the decreases to armhole and neck there are 14-16-18-18-20-22 stitches on the shoulder. When the piece measures 50-52-54-56-58-60 cm from the cast-on edge, cast off loosely with knit from the right side. ASSEMBLY: Sew the shoulder seams inside the cast-off edge. Sew the side seams from the armholes down, inside the 1 edge stitch. Insert 1 marker mid-back of neck – it is used when knitting up stitches for the bands. RIGHT BAND: Use circular needle size 3 mm and DROPS Air. Start from the right side at the bottom of the right front piece and knit up 135-141-145-153-159-163 stitches inside the 1 edge stitch, up the front piece and round the neck to the marker mid-back (the number of stitches must be divisible by 2 + 1). Turn and work rib as follows (wrong side): 1 edge stitch in garter stitch, work A.1 until there are 2 stitches left, work the first stitch in A.1 so the pattern is symmetrical and 1 edge stitch in garter stitch. Continue this pattern back and forth for 2½ cm. Now work 3-3-3-3-4-4 buttonholes evenly spaced. 1 BUTTONHOLE = cast off 2 stitches a little tightly and cast on 2 new stitches on the next row. The bottom buttonhole is 8 cm from the bottom edge and the top buttonhole 1 cm below the beginning of the V-neck. Work until the band measures 5 cm. Cast off from the right side with knit-twisted over knit-twisted and purl over purl – read CASTING-OFF TIP. LEFT BAND: Use circular needle size 3 mm and DROPS Air. Start from the right side at the marker mid-back and knit up the same number of stitches as on the right band, inside the 1 edge stitch, round the neck and down the left front piece. Turn and work rib as follows (wrong side): 1 edge stitch in garter stitch, work A.1 until there are 2 stitches left, work the first stitch in A.1 so the pattern is symmetrical and 1 edge stitch in garter stitch. Continue this pattern back and forth for 5 cm. Cast off from the right side with knit-twisted over knit-twisted and purl over purl – remember CASTING-OFF TIP. ASSEMBLY: Sew the bands together mid-back, in the outermost loop of the outermost stitch so the seam is flat. Sew the buttons onto the left band. SLEEVE EDGES: Use circular needle size 3 mm and DROPS Air. Start from the right side at the bottom of the armhole and knit up 118-122-126-130-134-138 stitches around the armhole, inside the 1 edge stitch (the number of stitches should be divisible by 2). Work A.1 in the round for 4 cm. Cast off from the right side with knit-twisted over knit-twisted and purl over purl – remember CASTING-OFF TIP. Work the other sleeve edge in the same way. |
|||||||
Diagram explanations |
|||||||
|
|||||||
|
|||||||
|
Have you made this or any other of our designs? Tag your pictures in social media with #dropsdesign so we can see them! Do you need help with this pattern?You'll find tutorial videos, a Comments/Questions area and more by visiting the pattern on garnstudio.com. © 1982-2024 DROPS Design A/S. We reserve all rights. This document, including all its sub-sections, has copyrights. Read more about what you can do with our patterns at the bottom of each pattern on our site. |
|||||||


With over 40 years in knitting and crochet design, DROPS Design offers one of the most extensive collections of free patterns on the internet - translated to 17 languages. As of today we count 304 catalogues and 11422 patterns - 11422 of which are translated into English (UK/cm).
We work hard to bring you the best knitting and crochet have to offer, inspiration and advice as well as great quality yarns at incredible prices! Would you like to use our patterns for other than personal use? You can read what you are allowed to do in the Copyright text at the bottom of all our patterns. Happy crafting!
Comments / Questions (10)
Could I knit the entire neckband as one rather than having a seam in the middle?
10.11.2023 - 17:08Hello! I am struggling with the invisible side seam when I get to the ribbed edges of the vest under the armholes. Is there any video or tutorial? Thanks!
16.04.2023 - 21:13DROPS Design answered:
Dear Mrs Hernandez, we show in this video how to make an invisible side seam. Happy assembly!
17.04.2023 - 10:02Modèle. 227 / 42 Après avoir monté et tricoté la bande de cotes, vous demandez de diminuer pour passer en jersey: pourquoi cette diminution ?
07.02.2023 - 18:08DROPS Design answered:
Bonjour Mme Villemin, nous souhaitons conserver la bonne largeur, or, pour la même largeur, il faut plus de mailles pour tricoter en côtes avec les aiguilles 3 qu'en jersey avec les aiguilles 5, on va donc diminuer avant de tricoter le jersey et on conserve ainsi la largeur souhaitée. Bon tricot!
08.02.2023 - 08:49A szamok nagyon nem stimmelnek. Ha M meretnel vegigcsinalom a leirtam szerint a vallra 8-8 szem marad a vegere. Az elejet 54 szemmel irja, de 54 szemmel nem lesz belole bordasminta mivel paros. Most lebontom, mert igy nem jo, kerlek segitsetek!
06.01.2023 - 07:51Je ne comprend pas les diminutions des emmanchures et encolure. Quand est qu'on passe au diminution tout les 4 rangs ou tous les 6 rangs?
20.08.2022 - 16:18DROPS Design answered:
Bonjour Anaïs, les diminutions de l'emmanchure et de l'encolure se font de la même façon mais à un rythme différent, pour les emmanchures: diminuez 0 à 6 x tous les 2 rangs + 6 à 10 x tous les 4 rangs (cf taille); pour 'encolure, diminuez la 1ère fois à 24-29 cm, puis tricotez 3 rangs sans diminuer pour l'encolure et ensuite diminuez 4 x tous les 2 rangs, 2 x tous les 4 rangs et 4-5 x tous les 6 rangs. Bon tricot!
22.08.2022 - 09:48Kære DROPS Design. Jeg har nu strikket denne vest i str. L - den passer perfekt, og den er virkelig flot! Blot har jeg alt for meget garn tilbage. Jeg købte de 300 g, som opskriften sagde, men jeg har et helt nøgle + 40 g i overskud. Det er lidt træls :-(
17.01.2022 - 21:48Jeg vil gerne strikke denne model på rundpind og så først dele ved ærmegabet. Jeg vil derfor gerne høre, om der er en god grund til ikke at gøre det?? På forhånd tak og venlig hilsen Lone
03.12.2021 - 11:46DROPS Design answered:
Hej Lone, jo men det kan du godt gøre - god fornøjelse! :)
03.12.2021 - 15:26Kan i ikke prøve at forklare disse to linjer på dansk. symbols = vriden rätmaska från rätsidan, vriden avigmaska från avigsidan symbols = avigmaska från rätsidan, rätmaska från avigsidan
17.10.2021 - 19:24DROPS Design answered:
Hej Karen. Beklagar det, nu är de översatta till dansk i opskriften. Mvh DROPS Design
18.10.2021 - 12:12Vid avmaskningstips ärmhål, ska det vara två RÄTstickade maskor innanför kantmaska, el två slätstickade?
05.09.2021 - 14:33DROPS Design answered:
Hej Sophie. Det ska vara slätstickade maskor. Mvh DROPS Design
07.09.2021 - 09:23Love the style and yarn. Really really hope it makes the cut. Love it.
08.08.2021 - 18:37