DROPS Kid-Silk
DROPS Kid-Silk
75% Mohair, 25% Silk
from 6.75 $ /25g
Get the yarn to make this pattern from 54.00$.

The yarn cost is calculated from the pattern’s smallest size and the yarn’s cheapest product type. Looking for an even better price? You might find it on the DROPS Deals!

DROPS SS24

Blackforest Memories

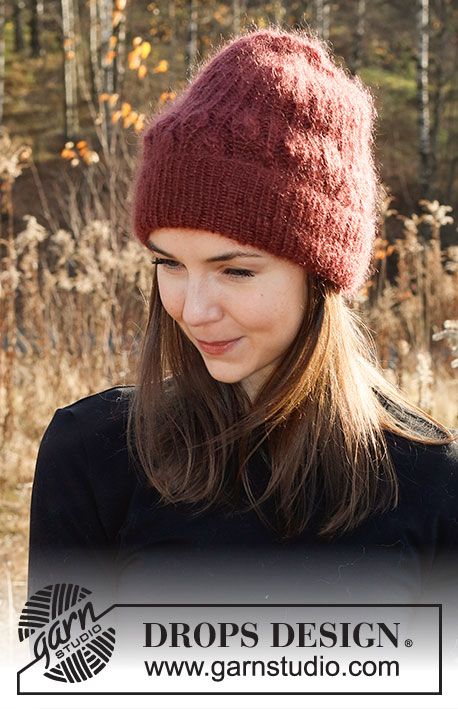
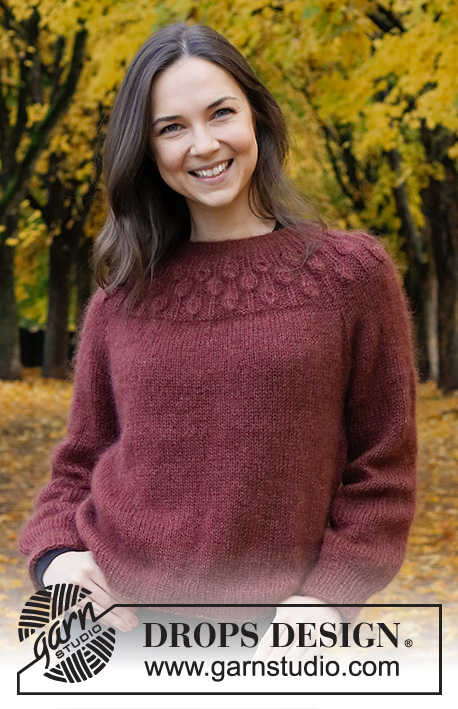
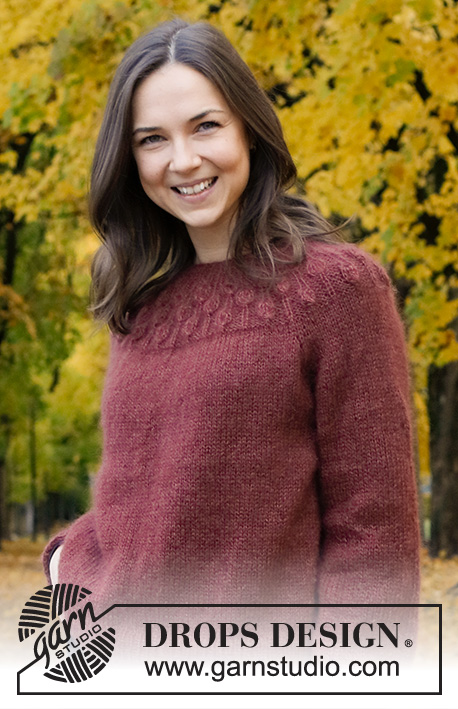
Knitted sweater in 2 strands DROPS Kid-Silk or 1 strand DROPS Brushed Alpaca Silk. Piece is knitted top down with round yoke, raglan and leaf pattern on yoke. Size: S - XXXL

DROPS 226-3
DROPS design: Pattern ks-188
Yarn group A + A or C
----------------------------------------------------------

SIZE:
S - M - L - XL - XXL – XXXL

Finished measurements:
Chest measurements: 92-98-108-118-132-142 cm = 92-98-108-118-132-142
Full length: 54-56-58-60-62-64 cm = 54-56-58-60-62-64
All measurements in charts are in cm.

MATERIALS:
DROPS KID-SILK from Garnstudio (belongs to yarn group A)
200-225-225-250-275-300 g color 36, bordeaux

Or use:
DROPS BRUSHED ALPACA SILK from Garnstudio (belongs to yarn group C)
175-200-200-225-225-275 g color 23, bordeaux

NEEDLES:
DROPS CIRCULAR NEEDLE SIZE 5 MM = US 8 : Length 40 cm, and 60-80 cm = 16", and 24"-32" for stockinette stitch.
DROPS CIRCULAR NEEDLE SIZE 4 MM = US 6 : Length 60-80 cm = 24"-32" for rib.
DROPS DOUBLE POINTED NEEDLES SIZE 5 MM = US 8
DROPS DOUBLE POINTED NEEDLES SIZE 4 MM = US 6
The technique MAGIC LOOP can be used – you then only need circular needle of 80 cm = 32" in each size.

KNITTING GAUGE:
17 stitches in width and 22 rows vertically in stockinette stitch and 2 strands DROPS Kid-Silk or 1 strand DROPS Brushed Alpaca Silk = 10 x 10 cm = 4" x 4".
NOTE! Remember that needle size is only a suggestion. If you have too many stitches on 10 cm = 4" switch to larger needles. If you have too few stitches on 10 cm = 4" switch to smaller needles.

-------------------------------------------------------

Alternative Yarn – See how to change yarns here
Yarn Groups A to F – Use the same pattern and change the yarn here
Yarn usage using an alternative yarn – Use our yarn converter here

-------------------------------------------------------

DROPS Kid-Silk
DROPS Kid-Silk
75% Mohair, 25% Silk
from 6.75 $ /25g
Get the yarn to make this pattern from 54.00$.

The yarn cost is calculated from the pattern’s smallest size and the yarn’s cheapest product type. Looking for an even better price? You might find it on the DROPS Deals!

Pattern instructions

NOTE: This pattern is written in American English. All measurements in charts are in cm. For conversion from inches to cm - click here. There are different terms for crocheting in American and British English. If this pattern includes crochet, click for "crochet terms" here. For this pattern in British English, please click here.
----------------------------------------------------------

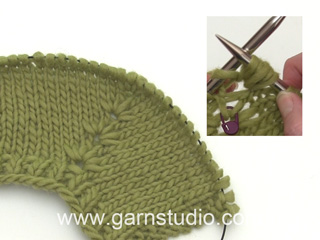
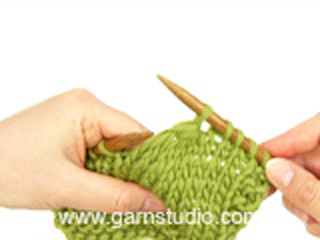
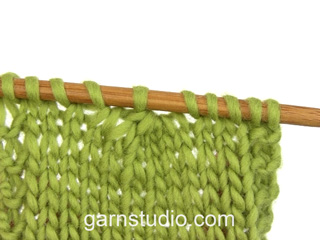
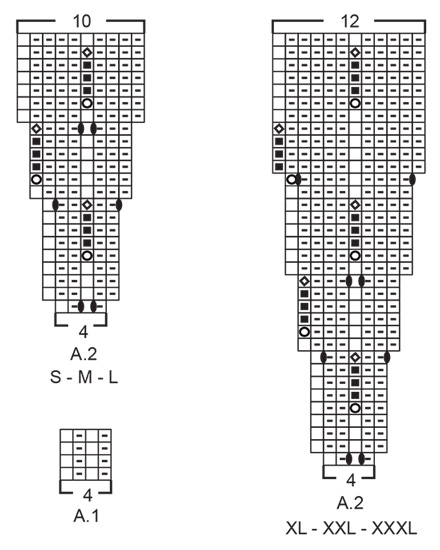
EXPLANATION FOR THE PATTERN:

----------------------------------------------------------

PATTERN:
See diagrams A.1 and A.2. Choose diagram for your size (applies to A.2).

INCREASE/DECREASE TIP (evenly):
To calculate how to increase/decrease evenly, use the total number of stitches on row (e.g. 190 stitches) and divide stitches by number of increases to be done (e.g. 6) = 31.7.
In this example increase by making 1 yarn over after alternately every 31st and 32nd stitch. On next round work yarn overs twisted to avoid holes.
If decreasing knit in this example every 30th and 31st stitch and every 31st and 32nd stitch together.

RAGLAN:
Increase 1 stitch in each side of the 4 stitches with marker - in every transition between front/back piece and sleeves (= 8 stitches increased on round). Increase 1 stitch by making 1 yarn over. On next round knit yarns over twisted to avoid holes. Then work the new stitches in stockinette stitch.

DECREASE TIP (applies to mid under sleeves):
Decrease 1 stitch on each side of marker thread as follows: Work until 3 stitches remain before marker thread, knit 2 together, knit 2 stitches (marker thread is between these 2 stitches), slip 1 stitch knitwise, knit 1, pass slipped stitch over stitch worked (= 2 stitches decreased).

BIND-OFF TIP:
To avoid a tight bind-off edge when binding off, you may use a larger needle. If this still is too tight, make 1 yarn over after approx. every 6th stitch while binding off (bind off yarn overs as stitches).

----------------------------------------------------------

START THE PIECE HERE:

----------------------------------------------------------

SWEATER - SHORT OVERVIEW OF THE PIECE:
Neck edge and yoke are worked in the round on circular needle, top down. Now divide yoke for body and sleeves. Work body in the round on needle, top down. Work sleeves in the round on double pointed needles/short circular needle, top down.

NECK EDGE:
Cast on 76-80-84-88-92-96 stitches on a short circular needle size 4 MM = US 6 with 2 strands DROPS Kid-Silk or 1 strand DROPS Brushed Alpaca Silk. Knit 1 round.
Then work A.1 in the round (= 19-20-21-22-23-24 repetitions of 4 stitches) for 4 cm = 1½".
Insert 1 marker middle on round (= mid front). Work yoke as explained below - measure yoke from this marker!

YOKE:
Switch to circular needle size 5 MM = US 8. Work A.2 in the round (= 19-20-21-22-23-24 repetitions of 4 stitches). Continue pattern like this and increase as shown in diagram.
When A.2 has been worked vertically, there are 190-200-210-264-276-288 stitches on row and piece measures approx. 10-10-10-15-15-15 cm = 4"-4"-4"-6"-6"-6" from marker by the neck.
Work 2 rounds in stockinette stitch and increase at the same time 6-0-2-0-4-0 stitches evenly on first round – read INCREASE/DECREASE TIP = 196-200-212-264-280-288 stitches.
Now insert 4 new markers in the piece as explained below. Use these markers when increasing for raglan, and insert markers in piece without working:
Count 30-31-33-40-44-46 stitches (= ½ back piece), insert 1 marker in next stitch, count 36-36-38-50-50-50 stitches (= sleeve), insert 1 marker in next stitch, count 60-62-66-80-88-92 stitches (= front piece), insert 1 marker in next stitch, count 36-36-38-50-50-50 stitches (= sleeve), insert 1 marker in next stitch. 30-31-33-40-44-46 stitches remain on round after last marker (= ½ back piece).
Work in stockinette stitch in the round.
AT THE SAME TIME on first round increase for RAGLAN – read explanation above (= 8 stitches increased). Increase for raglan every other round 0-2-3-0-2-3 times in total vertically and then every 4th round 5-5-5-5-4-5 times in total vertically.
After last increase there are 236-256-276-304-328-352 stitches on needle.
Work in stockinette stitch without increases until piece measures 20-22-24-25-27-29 cm = 8"-8¾"-9½"-9¾"-10⅝"-11⅜" from marker at the neck.
Now divide yoke for body and sleeves and work last round as follows: Work 35-38-41-45-50-54 stitches in stockinette stitch (= ½ back piece), slip the next 48-52-56-62-64-68 stitches on a stitch holder for sleeve, cast on 8-8-10-10-12-12 new stitches on row (= in the side under sleeve), work 70-76-82-90-100-108 stitches in stockinette stitch (= front piece), slip the next 48-52-56-62-64-68 stitches on a stitch holder for sleeve, cast on 8-8-10-10-12-12 new stitches on row (= in the side under sleeve) and work the remaining 35-38-41-45-50-54 stitches in stockinette stitch (= ½ back piece). Finish body and sleeves separately. NOW MEASURE PIECE FROM HERE!

BODY:
= 156-168-184-200-224-240 stitches. Insert 1 marker in the side of piece – in the middle of the 8-8-10-10-12-12 stitches that were cast on under sleeves. Work in stockinette stitch over the stitches on back piece until marker in the side - round now begins at the marker.
Work in stockinette stitch until piece measures 27 cm = 10⅝" from division in all sizes.
4 cm = 1½" remain until finished measurements. Try the sweater and work to desired length.
Now increase stitches to stop the rib from contracting.
Work 1 round in stockinette stitch while increasing 24-26-28-30-34-36 stitches evenly - remember INCREASE/DECREASE TIP = 180-194-212-230-258-276 stitches.
Switch to circular needle size 4 MM = US 6. Work rib in the round = knit 1/purl 1 for 4 cm = 1½". Bind off with knit over knit and purl over purl - read BIND-OFF TIP. Sweater measures approx. 54-56-58-60-62-64 cm = 21¼"-22"-22¾"-23⅝"-24⅜"-25¼" from shoulder and down.

SLEEVE:
Slip the 48-52-56-62-64-68 stitches from stitch holder in one side of piece back on a short circular needle or double pointed needles size 5 MM = US 8 – pick in addition up 1 stitch in each of the 8-8-10-10-12-12 stitches cast on under sleeve = 56-60-66-72-76-80 stitches.
Insert 1 marker thread mid under sleeve - i.e. In the middle of the 8-8-10-10-12-12 stitches that were cast on under sleeves. Move the marker thread upwards when working; it should be used for decrease mid under sleeve.
Begin round at the marker thread, and work stockinette stitch in the round.
When sleeve measures 3 cm = 1⅛" from division in all sizes, decrease 2 stitches mid under sleeve - read DECREASE TIP. Decrease like this every 3 cm = 1⅛" a total of 3-3-3-4-4-4 times vertically = 50-54-60-64-68-72 stitches.
Continue until sleeve measures 37-36-34-35-33-32 cm = 14½"-14¼"-13⅜"-13¾"-13"-12½" from division (shorter measurements in the larger sizes because of wider neck and longer yoke).
6 cm = 2⅜" remain until finished measurements. Try the sweater and work to desired length.
Knit 1 round while decreasing 12-14-18-20-22-24 stitches evenly - REMEMBER INCREASE/DECREASE TIP = 38-40-42-44-46-48 stitches.
Switch to double pointed needles size 4 MM = US 6. Work rib in the round = knit 1/purl 1 for 6 cm = 2⅜". Bind off with knit over knit and purl over purl - remember BIND-OFF TIP. Sleeve measures approx. 43-42-40-40-39-38 cm = 17"-16½"-15¾"-15¾"-15¼"-15" from division. Work the other sleeve the same way.

Diagram

All measurements in charts are in cm.

symbols = knit
symbols = purl
symbols = in stitch below this stitch knit 1, 1 yarn over, knit 1, 1 yarn over, knit 1 (= 4 stitches increased)
symbols = knit 5 stitches
symbols = knit 5 twisted together (= 4 stitches decreased)
symbols = between 2 stitches make 1 yarn over, on next round work yarn over twisted to avoid holes
diagram
diagram

Each of our patterns has specific tutorial videos to help you.

Do you have a question? See a list of frequently asked questions (FAQ)

Knitting tension is what determines the final measurements of your work, and is usually measured per 10 x 10 cm. It is provided like so: number of stitches in width x number of rows in height - eg: 19 stitches x 26 rows = 10 x 10 cm.

The knitting tension is very individual; some people knit/crochet loosely while others work tightly. You adjust the knitting tension with the needle size, which is why the suggested needle size only serve as a guide! You need to adjust this (up or down) to ensure that YOUR knitting tension matches the knitting tension provided in the pattern. If you work with a different knitting tension than provided you will have a different yarn consumption, and your work will have different measurements than what the pattern suggests.

The knitting tension also determines which yarns can replace each other. As long as you achieve the same knitting tension you can replace one yarn with another.

See DROPS lesson: How to measure your tension/gauge

See DROPS video: How to make a gauge tension swatch

The required amount of yarn is provided in grams, eg: 450 g. To calculate how many balls you’ll need you first need to know how many grams are in 1 ball (25g, 50g or 100g). This information is available if you click on the individual yarn quality on our pages. Divide the amount required with the amount of each ball. For example, if each ball is 50g (the most common amount), the calculation will be as follows: 450 / 50 = 9 balls.

The important thing when changing from one yarn to another is that the knitting/crochet tension remains the same. This is so that the measurements of the finished piece will be the same as on the sketch provided. It is easier to achieve the same knitting tension using yarns from the same yarn group. It is also possible to work with multiple strands of a thinner yarn to achieve the knitting tension of a thicker one. Please try our yarn converter. We recommend you to always work a test swatch.

Please NOTE: when changing yarn the garment might have a different look and feel to the garment in the photo, due to individual properties and qualities of each yarn.

See DROPS lesson: Can I use a different yarn than the one mentioned in the pattern?

All our yarns are categorised into yarn groups (from A to F) according to thickness and knitting tension – group A contains the thinnest yarns and group F the thickest. This makes it easier for you to find alternative yarns to our patterns, should you wish to switch yarn. All yarns within the same group have a similar knitting tension and can easily replace each other. However, different yarn qualities have different structures and properties which will give the finished work a unique look and feel.

Click here for an overview of the yarns in each yarn group

At the top of all our patterns you’ll find a link to our yarn converter, which is a helpful tool should you wish to use a different yarn than suggested. By filling in the yarn quality you wish to replace, the amount (in your size) and number of strands, the converter will present good alternative yarns with the same knitting tension. Additionally it will tell you how much you’ll require in the new qualities and whether you’ll need to work with multiple strands. Most skeins are 50g (some are 25g or 100g).

If the pattern is worked with multiple colours, every colour will have to be converted separately. Similarly, if the pattern is worked with several strands of different yarns (for example 1 strand Alpaca and 1 strand Kid-Silk) you will have to find alternatives for each, individually.

Click here to see our yarn converter

Since different yarns have different qualities and textures we have chosen to keep the original yarn in our patterns. However, you can easily find options among our available qualities by using our yarn converter, or simply pick a yarn from the same yarn group.

It is possible that some retailers still have discontinued yarns in stock, or that someone has a few skeins at home that they would like to find patterns for.

The yarn converter will provide both alternative yarn as well as required amount in the new quality.

If you think it's hard to decide what size to make, it can be a good idea to measure a garment you own already and like the size of. Then you can pick the size by comparing those measures with the ones available in the pattern's size chart.

You'll find the size chart at the bottom of the pattern.

See DROPS lesson: How to read size chart

The needle size provided in the pattern serves only as a guide, the important thing is to follow the knitting tension. And since knitting tension is very individual, you will have to adjust the needle size to ensure that YOUR tension is the same as in the pattern – maybe you’ll have to adjust 1, or even 2 needle sizes, up or down to achieve the correct tension. For this, we recommend that you work test swatches.

Should you work with a different knitting tension than the one provided, the measurements of the finished garment might deviate from the measurement sketch.

See DROPS lesson: How to measure your tension/gauge

See DROPS video: How to make a gauge tension swatch

Working a garment top-down provides more flexibility and room for personal adjustment. For example it is easier to try the garment on while working, as well as making adjustments to length of yoke and shoulder caps.

The instructions are carefully explaining every step, in the correct order. Diagrams are adjusted to the knitting direction and are worked as usual.

The diagram depicts all rows/rounds, and every stitch seen from the right side. It is read from bottom to top, from right to left. 1 square = 1 stitch.

When working back and forth, every other row is worked from the right side and every other row is worked from the wrong side. When working from the wrong side, the diagram will have to be worked reversed: from left to right, knit stitches are purled, purl stitches are knit etc.

When working in the round every round is worked from the right side and the diagram are worked from right to left on all rounds.

See DROPS lesson: How to read knitting diagrams

The diagram depicts all rows/rounds, and every stitch seen from the right side. It is worked from bottom to top, from right to left.

When working back and forth every other row is worked from the right side: from right to left and every other row is worked from the wrong side: from left to right.

When working in the round, every row in the diagram are worked from the right side, from right to left.

When working a circular diagram you start in the middle and work your way outwards, counter clockwise, row by row.

The rows usually start with a given number of chain stitches (equivalent to the height of the following stitch), this will either be depicted in the diagram or explained in the pattern.

See DROPS lesson: How to read crochet diagrams

Instructions for working several diagrams after each other on the same row/round, will often be written like so: “work A.1, A.2, A.3 a total of 0-0-2-3-4 times". This means you work A.1 once, then A.2 is worked once, and A.3 is repeated (in width) the number of times provided for your size – in this case like so: S = 0 times, M = 0 times, L=2 times, XL= 3 times and XXL = 4 times.

The diagrams are worked as usual: begin with the first row in A.1, then work the first row in A.2 etc.

See DROPS lesson: How to read knitting diagrams

See DROPS lesson: How to read crochet diagrams

The total width of the garment (from wrist-to-wrist) will be larger in the larger sizes, despite the actual sleeves being shorter. The larger sizes have longer sleeve caps and wider shoulders, so there will be a good fit in all sizes.

The measurement sketch/schematic drawing provides information regarding the full length of the garment. If it’s a jumper or a jacket the length is measured from the highest point on the shoulder (usually closest to the neckline), and straight down to the bottom of the garment. It is NOT measured from the tip of shoulder. Similarly, the length of yoke is measured from the highest point on the shoulder and down to where yoke is split into body and sleeves.

See DROPS lesson: How to read a schematic drawing

Diagrams are often repeated on the round or in height. 1 repeat is the diagram the way it appears in the pattern. If it says to work 5 repeats of A.1 in the round, then you work A.1 a total of 5 times after/next to each other in the round. If it says to work 2 repeats of A.1 vertically/in height you work the entire diagram once, then begin again at the start and work the entire diagram one more time.

Chain stitches are slightly narrower than other stitches and to avoid working the cast-on edge too tight, we simply chain more stitches to begin with. The stitch count will be adjusted on the following row to fit the pattern and measurement sketch.

The rib edge is more elastic and will contract slightly compared to, for example, stocking stitch. By increasing before the rib edge, you avoid a visible difference in width between the rib edge and the rest of the body.

It’s very easy to cast off too tightly, and by making yarn overs while casting off (and simultaneously casting these off) you avoid a too tight cast off edge.

See DROPS video: How to bind off with yarn overs (yo)

To achieve an even increase (or decrease) you can increase on, for example: every 3rd and 4th row alternately, like so: work 2 rows and increase on the 3rd row, work 3 rows and increase on the 4th. Repeat this until the increase is complete.

See DROPS lesson: Increase or decrease 1 st on every 3rd and 4th row alternately

Should you prefer to work in the round instead of back and forth, you may of course adjust the pattern. You’ll need to add steeks mid-front (usually 5 stitches), and follow the instructions. When you would normally turn and work from the wrong side, simply work across the steek and continue in the round. At the end you’ll cut the piece open, pick up stitches to work bands, and cover the cut edges.

See DROPS video: How to knit steeks and cut open

Should you prefer to work back and forth instead of in the round, you may of course adjust the pattern so you work the pieces separately and then assemble them at the end. Divide the stitches for the body in 2, add 1 edge stitch in each side (for sewing) and work the front and back pieces separately.

See DROPS lesson: Can I adapt a pattern for circular needles into straight needles?

Pattern repeats can vary slightly in the different sizes, in order to get the correct proportions. If you’re not working the exact same size as the garment in the photo, yours might deviate slightly. This has been carefully developed and adjusted so that the complete impression of the garment is the same in all sizes.

Make sure to follow instructions and diagrams for your size!

If you have found a pattern you like which is available in women’s size it’s not very difficult to convert it to men’s size. The biggest difference will be the length of sleeves and body. Start working on the women size that you think would fit across the chest. The additional length will be worked right before you cast off for the armhole/sleeve cap. If the pattern is worked top-down you can add the length right after the armhole or before the first decrease on sleeve.

Regarding additional yarn amount, this will depend on how much length you add, but it is better with a skein too many than too few.

All yarns will have excess fibres (from production) that might come off as lint or shedding. Brushed yarns (ie hairier yarns) have more of these loose, excess fibres, causing more shedding.

Shedding also depends on what is worn under or over the garment, and whether this pulls at the yarn fibres. It’s therefore not possible to guarantee that there will be no shedding

Below are some tips on how to get the best result when working with hairier yarns:

1. When the garment is finished (before you wash it) shake it vigorously so the looser hairs come off. NOTE: do NOT use a lint roller, brush or any method that pulls at the yarn.

2. Place the garment in a plastic bag and put it in your freezer - the temperature will cause the fibres to become less attached to each other, and excess fibres will come off easier.

3. Leave in the freezer for a few hours before taking it out and shaking it again.

4. Wash the garment according to the instructions on the yarn label.

Pilling is a natural process that happens to even the most exclusive of fibers. It's a natural sign of wear and tear that is hard to avoid, and that is most visible in high friction areas of your garment like a sweater's arms and cuffs.

You can make your garment look as new by removing the pilling, using a fabric comb or a pill/lint remover.

Still can't find the answer you need? Then scroll down and leave your question so one of our experts can try to help you. This will be done normally within 5 to 10 working days.
In the meantime, you can read the questions and answers that others have left to this pattern or join the DROPS Workshop on Facebook to get help from fellow knitters/crocheters!

You might also like...

Post a comment to pattern DROPS 226-3

We would love to hear what you have to say about this pattern!

If you want to leave a question, please make sure you select the correct category in the form below, to speed up the answering process. Required fields are marked *.

Comments / Questions (16)

country flag Maja E wrote:

Hello, this is a lovely sweater. Was the kid-silk used for the modeled sweater, or was it the brushed alpaca silk? Thank you.

19.11.2023 - 19:30

DROPS Design answered:

Dear Maja, Kid-Silk was used for the pattern in photos. Happy knitting!

20.11.2023 - 11:14

country flag Robi wrote:

Buonasera,e se volessi usare 1 filo Kid Silk e 1 Flora,come potrei fare?

07.04.2022 - 00:36

DROPS Design answered:

Buonasera Robi, deve dividere per 2 la quantità di filato di Kid-Silk e poi calcolare il metraggio che le serve per Flora. Buon lavoro!

07.04.2022 - 20:05

country flag Inmaculada wrote:

Sí en el canesú de la talla S aumenta hasta 196 puntos y luego colocamos 4 marcadores 30+36+69+36+30 = 192, sobran puntos

03.02.2022 - 19:06

DROPS Design answered:

Hola, marcapuntos estan insertados en los puntos, no entre los puntos. Saludos!

04.02.2022 - 14:26

country flag Lorena wrote:

"Dopo l’ultimo aumento ci sono 236-256-276-304-328-352 maglie sul ferro. Lavorare a maglia rasata senza aumenti, con 5 maglie per il bordo a maglia legaccio a ogni lato verso il centro davanti fino a quando il lavoro misura 20-22-24-25-27-29 cm dal segnapunti sul collo." Non ho capito questo passaggio e nelle immagini non si vedono le maglie legaccio. A quale lato si riferisce? verso il centro cosa significa? Grazie

30.01.2022 - 20:06

DROPS Design answered:

Buonasera Lorena, grazie per la segnalazione, abbiamo corretto il testo. Buon lavoro!

31.01.2022 - 23:36

country flag Myriam DEVAUCHELLE wrote:

Merci beaucoup de votre réponse, j'ai bien compris cette fois

19.11.2021 - 09:32

country flag Myriam DEVAUCHELLE wrote:

Je fais la taille L. pour les raglans, selon vos explications, je comprends que de chaque côté des marqueurs j'augmente au total de 8 mailles, (3 tous les 2 tours et 5 tous les 4 tours) soit 16 mailles 4 fois ( 16 par marqueur), puisque 4 marqueurs. mais faut il bouger les marqueurs de place à chaque fois qu'on augmente?

18.11.2021 - 11:39

DROPS Design answered:

Bonjour Mme Devauchelle, vous augmentez 8 mailles à chaque fois (2 pour chaque manche, pour le devant et le dos) - cf RAGLAN soit: 3 x tous les 2 tours + 5 x tous les 4 tours soit 3x8 m + 5 x 8 m = 212 m (après le motif) + 24 + 40=276 m. Faites bien suivre le marqueur à chaque fois pour que les augmentations soient toujours faites de chaque côté de la maille avec un marqueur. Bon tricot!

18.11.2021 - 17:13

country flag GILLIOT wrote:

Bonjour. pourriez vous me confirmer que pour le debut de l'empiecement je fais bien un tour de la premiere rangee ( je repete les 4 mailles)du diagramme A2 puis je continue le diagramme comme indique? merci de votre retour

16.11.2021 - 09:05

DROPS Design answered:

Bonjour Mme Gilliot, effectivement, pour l'empiècement, vous tricotez A.2 en répétant ces 4 mailles et en augmentant surtout comme indiqué dans le diagramme (au 1er rang, on augmente 2 mailles dans chaque A.2 = on aura 6 mailles dans chaque A.2 à la fin de ce 1er rang) - je ne suis juste pas sûre de bien comprendre votre formulation, en espérant avoir pu vous aider, sinon ,n'hésitez pas à reformuler, merci d'avance. Bon tricot!

16.11.2021 - 09:17

country flag Fina wrote:

Zie eerdere opmerking/vraag

19.10.2021 - 10:46

country flag Fina wrote:

Ik wil dit patroon, blackforest memories, graag breien met 1 draad alpaca en 1 draad kid silk in maat XL. Kunt u voor mij uitrekenen hoeveel wol ik van beide moet bestellen, ik kom er niet uit met de omrekentabel. Vrgr Fina

19.10.2021 - 10:44

DROPS Design answered:

Dag Fina,

In dat geval kun je DROPS Brushed Alpaca Silk invoeren bij 'te vervangen garen' in de garenvervanger. Bij de hoeveelheid geef je 225 gram op en 1 draad. De aangegeven hoeveelheden Kid-Silk en Flora kun je beide door de helft doen en vervolgens naar boven afronden. (Omdat Alpaca er niet bij staat in de resultaten heb ik Flora genomen omdat dit het meest in de buurt komt, dit vervang je dus één op één door Alpaca). Maak wel even een proeflapje en pas eventueel de naalddikte aan voor de juiste stekenverhouding.

19.10.2021 - 15:10

country flag Josephina wrote:

Kan ik dit patroon ook breien van 2 draden drops alpaca, of wordt het dan te dik of te zwaar. Of is 1 draad nepal of 1 draad air beter. Vrgr Josephina

25.09.2021 - 20:50

DROPS Design answered:

Dag Josephina,

Ja, dat kan prima. 2 draden DROPS alpaca komt overeen met een garendikte uit garengroep C. Maak wel eerst even een proeflapje en pas eventueel de naalddikte aan zodat de stekenverhouding klopt.

02.10.2021 - 12:50