DROPS Kid-Silk
DROPS Kid-Silk
75% Mohair, 25% Silk
from 6.75 $ /25g
Get the yarn to make this pattern from 81.00$.

The yarn cost is calculated from the pattern’s smallest size and the yarn’s cheapest product type. Looking for an even better price? You might find it on the DROPS Deals!

DROPS SS24

Woodland Sparkle

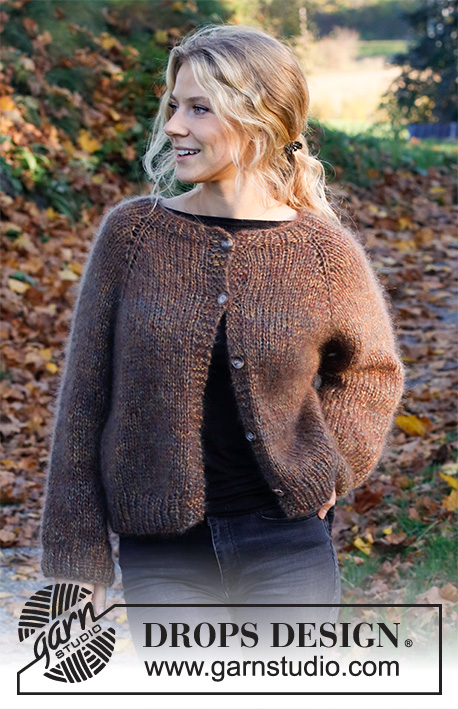
Knitted jacket in 4 strands DROPS Kid-Silk or 1 strand DROPS Wish. Piece is knitted top down with raglan. Size: S - XXXL

DROPS 226-1
DROPS design: Pattern ks-184
Yarn group E or A + A + A + A
----------------------------------------------------------

SIZE:
S - M - L - XL - XXL – XXXL

Finished measurements:
Chest measurements: 94-106-112-124-134-146 cm = 37"-41¾"-44"-48¾"-52¾"-57⅜"
Full length: 50-52-54-56-58-60 cm = 19¾"-20½"-21¼"-22"-22¾"-23⅝"
All measurements in charts are in cm.

MATERIALS:
DROPS KID-SILK from Garnstudio (belongs to yarn group A)
75-75-75-75-100-100 g color 30, curry
75-75-75-75-100-100 g color 35, chocolate
75-75-75-75-100-100 g color 36, bordeaux
75-75-75-75-100-100 g color 37, north sea

If garment is worked with only one colour:
225-250-275-300-325-350 g

Or use:
DROPS WISH from Garnstudio (belongs to yarn group E)
350-400-450-450-500-550 g colour 15, mauve


NEEDLES:
DROPS CIRCULAR NEEDLE SIZE 8 MM = US 11 : Length 40 and 80 cm = 16" and 32" for stockinette stitch.
DROPS CIRCULAR NEEDLE SIZE 7 MM = US 10.75: Length 80 cm = 32" for rib.
DROPS DOUBLE POINTED NEEDLES SIZE 8 MM = US 11
DROPS DOUBLE POINTED NEEDLES SIZE 7 MM = US 10.75
The technique MAGIC LOOP can be used – you then only need circular needle of 80 cm = 32" in each size.

DROPS BUTTON, MARBLE NO 630: 5-5-5-6-6-6 pieces

KNITTING GAUGE:
11 stitches in width and 15 rows vertically in stockinette stitch and 4 strands = 10 x 10 cm = 4" x 4".
Needle size is only a suggestion! If you have too many stitches on 10 cm = 4" switch to larger needles. If you have too few stitches on 10 cm = 4" switch to smaller needles.

-------------------------------------------------------

Alternative Yarn – See how to change yarns here
Yarn Groups A to F – Use the same pattern and change the yarn here
Yarn usage using an alternative yarn – Use our yarn converter here

-------------------------------------------------------

DROPS Kid-Silk
DROPS Kid-Silk
75% Mohair, 25% Silk
from 6.75 $ /25g
Get the yarn to make this pattern from 81.00$.

The yarn cost is calculated from the pattern’s smallest size and the yarn’s cheapest product type. Looking for an even better price? You might find it on the DROPS Deals!

Pattern instructions

NOTE: This pattern is written in American English. All measurements in charts are in cm. For conversion from inches to cm - click here. There are different terms for crocheting in American and British English. If this pattern includes crochet, click for "crochet terms" here. For this pattern in British English, please click here.
----------------------------------------------------------

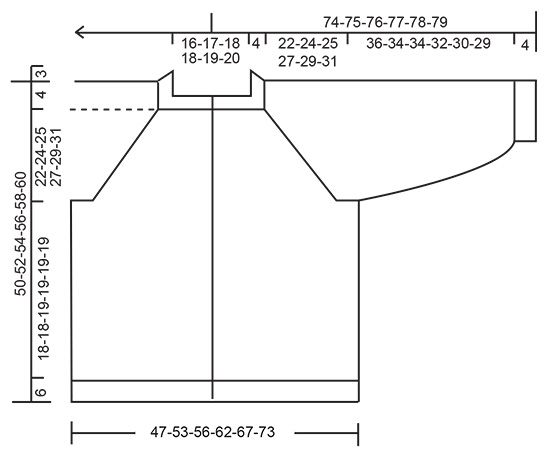
EXPLANATION FOR THE PATTERN:

----------------------------------------------------------

GARTER STITCH (back and forth):
Knit all rows.
1 ridge vertically = knit 2 rows.

BUTTONHOLES:
Decrease for buttonholes on right band (when garment is worn). 1 buttonhole = work from right side as before until 3 stitches remain on needle, make 1 yarn over, knit 2 together and finish by knitting 1. On next row (wrong side) knit the yarn over to make a hole.
Decrease first buttonhole right after rib in the neck, then decrease the next 4-4-4-5-5-5 buttonholes as explained above approx. 9 cm = 3½" apart.
RAGLAN:
Increase 1 stitch in each side of 1 stitch in stockinette stitch (raglan line) in every transition between body and sleeves (= 8 stitches increased on round). Increase 1 stitch by making 1 yarn over. On next row purl yarn overs twisted to avoid holes. Then work the new stitches in stockinette stitch.

INCREASE TIP (evenly):
To calculate how to increase evenly, use the total number of stitches on row (e.g. 69 stitches), minus bands (e.g. 8 stitches), and divide the remaining stitches by number of increases to be done (e.g. 7) = 8.7.
In this example increase by making 1 yarn over after approx. every 9th stitch. On next round work yarn overs twisted to avoid holes.

BIND-OFF TIP:
To avoid a tight bind-off edge when binding off, you may use a larger needle. If this still is too tight make 1 yarn over after approx. every 4th stitch while binding off (bind off yarn overs as stitches).

DECREASE TIP (applies to sleeves):
Decrease 1 stitch on each side of marker thread as follows: Work until 3 stitches remain before marker thread and knit 2 together, knit 2 (marker thread is between these stitches), slip 1 stitch knitwise, knit 1, pass slipped stitch over stitch worked.

----------------------------------------------------------

START THE PIECE HERE:

----------------------------------------------------------

JACKET - SHORT OVERVIEW OF THE PIECE:
Work neck edge, yoke and body back and forth on circular needle from mid front, work top down. Work sleeves in the round on double pointed needles/a short circular needle, top down.

NECK EDGE:
Cast on 59-61-63-63-69-71 stitches (including 4 band stitches in each side towards mid front) on circular needle size 7 MM = US 10.75 with a strand of each color in DROPS Kid-Silk (= 4 strands) or 1 strand DROPS wish. Purl 1 row from wrong side. Then work as follows from right side: 4 band stitches in GARTER STITCH - see explanation above - * knit 1, purl 1 *, work from *-* until 5 stitches remain, knit 1 and finish with 4 band stitches in garter stitch. Work rib like this for 4 cm = 1½". Purl 1 row from wrong side while increasing 1-3-5-5-7-5 stitches evenly – read INCREASE TIP = 60-64-68-68-76-76 stitches. Switch to circular needle size 8 MM = US 11. Then work yoke as explained below. NOW MEASURE THE PIECE FROM HERE!

YOKE:
Work first row as follows from right side: 4 band stitches in garter stitch, 7-8-9-9-11-11 stitches in stockinette stitch (= front piece), make 1 yarn over, work 1 stitch in stockinette stitch (= raglan line), make 1 yarn over, work 10 stitches in stockinette stitch (= sleeve), make 1 yarn over, work 1 stitch in stockinette stitch (= raglan line), make 1 yarn over, work 14-16-18-18-22-22 stitches in stockinette stitch (= back piece), make 1 yarn over, work 1 stitch in stockinette stitch (= raglan line), make 1 yarn over, work 10 stitches in stockinette stitch (= sleeve), make 1 yarn over, work 1 stitch in stockinette stitch (= raglan line), make 1 yarn over, work 7-8-9-9-11-11 stitches in stockinette stitch, and finish with 4 band stitches in garter stitch (= front piece). First increase for RAGLAN - read explanation above, is now done. Decrease for BUTTONHOLES - read explanation above! Continue in stockinette stitch with 4 band stitch in garter stitch in each side towards mid front, and continue increase for raglan in each transition between body and sleeves. Increase like this every other row (i.e. on every row from right side) until 14-16-17-19-19-21 increases have been done in total - REMEMBER KNITTING GAUGE! After last increase there are 172-192-204-220-228-244 stitches on needle. Work without increases until piece measures 22-24-25-27-29-31 cm = 8¾"-9½"-9¾"-10⅝"-11⅜"-12¼" from after neck edge.
Work next row as follows from right side:
Knit 27-30-32-35-37-40 (= front piece), slip the next 36-40-42-44-44-46 stitches on 1 stitch holder for sleeve, cast on 6-6-6-6-8-8 new stitches on row (= in the side under sleeve), knit 46-52-56-62-66-72 (= back piece), slip the next 36-40-42-44-44-46 stitches on 1 stitch holder for sleeve, cast on 6-6-6-6-8-8 new stitches on row (= in the side under sleeve) and knit the remaining 27-30-32-35-37-40 stitches as before (= front piece). NOW MEASURE THE PIECE FROM HERE!

BODY:
= 112-124-132-144-156-168 stitches. Continue with stockinette stitch and 4 band stitches in garter stitch in each side (work first row from wrong side). When piece measures 18-18-19-19-19-19 cm = 7"-7"-7½"-7½"-7½"-7½", work 1 row from right side while increasing 1 stitch = 113-125-133-145-157-169 stitches. Switch to circular needle size 7 MM = US 10.75. Work next row as follows from wrong side: 4 band stitches in garter stitch, * purl 1, knit 1 *, repeat from *-* until 5 stitches remain on needle, purl 1 and finish with 4 band stitches in garter stitch. Continue rib like this for 6 cm = 2⅜". Loosely bind off stitches with knit over knit and purl over purl - read BIND-OFF TIP. Jacket measures approx. 50-52-54-56-58-60 cm = 19¾"-20½"-21¼"-22"-22¾"-23⅝" from shoulder and down.

SLEEVE:
Slip the 36-40-42-44-44-46 stitches from stitch holder in one side of piece on double pointed needles or a short circular needle size 8 MM = US 11, pick in addition up 1 stitch in each of the 6-6-6-6-8-8 new stitches cast on under sleeve = 42-46-48-50-52-54 stitches. Insert 1 marker thread in the middle of the 6-6-6-6-8-8 stitches under sleeve and begin round here. Work in stockinette stitch in the round. When piece measures 2 cm = ¾", decrease 2 stitches mid under sleeve - read DECREASE TIP. Continue decreases every 12-6-6-4-4-4 cm = 4¾"-2⅜"-2⅜"-1½"-1½"-1½" 3-5-5-6-6-6 times in total = 36-36-38-38-40-42 stitches. Work until piece measures approx. 36-34-34-32-30-29 cm = 14¼"-13⅜"-13⅜"-12½"-11¾"-11⅜" from division (or desired length, approx. 4 cm = 1½" remain until finished measurements– NB:. Shorter measurements in the larger sizes because of wider neck and longer yoke). Switch to double pointed needles size 7 MM = US 10.75 and work rib in the round = knit 1/purl 1 for 4 cm = 1½". Loosely bind off stitches with knit over knit and purl over purl. Sleeve measures 40-38-38-36-34-33 cm = 15¾"-15"-15"-14¼"-13⅜"-13" in total. Work the other sleeve the same way.

ASSEMBLY:
Sew the buttons on to left band.

Diagram

All measurements in charts are in cm.

diagram measurements

Each of our patterns has specific tutorial videos to help you.

Do you have a question? See a list of frequently asked questions (FAQ)

Knitting tension is what determines the final measurements of your work, and is usually measured per 10 x 10 cm. It is provided like so: number of stitches in width x number of rows in height - eg: 19 stitches x 26 rows = 10 x 10 cm.

The knitting tension is very individual; some people knit/crochet loosely while others work tightly. You adjust the knitting tension with the needle size, which is why the suggested needle size only serve as a guide! You need to adjust this (up or down) to ensure that YOUR knitting tension matches the knitting tension provided in the pattern. If you work with a different knitting tension than provided you will have a different yarn consumption, and your work will have different measurements than what the pattern suggests.

The knitting tension also determines which yarns can replace each other. As long as you achieve the same knitting tension you can replace one yarn with another.

See DROPS lesson: How to measure your tension/gauge

See DROPS video: How to make a gauge tension swatch

The required amount of yarn is provided in grams, eg: 450 g. To calculate how many balls you’ll need you first need to know how many grams are in 1 ball (25g, 50g or 100g). This information is available if you click on the individual yarn quality on our pages. Divide the amount required with the amount of each ball. For example, if each ball is 50g (the most common amount), the calculation will be as follows: 450 / 50 = 9 balls.

The important thing when changing from one yarn to another is that the knitting/crochet tension remains the same. This is so that the measurements of the finished piece will be the same as on the sketch provided. It is easier to achieve the same knitting tension using yarns from the same yarn group. It is also possible to work with multiple strands of a thinner yarn to achieve the knitting tension of a thicker one. Please try our yarn converter. We recommend you to always work a test swatch.

Please NOTE: when changing yarn the garment might have a different look and feel to the garment in the photo, due to individual properties and qualities of each yarn.

See DROPS lesson: Can I use a different yarn than the one mentioned in the pattern?

All our yarns are categorised into yarn groups (from A to F) according to thickness and knitting tension – group A contains the thinnest yarns and group F the thickest. This makes it easier for you to find alternative yarns to our patterns, should you wish to switch yarn. All yarns within the same group have a similar knitting tension and can easily replace each other. However, different yarn qualities have different structures and properties which will give the finished work a unique look and feel.

Click here for an overview of the yarns in each yarn group

At the top of all our patterns you’ll find a link to our yarn converter, which is a helpful tool should you wish to use a different yarn than suggested. By filling in the yarn quality you wish to replace, the amount (in your size) and number of strands, the converter will present good alternative yarns with the same knitting tension. Additionally it will tell you how much you’ll require in the new qualities and whether you’ll need to work with multiple strands. Most skeins are 50g (some are 25g or 100g).

If the pattern is worked with multiple colours, every colour will have to be converted separately. Similarly, if the pattern is worked with several strands of different yarns (for example 1 strand Alpaca and 1 strand Kid-Silk) you will have to find alternatives for each, individually.

Click here to see our yarn converter

Since different yarns have different qualities and textures we have chosen to keep the original yarn in our patterns. However, you can easily find options among our available qualities by using our yarn converter, or simply pick a yarn from the same yarn group.

It is possible that some retailers still have discontinued yarns in stock, or that someone has a few skeins at home that they would like to find patterns for.

The yarn converter will provide both alternative yarn as well as required amount in the new quality.

If you think it's hard to decide what size to make, it can be a good idea to measure a garment you own already and like the size of. Then you can pick the size by comparing those measures with the ones available in the pattern's size chart.

You'll find the size chart at the bottom of the pattern.

See DROPS lesson: How to read size chart

The needle size provided in the pattern serves only as a guide, the important thing is to follow the knitting tension. And since knitting tension is very individual, you will have to adjust the needle size to ensure that YOUR tension is the same as in the pattern – maybe you’ll have to adjust 1, or even 2 needle sizes, up or down to achieve the correct tension. For this, we recommend that you work test swatches.

Should you work with a different knitting tension than the one provided, the measurements of the finished garment might deviate from the measurement sketch.

See DROPS lesson: How to measure your tension/gauge

See DROPS video: How to make a gauge tension swatch

Working a garment top-down provides more flexibility and room for personal adjustment. For example it is easier to try the garment on while working, as well as making adjustments to length of yoke and shoulder caps.

The instructions are carefully explaining every step, in the correct order. Diagrams are adjusted to the knitting direction and are worked as usual.

The diagram depicts all rows/rounds, and every stitch seen from the right side. It is read from bottom to top, from right to left. 1 square = 1 stitch.

When working back and forth, every other row is worked from the right side and every other row is worked from the wrong side. When working from the wrong side, the diagram will have to be worked reversed: from left to right, knit stitches are purled, purl stitches are knit etc.

When working in the round every round is worked from the right side and the diagram are worked from right to left on all rounds.

See DROPS lesson: How to read knitting diagrams

The diagram depicts all rows/rounds, and every stitch seen from the right side. It is worked from bottom to top, from right to left.

When working back and forth every other row is worked from the right side: from right to left and every other row is worked from the wrong side: from left to right.

When working in the round, every row in the diagram are worked from the right side, from right to left.

When working a circular diagram you start in the middle and work your way outwards, counter clockwise, row by row.

The rows usually start with a given number of chain stitches (equivalent to the height of the following stitch), this will either be depicted in the diagram or explained in the pattern.

See DROPS lesson: How to read crochet diagrams

Instructions for working several diagrams after each other on the same row/round, will often be written like so: “work A.1, A.2, A.3 a total of 0-0-2-3-4 times". This means you work A.1 once, then A.2 is worked once, and A.3 is repeated (in width) the number of times provided for your size – in this case like so: S = 0 times, M = 0 times, L=2 times, XL= 3 times and XXL = 4 times.

The diagrams are worked as usual: begin with the first row in A.1, then work the first row in A.2 etc.

See DROPS lesson: How to read knitting diagrams

See DROPS lesson: How to read crochet diagrams

The total width of the garment (from wrist-to-wrist) will be larger in the larger sizes, despite the actual sleeves being shorter. The larger sizes have longer sleeve caps and wider shoulders, so there will be a good fit in all sizes.

The measurement sketch/schematic drawing provides information regarding the full length of the garment. If it’s a jumper or a jacket the length is measured from the highest point on the shoulder (usually closest to the neckline), and straight down to the bottom of the garment. It is NOT measured from the tip of shoulder. Similarly, the length of yoke is measured from the highest point on the shoulder and down to where yoke is split into body and sleeves.

See DROPS lesson: How to read a schematic drawing

Diagrams are often repeated on the round or in height. 1 repeat is the diagram the way it appears in the pattern. If it says to work 5 repeats of A.1 in the round, then you work A.1 a total of 5 times after/next to each other in the round. If it says to work 2 repeats of A.1 vertically/in height you work the entire diagram once, then begin again at the start and work the entire diagram one more time.

Chain stitches are slightly narrower than other stitches and to avoid working the cast-on edge too tight, we simply chain more stitches to begin with. The stitch count will be adjusted on the following row to fit the pattern and measurement sketch.

The rib edge is more elastic and will contract slightly compared to, for example, stocking stitch. By increasing before the rib edge, you avoid a visible difference in width between the rib edge and the rest of the body.

It’s very easy to cast off too tightly, and by making yarn overs while casting off (and simultaneously casting these off) you avoid a too tight cast off edge.

See DROPS video: How to bind off with yarn overs (yo)

To achieve an even increase (or decrease) you can increase on, for example: every 3rd and 4th row alternately, like so: work 2 rows and increase on the 3rd row, work 3 rows and increase on the 4th. Repeat this until the increase is complete.

See DROPS lesson: Increase or decrease 1 st on every 3rd and 4th row alternately

Should you prefer to work in the round instead of back and forth, you may of course adjust the pattern. You’ll need to add steeks mid-front (usually 5 stitches), and follow the instructions. When you would normally turn and work from the wrong side, simply work across the steek and continue in the round. At the end you’ll cut the piece open, pick up stitches to work bands, and cover the cut edges.

See DROPS video: How to knit steeks and cut open

Should you prefer to work back and forth instead of in the round, you may of course adjust the pattern so you work the pieces separately and then assemble them at the end. Divide the stitches for the body in 2, add 1 edge stitch in each side (for sewing) and work the front and back pieces separately.

See DROPS lesson: Can I adapt a pattern for circular needles into straight needles?

Pattern repeats can vary slightly in the different sizes, in order to get the correct proportions. If you’re not working the exact same size as the garment in the photo, yours might deviate slightly. This has been carefully developed and adjusted so that the complete impression of the garment is the same in all sizes.

Make sure to follow instructions and diagrams for your size!

If you have found a pattern you like which is available in women’s size it’s not very difficult to convert it to men’s size. The biggest difference will be the length of sleeves and body. Start working on the women size that you think would fit across the chest. The additional length will be worked right before you cast off for the armhole/sleeve cap. If the pattern is worked top-down you can add the length right after the armhole or before the first decrease on sleeve.

Regarding additional yarn amount, this will depend on how much length you add, but it is better with a skein too many than too few.

All yarns will have excess fibres (from production) that might come off as lint or shedding. Brushed yarns (ie hairier yarns) have more of these loose, excess fibres, causing more shedding.

Shedding also depends on what is worn under or over the garment, and whether this pulls at the yarn fibres. It’s therefore not possible to guarantee that there will be no shedding

Below are some tips on how to get the best result when working with hairier yarns:

1. When the garment is finished (before you wash it) shake it vigorously so the looser hairs come off. NOTE: do NOT use a lint roller, brush or any method that pulls at the yarn.

2. Place the garment in a plastic bag and put it in your freezer - the temperature will cause the fibres to become less attached to each other, and excess fibres will come off easier.

3. Leave in the freezer for a few hours before taking it out and shaking it again.

4. Wash the garment according to the instructions on the yarn label.

Pilling is a natural process that happens to even the most exclusive of fibers. It's a natural sign of wear and tear that is hard to avoid, and that is most visible in high friction areas of your garment like a sweater's arms and cuffs.

You can make your garment look as new by removing the pilling, using a fabric comb or a pill/lint remover.

Still can't find the answer you need? Then scroll down and leave your question so one of our experts can try to help you. This will be done normally within 5 to 10 working days.
In the meantime, you can read the questions and answers that others have left to this pattern or join the DROPS Workshop on Facebook to get help from fellow knitters/crocheters!

You might also like...

Post a comment to pattern DROPS 226-1

We would love to hear what you have to say about this pattern!

If you want to leave a question, please make sure you select the correct category in the form below, to speed up the answering process. Required fields are marked *.

Comments / Questions (40)

country flag Å wrote:

Jag stickar uppifrån och ned för första gången och hoppas ni förstår den här frågan: när jag ska göra ökningen (omtag) för andra gången, ska dessa alltid komma på samma ställe i mönstret varv efter varv? Stickningen får ju fler maskor vartannat varv och sista övningen förskjuts då så att proportionerna blir förskjutna. Så jag undrar helt enkelt hur jag får rätt proportioner på det hela. MVH Å

03.01.2024 - 09:43

DROPS Design answered:

Hej, du skall alltid öka på varje sida om 1 raglanmaska (som slätstickas) :)

09.01.2024 - 14:38

country flag Marion wrote:

Bonjour, la couleur n°36 bordeaux n'existe pas/plus dans votre nuancier (ni chez Kalidou). Par quelle couleur la remplacer? La couleur n°33 pourrait-elle convenir? Je vous remercie pour votre aide. Marion

30.11.2023 - 14:32

DROPS Design answered:

Bonjour Marion, pour toute assistance au choix d'une couleur, merci de bien vouloir contacter votre magasin qui saura vous conseiller la couleur idéale, même par mail ou téléphone. Bon tricot!

30.11.2023 - 16:22

country flag Jolanta wrote:

Obszycie sciegiem francuskim jest znacznie krotsze niz strony swetra. Obszycie ma taka sama liczbe rzedow a scieg francuski wymaga wiecej rzedow niz jersejowy w uzyskaniu probki 10x10 cm. Jak dokonac korekty?

24.11.2023 - 06:46

DROPS Design answered:

Witaj Jolu, są 2 możliwości: 1 (gdy sweter już jest gotowy): zblokować sweter i naciągnąć odpowiednio podczas suszenia (ścieg francuski jest bardzo rozciągliwy). Jeśli nie chcesz prać całości, ułóż mokry ręcznik na obszyciu i lekko przeprasuj obszycie żelazkiem (temperatura na max. 2 kropki) 2 (podczas pracy nad swetrem): należy wykonywać rzędy skrócone co kilka rzędów (czyli przerabiać 2 dodatkowe rzędy tylko ponad oczkami obszycia przodu). Pozdrawiamy!

24.11.2023 - 14:39

country flag Sarah wrote:

I made the cardigan in size M with Drops Wish and am very happy with the result. The instructions are easy to follow and I like fit and fabric. However the suggested amount of yarn was not enough. With only 400 g of Wish the cardigan did not get enywhere close my hips and the arms were very short. That never happend before so I wonder if there is a mistake in the instruction?

27.10.2023 - 12:56

country flag Camille wrote:

I did the yarn over for the increase. On the next I am supposed to work the yarn over twisted. I don’t know what that means. Can you help? Or is there another way to make the raglan? Thank you

18.07.2023 - 03:51

DROPS Design answered:

Hi Camille, on the left side you have to work a yarn over from the back loop - the stitch becomes twisted and this way the hole becomes a bit smaller. Please see the video HERE (from 1 min 13 sec). Happy knitting!

18.07.2023 - 12:49

country flag Carolyn wrote:

I made this Woodland Sparkle with Drops Kids and love it. However after blocking it, the sleeves are slightly too long. Is there a way to shorten them? Would it help to mist them with water and reblock them shoing them smaller? Thank you.

01.07.2023 - 14:17

DROPS Design answered:

Dear Carolyn, you can just unravel the extra cm then work to the desired length before the ribbing edge and work the ribbing edge. Adjust to your own measurements. Happy knitting!

03.07.2023 - 10:05

country flag Christine wrote:

Je ne trouve pas de modèle raglan de bas en haut ??? avez vous un modèle merci cdlt

18.06.2023 - 12:55

DROPS Design answered:

Bonjour Christine, à l'aide de notre moteur de recherches, vous pouvez retrouver tous nos gilets et vestes tricotés de bas en haut avec raglan - ici - ajoutez ou supprimez des filtres si besoin. Bon tricot!

19.06.2023 - 08:53

country flag Stell wrote:

Hola soy Stell y estoy encantada de haber encontrado esta explicación tan bien explicada....ya leí primero el procedimiento. Tengo el material y voy a comenzar. Cualquier duda las voy a molestar. Hasta prontito.....

23.04.2023 - 15:44

country flag Lorraine wrote:

I am starting this pattern and I wanted to reach out with a correction. One of the knitting needles is listed as a US 10.75. We do not have this size but we do have a US 10.50. Happy Knitting to All!

22.04.2023 - 21:09

country flag Mascha wrote:

Kann man andere Knöpfe verwenden? Ich möchte die Jacke in Blautönen arbeiten und würde gern dazu Perlmutt-Knöpfe (612) verwenden. Diese gibt es aber nicht mit 25 mm, sondern maximal mit 20 mm Durchmesser - ist das ein Problem?

21.04.2023 - 22:41

DROPS Design answered:

Liebe Mascha, es kann wahrscheinlich schön passen - im Zweifelsfälle kann Ihnen Ihr DROPS Händler noch mehr individuelle Hilfe bitten. Viel Spaß beim stricken!

24.04.2023 - 09:35