DROPS Kid-Silk
DROPS Kid-Silk
75% Mohair, 25% Silk
from 4.60 £ /25g
Get the yarn to make this pattern from 36.80£.

The yarn cost is calculated from the pattern’s smallest size and the yarn’s cheapest product type. Looking for an even better price? You might find it on the DROPS Deals!

DROPS SS24

Hyde Park

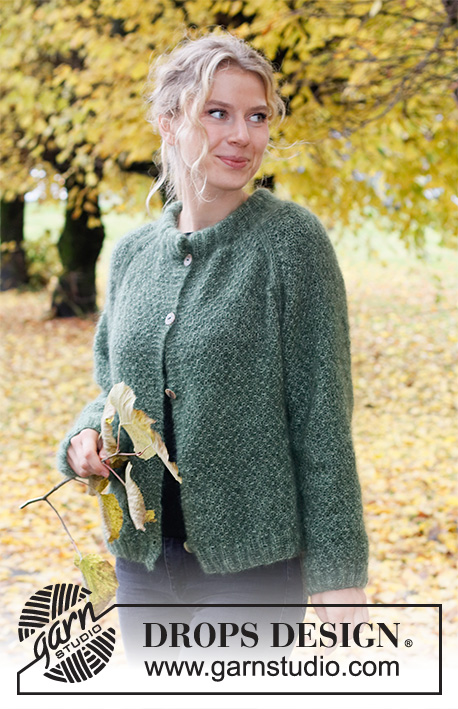
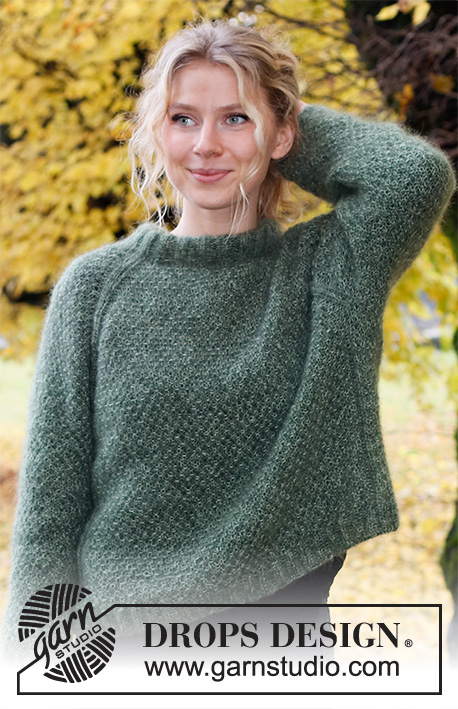
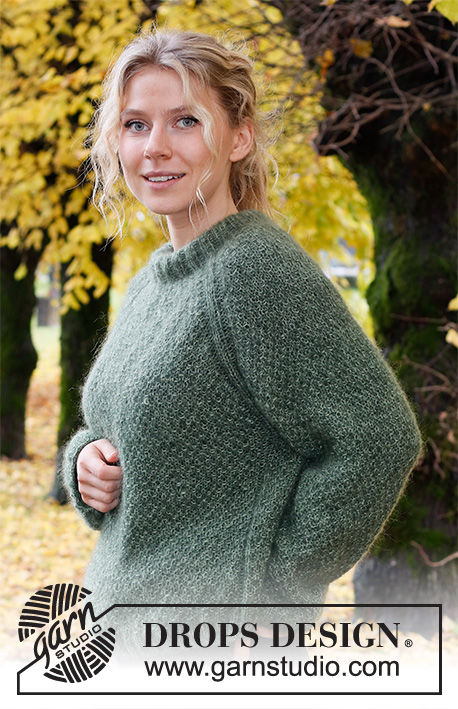
Knitted jumper in 2 strands DROPS Kid-Silk. Piece is knitted top down with raglan, moss stitch and double neck edge. Size XS – XXL.

DROPS 226-9
DROPS design: Pattern ks-183
Yarn group A + A or C
----------------------------------------------------------

SIZE:
XS - S - M - L - XL - XXL

MATERIALS:
DROPS KID-SILK from Garnstudio (belongs to yarn group A)
100-100-125-125-150-150 g colour 19, dark green
100-100-125-125-150-150 g colour 34, sage green

NEEDLES:
DROPS CIRCULAR NEEDLE SIZE 5 mm : Length 40 cm and 60-60-60-80-80-80 cm.
DROPS CIRCULAR NEEDLE SIZE 4 mm : Length 40 cm and 60-60-60-80-80-80 cm for rib.
DROPS DOUBLE POINTED NEEDLES SIZE 5 mm
DROPS DOUBLE POINTED NEEDLES SIZE 4 mm
The technique MAGIC LOOP can be used – you then only need circular needle of 80 cm in each size.

KNITTING TENSION:
17 stitches in width and 26 rows vertically with double moss stitch vertically and 2 strands = 10 x 10 cm.
NOTE! Remember that needle size is only a suggestion. If you have too many stitches on 10 cm switch to larger needles. If you have too few stitches on 10 cm switch to smaller needles.

-------------------------------------------------------

Alternative Yarn – See how to change yarns here
Yarn Groups A to F – Use the same pattern and change the yarn here
Yarn usage using an alternative yarn – Use our yarn converter here

-------------------------------------------------------

DROPS Kid-Silk
DROPS Kid-Silk
75% Mohair, 25% Silk
from 4.60 £ /25g
Get the yarn to make this pattern from 36.80£.

The yarn cost is calculated from the pattern’s smallest size and the yarn’s cheapest product type. Looking for an even better price? You might find it on the DROPS Deals!

Pattern instructions

NOTE: This pattern is written in British English. All measurements in charts are in cm. For conversion from cm to inches - click here. There are different terms for crocheting in British and American English. If this pattern includes crochet, click for "crochet terms" here. For this pattern in American English, please click here.
----------------------------------------------------------

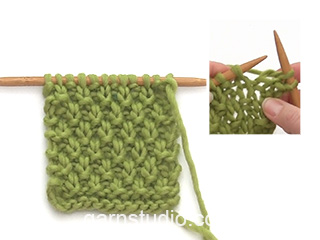
EXPLANATION FOR THE PATTERN:

----------------------------------------------------------

PATTERN:
See diagrams A.1 and A.2.

INCREASE TIP (evenly):
To calculate how to increase evenly, count the number of stitches to be increased (e.g. 10 stitches), and divide number by stitches of increases to be done (e.g. 3) = 3.3.
In this example increase by making 1 yarn over after approx. every 3rd stitch. On next round work yarn overs twisted to avoid holes.

RAGLAN:
Increase 1 stitch on each side of A.2 in every transition between front/back piece and sleeves (= 8 stitches increased on round). Increase 1 stitch by making 1 yarn over. On next round work yarn overs twisted to avoid holes. Then work the new stitches in A.1 (double moss stitch vertically).

DECREASE TIP (applies to mid under sleeves):
Decrease 1 stitch on each side of stitch with marker as follows: Work until 3 stitches remain before stitch with marker, knit 2 together, knit 3 (stitch with marker is in the middle of these 3 stitches), slip 1 stitch knitwise, knit 1, pass slipped stitch over stitch worked.

CAST-OFF TIP:
To avoid a tight cast-off edge when casting off, you may use a larger needle. If this still is too tight make 1 yarn over after approx. every 4th stitch while casting off (cast off yarn overs as stitches).

----------------------------------------------------------

START THE PIECE HERE:

----------------------------------------------------------

JUMPER - SHORT OVERVIEW OF THE PIECE:
Work neck edge and yoke in the round on circular needle from mid back, top down. Now divide yoke for body and sleeves. Work body in the round on needle, top down. Work sleeves in the round on double pointed needles/short circular needle, top down.

DOUBLE NECK EDGE:
Cast on 72-80-80-88-88-96 stitches on circular needle size 5 mm with 1 strand of each colour in DROPS Kid-Silk (= 2 strands).
Knit 1 round. Switch to circular needle size 4 mm. Then work rib (= knit 2/purl 2) in the round for 8 cm. The neck edge is later folded double and assembled so that the neck edge is approx. 4 cm.
When rib is done, work next round as follows:
Knit the first 10-14-14-18-18-22 stitches and increase at the same time 3-5-5-5-5-7 stitches evenly – read INCREASE TIP (= 13-19-19-23-23-29 stitches), work A.2 over the next 6 stitches, knit over the next 6 stitches and increase 1 stitch evenly (= 7 stitches), work A.2 over the next 6 stitches, knit over the next 18-22-22-26-26-30 stitches and increase at the same time 5-7-7-7-9-11 stitches evenly (= 23-29-29-33-35-41 stitches), work A.2 over the next 6 stitches, knit over the next 6 stitches and increase 1 stitch (= 7 stitches), work A.2 over the next 6 stitches, knit over the last 8-8-8-8-8-8 stitches and increase at the same time 2-2-2-2-4-4 stitches (= 10-10-10-10-12-12 stitches) = 84-96-96-104-108-120 stitches.
Insert 1 marker at beginning of round, measure yoke from this marker.

YOKE:
Switch to circular needle size 5 mm.
Now work pattern as follows: Work A.1 over the first 13-19-19-23-23-29 stitches (back piece), A.2, A.1 over the next 7 stitches (= sleeve), A.2, A.1 over the next 23-29-29-33-35-41 stitches (= front piece), A.2 over the next 6 stitches, A.1 over the next 7 stitches (= sleeve), A.2 over the next 6 stitches, A.1 over the last 10-10-10-10-12-12 stitches (= back piece).
Continue in the round like this. At the same time on next round begin increase for RAGLAN – read explanation above. Increase like this every other round a total of 18-20-23-24-25-27 times = 228-256-280-296-308-336 stitches
Increase on sleeves is now done. Continue to increase for raglan on front pieces and back piece 2-1-1-1-2-3 more times (= 18-20-23-24-25-27 stitches increased in each side of sleeves and 20-21-24-25-27-30 stitches increased in each side of front piece and back piece) = 236-260-284-300-316-348 stitches.
Continue with A.1 and A.2 until piece measures 20-20-22-24-26-28 cm from marker after the neck edge.
Now divide piece for body and sleeves. Work next round as follows:
Work the first 36-43-46-51-53-62 stitches (= ½ back piece), slip the next 49-53-59-61-63-67 stitches on a stitch holder for sleeve, cast on 9-9-9-11-11-11 new stitches on needle (= in the side under sleeve), work the next 69-77-83-89-95-107 stitches (= front piece), slip the next 49-53-59-61-63-67 stitches on a stitch holder for sleeve, cast on 9-9-9-11-11-11 new stitches on needle (= in the side under sleeve), work the last 33-34-37-38-42-45 stitches (= back piece).
Now finish body and sleeves separately. NOW MEASURE PIECE FROM HERE!

BODY:
= 156-172-184-200-212-236 stitches.
Continue in the round with knit over knit and purl over purl over stitches from A.2, and work A.1 over the remaining stitches on round (including the new stitches cast on in the sides under the sleeves).
When piece measures 24-26-26-26-26-26 cm from division, work A.1 as before until the 2 purl stitches (= A.2).
Then work as follows: * Purl 2, knit 1 (= A.2), knit over the next 9-9-9-11-11-11 stitches and increase at the same time 3-3-3-5-5-5 stitches evenly (= 12-12-12-16-16-16 stitches), knit 1, purl 2 (= A.2), knit the next 63-71-77-83-89-101 stitches and increase at the same time 11-11-13-15-17-17 stitches evenly (= 74-82-90-98-106-118 stitches) *, work from *-* 1 more time on round = 184-200-216-240-254-280 stitches.
Switch to circular needle size 4 mm. Work rib (= purl 2/knit 2) in the round.
When rib measures 4 cm, cast off with knit over knit and purl over purl - read CAST-OFF TIP.
Jumper measures approx. 52-54-56-58-60-62 cm from shoulder and down.

SLEEVES:
Slip the 49-53-59-61-63-67 stitches from stitch holder in one side on a short circular needle/double pointed needles size 5 mm and pick in addition up 1 stitch in each of the 9-9-9-11-11-11 new stitches cast on in the side under sleeve = 58-62-68-72-74-78 stitches. Insert a marker in the middle new stitch cast on under sleeve. Move markers upwards when working. Use marker later when decreasing under sleeve.
Continue in the round with A.1 – adjust to continue pattern over stitches on sleeve.
When sleeve measures 4 cm from division, decrease 1 stitch on each side of marker under sleeve - read DECREASE TIP. Decrease like this approx. every 4-4-2-2-2-2 cm 5-6-8-9-9-10 times in total = 48-50-52-54-56-58 stitches. Continue until sleeve measures 38-37-36-34-33-31 cm from division (shorter measurements in the larger sizes because of wider neck and longer yoke).
Knit 1 round while increasing 8-6-8-10-8-10 stitches evenly = 56-56-60-64-64-68 stitches. Switch to double pointed needles size 4 mm. Work rib (knit 2/purl 2) in the round for 4 cm.
Cast off stitches with knit over knit and purl over purl.
Work the other sleeve the same way.

ASSEMBLY:
Fold rib at the top of neck down on inside of garment. Fasten rib to get a double neck edge. To avoid a tight neck edge that sticks out it is important to keep the seam elastic.

Diagram

symbols = knit
symbols = purl
diagram

Each of our patterns has specific tutorial videos to help you.

Do you have a question? See a list of frequently asked questions (FAQ)

Knitting tension is what determines the final measurements of your work, and is usually measured per 10 x 10 cm. It is provided like so: number of stitches in width x number of rows in height - eg: 19 stitches x 26 rows = 10 x 10 cm.

The knitting tension is very individual; some people knit/crochet loosely while others work tightly. You adjust the knitting tension with the needle size, which is why the suggested needle size is only meant as a guide! You need to adjust this (up or down) to ensure that YOUR knitting tension matches the knitting tension provided in the pattern. If you work with a different knitting tension than provided you will have a different yarn consumption, and your work will have different measurements than what the pattern suggests.

The knitting tension also determines which yarns can replace each other. As long as you achieve the same knitting tension you can replace one yarn with another.

See DROPS lesson: How to measure your tension/gauge

See DROPS video: How to make a gauge tension swatch

The required amount of yarn is provided in grams, eg: 450 g. To calculate how many balls you’ll need you first need to know how many grams are in 1 ball (25g, 50g or 100g). This information is available if you click on the individual yarn quality on our pages. Divide the amount required with the amount of each ball. For example, if each ball is 50g (the most common amount), the calculation will be as follows: 450 / 50 = 9 balls.

The important thing when changing from one yarn to another is that the knitting/crochet tension remains the same. This is so that the measurements of the finished piece will be the same as on the sketch provided. It is easier to achieve the same knitting tension using yarns from the same yarn group. It is also possible to work with multiple strands of a thinner yarn to achieve the knitting tension of a thicker one. Please try our yarn converter. We recommend you to always work a test swatch.

Please NOTE: when changing yarn the garment might have a different look and feel to the garment in the photo, due to individual properties and qualities of each yarn.

See DROPS lesson: Can I use a different yarn than the one mentioned in the pattern?

All our yarns are categorised into yarn groups (from A to F) according to thickness and knitting tension – group A contains the thinnest yarns and group F the thickest. This makes it easier for you to find alternative yarns to our patterns, should you wish to switch yarn. All yarns within the same group have a similar knitting tension and can easily replace each other. However, different yarn qualities have different structures and properties which will give the finished work a unique look and feel.

Click here for an overview of the yarns in each yarn group

At the top of all our patterns you’ll find a link to our yarn calculator, which is a helpful tool should you wish to use a different yarn than suggested. By filling in the yarn quality you wish to replace, the amount (in your size) and number of strands, the calculator will present good alternative yarns with the same knitting tension. Additionally it will tell you how much you’ll require in the new qualities and whether you’ll need to work with multiple strands. Most skeins are 50g (some are 25g or 100g).

If the pattern is worked with multiple colours, every colour will have to be calculated separately. Similarly, if the pattern is worked with several strands of different yarns (for example 1 strand Alpaca and 1 strand Kid-Silk) you will have to find alternatives for each, individually.

Click here to see our yarn calculator

Since different yarns have different qualities and textures we have chosen to keep the original yarn in our patterns. However, you can easily find options among our available qualities by using our yarn calculator, or simply pick a yarn from the same yarn group.

It is possible that some retailers still have discontinued yarns in stock, or that someone has a few skeins at home that they would like to find patterns for.

The yarn calculator will provide both alternative yarn as well as required amount in the new quality.

If you think it's hard to decide what size to make, it can be a good idea to measure a garment you own already and like the size of. Then you can pick the size by comparing those measures with the ones available in the pattern's size chart.

You'll find the size chart at the bottom of the pattern.

See DROPS lesson: How to read size chart

The needle size provided in the pattern serves only as a guide, the important thing is to follow the knitting tension. And since knitting tension is very individual, you will have to adjust the needle size to ensure that YOUR tension is the same as in the pattern – maybe you’ll have to adjust 1, or even 2 needle sizes, up or down to achieve the correct tension. For this, we recommend that you work test swatches.

Should you work with a different knitting tension than the one provided, the measurements of the finished garment might deviate from the measurement sketch.

See DROPS lesson: How to measure your tension/gauge

See DROPS video: How to make a tension/gauge swatch

Working a garment top-down provides more flexibility and room for personal adjustment. For example it is easier to try the garment on while working, as well as making adjustments to length of yoke and shoulder caps.

The instructions are carefully explaining every step, in the correct order. Diagrams are adjusted to the knitting direction and are worked as usual.

The diagram depicts all rows/rounds, and every stitch seen from the right side. It is read from bottom to top, from right to left. 1 square = 1 stitch.

When working back and forth, every other row is worked from the right side and every other row is worked from the wrong side. When working from the wrong side, the diagram will have to be worked reversed: from left to right, knit stitches are purled, purl stitches are knit etc.

When working in the round every round is worked from the right side and the diagram are worked from right to left on all rounds.

See DROPS lesson: How to read knitting diagrams

The diagram depicts all rows/rounds, and every stitch seen from the right side. It is worked from bottom to top, from right to left.

When working back and forth every other row is worked from the right side: from right to left and every other row is worked from the wrong side: from left to right.

When working in the round, every row in the diagram are worked from the right side, from right to left.

When working a circular diagram you start in the middle and work your way outwards, counter clockwise, row by row.

The rows usually start with a given number of chain stitches (equivalent to the height of the following stitch), this will either be depicted in the diagram or explained in the pattern.

See DROPS lesson: How to read crochet diagrams

Instructions for working several diagrams after each other on the same row/round, will often be written like so: “work A.1, A.2, A.3 a total of 0-0-2-3-4 times". This means you work A.1 once, then A.2 is worked once, and A.3 is repeated (in width) the number of times provided for your size – in this case like so: S = 0 times, M = 0 times, L=2 times, XL= 3 times and XXL = 4 times.

The diagrams are worked as usual: begin with the first row in A.1, then work the first row in A.2 etc.

See DROPS lesson: How to read knitting diagrams

See DROPS lesson: How to read crochet diagrams

The total width of the garment (from wrist-to-wrist) will be larger in the larger sizes, despite the actual sleeves being shorter. The larger sizes have longer sleeve caps and wider shoulders, so there will be a good fit in all sizes.

The measurement sketch/schematic drawing provides information regarding the full length of the garment. If it’s a jumper or a jacket the length is measured from the highest point on the shoulder closest to the neckline, and straight down to the bottom of the garment. It is NOT measured from the tip of shoulder. Similarly, the length of yoke is measured from the highest point on the shoulder and down to where yoke is split into body and sleeves.

On a jacket measures are never taken along bands, unless specifically stated. Always measure inside band stitches when measuring the length.

See DROPS lesson: How to read a schematic drawing

Diagrams are often repeated on the round or in height. 1 repeat is the diagram the way it appears in the pattern. If it says to work 5 repeats of A.1 in the round, then you work A.1 a total of 5 times after/next to each other in the round. If it says to work 2 repeats of A.1 vertically/in height you work the entire diagram once, then begin again at the start and work the entire diagram one more time.

Chain stitches are slightly narrower than other stitches and to avoid working the cast-on edge too tight, we simply chain more stitches to begin with. The stitch count will be adjusted on the following row to fit the pattern and measurement sketch.

The rib edge is more elastic and will contract slightly compared to, for example, stocking stitch. By increasing before the rib edge, you avoid a visible difference in width between the rib edge and the rest of the body.

It’s very easy to cast off too tightly, and by making yarn overs while casting off (and simultaneously casting these off) you avoid a too tight cast off edge.

See DROPS video: How to bind off with yarn overs (yo)

To achieve an even increase (or decrease) you can increase on, for example: every 3rd and 4th row alternately, like so: work 2 rows and increase on the 3rd row, work 3 rows and increase on the 4th. Repeat this until the increase is complete.

See DROPS lesson: Increase or decrease 1 st on every 3rd and 4th row alternately

Should you prefer to work in the round instead of back and forth, you may of course adjust the pattern. You’ll need to add steeks mid-front (usually 5 stitches), and follow the instructions. When you would normally turn and work from the wrong side, simply work across the steek and continue in the round. At the end you’ll cut the piece open, pick up stitches to work bands, and cover the cut edges.

See DROPS video: How to knit steeks and cut open

Should you prefer to work back and forth instead of in the round, you may of course adjust the pattern so you work the pieces separately and then assemble them at the end. Divide the stitches for the body in 2, add 1 edge stitch in each side (for sewing) and work the front and back pieces separately.

See DROPS lesson: Can I adapt a pattern for circular needles into straight needles?

Pattern repeats can vary slightly in the different sizes, in order to get the correct proportions. If you’re not working the exact same size as the garment in the photo, yours might deviate slightly. This has been carefully developed and adjusted so that the complete impression of the garment is the same in all sizes.

Make sure to follow instructions and diagrams for your size!

If you have found a pattern you like which is available in women’s size it’s not very difficult to convert it to men’s size. The biggest difference will be the length of sleeves and body. Start working on the women size that you think would fit across the chest. The additional length will be worked right before you cast off for the armhole/sleeve cap. If the pattern is worked top-down you can add the length right after the armhole or before the first decrease on sleeve.

Regarding additional yarn amount, this will depend on how much length you add, but it is better with a skein too many than too few.

All yarns will have excess fibres (from production) that might come off as lint or shedding. Brushed yarns (ie hairier yarns) have more of these loose, excess fibres, causing more shedding.

Shedding also depends on what is worn under or over the garment, and whether this pulls at the yarn fibres. It’s therefore not possible to guarantee that there will be no shedding

Below are some tips on how to get the best result when working with hairier yarns:

1. When the garment is finished (before you wash it) shake it vigorously so the looser hairs come off. NOTE: do NOT use a lint roller, brush or any method that pulls at the yarn.

2. Place the garment in a plastic bag and put it in your freezer - the temperature will cause the fibres to become less attached to each other, and excess fibres will come off easier.

3. Leave in the freezer for a few hours before taking it out and shaking it again.

4. Wash the garment according to the instructions on the yarn label.

Pilling is a natural process that happens to even the most exclusive of fibers. It's a natural sign of wear and tear that is hard to avoid, and that is most visible in high friction areas of your garment like a sweater's arms and cuffs.

You can make your garment look as new by removing the pilling, using a fabric comb or a pill/lint remover.

Still can't find the answer you need? Then scroll down and leave your question so one of our experts can try to help you. This will be done normally within 5 to 10 working days.
In the meantime, you can read the questions and answers that others have left to this pattern or join the DROPS Workshop on Facebook to get help from fellow knitters/crocheters!

You might also like...

Hyde Park

@sisters.in.yarn

Hyde Park

Martine, Canada

Post a comment to pattern DROPS 226-9

We would love to hear what you have to say about this pattern!

If you want to leave a question, please make sure you select the correct category in the form below, to speed up the answering process. Required fields are marked *.

Comments / Questions (35)

country flag Elena wrote:

Buon giorno per la taglia M a fine collo ho 96 m; poi voi dite cambio ferro e "Ora lavorare il motivo come segue: lavorare A.1 19 maglie (= dietro), A.2, A.1 sulle 7 maglie succ (= manica), A.2, A.1 sulle 29 maglie successive (= davanti), A.2 sulle 6 maglie successive, A.1 sulle 7 maglie successive (= manica), A.2 sulle 6 maglie successive, A.1 sulle ultime 10 maglie (= dietro). totale fanno 84m, ne mancano 19 !quali sono le maglie per aumento raglan manica ? grazie

16.04.2024 - 15:59

country flag Suzanne Dawson wrote:

Sorry I didn't specify exactly what stage I was at. I became confused at the digitised for the body and sleeves. I am knitting the second size . I have divided incorrectly and need to undo back to the division point. Could you confirm where each 6 stitches of the raglan go. Ie back, sleeve front Thank you

28.09.2023 - 20:43

DROPS Design answered:

Dear Suzanne, to divide for the body and sleeves start counting from the beginning of the round, which is around the mid-back. Work the first 43 stitches for half the back. The next 53 stitches are put in the auxiliary needle for the sleeve, cast on 9 sts under the sleeve, work 77 stitches for the front piece, slip the next 53 stitches for the other sleeve, cast on 9 sts under the sleeve and work the last 34 stitches for the back. It doesn't matter anymore which raglan stitches are where, what's important is that the number of stitches in each section is correct and that these are correctly counted from the beginning of the round. Happy knitting!

30.09.2023 - 23:46

country flag Suzanne wrote:

Can I confirm that at the split the back is th A2 stitches plus 6 A1. Sleeve is A2 stitches plus 6 A1. Front A2 stitches plus 6 A1 ans second sleeve A2 plus 6 A1 or have I got it wrong

24.09.2023 - 22:02

DROPS Design answered:

Dear Suzanne, could you indicate which size you are working so that we may better address your question? Also, which part are you working, are you starting the yoke or dividing for the body and sleeves? Happy knitting!

24.09.2023 - 23:51

country flag Suzanne Dawson wrote:

Can I knit this pattern in drops air

04.09.2023 - 20:57

DROPS Design answered:

Hi Suzanne, Yes, you can use Drops Air, with just 1 strand instead of 2. You will still need the same number of skeins. Happy knitting!

05.09.2023 - 06:45

country flag Meike wrote:

Kann ich nach den Zunahmen der jeweils 11 Maschen unter den Ärmeln auch in A1 komplett stricken ohne die Maschen von A2?

22.08.2023 - 08:06

DROPS Design answered:

Liebe Meike, wahrscheinlich, aber dann sollen Sie die Bündchen anpassen, da die Erklärung wird dann vielleicht nicht so passen. Viel Spaß beim stricken!

22.08.2023 - 09:38

country flag Barbara wrote:

Leider ist die Anleitung für die erste Reihe nach der Halsblende fehlerhaft. Es fehlen in der Beschreibung 12 Maschen. Habe lange gebraucht, bis ich den Fehler gefunden habe. Bitte korrigiert doch die Anleitung! Danke!

20.07.2023 - 19:52

DROPS Design answered:

Liebe Barbara, ich habe keinen Fehler gefunden, bei der letzten Runde der Halsblende werden 12 Maschen in S zugenommen dann stimmt die Verteilung der Maschen bei der Passe. Viel Spaß beim stricken!

28.07.2023 - 08:51

country flag Marianne wrote:

Bonjour, en taille S, pour l'empiècement j'ai bien 256 mailles comme prévu, mais au moment de faire la séparation entre le corps et les manches, le compte donné par le modèle fait 260 mailles : 43 pour la moitié du dos plus 53 glissées pour la manche plus 77 pour le devant plus 53 pour la deuxième manche plus 34 plus la moitié du dos qui font 260. Où dois-je faire les séparations par rapport au motif A2 ?

04.05.2023 - 08:39

DROPS Design answered:

Bonjour Marianne, quand on a augmenté 20 fois pour le raglan (20 fois 8 mailles), on a bien 256 mailles, mais les augmentations du raglan ne sont pas terminées, on doit encore augmenter pour le devant et le dos (plus pour les manches) 2 fois tous les 2 tours = vous avez ainsi 256 + (4 x 2) = 260 mailles au total. la division se fait ensuite pour chaque pièce au milieu de chaque A.2. Bon tricot!

04.05.2023 - 13:40

country flag Andrea Van Lieshout wrote:

Bij maat M:\r\nAls de boordsteek klaar is, brei dan de volgende naald als volgt: brei de eerste 14 steken etc\r\nBrei ik deze steken recht of volgens de boordsteek(2r/2av)?

04.12.2022 - 16:08

DROPS Design answered:

Dag Andrea,

Deze steken brei je recht. Het stond inderdaad niet aangegeven en het is nu aangepast in het patroon.

07.12.2022 - 20:47

country flag Andrea Van Lieshout wrote:

Bij maat M: Als de boordsteek klaar is, brei dan de volgende naald als volgt: brei de eerste 14 steken etc Brei je dan recht of brei je volgens de boordsteek(2r/2av)

04.12.2022 - 16:03

country flag Anneli Christensen wrote:

Det står att garnåtgången är endast 200g sammanlagt, 100g av varje färg. Det kan väl inte stämma?

16.10.2022 - 12:31

DROPS Design answered:

Hei Anneli. DROPS Kid-Silk er et meget tynt garn og har en løpelengde på 420 meter på 50 gram, så i str. XS og S stemmer garnmengden med det som står i oppskriften. mvh DROPS Design

17.10.2022 - 14:12