
Popular categories
Looking for a yarn?


|
|||||||
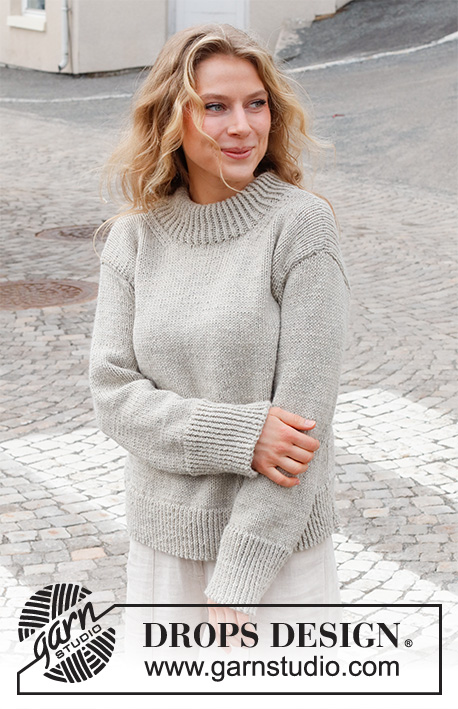
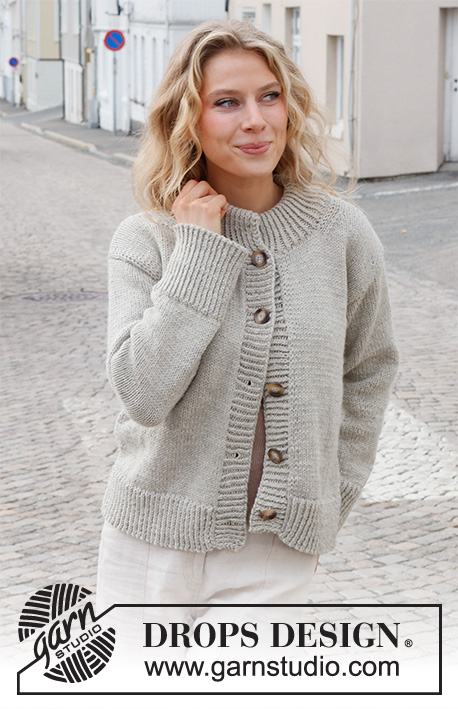
Stone Fences Jacket |
|||||||
 |
 |
||||||
Knitted jacket in DROPS Nepal or DROPS Alaska. The piece is worked with ribbed edges and double neck. Sizes S - XXXL.
DROPS 228-23 |
|||||||
|
------------------------------------------------------- EXPLANATIONS FOR THE PATTERN: ------------------------------------------------------- RIDGE/GARTER STITCH (worked back and forth): Knit all rows. 1 ridge = knit 2 rows. PATTERN: See diagram A.1. The diagram shows all rows in the pattern from the right side. DECREASE TIP-1 (evenly spaced): To work out how to decrease evenly, count the total number of stitches on the needle (e.g. 109 stitches) minus the edge stitches (e.g. 2 stitches) and divide the remaining stitches by the number of decreases to be made (e.g. 27) = 3.96. In this example decrease by knitting together each 3rd and 4th stitch (approx.). Do not decrease the edge stitches. DECREASE TIP-2 (for armholes and neck): All decreases are worked from the right side! DECREASE AT BEGINNING OF ROW: 1 edge stitch in garter stitch, knit 2, slip 1 stitch as if to knit, knit 1 and pass the slipped stitch over the knitted stitch (= 1 stitch decreased). DECREASE AT END OF ROW: Work until there are 5 stitches left, knit 2 together, knit 2 and 1 edge stitch in garter stitch (= 1 stitch decreased). INCREASE TIP (for sleeves): All increases are worked from the right side! Increase 1 stitch by making 1 yarn over. On the next row purl the yarn over twisted to avoid a hole. BINDING-OFF TIP: To avoid the bind-off edge being tight you can bind off with a larger size needle. If the edge is still tight, make 1 yarn over after approx. each 4th stitch at the same time as binding off; the yarn overs are bind off as normal stitches. ------------------------------------------------------- START THE PIECE HERE: ------------------------------------------------------- JACKET – SHORT OVERVIEW OF THE PIECE: The piece is worked back and forth in sections and then sewn together. The bands and neck are worked to finish. BACK PIECE: Cast on 101-109-117-129-143-155 stitches (including 1 edge stitch on each side) with circular needle size 4.5 MM = US 7 and DROPS Nepal or DROPS Alaska. Purl 1 row from the wrong side. Then work rib as follows: 1 edge stitch in GARTER STITCH – read description above, A.1 until there are 2 stitches left, work the first stitch in A.1 (so the rib is symmetrical) and 1 edge stitch in garter stitch. Continue this rib back and forth for 8 cm = 3⅛" – adjust so the next row is from the right side. Knit 1 row where you decrease 25-27-29-33-37-39 stitches evenly spaced – read DECREASE TIP-1 = 76-82-88-96-106-116 stitches. Change to circular needle size 5.5 MM = US 9. Continue with stockinette stitch and 1 edge stitch in garter stitch on each side. REMEMBER THE KNITTING GAUGE! When the piece measures 36-37-38-39-40-41 cm = 14¼"-14½"-15"-15¼"-15¾"-16⅛", bind off 3-3-5-6-8-8 stitches at the beginning of the next 2 rows for the armholes = 70-76-78-84-90-100 stitches. Continue to decrease as follows: Decrease 1 stitch on each side of the piece, every row from the right side a total of 2-3-3-4-5-8 times – read DECREASE TIP-2 = 66-70-72-76-80-84 stitches. Continue with stockinette stitch and 1 edge stitch in garter stitch on each side. When the piece measures 50-52-54-56-58-60 cm = 19¾"-20½"-21¼"-22"-22¾"-23⅝", bind off the middle 30-30-32-32-34-34 stitches for the neck and finish each shoulder separately (= 18-20-20-22-23-25 stitches on each shoulder). Decrease 1 stitch on the next row from the neck = 17-19-19-21-22-24 stitches. Continue with stockinette stitch and 1 edge stitch in garter stitch on each side until the piece measures 54-56-58-60-62-64 cm = 21¼"-22"-22¾"-23⅝"-24⅜"-25¼". Bind off. Work the other shoulder in the same way. RIGHT FRONT PIECE: Cast on 50-54-58-64-72-78 stitches (including 1 edge stitch on each side) with circular needle size 4.5 MM = US 7 and DROPS Nepal or DROPS Alaska. Purl 1 row from the wrong side. Then work rib as follows: 1 edge stitch in garter stitch, A.1 until there is 1 stitch left and 1 edge stitch in garter stitch. Continue this rib back and forth for 8 cm = 3⅛" – adjust so the next row is from the right side. Knit 1 row where you decrease 11-12-13-15-18-19 stitches evenly spaced – remember DECREASE TIP-1 = 39-42-45-49-54-59 stitches. Change to circular needle size 5.5 MM = US 9. Continue with stockinette stitch and 1 edge stitch in garter stitch on each side. When the piece measures 36-37-38-39-40-41 cm = 14¼"-14½"-15"-15¼"-15¾"-16⅛", bind off 3-3-5-6-8-8 stitches at the beginning of the next row from the wrong side for the armhole = 36-39-40-43-46-51 stitches. Decrease 1 stitch at the end of each row from the wrong side 2-3-3-4-5-8 times = 34-36-37-39-41-43 stitches. When the piece measures 45-47-48-50-51-53 cm = 17¾"-18½"-19"-19¾"-20"-21", work the first 10-10-10-10-11-11 stitches from the right side and place them on a thread for the neck, then work to the end of the row. Continue with stockinette stitch and 1 edge stitch in garter stitch on each side. Decrease 1 stitch for the neck on the inside of 3 stitches at the beginning of each row from the right side 7-7-8-8-8-8 times = 17-19-19-21-22-24 stitches. Continue working until the piece measures 54-56-58-60-62-64 cm = 21¼"-22"-22¾"-23⅝"-24⅜"-25¼". Bind off. LEFT FRONT PIECE: Cast on 50-54-58-64-72-78 stitches (including 1 edge stitch on each side) with circular needle size 4.5 MM = US 7 and DROPS Nepal or DROPS Alaska. Purl 1 row from the wrong side. Then work rib as follows: 1 edge stitch in garter stitch, purl 1, A.1 until there are 2 stitches left, work the first stitch in A.1 and 1 edge stitch in garter stitch. Continue this rib back and forth for 8 cm = 3⅛" – adjust so the next row is from the right side. Knit 1 row where you decrease 11-12-13-15-18-19 stitches evenly spaced = 39-42-45-49-54-59 stitches. Change to circular needle size 5.5 MM = US 9. Continue with stockinette stitch and 1 edge stitch in garter stitch on each side. When the piece measures 36-37-38-39-40-41 cm = 14¼"-14½"-15"-15¼"-15¾"-16⅛", bind off 3-3-5-6-8-8 stitches at the beginning of the next row from the right side for the armhole = 36-39-40-43-46-51 stitches. Decrease 1 stitch at the end of each row from the right side 2-3-3-4-5-8 times = 34-36-37-39-41-43 stitches. When the piece measures 45-47-48-50-51-53 cm = 17¾"-18½"-19"-19¾"-20"-21", work the first 10-10-10-10-11-11 stitches from the wrong side and place them on a thread for the neck. Work to the end of the row. Continue with stockinette stitch and 1 edge stitch in garter stitch on each side. Decrease 1 stitch for the neck on the inside of 3 stitches at the end of each row from the right side 7-7-8-8-8-8 times = 17-19-19-21-22-24 stitches. Continue working until the piece measures 54-56-58-60-62-64 cm = 21¼"-22"-22¾"-23⅝"-24⅜"-25¼". Bind off. SLEEVES: Cast on 64-66-68-72-74-74 stitches (including 1 edge stitch on each side) with circular needle size 4.5 MM = US 7 and DROPS Nepal or DROPS Alaska. Purl 1 row from the wrong side. Then work rib as follows: 1 edge stitch in garter stitch, A.1 until there is 1 stitch left and 1 edge stitch in garter stitch. Continue this rib back and forth for 12 cm = 4¾". Knit 1 row from the right side where you decrease 18-18-18-20-20-20 stitches evenly spaced = 46-48-50-52-54-54 stitches. Change to circular needle size 5.5 MM = US 9 Continue with stockinette stitch and 1 edge stitch in garter stitch on each side. When the piece measures 14 cm = 5½", increase 1 stitch inside 2 stitches on each side of the piece – read INCREASE TIP. Increase like this every 10-7½-5½-5½-4-3 cm = 4"-2⅞"-2⅛"-2⅛"-1½"-1⅛" a total of 4-5-6-6-7-9 times = 54-58-62-64-68-72 stitches. When the sleeve measures 46-46-44-44-42-40 cm = 18"-18"-17¼"-17¼"-16½"-15¾", bind off on each side for the sleeve cap as follows: Bind off 3-3-5-6-8-8 stitches 1 time, 2 stitches 3 times, then 1 stitch on each side until the sleeve measures 51 cm = 2". Finally, bind off 3 stitches on each side 1 time. Bind off – read BINDING-OFF TIP. The sleeve measures approx. 52 cm = 20½". Work the other sleeve in the same way. ASSEMBLY: Sew the shoulder seams with grafting stitches. Sew the sleeves into the armholes, inside the 1 edge stitch on the body and the bind-off edge on the sleeve. Sew the side seams from the armholes down, inside the 1 edge stitch. RIGHT BAND: Start from the right side at the bottom of the right front piece and knit up 91 to 107 stitches inside the 1 edge stitch with circular needle size 4.5 MM = US 7 and DROPS Nepal or DROPS Alaska. The number of stitches must be divisible by 2 + 1. Work rib starting from the wrong side as follows: 1 edge stitch in garter stitch, * purl 1 twisted, knit 1 *, work from *-* until there are 2 stitches left, purl 1 twisted and 1 edge stitch in garter stitch. Then work A.1 with 1 edge stitch in garter stitch on each side. When the rib measures 2½ cm = 1", work 5-5-6-6-6-6 buttonholes: The bottom buttonhole is worked 3 cm = 1⅛" from the bottom edge and the top buttonhole ½ cm = ⅛" below the neck. The remaining 3-3-4-4-4-4 buttonholes are worked with approx. 8 to 10 cm = 4" between each one. 1 buttonhole = knit 2 together, 1 yarn over. On the next row work the yarn over into the rib, leaving a hole. Continue the rib until it measures 4½ cm = 1⅝". Bind off with knit over knit and purl over purl – remember BINDING-OFF TIP. LEFT BAND: Start from the right side at the top of the left front piece and knit up the same number of stitches as on the right front piece, inside the 1 edge stitch and with circular needle size 4.5 MM = US 7 and DROPS Nepal or DROPS Alaska. Work rib starting from the wrong side as follows: 1 edge stitch in garter stitch, *purl 1 twisted, knit 1 *, work from *-* until there are 2 stitches left, purl 1 twisted and 1 edge stitch in garter stitch. Then work A.1 with 1 edge stitch in garter stitch on each side. Continue this rib for 4½ cm = 1⅝". Bind off with knit over knit and purl over purl. Sew the buttons onto the left band. NECK: Start from the right side, on the outer edge of the right band and knit up stitches around the neck with circular needle size 4.5 MM = US 7 and DROPS Nepal or DROPS Alaska. Knit up 107 to 125 stitches (including the stitches from the threads) inside the 1 edge stitch. The number of stitches must be divisible by 2 + 1. Work rib from the wrong side as follows: 1 edge stitch in garter stitch, *purl 1 twisted, knit 1 *, work from *-* until there are 2 stitches left, purl 1 twisted and 1 edge stitch in garter stitch. Then work A.1 with 1 edge stitch in garter stitch on each side. Continue this rib back and forth until the rib measures 15 cm = 6". Bind off with knit over knit and purl over purl – remember BINDING-OFF TIP! Fold the neck double to the inside and sew down. To avoid the neck being tight and rolling outwards, it is important that the seam is elastic. Sew the openings at the ends of the neck with small stitches. |
|||||||
Diagram explanations |
|||||||
|
|||||||

|
|||||||
|
Have you made this or any other of our designs? Tag your pictures in social media with #dropsdesign so we can see them! Do you need help with this pattern?You'll find tutorial videos, a Comments/Questions area and more by visiting the pattern on garnstudio.com. © 1982-2024 DROPS Design A/S. We reserve all rights. This document, including all its sub-sections, has copyrights. Read more about what you can do with our patterns at the bottom of each pattern on our site. |
|||||||


With over 40 years in knitting and crochet design, DROPS Design offers one of the most extensive collections of free patterns on the internet - translated to 17 languages. As of today we count 304 catalogs and 11422 patterns - 11417 of which are translated into English (US/in).
We work hard to bring you the best knitting and crochet have to offer, inspiration and advice as well as great quality yarns at incredible prices! Would you like to use our patterns for other than personal use? You can read what you are allowed to do in the Copyright text at the bottom of all our patterns. Happy crafting!
Comments / Questions (21)
Hei. Har strikket denne jakken i Nepal str.L, og den er en storfavoritt!! Har veldig lyst til å strikke den i et tynnere garn, strikkefasthet 26-27m x 10 cm. Hvordan skal jeg isåfall beregne garnmengde, og hvilken str. bør jeg endre til mtp.maskeantall? Mvh, Marianne S. Røkke
13.03.2024 - 22:49DROPS Design answered:
Hej Marianne, Da kan du følge denne opskrift: Jakke - 24 m
19.03.2024 - 11:41Zou het kunnen dat er bij patroon nr ne-355 een foutje staat in de beschrijving? Bij rechtervoorpand staat aan 37 cm hoogte kant 3 st af ah begin vd volgende naald ad verkeerde kant vr het armsgat en daarna minder 1 steek ah einde van elke nld ad VERKEERDE kant . Ik denk dat dit de goede kant moet zijn anders zit je langs de halskant . Vr linkervoorpand net andersom .
26.01.2024 - 09:58Bonjour. J'aimerai avoir une petite précision. Lorsque les explications disent : monter 101 mailles (y compris une maille lisière de chaque côté), est ce que les mailles lisières sont comprises dans les 101 mailles ? Ou est ce que je dois les monter en plus et donc avoir 103 mailles ? Merci pour votre réponse.
14.01.2024 - 23:03DROPS Design answered:
Bonjour Virginie, les mailles lisières sont comprises dans le nombre de mailles à monter, vous n'avez pas besoin de les ajouter, montez simplement 101 mailles. Bon tricot!
15.01.2024 - 10:02Sorry, gevonden.
12.10.2023 - 19:21Hallo, waar vind ik telpatroon A1?
12.10.2023 - 17:31DROPS Design answered:
Dag Elly,
Deze staat (een beetje verstopt) naast de maattekening, onder de mouw van de maattekening.
15.10.2023 - 17:11Ich benötige die Anzahl der Maschen der Original-Anleitung der Größe XL, die am Schluss an der Schulter abgekettet werden. Ich hatte lediglich versucht mir es selbst zu errechnen, da diese Angabe fehlt.
05.10.2023 - 12:42DROPS Design answered:
Liebe Anna, wie früher erklärt, diese Angaben geben wir eher nicht, da die Länge wichtiger als die Maschenanzahl ist, das sollen Sie selber mit Ihrer eigenen Maschenprobe kalkulieren. Viel Spaß beim stricken!
06.10.2023 - 08:46Liebes Drops-Team, Ich glaube Sie haben mich falsch verstanden. Ich benötige lediglich die Anzahl der Maschen, die ganz zuletzt abgenommen werden. Also ob beim letzten Abketten 24 Maschen angekettet werden. Sonst nichts.
05.10.2023 - 12:34DROPS Design answered:
Liebe Anna, diese Maschenanzahl hängt an Ihrer Maschenprobe an, je nach der Reihenanzahl, die man braucht bis die Ärmel 51 cm misst, so sollen Sie das zuerst in diese Richtung (mit Ihrer eigenen Maschenprobe) kalkulieren, so können Sie die Ärmel verkehrs stricken. Gerne kann Ihnen damit Ihr DROPS Laden weiterhelfen (auch per Telefon oder per E-Mail). Viel Spaß beim stricken!
06.10.2023 - 08:45Liebes Drops-Team, könnten Sie mir denn verraten, wie ich an die Angaben der restlichen Maschen kommen kann? Oder muss ich weiterhin mühsam rechnen und hoffen, dass es richtig ist? Ich bin dann immer ziemlich unsicher. Wenn ich wenigstens 1x wüßte, dass meine Rechnung richtig ist, könnte ich sie auch auf andere Modelle beruhigt anwenden.\r\nGibt es keine Angabe in Ihrer Original-Anleitung? Vielen Dank für Ihre Mühe.
04.10.2023 - 08:05DROPS Design answered:
Liebe Anna, die Angaben in der Originalanleitung werden von unten nach oben gestrickt und mit den Maßnahmen in cm nicht in Maschen/Reihen, da die Höhe wichtiger als die Maschenanzahl ist. Aber gerne fragen Sie Ihr Wollladen, wo Sie die Wolle gekauft haben, dort wird man Ihnen gerne weiterhelfen, auch per Telefon oder per E-Mail. Viel Spaß beim stricken!
04.10.2023 - 08:25Hallo, ich wollte ja auch nicht, dass man mir etwas umrechnet, denn es ist ja eine angegebene Größe. Mir fehlte ja nur die Angabe der restlich abzukettenden Maschen. Viele Grüße
03.10.2023 - 16:49Also müsste ich mit 24M oben an der Schulter beginnen. Habe ich richtig gerechnet? Kommt das mit Ihrem Modell hin?
29.09.2023 - 13:16DROPS Design answered:
Liebe Anna, es kann ja so sein, wie Sie es umgerechnet haben, leider können wir nicht jede Anleitung nach jedem Wunsch umrechnen, aber Ihr Math sehen richtig aus. Viel Spar beim stricken!
02.10.2023 - 08:49