DROPS Nord
DROPS Nord
45% Alpaca, 30% Polyamide, 25% Wool
from 3.85 $ /50g
DROPS Kid-Silk
DROPS Kid-Silk
75% Mohair, 25% Silk
from 6.75 $ /25g
Get the yarn to make this pattern from 78.05$.

The yarn cost is calculated from the pattern’s smallest size and the yarn’s cheapest product type. Looking for an even better price? You might find it on the DROPS Deals!

DROPS SS24

Arctic Moon

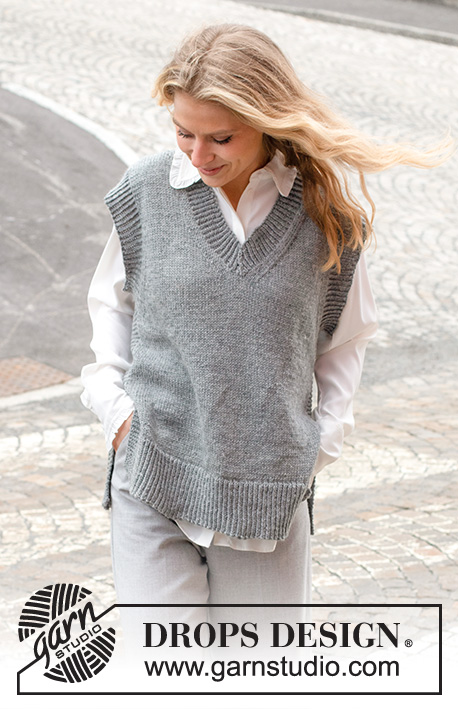
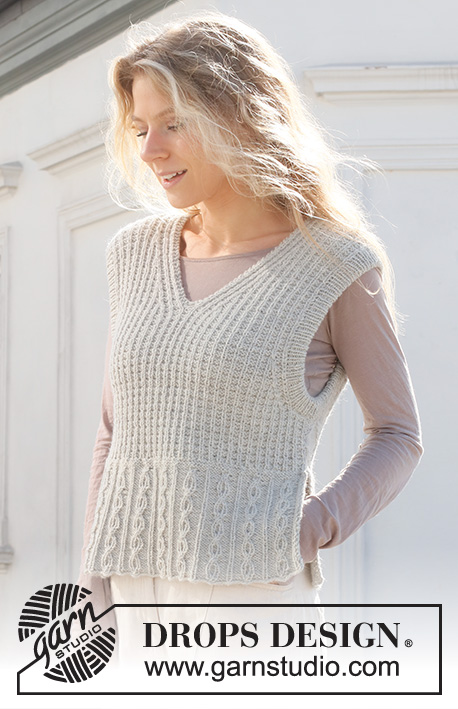
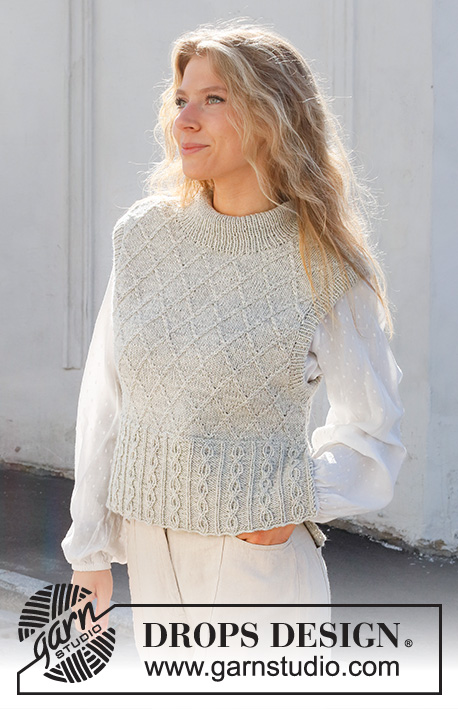
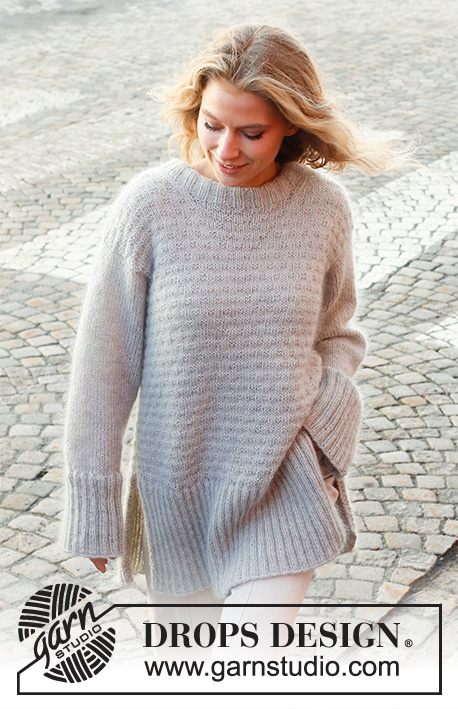
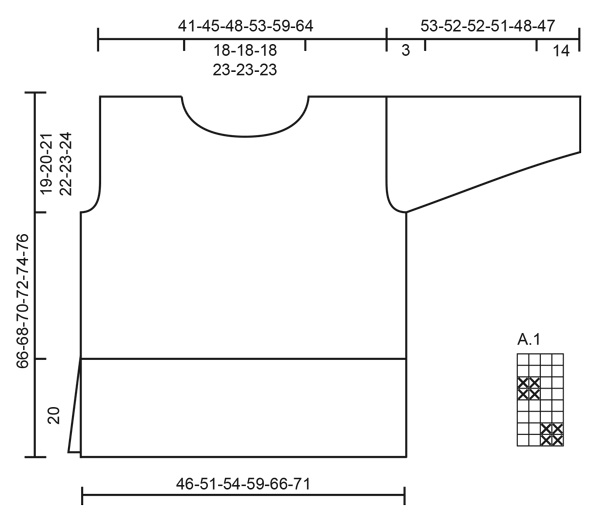
Knitted sweater in DROPS Nord and DROPS Kid-Silk or DROPS Flora and DROPS Kid-Silk. Piece is knitted bottom up with textured pattern. Size: S - XXXL

DROPS 228-4
DROPS design: Pattern no-050
Yarn group A + A or C
----------------------------------------------------------

SIZE:
S - M - L - XL - XXL – XXXL

Finished measurements:
Chest measurements: 92-102-108-118-132-142 cm = 36¼"-40"-42½"-46½"-52"-55¾"
Full length: 66-68-70-72-74-76 cm = 26"-26¾"-27½"-28⅜"-29⅛"-29½"
All measurements in charts are in cm.

MATERIALS:
DROPS NORD from Garnstudio (belongs to yarn group A)
400-450-450-500-550-600 g color 03, pearl grey
DROPS KID-SILK from Garnstudio (belongs to yarn group A)
175-175-200-225-250-300 g color 44, moonshine

Or use:
DROPS FLORA from Garnstudio (belongs to yarn group A)
350-400-400-450-500-550 g color 03, light grey
DROPS KID-SILK from Garnstudio (belongs to yarn group A)
175-175-200-225-250-300 g color 44, moonshine

NEEDLES:
DROPS CIRCULAR NEEDLE SIZE 5.5 MM = US 9 : Length 40 and 80 cm = 16" and 32".
DROPS CIRCULAR NEEDLE SIZE 4.5 MM = US 7 : Length 40 and 80 cm = 16" and 32".
DROPS DOUBLE POINTED NEEDLES SIZE 5.5 MM = US 9
DROPS DOUBLE POINTED NEEDLES SIZE 4.5 MM = US 7
The technique MAGIC LOOP can be used – you then only need circular needle of 80 cm = 32" in each size.

KNITTING GAUGE:
16 stitches in width and 20 rows vertically in stockinette stitch / pattern and 1 strand of each quality = 10 x 10 cm = 4" x 4".
NOTE! Remember that needle size is only a suggestion. If you have too many stitches on 10 cm = 4" switch to larger needles. If you have too few stitches on 10 cm = 4" switch to smaller needles.

-------------------------------------------------------

Alternative Yarn – See how to change yarns here
Yarn Groups A to F – Use the same pattern and change the yarn here
Yarn usage using an alternative yarn – Use our yarn converter here

-------------------------------------------------------

DROPS Nord
DROPS Nord
45% Alpaca, 30% Polyamide, 25% Wool
from 3.85 $ /50g
DROPS Kid-Silk
DROPS Kid-Silk
75% Mohair, 25% Silk
from 6.75 $ /25g
Get the yarn to make this pattern from 78.05$.

The yarn cost is calculated from the pattern’s smallest size and the yarn’s cheapest product type. Looking for an even better price? You might find it on the DROPS Deals!

Pattern instructions

NOTE: This pattern is written in American English. All measurements in charts are in cm. For conversion from inches to cm - click here. There are different terms for crocheting in American and British English. If this pattern includes crochet, click for "crochet terms" here. For this pattern in British English, please click here.
----------------------------------------------------------

EXPLANATION FOR THE PATTERN:

----------------------------------------------------------

GARTER STITCH (back and forth):
Knit all rows.
1 ridge vertically = knit 2 rows.

PATTERN:
See diagram A.1. Diagrams show all rows in pattern seen from the right side.

DECREASE TIP-1 (evenly):
To calculate how to decrease evenly, use the total number of stitches on needle (e.g. 122 stitches) and divide stitches by number of decreases to be done (e.g. 46) = 2,7.
In this example work alternately approx. every 1st and 2nd stitch and every 2nd and 3rd stitch together.

DECREASE TIP-2:
Decrease for neck inside 3 stitches towards mid front:
Decrease as follows at the end of row from right side:
Work until 4 stitches remain before neck, knit the next 2 stitches together, work 1 stitch in stockinette stitch and 1 in garter stitch.
Decrease at beginning of row as follows from right side:
Work 1 stitch in garter stitches, knit 1, slip next stitch knitwise, knit next stitch, pass slipped stitch over stitch worked, work rest of row as before.
Continue with 1 stitch in garter stitch and 2 stitches in stockinette stitch towards mid front until shoulder has been worked. Continue the remaining stitches in pattern as before.

INCREASE TIP (applies to sleeves):
Begin 1 stitch before marker thread, make 1 yarn over, work 2 stitches (marker thread is in the middle of these stitches), make 1 yarn over. On next round knit yarns over twisted to avoid holes.

BIND-OFF TIP:
To avoid a tight bind-off edge when binding off, you may use a larger needle. If this still is too tight make 1 yarn over after approx. every 4th stitch while binding off (bind off yarn overs as stitches).

----------------------------------------------------------

START THE PIECE HERE:

----------------------------------------------------------

SWEATER - SHORT OVERVIEW OF THE PIECE:
Piece is worked back and forth, bottom up. Sew the piece together as explained in pattern. Work sleeves in the round on double pointed needles/a short circular needle. Finish with a neck edge.

FRONT PIECE:
Cast on 122-134-142-154-174-186 stitches on circular needle size 4.5 MM = US 7 with 1 strand DROPS Nord and 1 strand DROPS Kid-Silk (= 2 strands), or 1 strand DROPS Flora and 1 strand DROPS Kid-Silk (= 2 strands). Purl 1 row from wrong side, then work as follows from right side: 2 edge stitches in GARTER STITCH - read explanation above - * knit 2, purl 2 *, work from *-* until 4 stitches remain, knit 2 and finish with 2 stitches in garter stitch. Continue until piece measures approx. 20 cm = 8" in all sizes.
Switch to circular needle size 5.5 MM = US 9. Knit 1 row from right side while decreasing 46-50-54-58-66-70 stitches evenly - read DECREASE TIP-1 = 76-84-88-96-108-116 stitches. Purl 1 row from wrong side. Then work as follows from right side: 1 edge stitch in garter stitch, A.1 until 3 stitches remain, work the 2 first stitches in A.1 so that pattern begins and ends the same, and finish with 1 edge stitch in garter stitch. Continue pattern like this. REMEMBER THE KNITTING GAUGE! When piece measures 47-48-49-50-51-52 cm = 18½"-19"-19¼"-19¾"-20"-20½", bind off for armholes in each side. Bind off at beginning of every row in each side: Bind off 3 stitches 1-1-1-1-1-1 time, 2 stitches 1-1-1-1-1-1 time and 1 stitch 0-1-1-1-2-2 times = 66-72-76-84-94-102 stitches.
Continue with A.1 until piece measures 59-61-63-65-67-69 cm = 23¼"-24"-24¾"-25½"-26⅜"-27⅛". Now slip the middle 20-20-20-28-28-28 stitches on a stitch holder for neck , and finish each shoulder separately= 23-26-28-28-33-37 stitches. Now bind off for neck - read DECREASE TIP-2: Bind off 1 stitch 4 times = 19-22-24-24-29-33 stitches remain on shoulder. Continue until piece measures 66-68-70-72-74-76 cm = 26"-26¾"-27½"-28⅜"-29⅛"-29½", and bind off. Work the other shoulder the same way.

BACK PIECE:
Cast on 122-134-142-154-174-186 stitches on circular needle size 4.5 MM = US 7 with 1 strand of each color (= 2 strands). Purl 1 row from wrong side, then work as follows from right side: 2 edge stitches in garter stitch, * knit 2, purl 2 *, repeat from *-* until 4 stitches remain, knit 2 and 2 stitches in garter stitch. Continue until piece measures approx. 20 cm = 8" in all sizes.
Switch to circular needle size 5.5 MM = US 9. Knit 1 row from right side while decreasing 46-50-54-58-66-70 stitches evenly - remember DECREASE TIP-1 = 76-84-88-96-108-116 stitches. Purl 1 row from wrong side. Then work as follows from right side: 1 edge stitch in garter stitch, A.1 until 3 stitches remain, work the 2 first stitches in A.1 so that pattern begins and ends the same, and finish with 1 edge stitch in garter stitch. Continue pattern like this. When piece measures 47-48-49-50-51-52 cm = 18½"-19"-19¼"-19¾"-20"-20½", bind off for armholes in each side. Bind off at beginning of every row in each side: Bind off 3 stitches 1-1-1-1-1-1 time, 2 stitches 1-1-1-1-1-1 time and 1 stitch 0-1-1-1-2-2 times = 66-72-76-84-94-102 stitches.
Continue with A.1 until piece measures 64-66-68-70-72-74 cm = 25¼"-26"-26¾"-27½"-28⅜"-29⅛". Now bind off the middle 26-26-26-34-34-34 stitches for neck, and finish each shoulder separately. Decrease 1 stitch on next row from neck = 19-22-24-24-29-33 stitches on needle on the shoulder. Continue until piece measures 66-68-70-72-74-76 cm = 26"-26¾"-27½"-28⅜"-29⅛"-29½", and bind off. Work the other shoulder the same way.

SLEEVE:
Work sleeves in the round bottom up on double pointed needles/circular needle. Divide piece when decreasing for sleeve cap and work back and forth on needle.
Cast on 48-48-52-52-56-56 stitches on double pointed needles 4.5 MM = US 7 with 1 strand of each yarn(= 2 strands). Knit 1 round, then work rib (= knit 2/purl 2). When
piece measures 14 cm = 5½", switch to double pointed needles size 5.5 MM = US 9, and work in stockinette stitch.
Knit 1 round while decreasing 2-0-2-0-0-0 stitches evenly = 46-48-50-52-56-56
stitches. Insert a marker thread at beginning of round = mid under sleeve. Continue
with stockinette stitch while AT THE SAME TIME when piece measures 16 cm = 6¼", increasing 1 stitch on each side of marker thread - read INCREASE TIP. Increase every 5-4½-4-3½-3½-3 cm = 2"-1⅝"-1½"-1¼"-1¼"-1⅛" 7-8-9-9-9-10 times in total = 60-64-68-70-74-76 stitches. When piece measures 50-49-49-48-45-44 cm = 19¾"-19¼"-19¼"-19"-17¾"-17¼", bind off 3 stitches on each side of marker thread (= 6 stitches decreased mid under sleeve), now work sleeve back and forth. Bind off for sleeve cap at beginning of every row in each side as follows: 2 stitches 1 time, 3 stitches 1 time, then bind off the remaining stitches = 44-48-52-54-58-60 stitches. Sleeve measures 53-52-52-51-48-47 cm = 21"-20½"-20½"-20"-19"-18½" in total. Work another sleeve the same way.

ASSEMBLY:
Sew the shoulder seams. Sew in sleeves. Sew side seams inside 1 edge stitch until 20 cm = 8" remain at the bottom = vent.

NECK EDGE:
Begin at one shoulder and from right side, and pick up approx. 96-108 stitches with circular needle size 4.5 MM = US 7 around the neck (including stitches on stitch holders and adjust so that the total number of stitches is divisible by 4). Work rib (= knit 2/purl 2). Work rib for 8 cm = 3⅛". Then bind off with knit over knit and purl over purl - read BIND-OFF TIP. Fold rib at the top of neck down on inside of garment. Fasten rib to get a double neck edge. To avoid a tight neck edge that sticks out it is important to keep the seam elastic.

Diagram

All measurements in charts are in cm.

symbols = knit from the right side, purl from the wrong side
symbols = purl from the right side, knit from the wrong side
diagram

Each of our patterns has specific tutorial videos to help you.

Do you have a question? See a list of frequently asked questions (FAQ)

Knitting tension is what determines the final measurements of your work, and is usually measured per 10 x 10 cm. It is provided like so: number of stitches in width x number of rows in height - eg: 19 stitches x 26 rows = 10 x 10 cm.

The knitting tension is very individual; some people knit/crochet loosely while others work tightly. You adjust the knitting tension with the needle size, which is why the suggested needle size only serve as a guide! You need to adjust this (up or down) to ensure that YOUR knitting tension matches the knitting tension provided in the pattern. If you work with a different knitting tension than provided you will have a different yarn consumption, and your work will have different measurements than what the pattern suggests.

The knitting tension also determines which yarns can replace each other. As long as you achieve the same knitting tension you can replace one yarn with another.

See DROPS lesson: How to measure your tension/gauge

See DROPS video: How to make a gauge tension swatch

The required amount of yarn is provided in grams, eg: 450 g. To calculate how many balls you’ll need you first need to know how many grams are in 1 ball (25g, 50g or 100g). This information is available if you click on the individual yarn quality on our pages. Divide the amount required with the amount of each ball. For example, if each ball is 50g (the most common amount), the calculation will be as follows: 450 / 50 = 9 balls.

The important thing when changing from one yarn to another is that the knitting/crochet tension remains the same. This is so that the measurements of the finished piece will be the same as on the sketch provided. It is easier to achieve the same knitting tension using yarns from the same yarn group. It is also possible to work with multiple strands of a thinner yarn to achieve the knitting tension of a thicker one. Please try our yarn converter. We recommend you to always work a test swatch.

Please NOTE: when changing yarn the garment might have a different look and feel to the garment in the photo, due to individual properties and qualities of each yarn.

See DROPS lesson: Can I use a different yarn than the one mentioned in the pattern?

All our yarns are categorised into yarn groups (from A to F) according to thickness and knitting tension – group A contains the thinnest yarns and group F the thickest. This makes it easier for you to find alternative yarns to our patterns, should you wish to switch yarn. All yarns within the same group have a similar knitting tension and can easily replace each other. However, different yarn qualities have different structures and properties which will give the finished work a unique look and feel.

Click here for an overview of the yarns in each yarn group

At the top of all our patterns you’ll find a link to our yarn converter, which is a helpful tool should you wish to use a different yarn than suggested. By filling in the yarn quality you wish to replace, the amount (in your size) and number of strands, the converter will present good alternative yarns with the same knitting tension. Additionally it will tell you how much you’ll require in the new qualities and whether you’ll need to work with multiple strands. Most skeins are 50g (some are 25g or 100g).

If the pattern is worked with multiple colours, every colour will have to be converted separately. Similarly, if the pattern is worked with several strands of different yarns (for example 1 strand Alpaca and 1 strand Kid-Silk) you will have to find alternatives for each, individually.

Click here to see our yarn converter

Since different yarns have different qualities and textures we have chosen to keep the original yarn in our patterns. However, you can easily find options among our available qualities by using our yarn converter, or simply pick a yarn from the same yarn group.

It is possible that some retailers still have discontinued yarns in stock, or that someone has a few skeins at home that they would like to find patterns for.

The yarn converter will provide both alternative yarn as well as required amount in the new quality.

If you think it's hard to decide what size to make, it can be a good idea to measure a garment you own already and like the size of. Then you can pick the size by comparing those measures with the ones available in the pattern's size chart.

You'll find the size chart at the bottom of the pattern.

See DROPS lesson: How to read size chart

The needle size provided in the pattern serves only as a guide, the important thing is to follow the knitting tension. And since knitting tension is very individual, you will have to adjust the needle size to ensure that YOUR tension is the same as in the pattern – maybe you’ll have to adjust 1, or even 2 needle sizes, up or down to achieve the correct tension. For this, we recommend that you work test swatches.

Should you work with a different knitting tension than the one provided, the measurements of the finished garment might deviate from the measurement sketch.

See DROPS lesson: How to measure your tension/gauge

See DROPS video: How to make a gauge tension swatch

Working a garment top-down provides more flexibility and room for personal adjustment. For example it is easier to try the garment on while working, as well as making adjustments to length of yoke and shoulder caps.

The instructions are carefully explaining every step, in the correct order. Diagrams are adjusted to the knitting direction and are worked as usual.

The diagram depicts all rows/rounds, and every stitch seen from the right side. It is read from bottom to top, from right to left. 1 square = 1 stitch.

When working back and forth, every other row is worked from the right side and every other row is worked from the wrong side. When working from the wrong side, the diagram will have to be worked reversed: from left to right, knit stitches are purled, purl stitches are knit etc.

When working in the round every round is worked from the right side and the diagram are worked from right to left on all rounds.

See DROPS lesson: How to read knitting diagrams

The diagram depicts all rows/rounds, and every stitch seen from the right side. It is worked from bottom to top, from right to left.

When working back and forth every other row is worked from the right side: from right to left and every other row is worked from the wrong side: from left to right.

When working in the round, every row in the diagram are worked from the right side, from right to left.

When working a circular diagram you start in the middle and work your way outwards, counter clockwise, row by row.

The rows usually start with a given number of chain stitches (equivalent to the height of the following stitch), this will either be depicted in the diagram or explained in the pattern.

See DROPS lesson: How to read crochet diagrams

Instructions for working several diagrams after each other on the same row/round, will often be written like so: “work A.1, A.2, A.3 a total of 0-0-2-3-4 times". This means you work A.1 once, then A.2 is worked once, and A.3 is repeated (in width) the number of times provided for your size – in this case like so: S = 0 times, M = 0 times, L=2 times, XL= 3 times and XXL = 4 times.

The diagrams are worked as usual: begin with the first row in A.1, then work the first row in A.2 etc.

See DROPS lesson: How to read knitting diagrams

See DROPS lesson: How to read crochet diagrams

The total width of the garment (from wrist-to-wrist) will be larger in the larger sizes, despite the actual sleeves being shorter. The larger sizes have longer sleeve caps and wider shoulders, so there will be a good fit in all sizes.

The measurement sketch/schematic drawing provides information regarding the full length of the garment. If it’s a jumper or a jacket the length is measured from the highest point on the shoulder (usually closest to the neckline), and straight down to the bottom of the garment. It is NOT measured from the tip of shoulder. Similarly, the length of yoke is measured from the highest point on the shoulder and down to where yoke is split into body and sleeves.

See DROPS lesson: How to read a schematic drawing

Diagrams are often repeated on the round or in height. 1 repeat is the diagram the way it appears in the pattern. If it says to work 5 repeats of A.1 in the round, then you work A.1 a total of 5 times after/next to each other in the round. If it says to work 2 repeats of A.1 vertically/in height you work the entire diagram once, then begin again at the start and work the entire diagram one more time.

Chain stitches are slightly narrower than other stitches and to avoid working the cast-on edge too tight, we simply chain more stitches to begin with. The stitch count will be adjusted on the following row to fit the pattern and measurement sketch.

The rib edge is more elastic and will contract slightly compared to, for example, stocking stitch. By increasing before the rib edge, you avoid a visible difference in width between the rib edge and the rest of the body.

It’s very easy to cast off too tightly, and by making yarn overs while casting off (and simultaneously casting these off) you avoid a too tight cast off edge.

See DROPS video: How to bind off with yarn overs (yo)

To achieve an even increase (or decrease) you can increase on, for example: every 3rd and 4th row alternately, like so: work 2 rows and increase on the 3rd row, work 3 rows and increase on the 4th. Repeat this until the increase is complete.

See DROPS lesson: Increase or decrease 1 st on every 3rd and 4th row alternately

Should you prefer to work in the round instead of back and forth, you may of course adjust the pattern. You’ll need to add steeks mid-front (usually 5 stitches), and follow the instructions. When you would normally turn and work from the wrong side, simply work across the steek and continue in the round. At the end you’ll cut the piece open, pick up stitches to work bands, and cover the cut edges.

See DROPS video: How to knit steeks and cut open

Should you prefer to work back and forth instead of in the round, you may of course adjust the pattern so you work the pieces separately and then assemble them at the end. Divide the stitches for the body in 2, add 1 edge stitch in each side (for sewing) and work the front and back pieces separately.

See DROPS lesson: Can I adapt a pattern for circular needles into straight needles?

Pattern repeats can vary slightly in the different sizes, in order to get the correct proportions. If you’re not working the exact same size as the garment in the photo, yours might deviate slightly. This has been carefully developed and adjusted so that the complete impression of the garment is the same in all sizes.

Make sure to follow instructions and diagrams for your size!

If you have found a pattern you like which is available in women’s size it’s not very difficult to convert it to men’s size. The biggest difference will be the length of sleeves and body. Start working on the women size that you think would fit across the chest. The additional length will be worked right before you cast off for the armhole/sleeve cap. If the pattern is worked top-down you can add the length right after the armhole or before the first decrease on sleeve.

Regarding additional yarn amount, this will depend on how much length you add, but it is better with a skein too many than too few.

All yarns will have excess fibres (from production) that might come off as lint or shedding. Brushed yarns (ie hairier yarns) have more of these loose, excess fibres, causing more shedding.

Shedding also depends on what is worn under or over the garment, and whether this pulls at the yarn fibres. It’s therefore not possible to guarantee that there will be no shedding

Below are some tips on how to get the best result when working with hairier yarns:

1. When the garment is finished (before you wash it) shake it vigorously so the looser hairs come off. NOTE: do NOT use a lint roller, brush or any method that pulls at the yarn.

2. Place the garment in a plastic bag and put it in your freezer - the temperature will cause the fibres to become less attached to each other, and excess fibres will come off easier.

3. Leave in the freezer for a few hours before taking it out and shaking it again.

4. Wash the garment according to the instructions on the yarn label.

Pilling is a natural process that happens to even the most exclusive of fibers. It's a natural sign of wear and tear that is hard to avoid, and that is most visible in high friction areas of your garment like a sweater's arms and cuffs.

You can make your garment look as new by removing the pilling, using a fabric comb or a pill/lint remover.

Still can't find the answer you need? Then scroll down and leave your question so one of our experts can try to help you. This will be done normally within 5 to 10 working days.
In the meantime, you can read the questions and answers that others have left to this pattern or join the DROPS Workshop on Facebook to get help from fellow knitters/crocheters!

You might also like...

Post a comment to pattern DROPS 228-4

We would love to hear what you have to say about this pattern!

If you want to leave a question, please make sure you select the correct category in the form below, to speed up the answering process. Required fields are marked *.

Comments / Questions (21)

country flag Venise wrote:

Hello, I tried to follow your explanation of the pattern; however, when I get to the row 6 doing “then 2 rows of knit 2, purl 2 rib”, looks like need to star row 2 of this section with 2 purl instead of 2 knit. Help!!

17.04.2024 - 03:32

DROPS Design answered:

Dear Venise, when working the 6th row = from WS K over K and P over P, ie A.1 will be worked (K2, P2) seen from WS but as you end with the first 2 sts in A.1 from RS, A.1 will start with P2 from WS, then repeat from (to) to the end of the row; and finish with 2 rows stocking stitch. Happy knitting!

17.04.2024 - 08:34

country flag Venise wrote:

Is the diagram in pattern 228-4 for a basket weave. I am not used to using diagrams and not shore how to read the Diagram A1 in this pattern. Can you tell me how many rows in the pattern. Anything to help make this clear please.

13.04.2024 - 08:10

DROPS Design answered:

Dear Venise, the chart shows a stitch-pattern to use as you work. The stitch pattern is: 2 rows of purl 2,knit 2 rib and 2 rows of stocking stitch, then 2 rows of knit 2,purl 2 rib and 2 rows in stocking stitch. These 8 rows are repeated as necessary as indicated in the pattern. You can read more information on our knitting diagrams here: https://www.garnstudio.com/lesson.php?id=68&cid=19. Happy knitting!

14.04.2024 - 23:14

country flag Anita Milland wrote:

Jeg ønsker at strikke denne i bomull-lin (gruppe c) - hvor mange nøgler skal jeg købe til str. small.

25.08.2023 - 20:18

DROPS Design answered:

Hei Anita. Med 1 tråd Bomull-Lin trenger du ca 16-17 nøster i str S. mvh DROPS Design

04.09.2023 - 13:53

country flag JZ wrote:

I submitted as comment, but it may be a question. About bind sleeves: 1) I assume that we decrease/bind off only on the right side 2) We bind off 1 stitch 3 times 3) In total we will add 9 rows to create a cap

15.06.2023 - 09:45

DROPS Design answered:

Dear JZ, for sleeve cap you will first cast off 6 sts mid under sleeve then continue working back and forth on needle binding off 2 stitches at the beginning of next 2 rows (= both froms RS and from WS, ie 2 sts cast off on each side), then bind off 3 stitches at the beg of next 2 rows (= 3 sts on each side) - you have worked 4 rows in total. Happy knitting!

15.06.2023 - 10:26

country flag JZ wrote:

Bind off sleeves. You ask to bind off 3 stitches 1 time. For me it should be rather 1 stitch 3 times If I understand it correctly : 1) no bind off on the left side 3) We will add 9 rows for sleeve cap.

15.06.2023 - 09:36

DROPS Design answered:

Dear JZ, pattern is correct, you should cast off 3 stitches on each side (= 3 sts at the beg of next 2 rows), then cast off remaining stitches. Happy knitting!

15.06.2023 - 15:32

country flag Nathalie Poulin wrote:

Bonjour, Ma question est dans la section de la manche. Lorsque vous dites de rabattre en aller-retour, je comprend qu’il faut faire une demi manche à la fois, est-ce bien cela?

14.06.2023 - 17:25

DROPS Design answered:

Bonjour Mme Poulin, les manches se tricotent de bas en haut, d'abord en rond, puis on va diviser l'ouvrage au milieu sous la manche et tricoter la tête de manche en allers et retours; autrement dit, rabattez 6 m sous la manche puis continuez à tricoter toutes les mailles mais en allers et retours cette fois-ci pour la tête de manche, et, en même temps, rabattez 2 mailles au début des 2 rangs suivants (= 2 m de chaque côté) et 3 mailles au début des 2 rangs suivants (3 m de chaque côté); rabattez les mailles restantes. Bon tricot!

15.06.2023 - 08:48

country flag Paula Stenqvist wrote:

Har stickat denna i storlek S som är min vanliga storlek, då jag trodde det var en lite ”oversize”-modell. När jag blockade den stretchade jag den till storlek L i måtten, men den är fortfarande inte alls lika lång och luftig som på bilden (dock snygg ändå). Mät dina egna mått ordentligt innan, om du - som jag - är ute efter modellen på bilden. Jag använde samma garntyp och kulörer som bildens, men garnet är mer beige i verkligheten. Garnet är härligt och snabbstickat :)

07.04.2022 - 12:12

country flag Odile A wrote:

Bonjour jevoudrais tricoter ce modele en Drops Air un seul fil donc , màis comment savoir le nombre de pelotes qui me seront nécessaires en taille L ? Merci

15.02.2022 - 14:56

DROPS Design answered:

Bonjour Odile, cette leçon vous explique comment procéder, n'hésitez pas à demander de l'aide à votre magasin si besoin, même par mail ou téléphone, on pourra vous aider. Bon tricot!

15.02.2022 - 17:12

country flag Anja Holmes wrote:

Hejsa. Det står strik videre indtil arb måler 52 cm og luk af til ærme. Men tegningen viser noget helt andet??? Både med rib og uden rib. Hvad skal man rette sig efter mon?

27.01.2022 - 20:04

country flag Momo Vaut wrote:

Je finis les coutures du pull et vous demande s il faut coudre ou pas les poignets en côtes des manches, ce n est pas précisé. De même, il me reste presque 3pelotes de Nord et 2,5 pelotes mohair 🤭. Étonnant ! Meilleurs Voeux 2022 🥳

04.01.2022 - 11:36

DROPS Design answered:

Bonjour Mme Vaut, les manches se tricotent en rond jusqu'à l'arrondi, raison pour laquelle aucune couture n'est indiquée, si vous les avez tricotées en rangs, alors oui, il vous faudra faire la couture (et elles se tricotent de bas en haut et non de haut en bas, la correction va être faite, merci). Bonne continuation!

04.01.2022 - 12:01