
Popular categories
Looking for a yarn?


|
||||
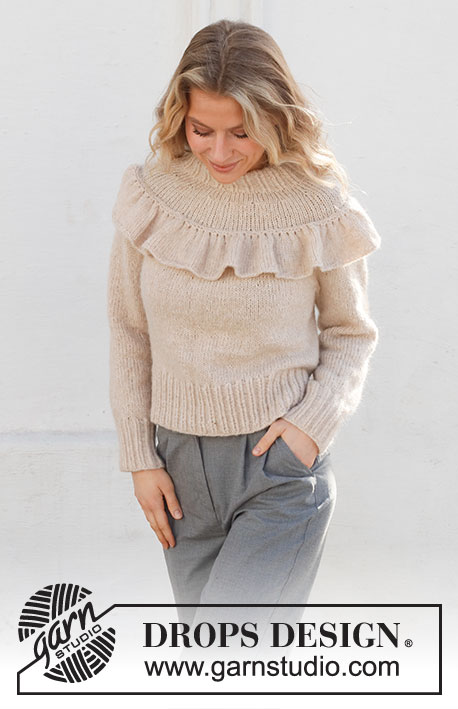
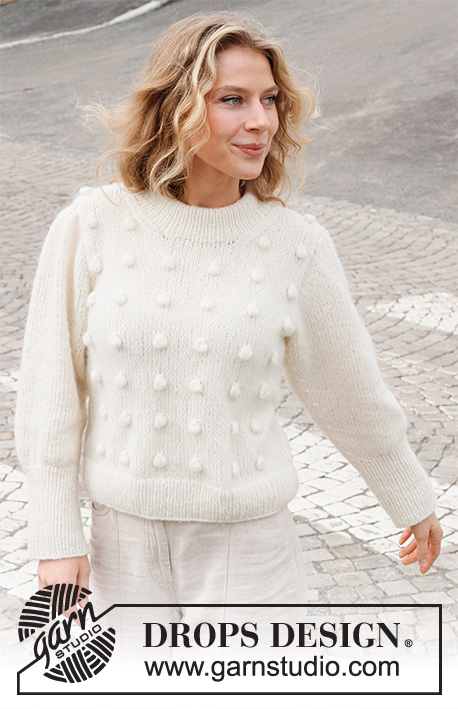
Full Moon Romance |
||||
 |
 |
|||
Knitted sweater in DROPS Air. The piece is worked with puffed sleeves and double neck. Sizes S - XXXL.
DROPS 227-14 |
||||
|
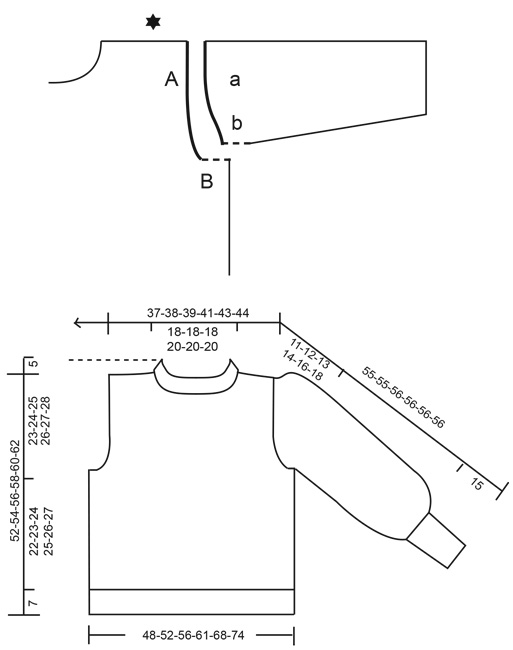
------------------------------------------------------- EXPLANATIONS FOR THE PATTERN: ------------------------------------------------------- RIDGE/GARTER STITCH (worked back and forth): Knit all rows. 1 ridge = knit 2 rows. DECREASE TIP (evenly spaced): To work out how to decrease evenly, count the total number of stitches on needle (e.g. 93 stitches) minus the edge stitches (e.g. 2 stitches) and divide the remaining stitches by the number of decreases to be made (e.g. 14) = 6.5. In this example decrease by knitting together alternately each 5th and 6th stitch and each 6th and 7th stitch. DECREASE TIP-2 (for armholes and neck): All decreases are worked from the right side! Decrease 2 stitches as follows: At the beginning of the row: Work 1 edge stitch in garter stitch, knit 2, slip 1 stitch as if to knit, knit 2 together, pass the slipped stitch over the knitted together stitches. At the end of the row: Work until there are 6 stitches left, knit 3 together, knit 2, 1 edge stitch in garter stitch. Decrease 1 stitch as follows: At the beginning of the row: Work 1 edge stitch in garter stitch, knit 2, slip 1 stitch as if to knit, knit 1 and pass the slipped stitch over the knitted stitch. At the end of the row: Work until there are 5 stitches left, knit 2 together, knit 2, 1 edge stitch in garter stitch. DECREASE TIP-3 (for sleeves): Decrease 1 stitch on either side of the marker thread as follows: Work until there are 3 stitches left before the marker thread, knit 2 together, knit 2 (marker thread sits between these 2 stitches), slip 1 stitch as if to knit, knit 1 and pass the slipped stitch over the knitted stitch. BINDING-OFF TIP: To avoid the bind-off edge being tight you can bind off with a larger size needle. If the edge is still tight, make 1 yarn over after approx. each 4th stitch at the same time as binding off; the yarn overs are bind off as normal stitches. ------------------------------------------------------- START THE PIECE HERE: ------------------------------------------------------- SWEATER – SHORT OVERVIEW OF THE PIECE: The front and back pieces are worked back and forth separately with circular needle, bottom up. The sleeves are worked top down, first back and forth for the sleeve cap, then the rest of the sleeve is worked in the round with short circular needle/double pointed needles. The piece is sewn together and the double neck worked to finish. FRONT PIECE: Cast on 93-99-107-117-129-141 stitches (including 1 edge stitch on each side) with circular needle size 4 MM = US 6 and DROPS Air. Purl 1 row from the wrong side. Then work rib from the right side as follows: 1 edge stitch in GARTER STITCH – read description above, work rib (knit 1, purl 1) until there are 2 stitches left, knit 1 and 1 edge stitch in garter stitch. Continue this rib back and forth for 7 cm = 2¾". Knit 1 row from the right side where you decrease 14-14-16-17-19-21 stitches evenly spaced – read DECREASE TIP-1 = 79-85-91-100-110-120 stitches. Change to circular needle size 5.5 MM = US 9. Work stockinette stitch with 1 edge stitch in garter stitch on each side. REMEMBER THE KNITTING GAUGE! When the piece measures 29-30-31-32-33-34 cm = 11⅜"-11¾"-12¼"-12½"-13"-13⅜", bind off 4-4-5-5-6-6 stitches at the beginning of the next 2 rows for the armholes = 71-77-81-90-98-108 stitches. Continue by decreasing for the armholes on each row from the right side as follows – read DECREASE TIP-2. Decrease 2 stitches every 2nd row 0-0-0-2-4-6 times and 1 stitch every 2nd row 6-8-9-8-7-7 times (= 6-8-9-12-15-19 stitches decreased on each side) = 59-61-63-66-68-70 stitches. Continue working stockinette stitch and 1 edge stitch in garter stitch on each side. When the piece measures 42-44-45-47-48-50 cm = 16½"-17¼"-17¾"-18½"-19"-19¾", place the middle 13-13-13-16-16-16 stitches on a thread for the neck and each shoulder is finished separately. On the next row from the right side begin to decrease for the neck – remember DECREASE TIP-2 (on the right shoulder decrease at the beginning of the row, on the left shoulder at the end of the row). Decrease 1 stitch every 2nd row 8 times in all sizes = 15-16-17-17-18-19 stitches on the shoulder. Continue working until the piece measures 52-54-56-58-60-62 cm = 20½"-21¼"-22"-22¾"-23⅝"-24⅜". Bind off. Work the other shoulder in the same way. BACK PIECE: Cast on 93-99-107-117-129-141 stitches (including 1 edge stitch on each side) with circular needle size 4 MM = US 6 and DROPS Air. Purl 1 row from the wrong side. Then work rib from the right side as follows: 1 edge stitch in garter stitch, work rib (purl 1, knit 1) until there are 2 stitches left, purl 1 and 1 edge stitch in garter stitch. Continue this rib back and forth for 7 cm = 2¾". Knit 1 row from the right side where you decrease 14-14-16-17-19-21 stitches evenly spaced = 79-85-91-100-110-120 stitches. Change to circular needle size 5.5 MM = US 9. Work stockinette stitch with 1 edge stitch in garter stitch on each side until the piece measures 29-30-31-32-33-34 cm = 11⅜"-11¾"-12¼"-12½"-13"-13⅜". Bind off 4-4-5-5-6-6 stitches at the beginning of the next 2 rows for the armholes = 71-77-81-90-98-108 stitches. Continue with stockinette stitch and 1 edge stitch in garter stitch on each side and decrease for the armholes in the same way as on the front piece = 59-61-63-66-68-70 stitches. When the piece measures 50-52-54-56-58-60 cm = 19¾"-20½"-21¼"-22"-22¾"-23⅝", bind off the middle 27-27-27-30-30-30 stitches for the neck and each shoulder is finished separately. On the next row from the neck bind off 1 stitch = 15-16-17-17-18-19 stitches on the shoulder. Continue working until the piece measures 52-54-56-58-60-62 cm = 20½"-21¼"-22"-22¾"-23⅝"-24⅜". Bind off. Work the other shoulder in the same way. SLEEVES: Cast on 16-16-18-18-20-20 stitches with circular needle size 4 MM = US 6 and DROPS Air. Change to circular needle size 5.5 MM = US 9. Work 2 rows of stockinette stitch back and forth. The next row is worked as follows: 1 edge stitch in garter stitch, * 1 yarn over, knit 1 *, work from *-* until there is 1 stitch left, 1 yarn over, 1 edge stitch in garter stitch = 31-31-35-35-39-39 stitches. Purl 1 row (yarn overs are purled to leave holes). Work the next row from the right side as follows: 1 edge stitch in garter stitch, * knit 2, 1 yarn over *, work from *-* until there are 2 stitches left, knit 1, 1 edge stitch in garter stitch = 45-45-51-51-57-57 stitches. Purl 1 row with 1 edge stitch in garter stitch on each side (yarn overs are purled to leave holes). Continue back and forth with stockinette stitch, AT THE SAME TIME cast on stitches for the sleeve cap at the end of each row on each side as follows: 3-3-3-3-2-2 stitches 3-5-4-2-3-3 times, 1 stitch 2-2-4-3-6-9 times, 3-2-2-2-2-2 stitches 2-1-1-5-3-2 times and 4-4-5-5-6-6 stitches 1 time = 87-91-97-99-105-107 stitches. THE PIECE IS NOW MEASURED FROM HERE. Continue in the round with stockinette stitch over all stitches. Insert a marker thread at the beginning of the round (= mid-under sleeve, where 4-4-5-5-6-6 stitches were cast on either side of the sleeve cap). When the piece measures 4 cm = 1½", decrease 1 stitch on each side of the marker thread – read DECREASE TIP-3. Decrease like this every 2-1½-1½-1½-1-1 cm = ¾"-½"-½"-½"-⅜"-⅜" a total of 13-14-16-16-18-18 times = 61-63-65-67-69-71 stitches. Continue working until the sleeve measures 29-28-28-27-25-23 cm = 11⅜"-11"-11"-10⅝"-9¾"-9". Now work the next round as follows: Knit 8-9-9-10-10-11 stitches, knit 45-45-47-47-49-49 stitches and decrease 15 stitches evenly over these stitches, knit 8-9-9-10-10-11 = 46-48-50-52-54-56 stitches. Change to double pointed needles size 4 MM = US 6. Work rib (knit 1, purl 1) for 15 cm = 6". Bind off with knit over knit and purl over purl – read BINDING-OFF TIP. The sleeve measures a total of approx. 55-55-56-56-56-56 cm = 21⅝"-21⅝"-22"-22"-22"-22". Work the other sleeve in the same way. ASSEMBLY: Sew the shoulder seams inside the bind-off edge. Sew the sleeves to the body, inside the cast-on edge on the sleeve and the 1 edge stitch on the body. Sew the side seams inside the 1 edge stitch. NECK: Knit up from the right side, inside the 1 edge stitch, 88-100 stitches (including the stitches on the thread in front) with short circular needle size 4 MM = US 6. The number of stitches should be divisible by 2. Work rib (knit 1, purl 1) in the round for 10 cm = 4". Bind off with knit over knit and purl over purl – remember BINDING-OFF TIP. Fold the neck double to the inside and sew down. To avoid the neck being tight and rolling outwards, it is important that the seam is elastic. |
||||
Diagram explanations |
||||
|
||||
|
||||
|
Have you made this or any other of our designs? Tag your pictures in social media with #dropsdesign so we can see them! Do you need help with this pattern?You'll find tutorial videos, a Comments/Questions area and more by visiting the pattern on garnstudio.com. © 1982-2024 DROPS Design A/S. We reserve all rights. This document, including all its sub-sections, has copyrights. Read more about what you can do with our patterns at the bottom of each pattern on our site. |
||||


With over 40 years in knitting and crochet design, DROPS Design offers one of the most extensive collections of free patterns on the internet - translated to 17 languages. As of today we count 304 catalogs and 11422 patterns - 11417 of which are translated into English (US/in).
We work hard to bring you the best knitting and crochet have to offer, inspiration and advice as well as great quality yarns at incredible prices! Would you like to use our patterns for other than personal use? You can read what you are allowed to do in the Copyright text at the bottom of all our patterns. Happy crafting!
Comments / Questions (15)
Det står at ermet skal strikkes til det er 29 cm, så en omgang med felling , deretter vrangbord 15 cm. Da skal ermet være 55 cm langt. Det stemmer ikke, blir jo mye kortere
03.11.2023 - 05:22DROPS Design answered:
Hei Marit, Det har du rett i. Ermet måler ca 44 cm. God fornøyelse!
03.11.2023 - 06:51Hi, I am having issues at the sleeve start. For the small size, it said to cast on 16 then after the 2 stockinette rows and the first yarn over row, there should be 31 stitches total. I am not getting 31, I’m getting 23. Am I doing something wrong?
14.11.2022 - 20:32DROPS Design answered:
Hi Sara, On the third row you work 1 edge stitch then 1 yarn over, knit 1 until there is 1 stitch left, work 1 yarn over and 1 edge stitch. This increases the number of stitches by 15 (15 yarn overs), leaving you with 31 stitches. Happy knitting!
15.11.2022 - 07:03Olen ompelemassa pääntie reunusta ( resori on siis valmis, ja nyt pitäisi ommella se kaksinkerroin). Ohjeessa sanotaan:"On tärkeää, että saumasta tulee joustava" Missään ei kuitenkaan kerrota/ näytetä miten ommellaan sellainen joustava sauma. Tai edes miten ylipäätään ommellaan tällainen sauma...Jos se on niin tärkeä luulisi ,että siihen löytyy joku ohjevideo, mutta en ole löytänyt mitään..
05.11.2022 - 19:58DROPS Design answered:
Hei, saumasta tulee joustava, kun ompelet sen löyhin pistoin. Älä myöskään ompele liian tiheään. Tarkista ompelun aikana, että sauma ei kiristä.
14.11.2022 - 17:57Ho bisogno di un aiuto. Sto lavorando una taglia L. Quando si iniziano le dimizioni per gli scalfi c'è scritto di diminuire 2 maglie ogni 0 ferri. Questo vuol dire che devo saltare il passaggio e passare direttamnete alla diminuzione di 1 maglia ogni 2 ferri per 9 volte, o che devo comunque eseguire i ferri indicati (4 in tutto) ma senza diminuzioni? Grazie mille
15.10.2022 - 00:21DROPS Design answered:
Buonasera Valeria, deve saltare il passaggio e continuare con le diminuzioni successive. Buon lavoro!
15.10.2022 - 12:44Steekverhouding met naalden 4 of 5,5?
11.05.2022 - 15:19DROPS Design answered:
Dag Marja,
De stekenverhouding is met naald nr 5.5. (De boord wordt met naald 4 mm gebreid.)
14.05.2022 - 10:00Buongiorno, vorrei sapere se è possibile realizzare questo modello utilizzando il filato DROPS Melody. Grazie!
04.11.2021 - 14:27DROPS Design answered:
Buonasera Noemi, Melody è un filato diverso rispetto a quello richiesto nel modello, appartiene al gruppo filati D, Air al gruppo filati C. In ogni caso provi a lavorare un campione e veda se corrisponde a quello indicato. Buon lavoro!
04.11.2021 - 23:29Hi, i am having troubles with instructions for sleeves for size m: AT THE SAME TIME cast on stitches for the sleeve cap at the end of each row on each side as follows: 3 stitches 5 times, 1 stitch 2 times etc, what does a time mean? Knit row, add 3, purl add 3, 5 times, or simply add at the end? I can only get 91 in the end if i K 1row, add 3, P 1row add 3, 5 times, so 30 stiches in total. Then, add 1 and so on. Thank you!
12.10.2021 - 18:12DROPS Design answered:
Dear Julia, in the 2nd size work as follows: *cast on 3 sts at the end of next row from RS, cast on 3 sts at the end of next row from WS*, work from *-* a total of 5 times, then *cast on 1 st at the end of next row from RS, cast on 1 st at the end of next row from WS*, work from *-* a total of 2 times etc... you will cast on on each side: 3 sts x 5 + 1 st x 2 + 2 sts x 1 + 4 sts x 1 = 23 sts cast on + 45 sts + 23 sts cast on = 91 sts. Hope this will help, happy knitting!
13.10.2021 - 07:50De huller der bliver øverst på ærmet, har de en funktion eller er de bare til pynt? Syntes det er mærkeligt, at de er der, hvor ærmet skal sys på blusen.
08.10.2021 - 16:52DROPS Design answered:
Hei Jette. På denne modellen er mønstret slik at det blir søte små hull øverts på ermet. Om du ikke ønsker hull, kan du strikke kastene vridd på neste pinne. mvh DROPS Design
11.10.2021 - 09:49I would name this sophisticate or simply elegance
17.08.2021 - 10:03Flot model
05.08.2021 - 21:11