
Popular categories
Looking for a yarn?


|
|||||||
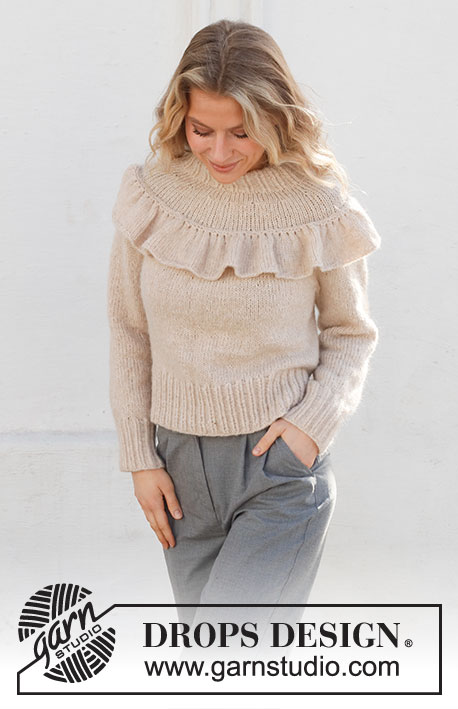
Winter Frill |
|||||||
 |
 |
||||||
Knitted sweater in DROPS Air. Piece is knitted top down with round yoke and flounce. Size: S - XXXL
DROPS 227-12 |
|||||||
|
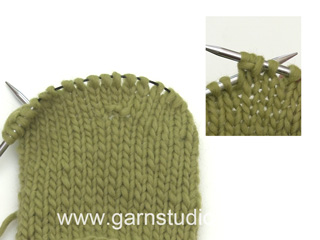
---------------------------------------------------------- EXPLANATION FOR THE PATTERN: ---------------------------------------------------------- GARTER STITCH (back and forth): Knit all rows. 1 ridge vertically = knit 2 rows. INCREASE TIP (evenly): To calculate how to increase evenly, use the total number of stitches on row (e.g. 92 stitches) and divide stitches by number of increases to be done (e.g. 13) = 7.1. In this example increase by making 1 yarn over after approx. every 7th stitch. On next round work yarn overs twisted to avoid holes. PATTERN: See diagram A.1. DECREASE TIP (applies to sleeves): Decrease 1 stitch on each side of marker thread as follows: Work until 3 stitches remain before marker thread and knit 2 together, knit 2 (marker thread is between these stitches), slip 1 stitch knitwise, knit 1, pass slipped stitch over stitch worked. BIND-OFF TIP: To avoid a tight bind-off edge when binding off, you may use a larger needle. If this still is too tight make 1 yarn over after approx. every 4th stitch while binding off (bind off yarn overs as stitches). ---------------------------------------------------------- START THE PIECE HERE: ---------------------------------------------------------- SWEATER - SHORT OVERVIEW OF THE PIECE: Worked in the round on circular needle, top down. Work double neck edge and yoke in the round on circular needle from mid back, top down. Increase stitches on yoke. Now divide yoke for body and sleeves. Work the body in the round on circular needle, work sleeves in the round on a double pointed needles / short circular needle. Work a flounce that are sewn to the yoke at the end. NECK EDGE: Cast on 72-84-88-92-96-100 stitches on short circular needle size 5 MM = US 8 with DROPS Air. Knit 1 round. Switch to a short circular needle size 4 MM = US 6. Work rib (= knit 2 twisted/purl 2). Work until rib measures 9 cm = 3½". The neck edge is later folded double and assembled so that the neck edge is approx. 4 cm = 1½". YOKE: Switch to circular needle size 5 MM = US 8. Insert 1 marker at beginning of round (= mid back), measure yoke from this marker! Knit 1 row from right side while increasing 3-1-2-13-14-15 stitches evenly - read INCREASE TIP = 75-85-90-105-110-115 stitches. Work in stockinette stitch until piece measures 3 cm = 1⅛". REMEMBER THE KNITTING GAUGE! On next round work A.1 over all stitches (= 15-17-18-21-22-23 repetitions of 5 stitches). When A.1 has been worked, there are 30-34-36-42-44-46 stitches= 105-119-126-147-154-161 stitches. Continue then in stockinette stitch until piece measures 9-9-10-10-11-11 cm = 3½"-3½"-4"-4"-4⅜"-4⅜" from marker. Work next round as follows: Knit 0-2-1-1-2-1, A.1 over the next 105-115-125-145-150-160 stitches (= 21-23-25-29-30-32 repetitions of 5 stitches), knit 0-2-0-1-2-0. When A.1 has been worked, there are 42-46-50-58-60-64 stitches= 147-165-176-205-214-225 stitches. When piece measures 10-10-11-11-12-12 cm = 4"-4"-4⅜"-4⅜"-4¾"-4¾", pull 1 marker thread through all stitches on needle. This is used later when sewing flounce on to sweater Then continue in stockinette stitch until piece measures 15-16-17-18-19-20 cm = 6"-6¼"-6¾"-7"-7½"-8" from marker. Work next round as follows: Knit 1-0-1-0-2-0, A.1 over the next 145-165-175-205-210-225 stitches (= 29-33-35-41-42-45 repetitions of 5 stitches), knit 1-0-0-0-2-0. When A.1 has been worked, there are 58-66-70-82-84-90 stitches= 205-231-246-287-298-315 stitches. Continue with stockinette stitch until piece measures 20-22-23-25-27-29 cm = 8"-8¾"-9"-9¾"-10⅝"-11⅜", now increase 27-29-26-17-26-29 stitches evenly = 232-260-272-304-324-344 stitches. Now divide yoke for body and sleeves as follows: Knit 34-39-40-44-49-53 (= half back piece), slip the next 48-52-56-64-64-66 stitches on 1 stitch holder for sleeve, cast on 6-6-8-8-10-12 new stitches on row (= in the side under sleeve), knit 68-78-80-88-98-106 (= front piece), slip the next 48-52-56-64-64-66 stitches on 1 stitch holder for sleeve, cast on 6-6-8-8-10-12 new stitches on row (= in the side under sleeve) and knit the remaining 34-39-40-44-49-53 stitches as before (= half back piece). Finish body and sleeves separately. NOW MEASURE THE PIECE FROM HERE! BODY: There are now 148-168-176-192-216-236 stitches on round. Continue in stockinette stitch. Work until piece measures 18-18-19-19-19-19 cm = 7"-7"-7½"-7½"-7½"-7½" from division. 10 cm = 4" remain until finished measurements. Try the sweater and work to desired length. Now increase stitches to avoid the rib from contracting. Knit 1 round while increasing 32-32-36-40-44-48 stitches evenly = 180-200-212-232-260-284 stitches. Switch to circular needle size 4 MM = US 6 and work rib = knit 2 twisted /purl 2 in the round. Work rib for 10 cm = 4". Bind off loosely with knit over knit and purl over purl - read BIND-OFF TIP. Sweater measures approx. 52-54-56-58-60-62 cm = 20½"-21¼"-22"-22¾"-23⅝"-24⅜" from shoulder and down. SLEEVE: Slip the 48-52-56-64-64-66 stitches from stitch holder in one side of piece on a short circular needle / double pointed needles size 5 MM = US 8 and pick up 1 stitch in each of the 6-6-8-8-10-12 new stitches cast on under sleeve = 54-58-64-72-74-78 stitches. Insert 1 marker thread mid under sleeve, i.e. in the middle of the 6-6-8-8-10-12 stitches that were cast on under sleeves. Move the marker thread upwards when working; it should be used for decrease mid under sleeve. Begin round at the marker thread and work stockinette stitch in the round. When sleeve measures 3 cm = 1⅛" from division, decrease 2 stitches mid under sleeve - read DECREASE TIP. Decrease like this every 8-5-3-2½-2-2 cm = 3⅛"-2"-1⅛"-1"-¾"-¾" 4-5-7-10-10-11 times in total = 46-48-50-52-54-56 stitches. Continue without decreases until sleeve measures 32-30-30-29-28-26 cm = 12½"-11¾"-11¾"-11⅜"-11"-10¼" from division (shorter measurements in the larger sizes because of wider neck and longer yoke). 10 cm = 4" remain until finished measurements. Try the sweater and work to desired length. Knit 1 round while increasing 6-4-6-4-6-4 stitches evenly = 52-52-56-56-60-60 stitches. Switch to double pointed needles size 4 MM = US 6. Work rib in the round (= knit 2 twisted/purl 2) for 10 cm = 4". Bind off with knit over knit and purl over purl - remember BIND-OFF TIP. Sleeve measures approx. 42-40-40-39-38-36 cm = 16½"-15¾"-15¾"-15¼"-15"-14¼" from division. Work the other sleeve the same way. FLOUNCE: Work flounce back and forth on circular needle, and fasten to front side of sweater, from one shoulder to the other. If you want flounce around the entire sweater, double the number of stitches. Cast on 74-82-86-102-106-114 stitches on circular needle size 4 MM = US 6 with DROPS Air. Work 2 ridges in GARTER STITCH - read explanation above. Switch to circular needle size 5 MM = US 8. Now in stockinette stitch, and increase stitches as follows: ROW 1 (= right side): * Knit 2, make 1 yarn over *, work from *-* until 2 stitches remain on row, and finish with knit 2. 36-40-42-50-52-56 stitches have been increased and there are 110-122-128-152-158-170 stitches on needle. ROW 2 (= wrong side): Purl all stitches, purl yarn overs (to make holes). ROW 3 (= right side): * Knit 3, make 1 yarn over *, work from *-* until 2 stitches remain on row, and finish with knit 2. 36-40-42-50-52-56 stitches have been increased and there are 146-162-170-202-208-226 stitches on needle. ROW 4 (= wrong side): Purl all stitches, purl yarn overs (to make holes). Work in stockinette stitch until piece measures approx. 8-9-9-9-10-10 cm = 3⅛"-3½"-3½"-3½"-4"-4", and adjust so that next row is worked from wrong side. * Purl 2, knit 2 *, repeat *-* the entire row. Loosely bind off on next row, bind off with knit over knit and purl over purl. ASSEMBLY: Fasten flounce to front side of sweater, from shoulder to shoulder. Fasten flounce along marker thread inserted into yoke, with small stitches. Pull out the marker thread. Fold rib at the top of neck down on inside of garment. Fasten rib to get a double neck edge. To avoid a tight neck edge that sticks out it is important to keep the seam elastic. |
|||||||
Diagram explanations |
|||||||
|
|||||||

|
|||||||
|
Have you made this or any other of our designs? Tag your pictures in social media with #dropsdesign so we can see them! Do you need help with this pattern?You'll find tutorial videos, a Comments/Questions area and more by visiting the pattern on garnstudio.com. © 1982-2024 DROPS Design A/S. We reserve all rights. This document, including all its sub-sections, has copyrights. Read more about what you can do with our patterns at the bottom of each pattern on our site. |
|||||||


With over 40 years in knitting and crochet design, DROPS Design offers one of the most extensive collections of free patterns on the internet - translated to 17 languages. As of today we count 304 catalogs and 11422 patterns - 11417 of which are translated into English (US/in).
We work hard to bring you the best knitting and crochet have to offer, inspiration and advice as well as great quality yarns at incredible prices! Would you like to use our patterns for other than personal use? You can read what you are allowed to do in the Copyright text at the bottom of all our patterns. Happy crafting!
Comments / Questions (22)
Hvordan skal udtagning forstås : “ Strik 1 pind ret fra retsiden hvor der tages 3-1-2-13-14-15 jævnt fordelt” I mine ører giver det slet ingen mening
10.01.2024 - 11:52DROPS Design answered:
Hej Lissy, det kommer an på hvilken størrelse du strikker. I den mindste størrelse tager du 3 masker ud jævnt fordelt, i str M tager du 1 m ud osv :)
11.01.2024 - 14:07Kunne man strikke flæse direkte på Blusen? F.eks ved at sætte en wire i maskerne istedet for en snor - og tage ind til Sidst Snor
13.12.2023 - 19:03DROPS Design answered:
Hej Susanne, prøv på en lille prøve først, så du ser om det bliver fint :)
14.12.2023 - 08:26So ein schönes feminines Design! Mal was ganz anderes. Bin verliebt in meinen neuen Sweater!
08.12.2023 - 10:52Ususally the S size of the Drops Design patterns fit perfectly, but this time it was too tight and had to re-knit it in size M. So just a hint: double-check the size and measurement before start knitting.
13.05.2023 - 18:10Buongiorno. Il diagramma A1 devo leggerlo considerando che devo partire prima dalla riga sotto o da quella sopra? Grazie per l'aiuto
05.03.2023 - 19:10DROPS Design answered:
Buonasera Diletta, i diagrammi si leggono dal basso verso l'alto, da destra verso sinistra per la lavorazione in tondo. Buon lavoro!
06.03.2023 - 20:05Buongiorno. Non ho capito come si realizza A1. Il quadratino nero cosa istruisce a fare nello specifico?
05.03.2023 - 19:08DROPS Design answered:
Buonasera Beatrice, per il quadratino nero deve lavorare 1 maglia diritto, 1 gettato e 1 maglia diritto ritorto nella stessa maglia. Buon lavoro!
06.03.2023 - 20:07Hvordan syer jeg flæsen fast til sidst? Jeg kan ikke finde en video som viser det. Mvh. Karin
08.06.2022 - 23:24DROPS Design answered:
Hej Karin, vi har mange monteringsvideoer, jeg tror du kan bruge denne: Montering (Lomme)
10.06.2022 - 08:45Hello. I have made this nice model and decided to go with the flounce all around the sweater. However, the flounce is not heavy enough and it curls up on itself. How should I keep it down to make it look tidy like in your pictures? Thank you.
23.01.2022 - 12:17DROPS Design answered:
Dear JJ, you can block it, wash it and let it dry as flat as possible. Happy knitting!
24.01.2022 - 09:32Bij de ruche af zetten krolt mijn afgezet stuk naar binnen. Hoe los ik dat op? Bedankt
01.12.2021 - 21:34Thank you for the beautiful pattern! I was wondering if i can pick up the 164 (82*2) stitches for the flounce directly from the row that i put the marker thread in, and knit the flounce directly in the round? would that mess up the folds? Also, would the neck band stick out if I knit it to a fold, stitch for stitch right at end of the 9 cm? (considering it's supposed to be a "loose" sew in) I'm not an experienced knitter and i would appreciate guidance :)
11.11.2021 - 10:01DROPS Design answered:
Dear Tara, yes it is possible to pick up stitches and knit the flounce directly on the jumper. You can also knit the neck band together instead of sewing it (see for ex. this video showing how to knit a folded edge). Happy knitting!
18.11.2021 - 10:10