DROPS Muskat
DROPS Muskat
100% Cotton
from 1.85 £ /50g
Get the yarn to make this pattern from 12.95£.

The yarn cost is calculated from the pattern’s smallest size and the yarn’s cheapest product type. Looking for an even better price? You might find it on the DROPS Deals!

DROPS SS24

Spring Bloom

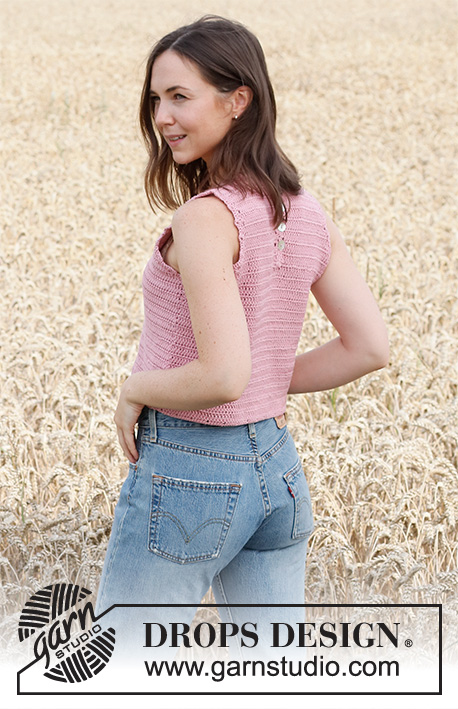
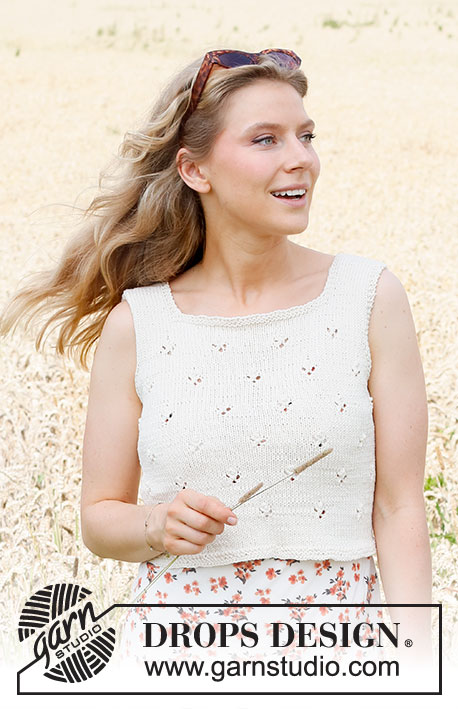
Crocheted top in DROPS Muskat. Piece is crocheted top down with vent mid back of neck. Size XS–XXL.

DROPS 220-15
DROPS design: Pattern no R-781
Yarn group B
-------------------------------------------------------

SIZE:
S - M - L - XL - XXL - XXXL

MATERIALS:
DROPS MUSKAT from Garnstudio (belongs to yarn group B)
350-350-400-450-450-500 g colour 29, pink panther

CROCHET TENSION:
20 treble crochets in width and 10 rows vertically = 10 x 10 cm.

CROCHET HOOK:
DROPS CROCHET HOOK SIZE 3.5 mm
Hook size is only a suggestion! If you have too many stitches on 10 cm switch to larger hook. If you have too few stitches on 10 cm switch to smaller hook.

DROPS MOTHER-OF-PEARL BUTTON ARCHED (white), NO 521: 4 pieces for all sizes

-------------------------------------------------------

Alternative Yarn – See how to change yarns here
Yarn Groups A to F – Use the same pattern and change the yarn here
Yarn usage using an alternative yarn – Use our yarn converter here

-------------------------------------------------------

DROPS Muskat
DROPS Muskat
100% Cotton
from 1.85 £ /50g
Get the yarn to make this pattern from 12.95£.

The yarn cost is calculated from the pattern’s smallest size and the yarn’s cheapest product type. Looking for an even better price? You might find it on the DROPS Deals!

Pattern instructions

NOTE: This pattern is written in British English. All measurements in charts are in cm. For conversion from cm to inches - click here. There are different terms for crocheting in British and American English. If this pattern includes crochet, click for "crochet terms" here. For this pattern in American English, please click here.
-------------------------------------------------------

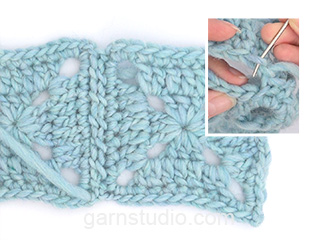
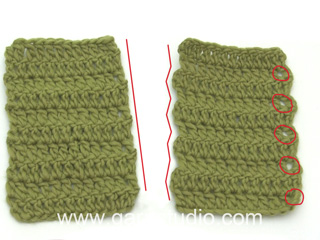
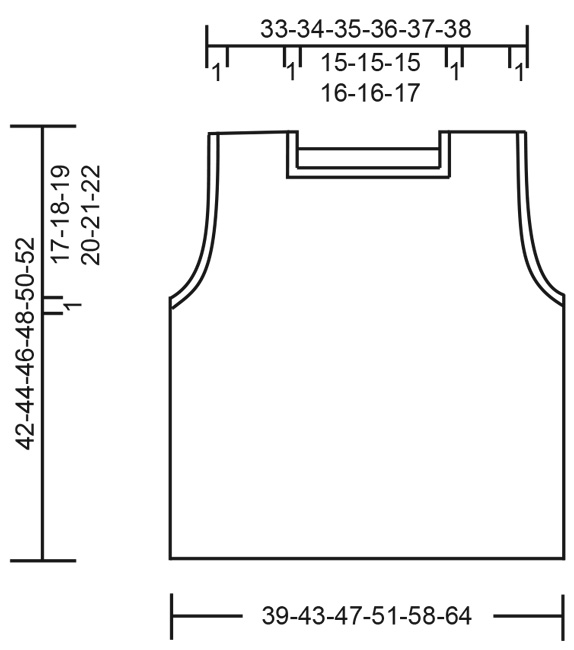
EXPLANATION FOR THE PATTERN:

-------------------------------------------------------

CROCHET TIP FOR CHAIN STITCH:
If you work at the end of crochet hook the chain stitch will often be too tight. 
1 chain stitch should be just as long as 1 treble crochet is wide. 

CROCHET INFORMATION:
At beginning of every row with treble crochets work 3 chain stitches, these chain stitches do not replace first treble crochet.

INCREASE TIP (applies to armholes):
Increase 1 stitch as follows: Work 1 chain stitch at the end of row (= 1 new stitch).
Increase 3 stitches as follows: Work 3 chain stitches at the end of row (= 3 new stitches).
On next row after increase work 1 treble crochet in each of the new chain stitches.

-------------------------------------------------------

START THE PIECE HERE:

-------------------------------------------------------

TOP - SHORT OVERVIEW OF THE PIECE:
Work front piece and back piece back and forth separately and work top down. When the parts are worked, sew them together. Finally crochet an edge around the armholes and neck edge.

FRONT PIECE:
Right shoulder:
Work 18-19-20-20-21-21 chain stitches – read CROCHET TIP FOR CHAIN STITCH, work 1 treble crochet in the 4th chain stitch from hook, then work 1 treble crochet in each of the next 14-15-16-16-17-17 chain stitches = 15-16-17-17-18-18 treble crochet and 3 chain stitches to turn with. Continue back and forth with 1 treble crochet in every treble crochet - read CROCHET INFORMATION.
REMEMBER THE CROCHET TENSION!
When 7-7-7-9-9-9 rows with treble crochets have been worked, cut the yarn and put piece aside. Work left shoulder.

Left shoulder:
Work 18-19-20-20-21-21 chain stitches, work 1 treble crochet in the 4th chain stitch from hook, then work 1 treble crochet in each of the next 14-15-16-16-17-17 chain stitches = 15-16-17-17-18-18 treble crochets and 3 chain stitches to turn with. Continue back and forth with 1 treble crochet in every treble crochet. When 7-7-7-9-9-9 rows with treble crochets have been worked, work next row from wrong side as follows:
Work 1 treble crochet in each of the 15-16-17-17-18-18 treble crochet on left shoulder, work 32-32-32-34-34-36 chain stitches (= neck), work 1 treble crochet in each of the 15-16-17-17-18-18 treble crochets on right shoulder – make sure to work from wrong side to that texture is the same on right and left shoulder.

There are now 62-64-66-68-70-72 trebles on row.
Continue back and forth in treble crochets. When piece measures 10-11-12-11-12-11 cm from shoulder, begin increase in each side for armhole – read INCREASE TIP. Increase 1 stitch 3-2-1-1-1-1 time, 3 stitches 0-1-2-3-3-4 times and 5-6-7-7-11-13 stitches 1 time = 78-86-94-102-112-124 stitches. Piece measures approx. 18-19-20-21-22-23 cm from shoulder and down.
Continue back and forth with treble crochets until piece measures 42-44-46-48-50-52 cm in total from shoulder and down. Cut and fasten the yarn.

BACK PIECE:
Right shoulder:
Work 18-19-20-20-21-21 chain stitches, work 1 treble crochet in the 4th chain stitch from hook, then work 1 treble crochet in each of the next 14-15-16-16-17-17 chain stitches = 15-16-17-17-18-18 treble crochets and 3 chain stitches to turn with. Continue back and forth with 1 treble crochet in every treble crochet. When 2 rows with treble crochets have been worked, cut the yarn. Work 16-16-16-17-17-18 loose chain stitches (= neck), then work 1 treble crochet in every treble crochet on shoulder – make sure to work from right side so that every other row on shoulder is worked from right side and wrong side = 31-32-33-34-35-36 stitches. Continue back and forth with 1 treble crochet in every treble crochet.

OVERVIEW OF NEXT SECTION:
Now increase for armholes, at the same time when piece measures 15 cm, put piece aside and work left shoulder. Then work left and right shoulder together to create a vent mid back. Read all of the following section before continuing.

When piece measures 10-11-12-11-12-11 cm from shoulder, begin increase for armhole in the side - increase at the end of each row from right side - remember INCREASE TIP. Increase 1 stitch 3-2-1-1-1-1 time, 3 stitches 0-1-2-3-3-4 times and 5-6-7-7-11-13 stitches 1 time, AT THE SAME TIME when piece measures 15 cm from shoulder – adjust so that last row is worked from wrong side, cut the yarn. Put piece aside. Work left shoulder.

Left shoulder:
Work 18-19-20-20-21-21 chain stitches, work 1 treble crochet in the 4th chain stitch from hook, then work 1 treble crochet in each of the next 14-15-16-16-17-17 chain stitches = 15-16-17-17-18-18 treble crochets and 3 chain stitches to turn with. Continue back and forth with 1 treble crochet in every treble crochet. When 3 rows with treble crochets have been worked, work 16-16-16-17-17-18 chain stitches at the end of 3rd row (= neck). Work 3 chain stitches to turn with, and work 1 treble crochet in every stitch = 31-32-33-34-35-36 stitches. Continue back and forth in treble crochets.
Now increase for armhole the same way as on right shoulder but increase at the end of every row from wrong side. AT THE SAME TIME when piece measures 15 cm - adjust so that last row is worked from wrong side, work left and right shoulder together from right side as follows:

Work as before over stitches on left shoulder, then work over stitches from right shoulder. There is now a vent mid back on back piece. Continue back and forth with treble crochets and increases for armholes in each side. When all increases for armhole are done, there are 78-86-94-102-112-124 stitches and piece measures approx. 18-19-20-21-22-23 cm from shoulder.
Continue back and forth with treble crochets until piece measures 42-44-46-48-50-52 cm in total from shoulder and down. Cut and fasten the yarn.

ASSEMBLY:
Sew the shoulder seams together. Sew side seams, and leave a vent of approx. 5 cm in each side at the bottom of top.

ARMHOLE EDGES:
Work an edge around the armholes as follows - begin mid under sleeve with 1 slip stitch in first stitch:
ROUND 1: Work 1 chain stitch, * 1 double crochet in next stitch, 1 chain stitch, skip approx. 1 cm *, work from *-* the entire round – adjust to work a number of double crochets/chain stitches that is divisible by 6, finish with 1 slip stitch in first chain stitches at the beginning of round.
ROUND 2: Work 1 chain stitch, * skip 1 double crochet, work 2 double crochets around next chain stitch, 3 chain stitches, skip 1 double crochet, work 1 treble crochet around next chain stitch, skip 1 double crochet, work 2 double crochets around chain stitch *, work from *-* the entire round, finish with 1 slip stitch in first chain stitch at the beginning of round.

NECK EDGE:
Work an edge around the neck as follows - begin mid back at the bottom of vent and work first row from wrong side.
ROW 1: Work 1 slip stitch in first stitch, 1 chain stitch, * 1 double crochet, 1 chain stitch, skip approx. 1 cm *, work from *-* 12 times up along the vent, continue the same way around the neck edge and work the same way 12 times down along the other side of vent – adjust to work a number of double crochet/chain stitches that is divisible by 6, finish with 1 double crochet at the bottom of vent. Turn piece and work 2nd row from right side.
ROW 2: Work 1 chain stitch, * skip 1 double crochet, work 2 double crochets around next chain stitch, 3 chain stitches, skip 1 double crochet, work 1 treble crochet around next chain stitch, skip 1 double crochet, work 2 double crochets around next chain stitch *, work from *-* the entire round, finish with 1 double crochet at the bottom of vent.
Now sew neck edge at the bottom at vent together as follows:
Place left side of edge over right side of vent and sew a few stitches through both layers to fasten the edges together.
Sew buttons on to the right side of vent. Button through chain spaces on left side of edge.

Diagram

diagram measurements
Do you have a question? See a list of frequently asked questions (FAQ)

Knitting tension is what determines the final measurements of your work, and is usually measured per 10 x 10 cm. It is provided like so: number of stitches in width x number of rows in height - eg: 19 stitches x 26 rows = 10 x 10 cm.

The knitting tension is very individual; some people knit/crochet loosely while others work tightly. You adjust the knitting tension with the needle size, which is why the suggested needle size is only meant as a guide! You need to adjust this (up or down) to ensure that YOUR knitting tension matches the knitting tension provided in the pattern. If you work with a different knitting tension than provided you will have a different yarn consumption, and your work will have different measurements than what the pattern suggests.

The knitting tension also determines which yarns can replace each other. As long as you achieve the same knitting tension you can replace one yarn with another.

See DROPS lesson: How to measure your tension/gauge

See DROPS video: How to make a gauge tension swatch

The required amount of yarn is provided in grams, eg: 450 g. To calculate how many balls you’ll need you first need to know how many grams are in 1 ball (25g, 50g or 100g). This information is available if you click on the individual yarn quality on our pages. Divide the amount required with the amount of each ball. For example, if each ball is 50g (the most common amount), the calculation will be as follows: 450 / 50 = 9 balls.

The important thing when changing from one yarn to another is that the knitting/crochet tension remains the same. This is so that the measurements of the finished piece will be the same as on the sketch provided. It is easier to achieve the same knitting tension using yarns from the same yarn group. It is also possible to work with multiple strands of a thinner yarn to achieve the knitting tension of a thicker one. Please try our yarn converter. We recommend you to always work a test swatch.

Please NOTE: when changing yarn the garment might have a different look and feel to the garment in the photo, due to individual properties and qualities of each yarn.

See DROPS lesson: Can I use a different yarn than the one mentioned in the pattern?

All our yarns are categorised into yarn groups (from A to F) according to thickness and knitting tension – group A contains the thinnest yarns and group F the thickest. This makes it easier for you to find alternative yarns to our patterns, should you wish to switch yarn. All yarns within the same group have a similar knitting tension and can easily replace each other. However, different yarn qualities have different structures and properties which will give the finished work a unique look and feel.

Click here for an overview of the yarns in each yarn group

At the top of all our patterns you’ll find a link to our yarn calculator, which is a helpful tool should you wish to use a different yarn than suggested. By filling in the yarn quality you wish to replace, the amount (in your size) and number of strands, the calculator will present good alternative yarns with the same knitting tension. Additionally it will tell you how much you’ll require in the new qualities and whether you’ll need to work with multiple strands. Most skeins are 50g (some are 25g or 100g).

If the pattern is worked with multiple colours, every colour will have to be calculated separately. Similarly, if the pattern is worked with several strands of different yarns (for example 1 strand Alpaca and 1 strand Kid-Silk) you will have to find alternatives for each, individually.

Click here to see our yarn calculator

Since different yarns have different qualities and textures we have chosen to keep the original yarn in our patterns. However, you can easily find options among our available qualities by using our yarn calculator, or simply pick a yarn from the same yarn group.

It is possible that some retailers still have discontinued yarns in stock, or that someone has a few skeins at home that they would like to find patterns for.

The yarn calculator will provide both alternative yarn as well as required amount in the new quality.

If you think it's hard to decide what size to make, it can be a good idea to measure a garment you own already and like the size of. Then you can pick the size by comparing those measures with the ones available in the pattern's size chart.

You'll find the size chart at the bottom of the pattern.

See DROPS lesson: How to read size chart

The needle size provided in the pattern serves only as a guide, the important thing is to follow the knitting tension. And since knitting tension is very individual, you will have to adjust the needle size to ensure that YOUR tension is the same as in the pattern – maybe you’ll have to adjust 1, or even 2 needle sizes, up or down to achieve the correct tension. For this, we recommend that you work test swatches.

Should you work with a different knitting tension than the one provided, the measurements of the finished garment might deviate from the measurement sketch.

See DROPS lesson: How to measure your tension/gauge

See DROPS video: How to make a tension/gauge swatch

Working a garment top-down provides more flexibility and room for personal adjustment. For example it is easier to try the garment on while working, as well as making adjustments to length of yoke and shoulder caps.

The instructions are carefully explaining every step, in the correct order. Diagrams are adjusted to the knitting direction and are worked as usual.

The diagram depicts all rows/rounds, and every stitch seen from the right side. It is read from bottom to top, from right to left. 1 square = 1 stitch.

When working back and forth, every other row is worked from the right side and every other row is worked from the wrong side. When working from the wrong side, the diagram will have to be worked reversed: from left to right, knit stitches are purled, purl stitches are knit etc.

When working in the round every round is worked from the right side and the diagram are worked from right to left on all rounds.

See DROPS lesson: How to read knitting diagrams

The diagram depicts all rows/rounds, and every stitch seen from the right side. It is worked from bottom to top, from right to left.

When working back and forth every other row is worked from the right side: from right to left and every other row is worked from the wrong side: from left to right.

When working in the round, every row in the diagram are worked from the right side, from right to left.

When working a circular diagram you start in the middle and work your way outwards, counter clockwise, row by row.

The rows usually start with a given number of chain stitches (equivalent to the height of the following stitch), this will either be depicted in the diagram or explained in the pattern.

See DROPS lesson: How to read crochet diagrams

Instructions for working several diagrams after each other on the same row/round, will often be written like so: “work A.1, A.2, A.3 a total of 0-0-2-3-4 times". This means you work A.1 once, then A.2 is worked once, and A.3 is repeated (in width) the number of times provided for your size – in this case like so: S = 0 times, M = 0 times, L=2 times, XL= 3 times and XXL = 4 times.

The diagrams are worked as usual: begin with the first row in A.1, then work the first row in A.2 etc.

See DROPS lesson: How to read knitting diagrams

See DROPS lesson: How to read crochet diagrams

The total width of the garment (from wrist-to-wrist) will be larger in the larger sizes, despite the actual sleeves being shorter. The larger sizes have longer sleeve caps and wider shoulders, so there will be a good fit in all sizes.

The measurement sketch/schematic drawing provides information regarding the full length of the garment. If it’s a jumper or a jacket the length is measured from the highest point on the shoulder closest to the neckline, and straight down to the bottom of the garment. It is NOT measured from the tip of shoulder. Similarly, the length of yoke is measured from the highest point on the shoulder and down to where yoke is split into body and sleeves.

On a jacket measures are never taken along bands, unless specifically stated. Always measure inside band stitches when measuring the length.

See DROPS lesson: How to read a schematic drawing

Diagrams are often repeated on the round or in height. 1 repeat is the diagram the way it appears in the pattern. If it says to work 5 repeats of A.1 in the round, then you work A.1 a total of 5 times after/next to each other in the round. If it says to work 2 repeats of A.1 vertically/in height you work the entire diagram once, then begin again at the start and work the entire diagram one more time.

Chain stitches are slightly narrower than other stitches and to avoid working the cast-on edge too tight, we simply chain more stitches to begin with. The stitch count will be adjusted on the following row to fit the pattern and measurement sketch.

The rib edge is more elastic and will contract slightly compared to, for example, stocking stitch. By increasing before the rib edge, you avoid a visible difference in width between the rib edge and the rest of the body.

It’s very easy to cast off too tightly, and by making yarn overs while casting off (and simultaneously casting these off) you avoid a too tight cast off edge.

See DROPS video: How to bind off with yarn overs (yo)

To achieve an even increase (or decrease) you can increase on, for example: every 3rd and 4th row alternately, like so: work 2 rows and increase on the 3rd row, work 3 rows and increase on the 4th. Repeat this until the increase is complete.

See DROPS lesson: Increase or decrease 1 st on every 3rd and 4th row alternately

Should you prefer to work in the round instead of back and forth, you may of course adjust the pattern. You’ll need to add steeks mid-front (usually 5 stitches), and follow the instructions. When you would normally turn and work from the wrong side, simply work across the steek and continue in the round. At the end you’ll cut the piece open, pick up stitches to work bands, and cover the cut edges.

See DROPS video: How to knit steeks and cut open

Should you prefer to work back and forth instead of in the round, you may of course adjust the pattern so you work the pieces separately and then assemble them at the end. Divide the stitches for the body in 2, add 1 edge stitch in each side (for sewing) and work the front and back pieces separately.

See DROPS lesson: Can I adapt a pattern for circular needles into straight needles?

Pattern repeats can vary slightly in the different sizes, in order to get the correct proportions. If you’re not working the exact same size as the garment in the photo, yours might deviate slightly. This has been carefully developed and adjusted so that the complete impression of the garment is the same in all sizes.

Make sure to follow instructions and diagrams for your size!

If you have found a pattern you like which is available in women’s size it’s not very difficult to convert it to men’s size. The biggest difference will be the length of sleeves and body. Start working on the women size that you think would fit across the chest. The additional length will be worked right before you cast off for the armhole/sleeve cap. If the pattern is worked top-down you can add the length right after the armhole or before the first decrease on sleeve.

Regarding additional yarn amount, this will depend on how much length you add, but it is better with a skein too many than too few.

All yarns will have excess fibres (from production) that might come off as lint or shedding. Brushed yarns (ie hairier yarns) have more of these loose, excess fibres, causing more shedding.

Shedding also depends on what is worn under or over the garment, and whether this pulls at the yarn fibres. It’s therefore not possible to guarantee that there will be no shedding

Below are some tips on how to get the best result when working with hairier yarns:

1. When the garment is finished (before you wash it) shake it vigorously so the looser hairs come off. NOTE: do NOT use a lint roller, brush or any method that pulls at the yarn.

2. Place the garment in a plastic bag and put it in your freezer - the temperature will cause the fibres to become less attached to each other, and excess fibres will come off easier.

3. Leave in the freezer for a few hours before taking it out and shaking it again.

4. Wash the garment according to the instructions on the yarn label.

Pilling is a natural process that happens to even the most exclusive of fibers. It's a natural sign of wear and tear that is hard to avoid, and that is most visible in high friction areas of your garment like a sweater's arms and cuffs.

You can make your garment look as new by removing the pilling, using a fabric comb or a pill/lint remover.

Still can't find the answer you need? Then scroll down and leave your question so one of our experts can try to help you. This will be done normally within 5 to 10 working days.
In the meantime, you can read the questions and answers that others have left to this pattern or join the DROPS Workshop on Facebook to get help from fellow knitters/crocheters!

You might also like...

Post a comment to pattern DROPS 220-15

We would love to hear what you have to say about this pattern!

If you want to leave a question, please make sure you select the correct category in the form below, to speed up the answering process. Required fields are marked *.

Comments / Questions (9)

country flag Maria Luisa wrote:

Hi! I am going to crochet this top, I have got the yarn! My question is about sizing: I am a size 12 uk and my bust measurement is 39 inches. Which size do you advise me to make? I have made a crochet top from your website before, I made it a size medium and it was a bit big on me. Would be very grateful for your advice. Thank you.

20.05.2022 - 18:10

DROPS Design answered:

Dear Maria Luisa, measure a similar garment you have and like the size and compare these measurements to those in the chart, this is the best way to find the matching size; Read more here. Happy crocheting!

23.05.2022 - 09:06

country flag Marjolein Abeln wrote:

Bij uitleg welke maat haaknaald lijkt het advies net verkeerd om. Heb je teveel steken pak dan grotere naald?

09.05.2022 - 16:32

country flag Lieze wrote:

Heyy Heb al vraag gesteld ma ik snap het nog steeds niet. Bij de smal moet je 3 keer in 1 steek gaan enzo maar ik snap niet wat je bedoelt met die 3x in 1steek..? Kunt u het uitleggen aub..?

09.04.2022 - 13:11

DROPS Design answered:

Dag Lieze,

Bovenaan bij de uitleg voor het patroon (tip voor het meerderen) staat dit uitgelegd; je meerdert 3 steken aan door 3 lossen aan het eind van de toer te haken en op de volgende toer haak je 1 stokje in elk van de nieuwe lossen.

14.04.2022 - 11:30

country flag Lieze wrote:

Hallo, ik heb een vraagje. bij de linkerschouder te haken( heb het al aan het rechter schouder gehaakt) daaronder staat er ergens bij TIP VOOR HET MEERDEREN: meerder 3-2-1-1-1 keer in 1 steek, 0-1-2-3-3-4 keer in 3 steken en dan nog iets gelijkaardigs... ik snap hierbij niet wat je moet doen? kunt u me helpen? ( heb trouwens de versie voor de M. mvg

06.04.2022 - 22:01

DROPS Design answered:

Dag Lieze,

De serie getallen refereert aan de verschillende maten, dus als je bijvoorbeeld mat S haakt, neem je het eerste getal. Je meerdert dan dus 3 keer 1 steek en nog eens 0 keer 3 steken en tot slot 1 keer 5 steken.

09.04.2022 - 10:04

country flag Sofie wrote:

Hejsa! Jeg forsøger at hækle denne top i str. S, og ser på forstykket at jeg skal lave udtagninger og gå fra 62 masker til 78. Men 1 maske 3 gange og 5 masker en gang giver kun 70 masker, og stykket bliver helt skævt i den ene side hvor der er hæklet 5 nye masker. Er der noget jeg har misforstået?

07.09.2021 - 16:14

DROPS Design answered:

Hej Sofie. Du ska ta ut masker i hver side, så du tar ut 8 m på hver side. 62+8+8=78 m. Mvh DROPS Design

08.09.2021 - 08:08

country flag Louise wrote:

Skal der laves 3 lm både i starten og slutningen af rækken, for at kunne hækle kanten pæn hele vejen rundt?

03.09.2021 - 21:40

DROPS Design answered:

Hei Louise. Du hekler 3 luftmasker på begynnelsen av hver rad, - les Hekleinformasjon i oppskriften. Disse 3 luftmaskene erstatter IKKE første stav, men du kommer opp i "høyden" med stavene som skal hekles på raden. Du avslutter hver rad med 1 stav. Snu og start med 3 luftmasker. mvh DROPS design

13.09.2021 - 11:26

country flag Krista De Backer wrote:

Bij het meerderen van 1 steek bij de armsgaten moet je 1 losse haken. Moet je dan ook 3 keerlossen erbij haken? Dus 4 lossen haken in totaal? Groetjes

14.08.2021 - 13:59

DROPS Design answered:

Dag Krista,

Ja, je haakt inderdaad gewoon 3 keerlossen zoals anders, daarna haak je een stokje in de nieuwe losse, dit is de meerdering. Vervolgens haak je verder over de toer.

17.08.2021 - 12:38

country flag Mette Krogh wrote:

Hvad er maskesting til at sy toppen sammen med. Kan kun finde maskesting til strik

28.07.2021 - 12:56

DROPS Design answered:

Hej Mette, Se den video "Sy hæklede ruder sammen" så får du en fin søm :)

04.08.2021 - 08:44

country flag Valerie wrote:

C est une petit top d 'été comme on les adore de chez drop.

07.04.2021 - 08:15