DROPS Paris
DROPS Paris
100% Cotton
from 1.10 £ /50g
Get the yarn to make this pattern from 6.60£.

The yarn cost is calculated from the pattern’s smallest size and the yarn’s cheapest product type. Looking for an even better price? You might find it on the DROPS Deals!

DROPS SS24

Blue Pine Shore

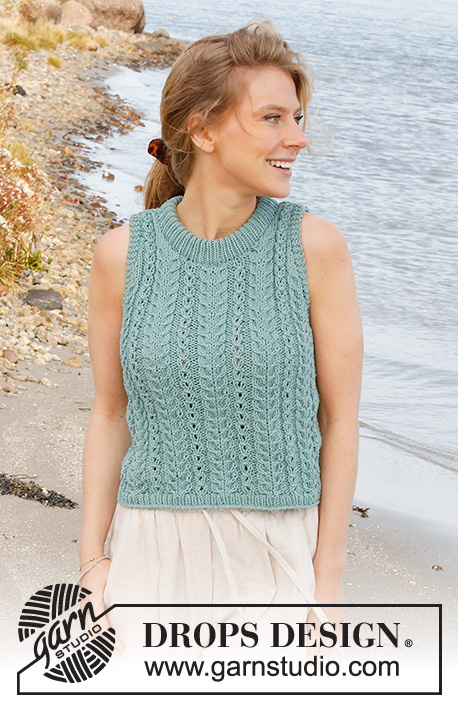
Knitted top in DROPS Paris. The piece is worked with cables and a double neck. Sizes S - XXXL.

DROPS 221-26
DROPS Design: Pattern no w-835
Yarn group C or A + A
-------------------------------------------------------

SIZES:
S - M - L - XL - XXL - XXXL

MATERIALS:
DROPS PARIS from Garnstudio (belongs to yarn group C)
300-350-400-450-450-500 g colour 62, sage green

KNITTING TENSION:
17 stitches in width and 22 rows in height with stocking stitch = 10 x 10 cm.

NEEDLES:
DROPS CIRCULAR NEEDLE SIZE 5 MM: Length 60 cm or 80 cm for stocking stitch and pattern.
DROPS CIRCULAR NEEDLE SIZE 4 MM: Length 40 cm and 60 cm or 80 cm for rib.
DROPS CABLE NEEDLE – for cables.
Needle size is only a guide. If you get too many stitches on 10 cm, change to a larger needle size. If you get too few stitches on 10 cm, change to a smaller needle size.

-------------------------------------------------------

Alternative Yarn – See how to change yarns here
Yarn Groups A to F – Use the same pattern and change the yarn here
Yarn usage using an alternative yarn – Use our yarn converter here

-------------------------------------------------------

DROPS Paris
DROPS Paris
100% Cotton
from 1.10 £ /50g
Get the yarn to make this pattern from 6.60£.

The yarn cost is calculated from the pattern’s smallest size and the yarn’s cheapest product type. Looking for an even better price? You might find it on the DROPS Deals!

Pattern instructions

NOTE: This pattern is written in British English. All measurements in charts are in cm. For conversion from cm to inches - click here. There are different terms for crocheting in British and American English. If this pattern includes crochet, click for "crochet terms" here. For this pattern in American English, please click here.
-------------------------------------------------------

EXPLANATIONS FOR THE PATTERN:

-------------------------------------------------------

RIDGE/GARTER STITCH (worked in the round):
1 ridge in height = 2 rounds; Knit 1 round and purl 1 round.

RIDGE/GARTER STITCH (worked back and forth):
Knit all rows.
1 ridge in height = Knit 2 rows.

PATTERN:
See diagrams A.1 and A.2. The diagrams show all the rows in the pattern from the right side.

INCREASE TIP (for sides of body):
The first increase is worked as follows: Work until there are 2-5-2-6-5-4 stitches left before the marker thread, make 1 yarn over, purl 4-10-4-12-10-8 (marker thread sits in the middle of these 4-10-4-12-10-8 stitches), 1 yarn over = 2 stitches increased by the marker thread. Repeat at the other marker thread = 4 stitches increased on the round.
On the next round the yarn overs are purled twisted to avoid holes and, subsequently, the new stitches are purled.
Each time you increase, there are 2 more stitches between the yarn overs (i.e. 1 more stitch on each side of the marker thread); in this way the yarn overs are straight after the lace-border before the marker thread and just before the lace-border after the marker thread; the increases are as invisible as possible.

DECREASE TIP (for armholes):
Decrease on the inside of the 3 edge stitches. All decreases are worked from the right side!
DECREASE AS FOLLOWS AFTER THE 3 EDGE STITCHES IN GARTER STITCH:
Purl 2 together.
DECREASE AS FOLLOWS BEFORE THE 3 EDGE STITCHES IN GARTER STITCH:
Work until there are 2 stitches left before the edge stitches and purl these 2 stitches twisted together.

-------------------------------------------------------

START THE PIECE HERE:

-------------------------------------------------------

TOP – SHORT OVERVIEW OF THE PIECE:
The body is worked in the round with circular needle as far as the armholes. Then the front and back pieces are finished separately, back and forth on the needle.
The shoulder seams are sewn together. A double neck is worked to finish.

BODY:
Cast on 132-144-162-178-204-230 stitches with circular needle size 4 mm and Paris – make sure the cast-on edge is not tight. Knit 1 round, then work rib in the round (knit 1, purl 1) for 2-2-2-3-3-3 cm.
Change to circular needle size 5 mm. Insert 1 marker thread at the beginning of the round and 1 marker thread after 66-72-81-89-102-115 stitches (sides of body). Allow the threads to follow your work onwards; they are used when increasing in the sides.
Knit 1 round.
The next round is worked as follows: * Purl 0-3-0-4-3-2, work A.1 over the next 60-60-75-75-90-105 stitches (= 4-4-5-5-6-7 repeats of 15 stitches), A.2 (= 6 stitches), purl 0-3-0-4-3-2, marker thread *, work from *-* 1 more time.
Continue this pattern. REMEMBER THE KNITTING TENSION!
When the piece measures 7 cm, increase 1 stitch on each side of both marker threads - read INCREASE TIP (= 4 stitches increased). Increase like this every 5-5-6-6-7-7 cm a total of 4 times on each side = 148-160-178-194-220-246 stitches.
Continue working until the piece measures 28-29-30-31-32-33 cm – adjust so the next round is an even round in A.1 (this is important to avoid cabling from the wrong side when the front and back pieces are finished back and forth).
Now work 2 RIDGES – read description above, over the middle 12-12-14-14-16-18 stitches on each side (i.e. 6-6-7-7-8-9 stitches on each side of both marker threads – the other stitches are continued as before).
After the 2 ridges cast off for the armholes on the next round as follows: Cast off 3-3-4-4-5-6 stitches, work as before until there are 3-3-4-4-5-6 stitches left before the next marker thread, cast off 6-6-8-8-10-12 stitches, work as before until there are 3-3-4-4-5-6 stitches left on the round and cast off these 3-3-4-4-5-6 stitches. Cut the strand and pull it through the last stitch.
The back and front pieces are finished separately.

BACK PIECE:
= 68-74-81-89-100-111 stitches. Start from the wrong side and continue the pattern back and forth with 3 edge stitches in GARTER STITCH on each side – read description above.
AT THE SAME TIME on the next row from the right side begin to decrease for the armholes – read DECREASE TIP. Decrease on each side every 2nd row (i.e. on each row from the right side) a total of 4-6-8-10-14-17 times on each side, and then every 4th row (i.e. every 2nd row from the right side) a total of 3-3-3-3-2-2 times on each side = 54-56-59-63-68-73 stitches.
When the piece measures 43-45-47-49-51-53 cm, decrease 4-4-4-6-6-6 stitches evenly spaced over the middle 24 stitches = 50-52-55-57-62-67 stitches. On the next row, cast off the middle 26-26-27-29-30-31 stitches for the neck and each shoulder is finished separately. Continue as before and cast off 2 stitches on the next row from the neck = 10-11-12-12-14-16 stitches.
When there is 1 row left before the piece measures 46-48-50-52-54-56 cm, knit 1 row from the right side where you decrease 2 stitches evenly spaced = 8-9-10-10-12-14 stitches. Cast off with purl from the wrong side. The piece measures approx. 46-48-50-52-54-56 cm from the cast-on edge. Work the other shoulder in the same way.

FRONT PIECE:
= 68-74-81-89-100-111 stitches. Start from the wrong side and continue the pattern back and forth, with 3 edge stitches in garter stitch on each side.
AT THE SAME TIME on the next row from the right side begin to decrease for the armholes. Decrease on each side every 2nd row a total of 4-6-8-10-14-17 times on each side, and then every 4th row a total of 3-3-3-3-2-2 times on each side = 54-56-59-63-68-73 stitches.
AT THE SAME TIME when the piece measures 38-39-41-42-44-46 cm, decrease 4-4-4-6-6-6 stitches evenly spaced over the middle 24 stitches = 50-52-55-57-62-67 stitches. On the next row place the middle 10-10-11-13-14-15 stitches on a thread for the neck and each shoulder is finished separately. Continue the pattern and cast off for the neck at the beginning of each row from the neck as follows: 3 stitches 1 time, 2 stitches 2 times and 1 stitch 3 times.
After all the decreases for the armhole and neck there are 10-11-12-12-14-16 stitches left on the shoulder. Continue working until there is 1 row left before the piece measures 46-48-50-52-54-56 cm. Knit 1 row from the right side where you decrease 2 stitches evenly spaced = 8-9-10-10-12-14 stitches. Cast off with purl from the wrong side. The piece measures approx. 46-48-50-52-54-56 cm from the cast-on edge. Work the other shoulder in the same way.

ASSEMBLY:
Sew the shoulder seams inside the cast-off edge.

DOUBLE NECK:
Start from the right side, on one shoulder, and knit up 80 to 100 stitches around the neck (including the stitches on the thread in front) with short circular needle size 4 mm and Paris – the number of stitches should be divisible by 2. Work rib in the round (knit 1, purl 1) for 7 cm. Loosely cast off with knit over knit and purl over purl.
Fold the neck double to the inside and sew down. To avoid the neck being tight and rolling outwards, it is important the seam is elastic.

This pattern has been corrected.

Updated online: 14.06.2022
Correction of number of stitches before decreasing for neck on both back and front pieces.

Diagram

symbols = knit from right side, purl from wrong side
symbols = purl from right side, knit from wrong side
symbols = between 2 stitches make 1 yarn over
symbols = knit 3, pass the first of these 3 stitches over the other 2, so it lies around them (= 1 stitch decreased)
symbols = this square has no stitch; it was decreased earlier or does not exist.Go straight to next symbol in diagram
symbols = place 3 stitches on cable needle behind the piece, knit 1, knit 3 from cable needle
symbols = place 1 stitch on cable needle in front of the piece, knit 3, knit 1 from cable needle
diagram
diagram

Each of our patterns has specific tutorial videos to help you.

Do you have a question? See a list of frequently asked questions (FAQ)

Knitting tension is what determines the final measurements of your work, and is usually measured per 10 x 10 cm. It is provided like so: number of stitches in width x number of rows in height - eg: 19 stitches x 26 rows = 10 x 10 cm.

The knitting tension is very individual; some people knit/crochet loosely while others work tightly. You adjust the knitting tension with the needle size, which is why the suggested needle size is only meant as a guide! You need to adjust this (up or down) to ensure that YOUR knitting tension matches the knitting tension provided in the pattern. If you work with a different knitting tension than provided you will have a different yarn consumption, and your work will have different measurements than what the pattern suggests.

The knitting tension also determines which yarns can replace each other. As long as you achieve the same knitting tension you can replace one yarn with another.

See DROPS lesson: How to measure your tension/gauge

See DROPS video: How to make a gauge tension swatch

The required amount of yarn is provided in grams, eg: 450 g. To calculate how many balls you’ll need you first need to know how many grams are in 1 ball (25g, 50g or 100g). This information is available if you click on the individual yarn quality on our pages. Divide the amount required with the amount of each ball. For example, if each ball is 50g (the most common amount), the calculation will be as follows: 450 / 50 = 9 balls.

The important thing when changing from one yarn to another is that the knitting/crochet tension remains the same. This is so that the measurements of the finished piece will be the same as on the sketch provided. It is easier to achieve the same knitting tension using yarns from the same yarn group. It is also possible to work with multiple strands of a thinner yarn to achieve the knitting tension of a thicker one. Please try our yarn converter. We recommend you to always work a test swatch.

Please NOTE: when changing yarn the garment might have a different look and feel to the garment in the photo, due to individual properties and qualities of each yarn.

See DROPS lesson: Can I use a different yarn than the one mentioned in the pattern?

All our yarns are categorised into yarn groups (from A to F) according to thickness and knitting tension – group A contains the thinnest yarns and group F the thickest. This makes it easier for you to find alternative yarns to our patterns, should you wish to switch yarn. All yarns within the same group have a similar knitting tension and can easily replace each other. However, different yarn qualities have different structures and properties which will give the finished work a unique look and feel.

Click here for an overview of the yarns in each yarn group

At the top of all our patterns you’ll find a link to our yarn calculator, which is a helpful tool should you wish to use a different yarn than suggested. By filling in the yarn quality you wish to replace, the amount (in your size) and number of strands, the calculator will present good alternative yarns with the same knitting tension. Additionally it will tell you how much you’ll require in the new qualities and whether you’ll need to work with multiple strands. Most skeins are 50g (some are 25g or 100g).

If the pattern is worked with multiple colours, every colour will have to be calculated separately. Similarly, if the pattern is worked with several strands of different yarns (for example 1 strand Alpaca and 1 strand Kid-Silk) you will have to find alternatives for each, individually.

Click here to see our yarn calculator

Since different yarns have different qualities and textures we have chosen to keep the original yarn in our patterns. However, you can easily find options among our available qualities by using our yarn calculator, or simply pick a yarn from the same yarn group.

It is possible that some retailers still have discontinued yarns in stock, or that someone has a few skeins at home that they would like to find patterns for.

The yarn calculator will provide both alternative yarn as well as required amount in the new quality.

If you think it's hard to decide what size to make, it can be a good idea to measure a garment you own already and like the size of. Then you can pick the size by comparing those measures with the ones available in the pattern's size chart.

You'll find the size chart at the bottom of the pattern.

See DROPS lesson: How to read size chart

The needle size provided in the pattern serves only as a guide, the important thing is to follow the knitting tension. And since knitting tension is very individual, you will have to adjust the needle size to ensure that YOUR tension is the same as in the pattern – maybe you’ll have to adjust 1, or even 2 needle sizes, up or down to achieve the correct tension. For this, we recommend that you work test swatches.

Should you work with a different knitting tension than the one provided, the measurements of the finished garment might deviate from the measurement sketch.

See DROPS lesson: How to measure your tension/gauge

See DROPS video: How to make a tension/gauge swatch

Working a garment top-down provides more flexibility and room for personal adjustment. For example it is easier to try the garment on while working, as well as making adjustments to length of yoke and shoulder caps.

The instructions are carefully explaining every step, in the correct order. Diagrams are adjusted to the knitting direction and are worked as usual.

The diagram depicts all rows/rounds, and every stitch seen from the right side. It is read from bottom to top, from right to left. 1 square = 1 stitch.

When working back and forth, every other row is worked from the right side and every other row is worked from the wrong side. When working from the wrong side, the diagram will have to be worked reversed: from left to right, knit stitches are purled, purl stitches are knit etc.

When working in the round every round is worked from the right side and the diagram are worked from right to left on all rounds.

See DROPS lesson: How to read knitting diagrams

The diagram depicts all rows/rounds, and every stitch seen from the right side. It is worked from bottom to top, from right to left.

When working back and forth every other row is worked from the right side: from right to left and every other row is worked from the wrong side: from left to right.

When working in the round, every row in the diagram are worked from the right side, from right to left.

When working a circular diagram you start in the middle and work your way outwards, counter clockwise, row by row.

The rows usually start with a given number of chain stitches (equivalent to the height of the following stitch), this will either be depicted in the diagram or explained in the pattern.

See DROPS lesson: How to read crochet diagrams

Instructions for working several diagrams after each other on the same row/round, will often be written like so: “work A.1, A.2, A.3 a total of 0-0-2-3-4 times". This means you work A.1 once, then A.2 is worked once, and A.3 is repeated (in width) the number of times provided for your size – in this case like so: S = 0 times, M = 0 times, L=2 times, XL= 3 times and XXL = 4 times.

The diagrams are worked as usual: begin with the first row in A.1, then work the first row in A.2 etc.

See DROPS lesson: How to read knitting diagrams

See DROPS lesson: How to read crochet diagrams

The total width of the garment (from wrist-to-wrist) will be larger in the larger sizes, despite the actual sleeves being shorter. The larger sizes have longer sleeve caps and wider shoulders, so there will be a good fit in all sizes.

The measurement sketch/schematic drawing provides information regarding the full length of the garment. If it’s a jumper or a jacket the length is measured from the highest point on the shoulder closest to the neckline, and straight down to the bottom of the garment. It is NOT measured from the tip of shoulder. Similarly, the length of yoke is measured from the highest point on the shoulder and down to where yoke is split into body and sleeves.

On a jacket measures are never taken along bands, unless specifically stated. Always measure inside band stitches when measuring the length.

See DROPS lesson: How to read a schematic drawing

Diagrams are often repeated on the round or in height. 1 repeat is the diagram the way it appears in the pattern. If it says to work 5 repeats of A.1 in the round, then you work A.1 a total of 5 times after/next to each other in the round. If it says to work 2 repeats of A.1 vertically/in height you work the entire diagram once, then begin again at the start and work the entire diagram one more time.

Chain stitches are slightly narrower than other stitches and to avoid working the cast-on edge too tight, we simply chain more stitches to begin with. The stitch count will be adjusted on the following row to fit the pattern and measurement sketch.

The rib edge is more elastic and will contract slightly compared to, for example, stocking stitch. By increasing before the rib edge, you avoid a visible difference in width between the rib edge and the rest of the body.

It’s very easy to cast off too tightly, and by making yarn overs while casting off (and simultaneously casting these off) you avoid a too tight cast off edge.

See DROPS video: How to bind off with yarn overs (yo)

To achieve an even increase (or decrease) you can increase on, for example: every 3rd and 4th row alternately, like so: work 2 rows and increase on the 3rd row, work 3 rows and increase on the 4th. Repeat this until the increase is complete.

See DROPS lesson: Increase or decrease 1 st on every 3rd and 4th row alternately

Should you prefer to work in the round instead of back and forth, you may of course adjust the pattern. You’ll need to add steeks mid-front (usually 5 stitches), and follow the instructions. When you would normally turn and work from the wrong side, simply work across the steek and continue in the round. At the end you’ll cut the piece open, pick up stitches to work bands, and cover the cut edges.

See DROPS video: How to knit steeks and cut open

Should you prefer to work back and forth instead of in the round, you may of course adjust the pattern so you work the pieces separately and then assemble them at the end. Divide the stitches for the body in 2, add 1 edge stitch in each side (for sewing) and work the front and back pieces separately.

See DROPS lesson: Can I adapt a pattern for circular needles into straight needles?

Pattern repeats can vary slightly in the different sizes, in order to get the correct proportions. If you’re not working the exact same size as the garment in the photo, yours might deviate slightly. This has been carefully developed and adjusted so that the complete impression of the garment is the same in all sizes.

Make sure to follow instructions and diagrams for your size!

If you have found a pattern you like which is available in women’s size it’s not very difficult to convert it to men’s size. The biggest difference will be the length of sleeves and body. Start working on the women size that you think would fit across the chest. The additional length will be worked right before you cast off for the armhole/sleeve cap. If the pattern is worked top-down you can add the length right after the armhole or before the first decrease on sleeve.

Regarding additional yarn amount, this will depend on how much length you add, but it is better with a skein too many than too few.

All yarns will have excess fibres (from production) that might come off as lint or shedding. Brushed yarns (ie hairier yarns) have more of these loose, excess fibres, causing more shedding.

Shedding also depends on what is worn under or over the garment, and whether this pulls at the yarn fibres. It’s therefore not possible to guarantee that there will be no shedding

Below are some tips on how to get the best result when working with hairier yarns:

1. When the garment is finished (before you wash it) shake it vigorously so the looser hairs come off. NOTE: do NOT use a lint roller, brush or any method that pulls at the yarn.

2. Place the garment in a plastic bag and put it in your freezer - the temperature will cause the fibres to become less attached to each other, and excess fibres will come off easier.

3. Leave in the freezer for a few hours before taking it out and shaking it again.

4. Wash the garment according to the instructions on the yarn label.

Pilling is a natural process that happens to even the most exclusive of fibers. It's a natural sign of wear and tear that is hard to avoid, and that is most visible in high friction areas of your garment like a sweater's arms and cuffs.

You can make your garment look as new by removing the pilling, using a fabric comb or a pill/lint remover.

Still can't find the answer you need? Then scroll down and leave your question so one of our experts can try to help you. This will be done normally within 5 to 10 working days.
In the meantime, you can read the questions and answers that others have left to this pattern or join the DROPS Workshop on Facebook to get help from fellow knitters/crocheters!

You might also like...

Blue Pine Shore

Erkku, Finland

Blue Pine Shore

Angèle, France

Post a comment to pattern DROPS 221-26

We would love to hear what you have to say about this pattern!

If you want to leave a question, please make sure you select the correct category in the form below, to speed up the answering process. Required fields are marked *.

Comments / Questions (12)

country flag Sylvie wrote:

Je fais la grandeur XL . Si je fais les augmentations à 6 mailles avant le fil marqueur, je vais me ramasser avec trop de mailles pour faire mon motif de 15 mailles au tour suivant, quoi faire?

25.05.2023 - 22:18

DROPS Design answered:

Bonjour Sylvie, les augmentations des côtés se font dans les mailles envers tricotées sur les côté: tricotez jusqu'à ce qu'il reste 6 mailles avant le fil marqueur sur le côté soit: les 2 dernières mailles de A.2 + les 4 mailles envers avant le fil marqueur, faites 1 jeté, tricotez ces 6 mailles, puis les 4 m envers après le fil marqueur, les 2 premières mailles de A.1 et faites 1 jeté (= 12 m entre les 2 jetés). Répétez à l'autre marqueur. Lorsque vous augmentez la fois suivante, procédez de la même façon en augmentant quand il reste 7 mailles avant le fil marqueur (vous aurez cette fois 14 mailles entre les 2 jetés) et ainsi de suite. Bon tricot!

26.05.2023 - 10:10

country flag Cindy Pedersen wrote:

Hej Jeg har fundet ud af diagrammet. Så jeg skal ikke have svar på min henvendelse.

28.06.2022 - 18:33

country flag Cindy Pedersen wrote:

Ved A1 ved maskerne 10-12 i mønstret. Pind 1 reducerer man ved maskerne antallet af masker fra 3 til 2. Pind 2 står der man skal strikke 3 masker her. Pind 3 skal man strikke 1 m og lave 1 omslag og 1 m igen. Pind 4 er der kun 2 masker at strikke. Skal de sorte firkanter ikke være på pind 2 og 3, så mener jeg mønstret passer

28.06.2022 - 17:30

DROPS Design answered:

Hej Cindy, du starter altid nederst i højre hjørne af diagrammet. Første pind strikker du: 2vr, 2r, 2vr,9r(=15m) og så videre. På næste pind laver du 1 omslag imellem de 2 ret og strikker snoningerne over de 9r :)

29.06.2022 - 11:22

country flag Bee wrote:

Dear all, the issue regarding number of back stitches after the 4 decrease is still appearing in French version. Would it be possible to correct all language ? Thank you :-)

20.06.2022 - 15:10

DROPS Design answered:

Dear Bee, this issue was already edited in French - this applies only if you printed the pattern before the date of correction, otherwise,online pattern is right. Happy knitting!

20.06.2022 - 15:25

country flag Mana wrote:

I am working on the back piece now in size small and I need clarification. After I decrease 68sts to 54sts, I continue working on it until I get 43cm in length. Then,, I am supposed to decrease 4 more stitches in the middle 24sts, but could you help me understand how I could get 48 sts? Thanks!

10.06.2022 - 23:07

DROPS Design answered:

Dear Mana, you are right, there was a mistake in the pattern, the number of stitches has been now fixed, thanks. Happy knitting!

14.06.2022 - 09:55

country flag Ulrike wrote:

Rapport A1 hat nicht 15 sondern 16M, A2 hat 7 und nicht 6m. Somit ist die Anleitung fehlerhaft. Oder habe ich einen Denkfehler gemacht? Ich würde mich über Hilfe sehr freuen. :-}

20.07.2021 - 18:18

DROPS Design answered:

Liebe Ulrike, die erste Reihe in A.1 wird über 15 Maschen gestrickt, aber richtig, das Muster wird bei einigen Reihen 16 Maschen sein (2,3,5,6 und 7). Viel Spaß beim stricken!

21.07.2021 - 07:51

country flag Ilaria wrote:

Molto bello! Quando sarà disponibile lo schema? Grazie.

25.04.2021 - 21:34

country flag Biggi wrote:

Muster und Farbe super schön. Trägt sich sicher angenehm!

18.01.2021 - 00:12

country flag Mechthild wrote:

Tolles Muster

16.01.2021 - 19:45

country flag Annika wrote:

Rippled Reed

16.01.2021 - 10:32